Portable and affordable 2.5 Gigabit Ethernet iperf3 Server – FriendlyElec NanoPi R5S

What problem am I trying to solve?

Wi-Fi standards have developed and also WAN links are fast and reasonably priced these days. When it comes to throughput testing tools like iperf3 servers, 1 Gigabit Ethernet has become a bottleneck. A Wi-Fi 6E client can now easily generate more than 1 Gbps of traffic, but how do we measure it?

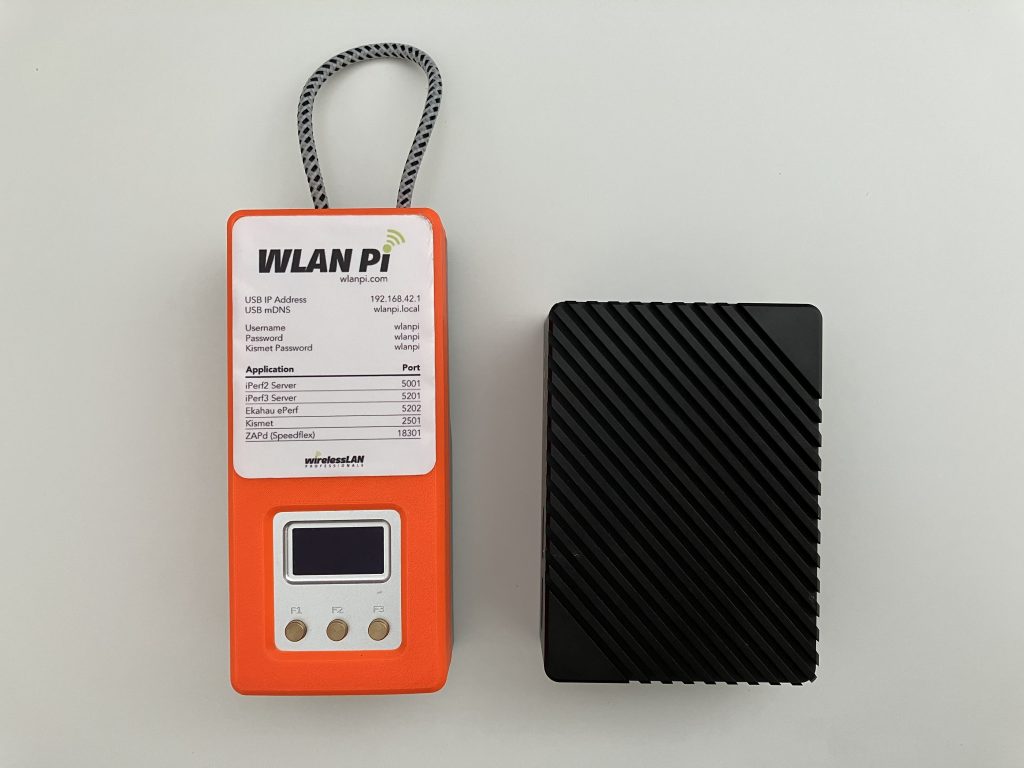
To overcome that issue, I am looking for a reasonably priced portable single-board computer, which can push more than 1 Gbps of traffic. It should be powered via USB-C, battery, or PoE powered, and should be portable to fit in my “just in case I need it” tool bag.

FriendlyElec NanoPi R5S

This little FriendlyElec NanoPi R5S single-board computer (SBC) delivers everything I mentioned above. Let’s have a look.

Dimensions and case

It comes with a well designed aluminium case, which also serves as a heatsink. The whole unit is smaller than the smallest iPhone, slightly thicker obviously. It runs silent. There is no built-in fan whatsoever.

Portable? Tick! By the way, did you know that the original WLAN Pi uses NanoPi NEO2?
Left to right: WLAN Pi, R5S, Intel-based SBC I am also testing, WLAN Pi Pro

Ports

USB-C power input, two 2.5 GbE, one 1 GbE, HDMI useful troubleshooting or demos, two USB-A 3.0 ports

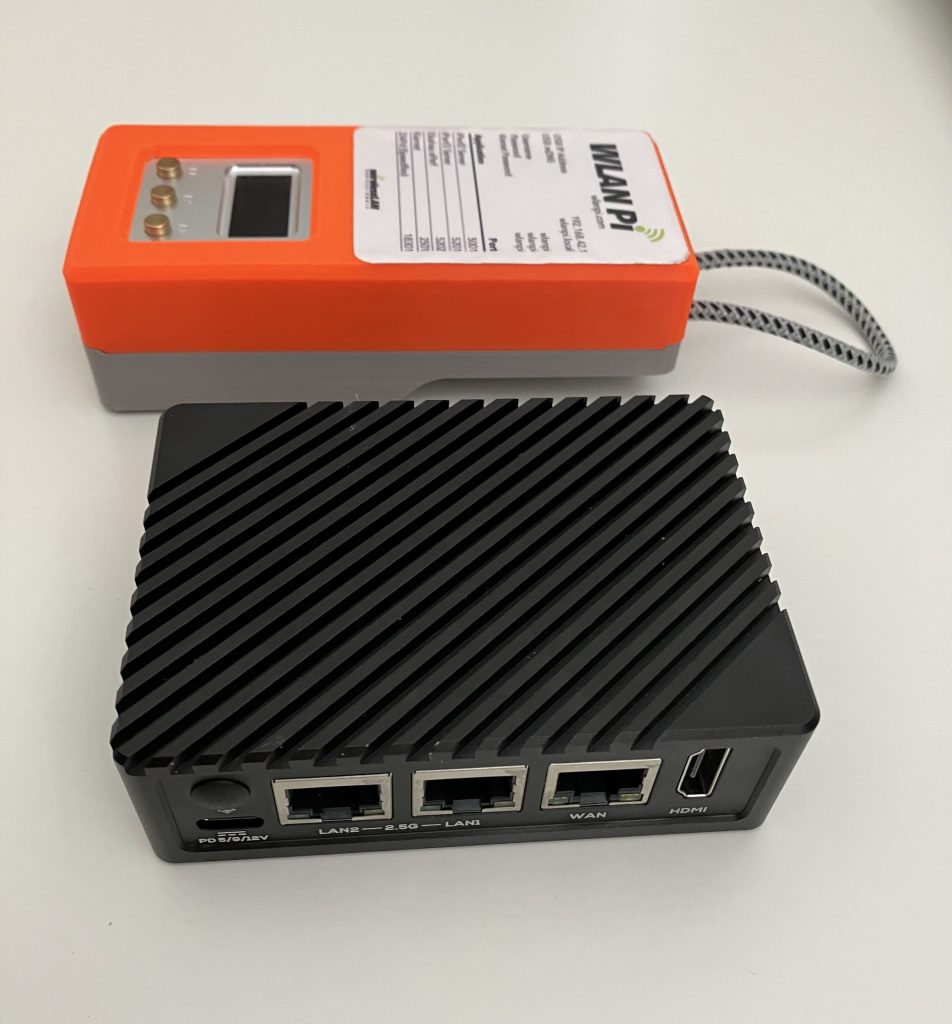
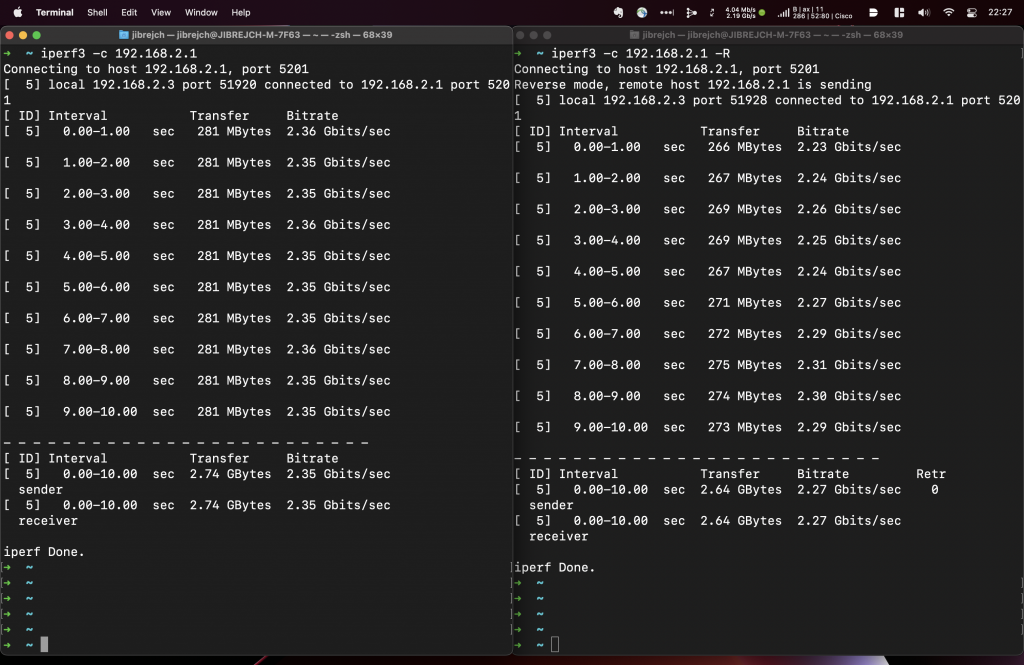
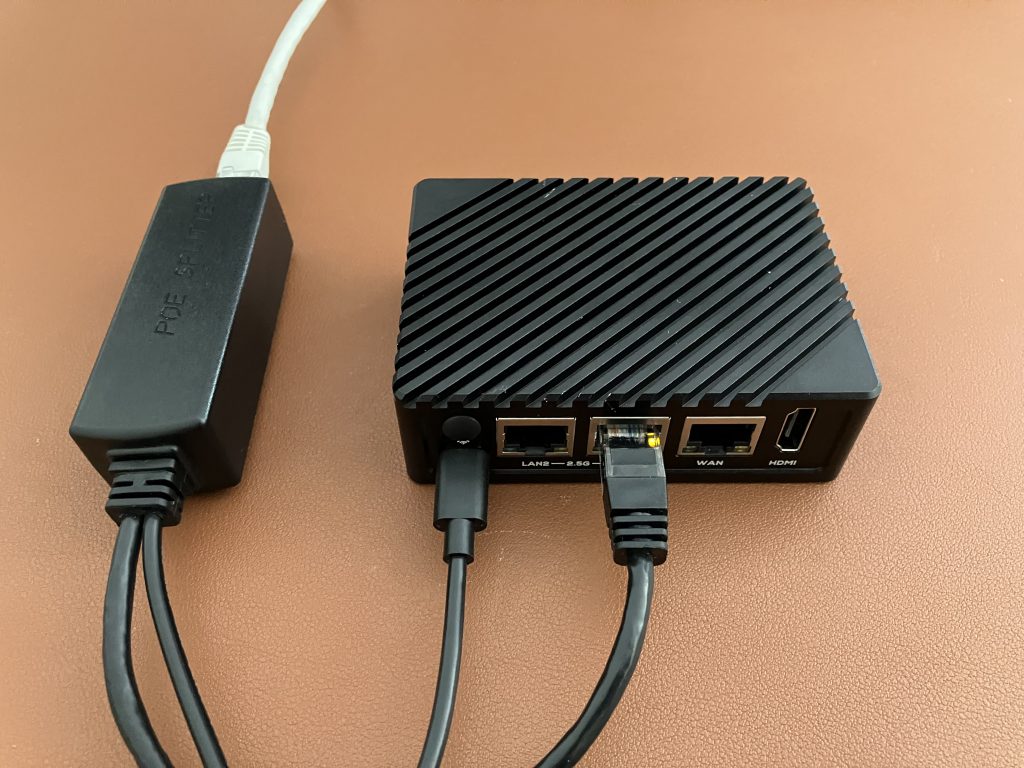
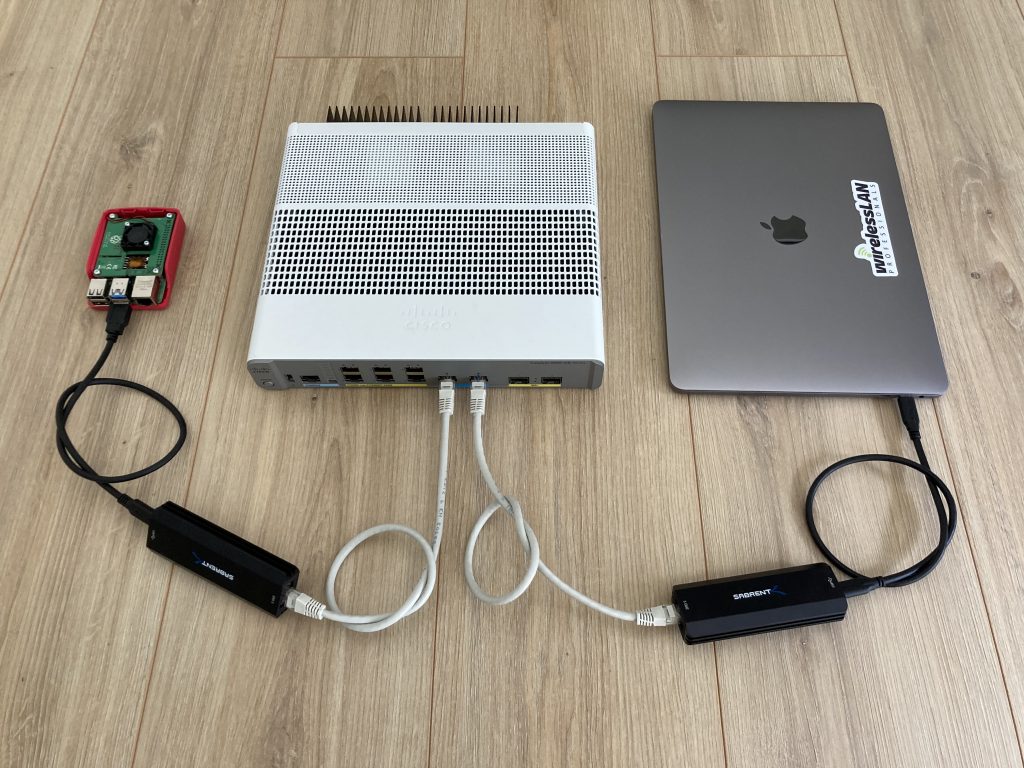
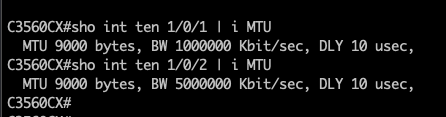
It has two 2.5 Gigabit Ethernet interfaces (LAN1 and LAN2) and one 1 Gigabit Ethernet interface (WAN). Either of the LAN ports delivers 2.3 Gbps of actual useful iperf3 throughput with default 1500-byte MTU and single stream. I used MacBook with OWC 10 Gigabit Ethernet Thunderbolt 3 Adapter and Cisco WS-C3560CX-8XPD switch.

From client’s perspective that’s 2.27 Gbps down and 2.35 Gbps up

Power

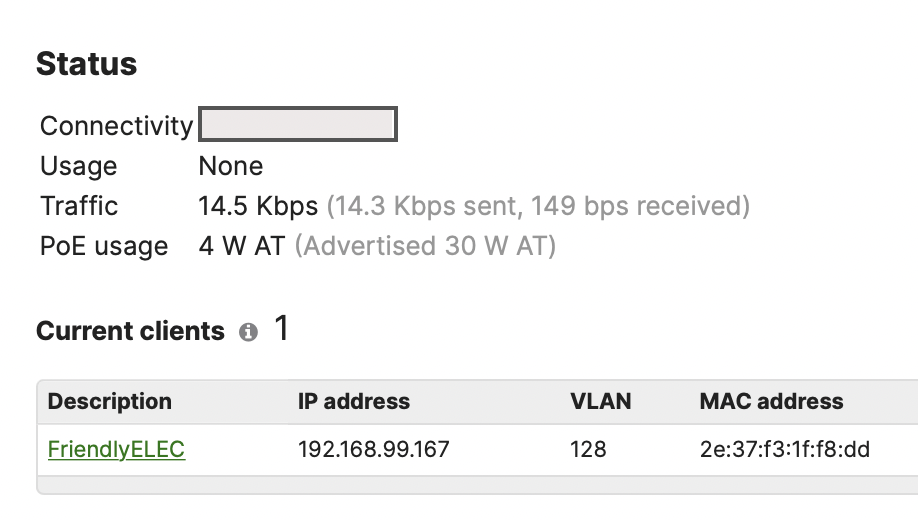
The R5S only draws 4 Watts in idle, and can be powered by any USB-C 5V power source. Your MacBook USB-C charger, iPad/iPhone charger, or USB-C battery pack would do. Alternatively, use a 1 Gigabit Ethernet 5V PoE splitter and PoE power the unit. In my lab with a 2 meter cable, the 1 Gigabit Ethernet PoE splitter actually allowed the R5S auto negotiate stable 2.5 Gbps connection with the switch.

PoE powered

Software

FriedlyElec built and published two operating system SD card images for the R5S – Ubuntu and FriendlyWRT. I tested both, and for my use case FriendlyWRT works best. It has a network-centric and easy to use web UI, has iperf3 preinstalled, and delivers great performance.

Initial setup and tips

R5S ships without any micro SD card, so make sure you have one ready to use. Flash the software image to it using Balena Etcher or similar tool.

Connect the WAN port to a network with existing DHCP server. If you are in the same subnet, simply ping FriendlyWrt.local to get the IP address of the R5S.

Then access the web UI or SSH to the unit, SSH is enabled by default. Change the root password now.

Now, this is important! To achieve maximum throughput, delete the pre-configured bridge interface br0, and configure both multigigabit eth1 (LAN1 port) and eth2 (LAN2 port) as standalone unbridged interfaces. Also, tweak IP address settings to your liking while you are there.

eth1 configured as a standalone interface. Bridge interface removed.

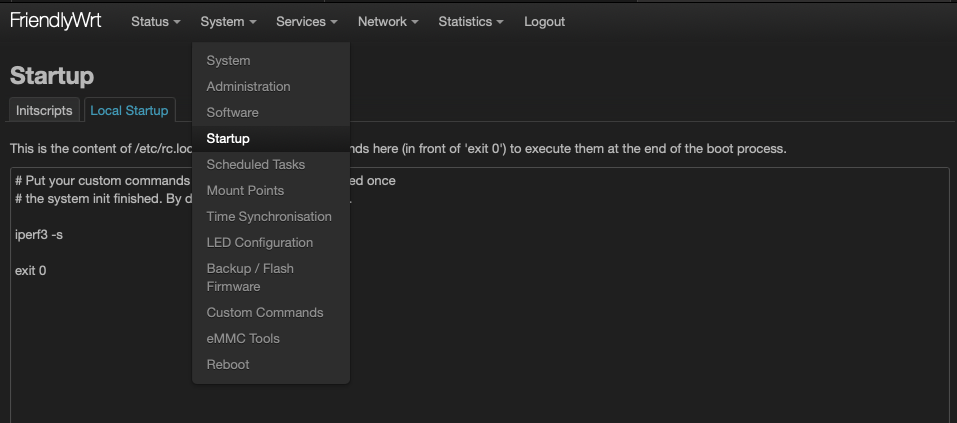
Make iperf3 automatically start by going to System > Startup > Local Startup and add iperf3 -s and hit the Save button.

Change CPU Governor setting to Performance. And CPU Minimum Frequency to the maximum value.

Here is the FriendlyElec documentation and introduction to their FriendlyWRT distribution.

Final verdict

This little single-board computer absolutely deserves its space in my tool bag. For the 2 GB RAM model with case I paid $88 including shipping to the UK. Add a Micro SD card and that’s all you need to get started.

Finally, it you need top performance, don’t care that much about small form factor, and money is no object, the latest Apple M1 Mac Mini can be configured with built-in 10 GbE.

Multigigabit Ethernet on the Raspberry Pi 4

Update: The Linux driver for this adapter does not seem to perform great. I tested a 2.5 GbE adapter based on Realtek chipset, which might work better for you. Here is my review.

I also tested this adapter on Windows 11 and macOS here.

With the first consumer Wi-Fi 6E routers already shipping, and enterprise access points being worked on, I think it is now time to up my iperf3 game. While the standard 1 Gbps adapters push around 950 Mbps of TCP traffic, the iperf3 server will sooner or later become a bottleneck for throughput measurements.

Raspberry Pi 4 (RPi4) is widely available, and there is a chance that you might already own one. So, the question is, can it support multigigabit speeds?

Although it does not have any PCI Express slot available, it does have a couple of USB 3.0 ports. I researched USB 3.0 multigigabit NBASE-T Ethernet adapters, and purchased a few. At the time of writing, Linux kernel 5.10 is the Raspberry Pi OS gold standard, and that’s what I used for all tests.

TL;DR … give me the short answer

The maximum TCP throughput Raspberry Pi 4 iperf3 server can handle with a 5 Gbps USB 3.0 Ethernet adapter. These were 90-second iperf3 tests with standard 1500-byte MTU and a single iperf3 stream.

  • Download (from RPi4 server to a client): 2.05 Gbps
  • Upload (from a client to RPi4 server): 528 Mbps

If you can enable 9000-byte Jumbo frames on all devices involved in the data path, the upload speed becomes much healthier.

  • Download (from RPi4 server to a client): 2.05 Gbps
  • Upload (from a client to RPi4 server): 1.73 Gbps

USB multigigabit adapters

There are a few available on the market. After reading a dozen of reviews, I decided to get 3 adapters from a company called Sabrent. They make adapters with nice metal cases, which helps with dealing with the heat they dissipate.

Left to right: 2.5 GE USB 3.0 Sabrent NT-S25G, 5 GE USB 3.1 Sabrent NT-SS5G, 10 GE Thunderbolt 3 Sabrent TH-S3EA

The 5 GE USB 3.1 Sabrent NT-SS5G is the only I recommend for use with the RPi4:

  • It uses the Marvell Aquantia AQC111U chipset
  • It works out of the box with Raspberry Pi OS and
  • It works on Windows 10 after you install the driver
  • It ships with USB-C and USB-A cables so you can connect it to your laptop using USB-C or RPi4 using USB-A
  • Unlike other brands it does not overhead or disconnect due to instability

Here is what’s in the box

5 GE USB 3.1 Sabrent NT-SS5G ships with both USB-A and USB-C cables

RPi4 for scale

ServeTheHome team did a great job of comparing the 5 GE adapters using the same chipset as the 5 GE USB 3.1 Sabrent NT-SS5G. It came out as a clear winner:

USB 3.1 Gen1 To 5GbE Comparison Table AQC111U Based Q1 2021
Credit and kudos to ServeTheHome

Why not use the cheaper 2.5 GE USB 3.0 Sabrent NT-S25G? Because it uses Realtek 8156 chipset, and there is no suitable Linux driver available at the time of writing.

Why not the 10 GE Thunderbolt 3 Sabrent TH-S3EA? Although it has a USB-C connector, it is not a USB adapter. It uses Thunderbolt 3 protocol, which is not supported by the RPi4.

Test setup

I use RPi4 with PoE HAT, because it has a fan on it, and I power the unit by a USB-C charger. Both multigigabit adapters involved in the test are 5-Gigabit Ethernet capable Sabrent NT-SS5G. The best part is that these work out of the box on the Raspberry Pi OS with no action required on your part.

But, if you are considering the purchase of these adapters for your Mac, please stop. After you plug the adapter in, it uses Apple’s 1 Gigabit Ethernet adapter driver, and it would only auto-negotiate 1 Gbps. To enable 2.5 and 5 Gigabit speeds, and support for Jumbo frames on Mac, you have to disable Apple System Integrity Protection (SIP) tool, and install a legacy kext Sabrent driver. I would discourage you from making these security compromises. If you are interested in a multigigabit adapter that works with macOS out of the box, tune in later and read this review (link to be added).

How to increase the MTU and enable Jumbo frames?

On the Raspberry Pi:

sudo ip link set dev eth1 mtu 9000

On the Cisco Catalyst switch running IOS:

Configure, save config, reload
Verify after reloading
System Preferences > Network > Adapter settings > Hardware > MTU on macOS

Conclusion

The RPi4 allows you to test download-only throughput up to 2 Gbps with standard MTU. Upload speeds are really poor and you would be better off using the built-in 1 Gibabit Ethernet adapter. You can use the RPi4 to run a few other tools, scripts, or take wall attenuation measurements.

With Jumbo frames enabled, 2 Gbps/1.7 Gbps is good enough for lab use or demonstrations. Keep in mind that you would have to enable Jumbo frames on all devices (RPi4, MacBook and the switch in my case).

The main cause of the relatively low performance is the storm of IRQ hammering the RPi4 CPU:

In a computer, an interrupt request (or IRQ) is a hardware signal sent to the processor that temporarily stops a running program and allows a special program, an interrupt handler, to run instead. Hardware interrupts are used to handle events such as receiving data from a modem or network card, key presses, or mouse movements.

Source: Wikipedia.org

If your use case requires a powerful iperf3 server, Apple’s Mac Mini with built-in 10 Gigabit Ethernet adapter would be something to consider today. It won’t be the cheapest option, but you won’t have to worry about performance or USB dongles. From what I’ve found, it uses Marvell AQC 1113 chipset and does 9.4 Gbps with 4 parallel iperf3 streams.

Disclosure

I purchased these adapters myself. No one asked me, or paid me, to write this blog post. I was as curious as you to see how the RPi4 performs when it comes to multigigabit Ethernet.

Throughput speed test of the fastest tp-link and Devolo Magic 2 Wi-Fi power line adapters (PLC)

I am in the market of buying a new pair of power line adapters. Power line is a great alternative or complement to Ethernet and Wi-Fi. It provides low latency and jitter and is very flexible and easy to install.

The current tp-link TL-PA6010 adapters have served me well, but they are now reaching their maximum throughput. So, I decided to get a new pair of the fastest adapters on the market (Devolo Magic 2 Wi-Fi) and also a pair of the best adapters from tp-link (TL-PA9020P). These will be used to connect my home office and lab networks to my router.

Since there are multiple brands offering a variety of products with a variety of advertised speeds, I am curious to see if the more expensive adapters are worth the premium price, what real throughput they would provide and if and how much a passthrough socket improves the power line speed.

Left to right: Devolo Magic 2 Wi-Fi, tp-link TL-PA9020P, tp-link PL-PA6010 (not sold anymore, this would be an equivalent)

Specification

I tested my current low-end adapters and two new high-speed ones:

Throughput, ping, jitter, power and Wi-Fi tests

Power line speeds vary and depend on the distance between the two adapters, your electrical wiring and interference. Please take the numbers below as relative ones, which would allow you to compare how these adapters perform under the same conditions and in the same setup.

All throughput numbers below were TCP measurements taken by iPerf3 running on a WLAN Pi (a single-board computer with 1 Gbps Ethernet) and the client was my MacBook with 1 Gbps USB-C Ethernet adapter. There were no intermediate network devices between them:

MacBook iPerf3 client <-> PLC1 <-> PLC2 <-> WLAN Pi iPerf3 server

The average download speed (measured 5 times at each of the locations in my house) ranges from 13% to 26% of the advertised speeds and goes nowhere near them. With £16 per 100 Mbps, the cheapest adapter seems to be the best value for money, unless you need higher speed and are willing to pay for it. It also is the most power efficient.

Devolo Magic 2 proved to the be the fastest solution with 331 Mbps average download speeds, while TL-PA9020P provided slightly better upload speeds than Devolo.

Each of the parameters (i.e. Download average) consisted of five iPerf3 tests in each location and I then computed the average values:

Built-in Wi-Fi access point

Devolo Magic 2 Wi-Fi remote adapter comes with a built-in dual-band 802.11ac Wi-Fi AP (not just a repeater as some of the cheaper adapters), but it is unstable and resets the power line connection every single time I connect and generate some traffic. I used the latest firmware available in July 2020. If a built-in Wi-Fi is a must-have for you, do NOT buy this adapter. Wait until it gets fixed or look for alternatives.

This is what happens. The SSID is broadcast, a Wi-Fi client can associate to the AP, but when the iPerf test starts, the client gets disconnected and power line connection is torn down for 10 seconds or so and then re-establishes. I was able to reproduce this bug every single time and it was not just one-off random problem.

On the positive note, it supports 2.4 GHz only, 2.4 + 5 GHz or 5 GHz only modes. It does not let you change channel width on 5 GHz though and always uses 80 MHz, which may sound like a good idea in a small town, but it is a disaster in a shared building with many other access points and neighbours present.

If high-speed power line without Wi-Fi is what you are after, then the Magic 2 non-Wi-Fi model could be a good option for you.

Passthrough socket

Passthrough socket allows you to plug an electrical appliance to the power line adapter without generating the socket your adapter is plugged into unusable. Cheaper adapters usually do not provide this.

The other benefit is that adapters with passthrough socket use filters to suppress noise coming from the connected electrical appliance and this improves speed by 13% – 15%.

Pros and cons

Devolo Magic 2 Wi-Fi
+ Fastest average download speed
+ Comes with a mobile app and each unit has a management web GUI
– Built-in access point resets the whole unit and Wi-Fi is not usable
– It runs quite warm compared to the other two and is the largest

tp-link TL-PA9020P
+ Very good and symmetrical performance
+ Stable
– No built-in Wi-Fi
– Still quite expensive compared to the slower and cheaper units

tp-link TL-PA6010 (or similar)
+ Great value for money
+ Stable
– Relatively low speeds
– No passthrough socket, no Wi-Fi

And the winner is

My personal preferences are very likely different from yours and that is fine. I am looking for symmetrical TCP throughput of at least 200 Mbps, ideally a passthrough socket support and all other features are nice to have.

Devolo Magic 2 Wi-Fi proves to be unstable as the built-in access point crashes the whole adapter and resets the power line connection. Its back side also becomes quite warm regardless the load.

So, I decided for tp-link TL-PA9020P. It is stable, does all I need it to do and both adapters come with 2 Ethernet ports which gives me flexibility to plug my own access point in or connect using wired Ethernet connection.

Články s ryze síťovou tématikou se přestěhovaly na Síťařinu.cz

Dlouho jsem to plánoval a v posledních týdnech konečně zapracoval na rozjetí nového serveru Síťařina.cz. Všechny nové články zaměřené na počítačové sítě najdete právě tady. Nečekejte teoretická pojednání a smršť standardů a citací RFC. Síťařina vás bude zásobovat převážně praktickými články a tipy.

Přijďte nás navštívit na www.sitarina.cz.

AKTUALIZOVÁNO: S příchodem nového roku 2011 se Síťařina spojila se servery NETGURU a Corporate ICT. Veškeré mé nové příspěvky z oblasti počítačových sítí a podnikových řešení tedy budou vycházet pod hlavičkou jednoho z těchto médií.

MSNswitch – ovládání elektrických zásuvek po síti

Na serveru Síťařina.cz právě vyšel článek a především video s praktickou ukázkou možností zařízení MSNswitch. Díky němu můžete na dálku spínat elektrické zásuvky přes lokální síť i internet. Mě osobně se tato krabička velmi zalíbila, a tak ji mohu doporučit i vám.

Zjištění MAC adresy síťového adaptéru

Fyzickou MAC adresu síťové karty obvykle zjišťujeme hledáním odpovídající hodnoty v objemném výstupu příkazu ipconfig /all. Znáte ale utilitu getmac? Jde o jednoúčelový nástroj, který je integrovanou součástí Windows Vista a 7. Vyzkoušejte si následující příkaz.

getmac /V /NH

Výstup může být následující. Řekněte sami, není příjemnější nežli sáhodlouhý sled informací z ipconfigu?

Rychlé otevření panelu Síťová připojení

 Ve Windows Vista i Windows 7 byl ovládací panel Síťová připojení přesunut lehce pozadí. Pokud si nevybavujete jeho konkrétní podobu, napoví vám tento obrázek.

sitova-pripojeni

Panel obsahuje přehled všech síťových adaptérů v počítači. Díky němu můžeme pomocí grafického rozhraní Windows snadno měnit prakticky jakákoliv nastavení související se sítěmi. Chcete-li změnit IP adresu vaší síťové karty, provedete to zde, potřebujete-li zakázat bezdrátový síťový adaptér či změnit název nějakého připojení, opět jste zde na správné adrese.

Panel Síťová připojení můžete ve Windows XP najít ve výčtu ovládacích panelů. Nové verze Windows ovšem jeho přístupnost lehce komplikují a do cesty je nám postaven dialog Centrum sítí a sdílení. Ten sice shromažďuje vše týkající se sítí a sdílení souborů a složek na jednom místě, ale námi kýžený panel se skrývá až pod odkazem Spravovat síťová připojení v levém funkčním sloupci. Pokud tedy nyní chcete panel otevřít nezbyde než použít tuto cestu.

Otevření panelu

Pokud chcete Síťová připojení otevřít rychle a bez použití myši, vyzkoušejte tento způsob. Funguje ve všech operačních systémech Windows XP a novějších.

  1. Otevřete menu Start a vyberte možnost Spustit (Win+R).
    spustit-ncpa-xp
  2. Do pole Otevřít napište „ncpa.cpl“. Ve Windows Vista a Windows 7 můžete psát přímo do vyhledávacího políčka vlevo dole v nabídce Start.
    spustit-ncpa-vista

Tím přímo otevřete panel Síťová připojení. Ve skutečnosti systém na pozadí najde tento soubor v adresáři „C:\Windows\System32\ncpa.cpl“ a otevře jej.

Pokud síťová nastavení měníte často, mohl by se vám hodit následující tip. Vytvořte si na ploše či v nabídce Start zástupce panelu Síťová připojení.

  1. Klikněte na ploše pravým tlačítkem myši a z kontextové nabídky zvolte Nový a dále vyberte Zástupce.
  2. Do pole udávajícího umístění položky zadejte „C:\Windows\System32\ncpa.cpl“.
    zastupce-ncpa
  3. V dalším kroku zadejte název zástupce a klikněte na tlačítko dokončit.

Klávesová zkratka

Volitelným krokem je přiřazení klávesové zkratky takto vytvořenému zástupci. Tou pak můžete rychle spustit zástupce a tím otevřít panel Síťová připojení.

  1. Klikněte pravým tlačítkem na zástupce (ALT+ENTER) a z kontextového menu zvolte Vlastnosti.
  2. Přepněte se do políčka Klávesová zkratka a stiskněte například trojhmat CTRL+ALT+S.
    zastupce-klavesova-zkratka
  3. Po dokončení průvodce můžete vyvolat Síťová připojení pomocí zadané klávesové zkratky.

Vše se dá zvládnout prakticky bez použití myši. Na své si tedy jistě přijdou i klávesnicoví fajnšmekři.

Tipy

Podobným způsobem můžete ve Windows otevírat snad všechny ovládací panely. Přehled jejich názvů a příkazů pro jejich spuštění najdete v tomto příspěvku.

Nastavení IP protokolu (adresa, maska, brána,…) lze měnit i z příkazového řádku. Můj návod najdete tady.

Tento článek byl napsán pro časopis Computer.