WLAN Pi is primarily a Wi-Fi tool, but occasionally I need an iperf server that would be able to deliver more than 1 Gbps of TCP throughput. In a controlled lab environment, I normally use PoE powered NanoPi R5S. I know the IP address of the iperf server by heart. Outside of the lab, I could really do with a WLAN Pi, its preinstalled software, display, buttons and everything it does out of the box. So the question is: “Can we add 2.5 GbE to WLAN Pi M4?”
M.2 slot to the rescue
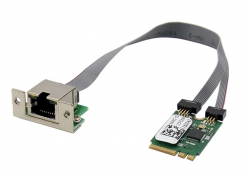
WLAN Pi M4 doesn’t have any USB 3 ports. How do we add 2.5 Gbps Ethernet to it? If you don’t mind losing the Wi-Fi adapter in favour of 2.5 GbE mGig port, we can install this 2.5 Gbps Ethernet adapter in M4’s PCIe M.2 slot. It is based on Realtek RTL8125B chipset. I paid £17 for it including shipping to the UK.
To my surprise, it just works*. Yes, I hear you, no one likes these asterisks, do you? 😉 Continue reading, it’s not the end of the story.
WLAN Pi M4 with 2.5 Gbps Ethernet2.5 Gbps full duplex
The underwhelming default driver
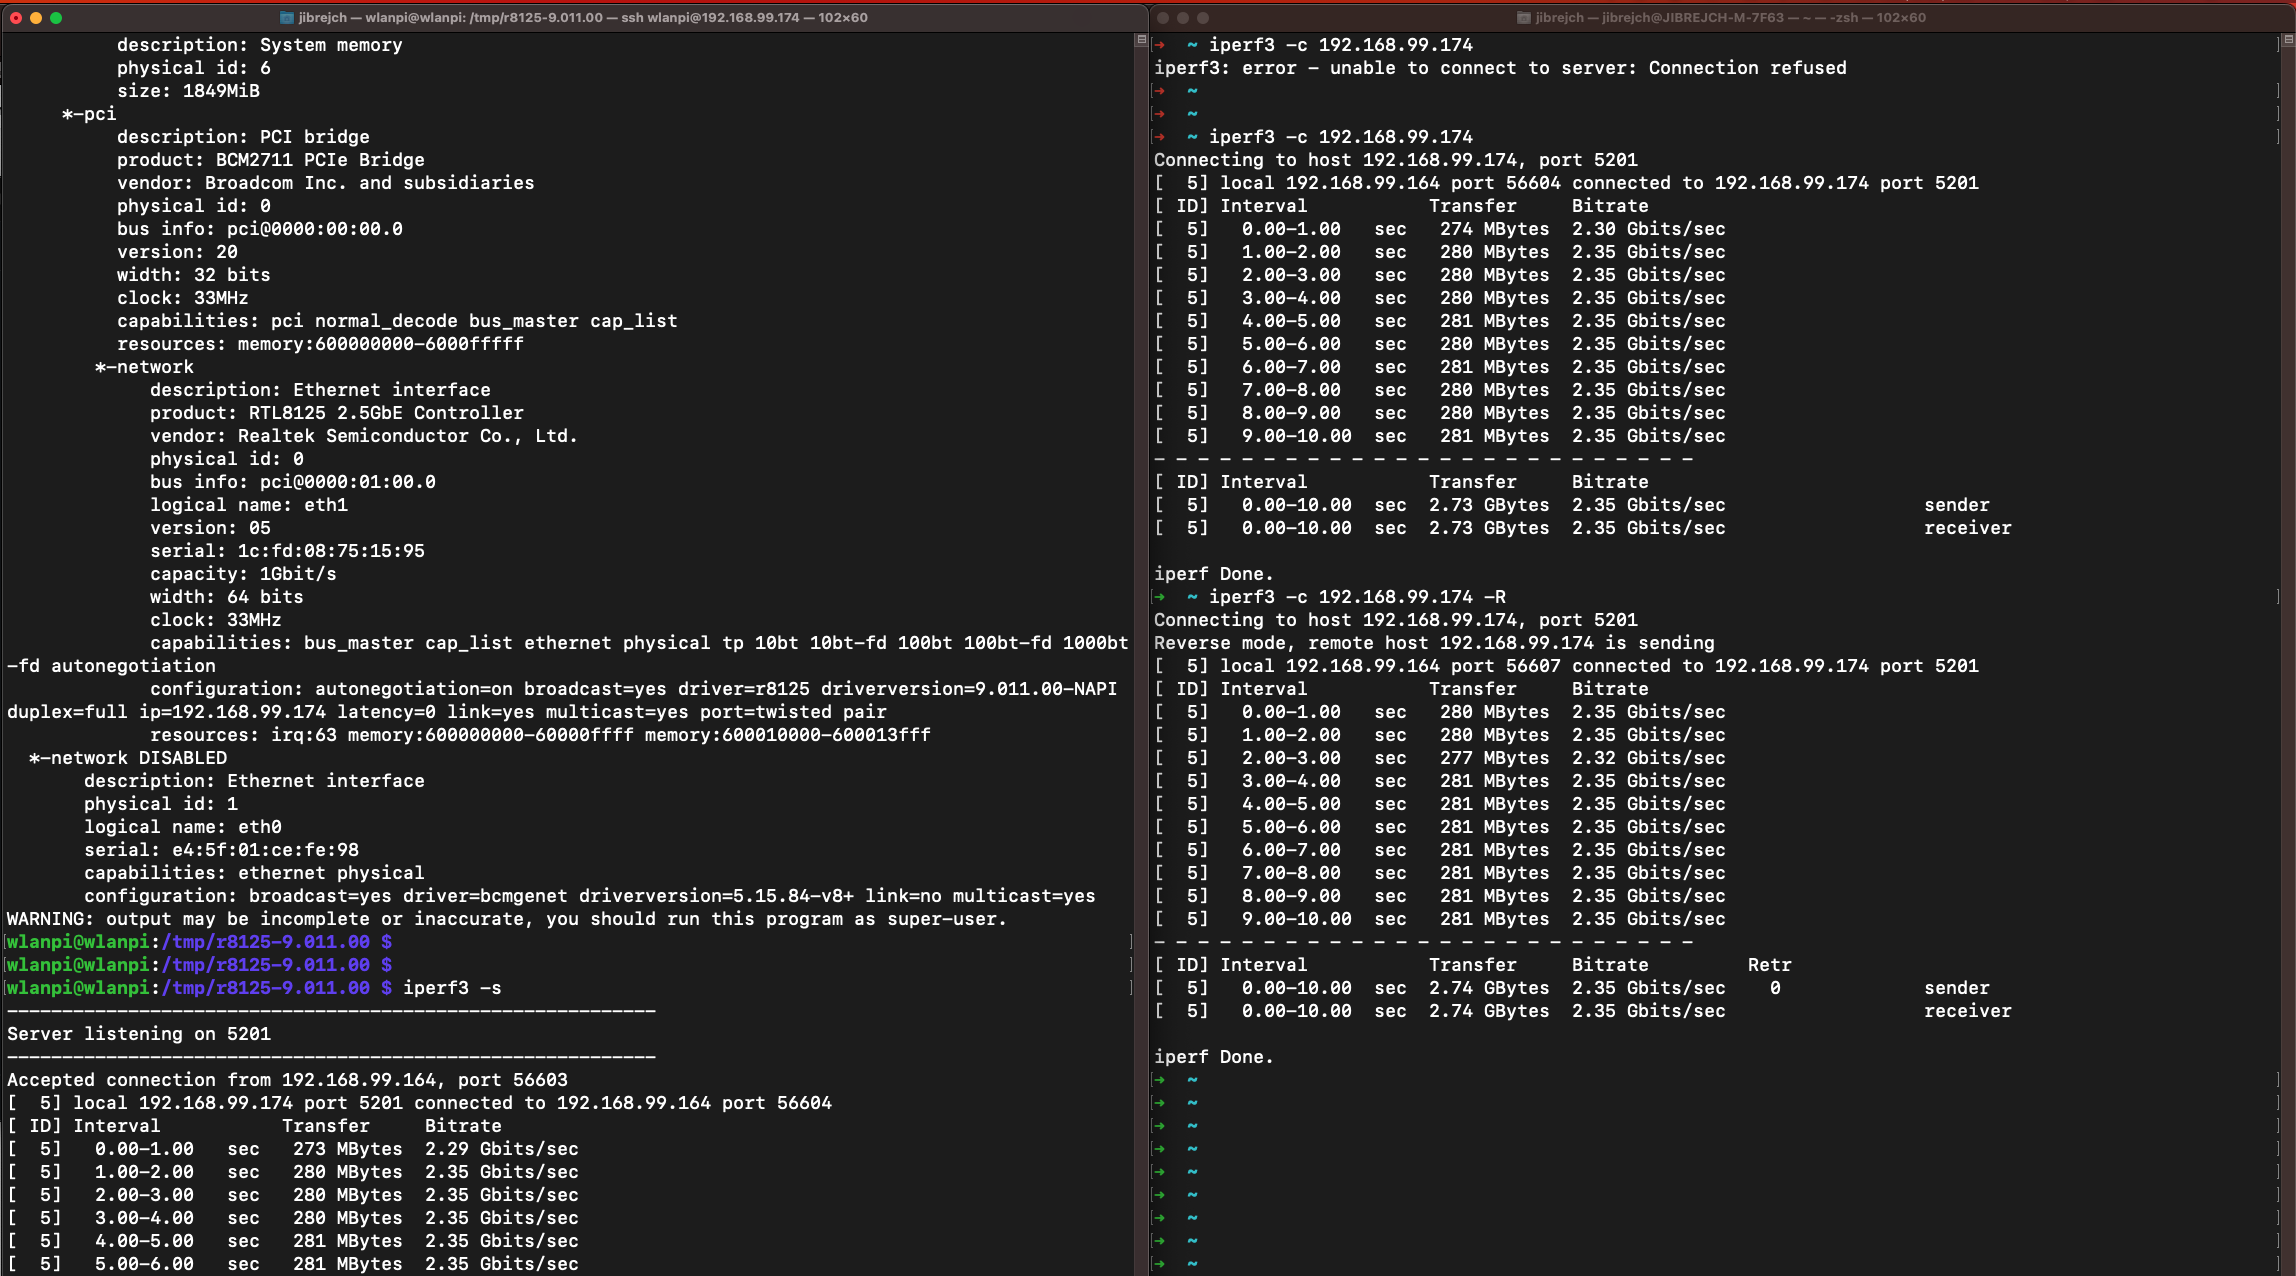
Linux (and WLAN Pi image) has a driver for this adapter, but upload speeds, that is from iperf client to WLAN Pi iperf server, are very poor. We are talking 300 Mbps poor.
Poor 300 Mbps upload speed
Install Realtek’s latest driver to fix performance
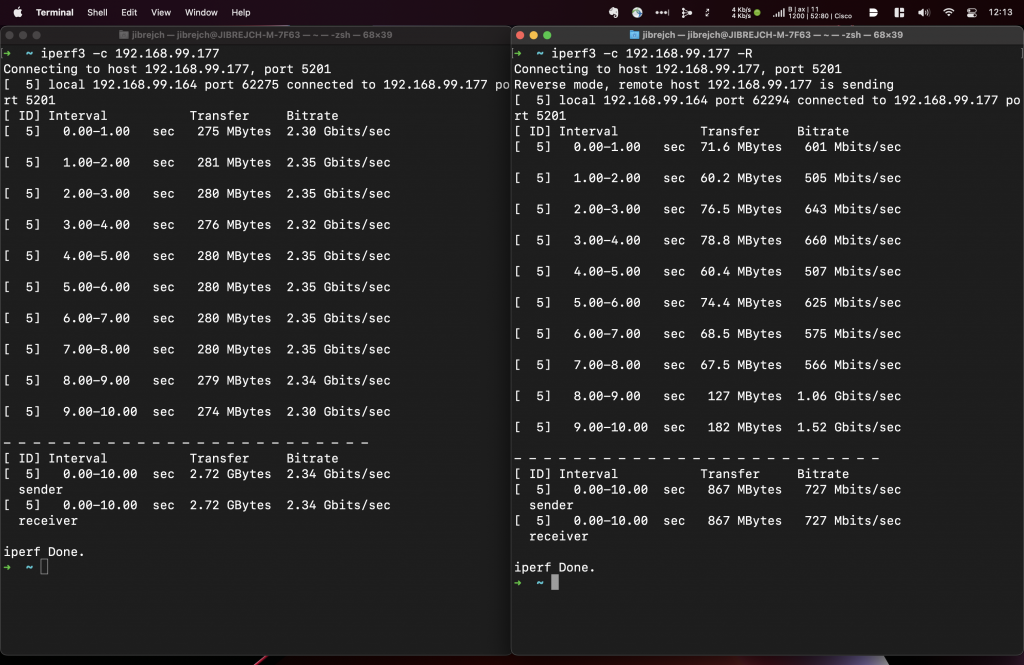
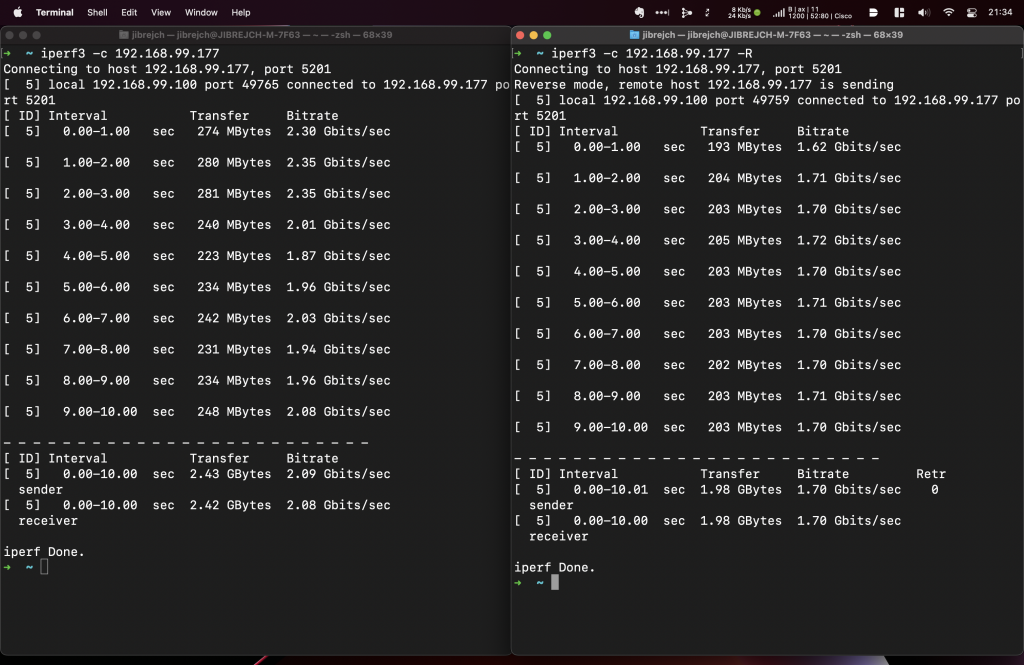
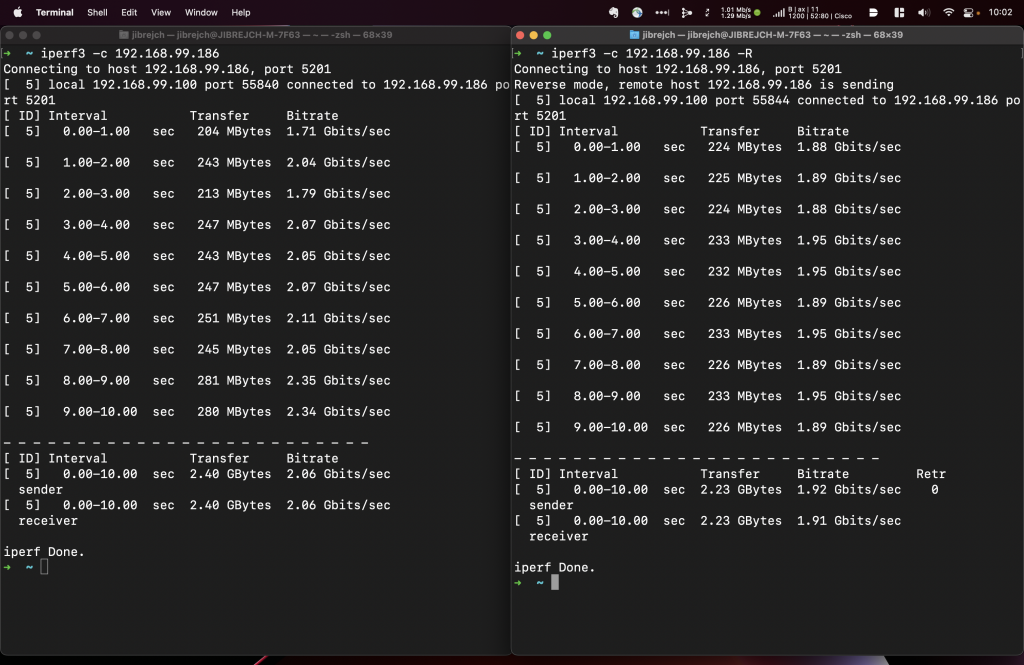
Downloading, compiling and installing the latest Linux driver from Realtek’s website fixes the performance issue. We get symmetric 2.35 Gbps of TCP throughput with standard packet size.
2.35 Gbps of iperf3 TCP throughput
Installation of this driver isn’t as straightforward as it might look. I ended using vanilla Raspberry Pi OS image instead of the WLAN Pi one. Mainly because it is not easy to get the kernel headers for WLAN Pi image and we need them to be able to compile the new driver.
Summary
Yes, it is possible to achieve 2.35 Gbps symmetric TCP throughput on the WLAN Pi M4 with this adapter. But you should be aware of these facts:
This Ethernet adapter doesn’t fit inside WLAN Pi M4 case
You will have to give up the M.2 Wi-Fi adapter in favour of mGig Ethernet
From software perspective, the Realtek driver that ships in WLAN Pi image doesn’t unlock full performance of this adapter (iperf client pushing traffic to WLAN Pi iperf server). Installing the latest driver isn’t trivial on WLAN Pi.
We, WLAN Pi team, currently don’t support this setup. If you have a use case for 2.5 GbE support on the M4, please let us know.
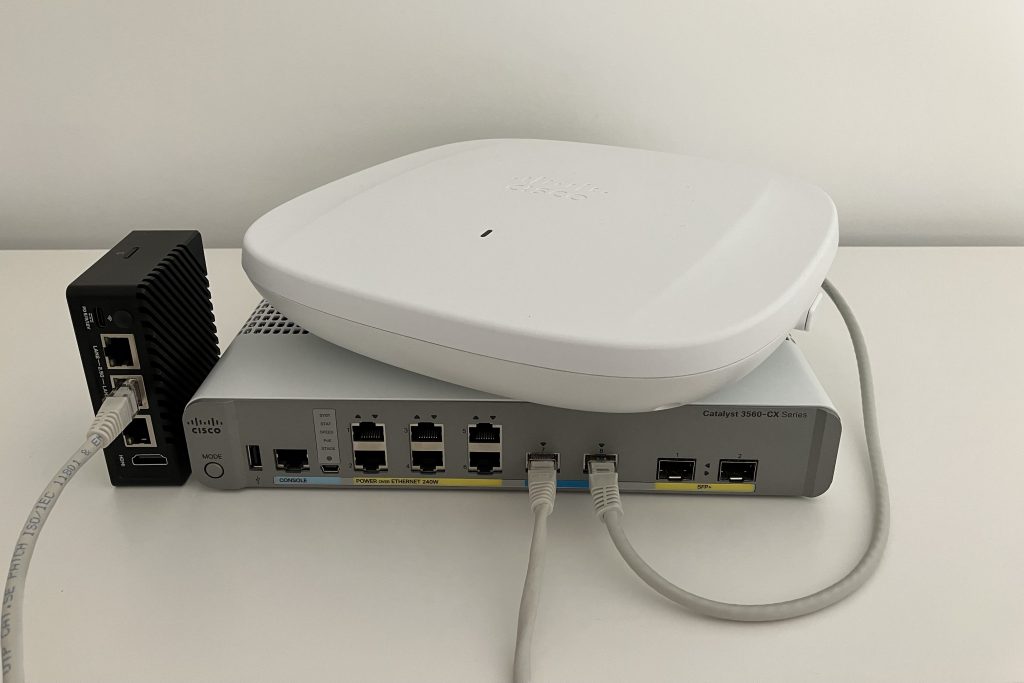
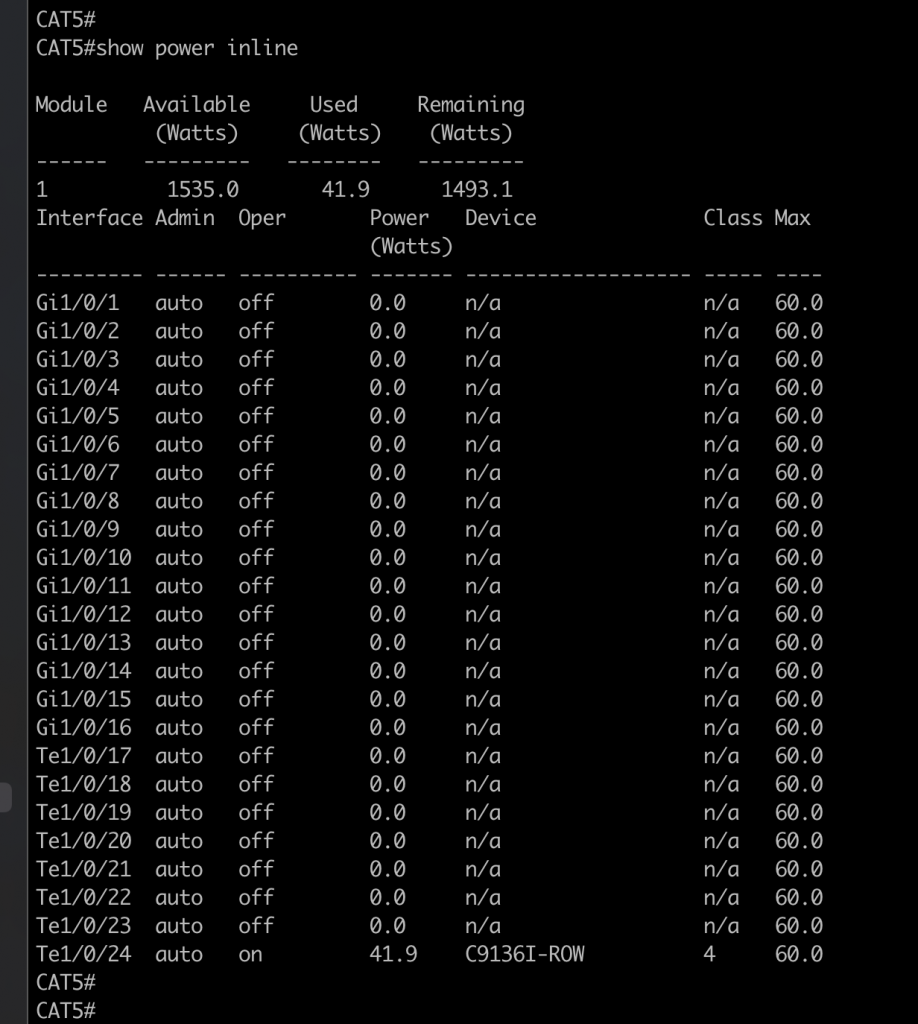
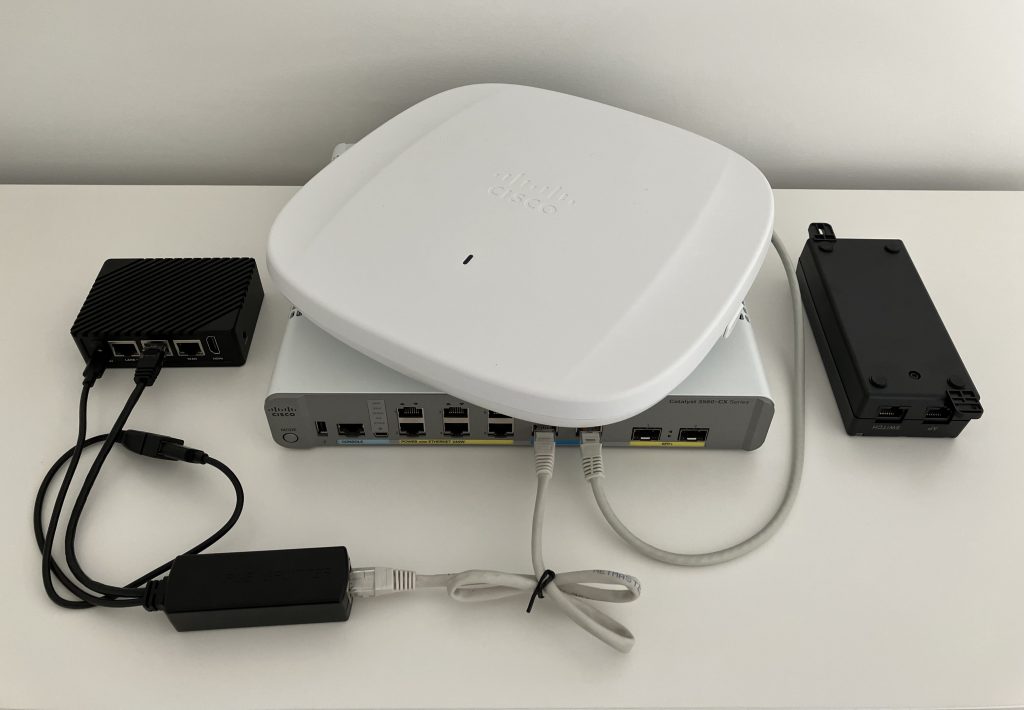
My Catalyst 9800-CL controller is hosted on a cloud, so I don’t need any hardware for that. Finally, my Catalyst 9136 Wi-Fi 6E AP is powered by a Catalyst 3560CX 10 Gigabit Ethernet multigigabit switch.
6 GHz 2×2 MIMO setup powered by PoE+
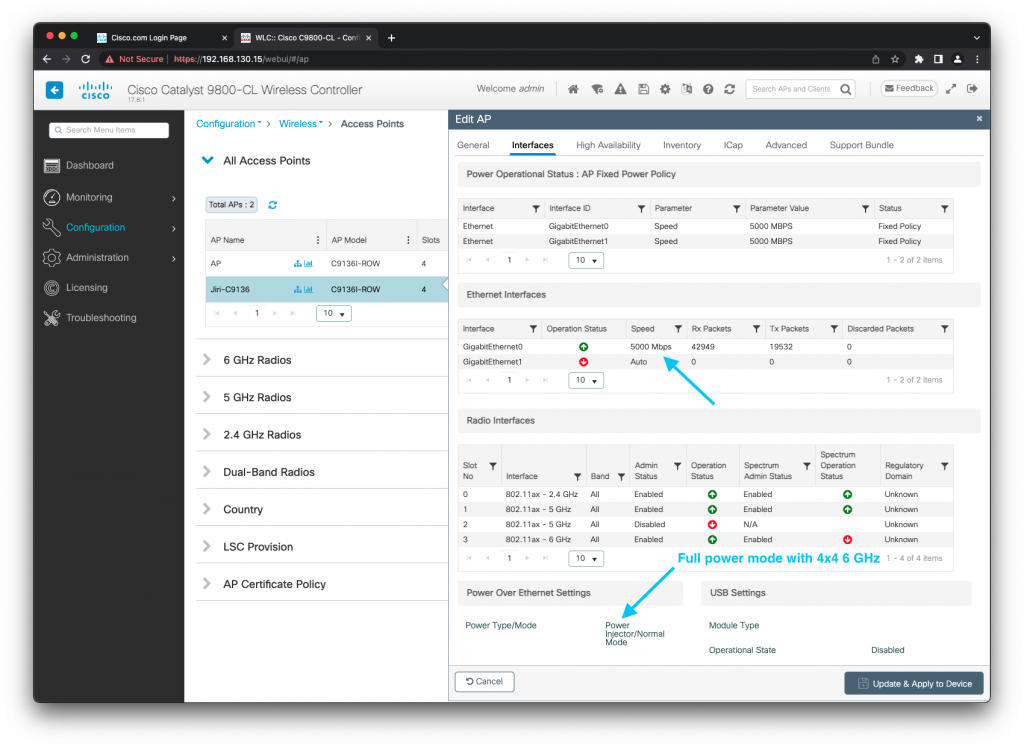
Catalyst 9136 is Cisco’s premium AP with all the bells and whistles including hexa-radio architecture and built-in environmental sensors for smart building use cases. It requires an 802.3bt/UPOE power source to enable 6 GHz radio in full performance 4×4 MIMO mode. The switch I use supports 802.3at/PoE+, which is great, but 6 GHz radio downshifts to 2×2. And that’s where an 802.3bt power injector comes to the rescue.
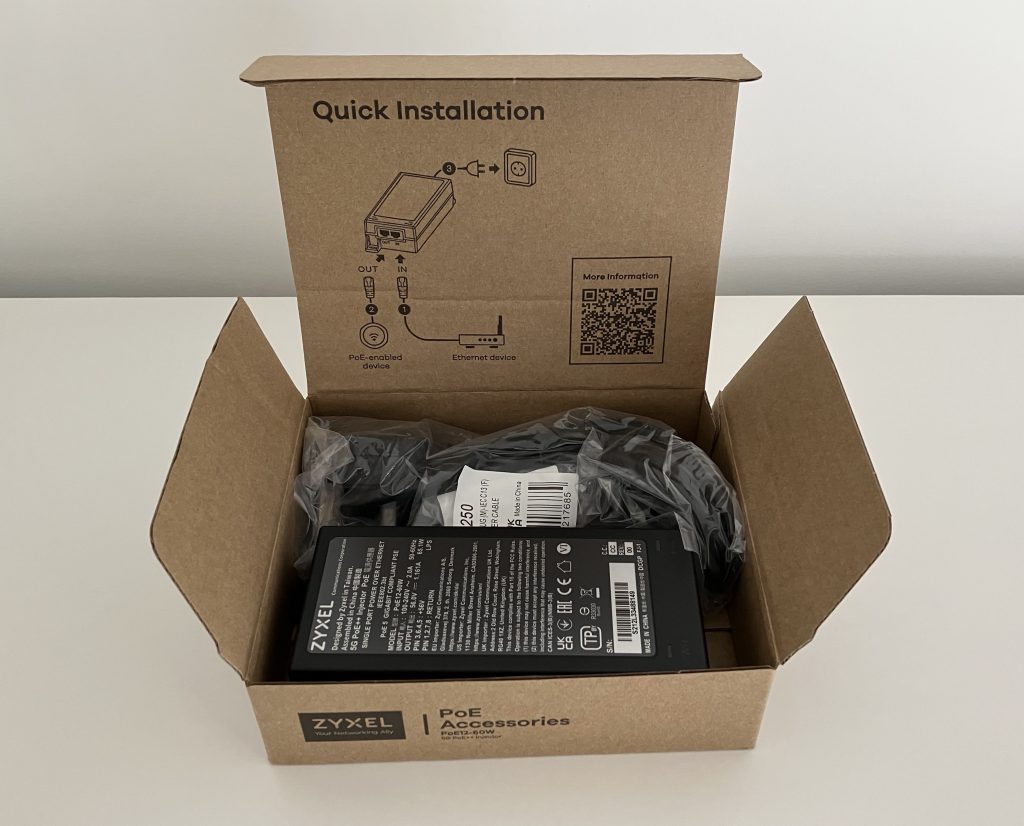
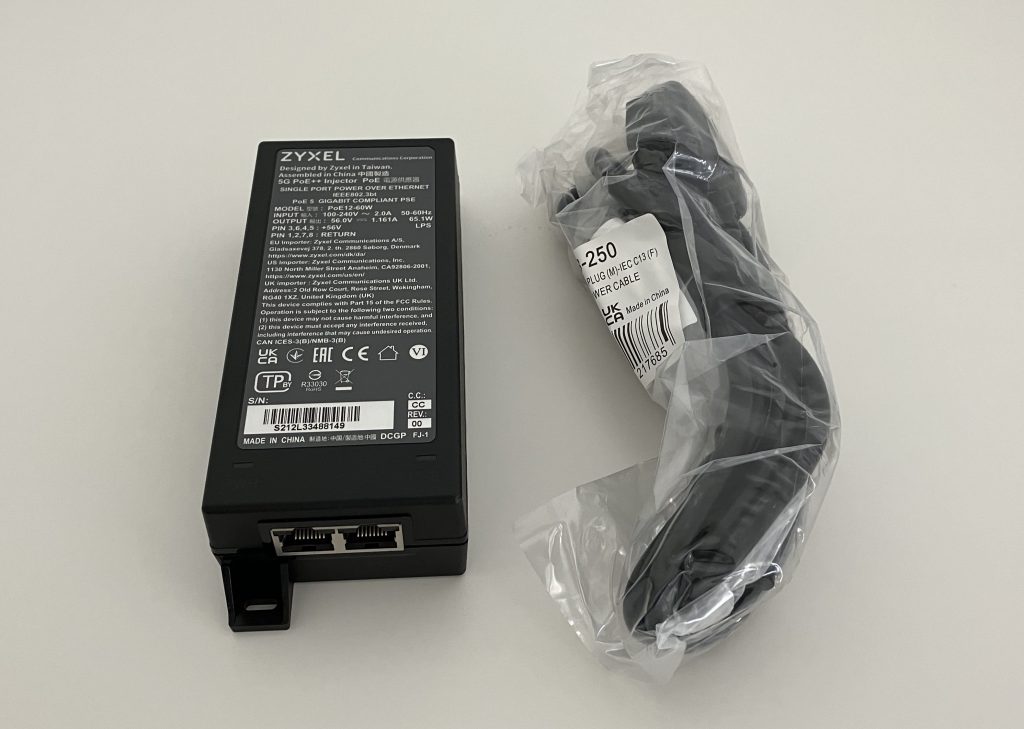
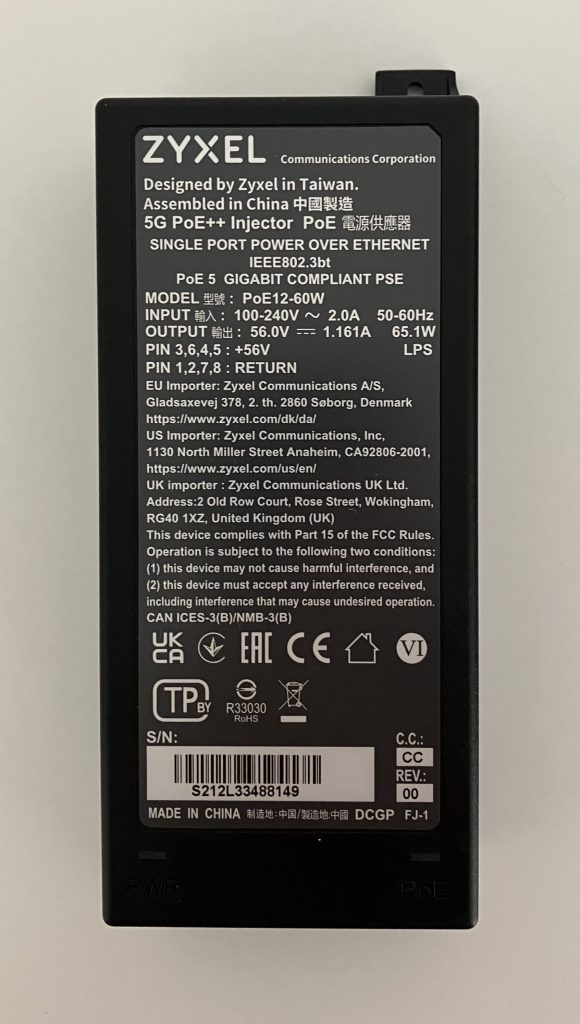
Since the Cisco injector isn’t widely available yet, I decided to test this Zyxel one. It provides 802.3bt power and allows the AP to run in full power and full 4×4 6 GHz radio mode with no compromise.
Do I like power injectors in production?
Absolutely not! Ideally you should design for 802.3bt/UPOE switches to power all your new APs via PoE.
It allows you to:
easily, centrally and remotely monitor how much power the APs use
enable/disable power on a port to bounce an AP
leverage redundant Platinum-rated power supplies for the AC to DC power conversion
manage the solution with ease – just think how difficult it is to manage more than 1 power injector, the number of AC power sockets, and what happens when someone disconnects the injector?
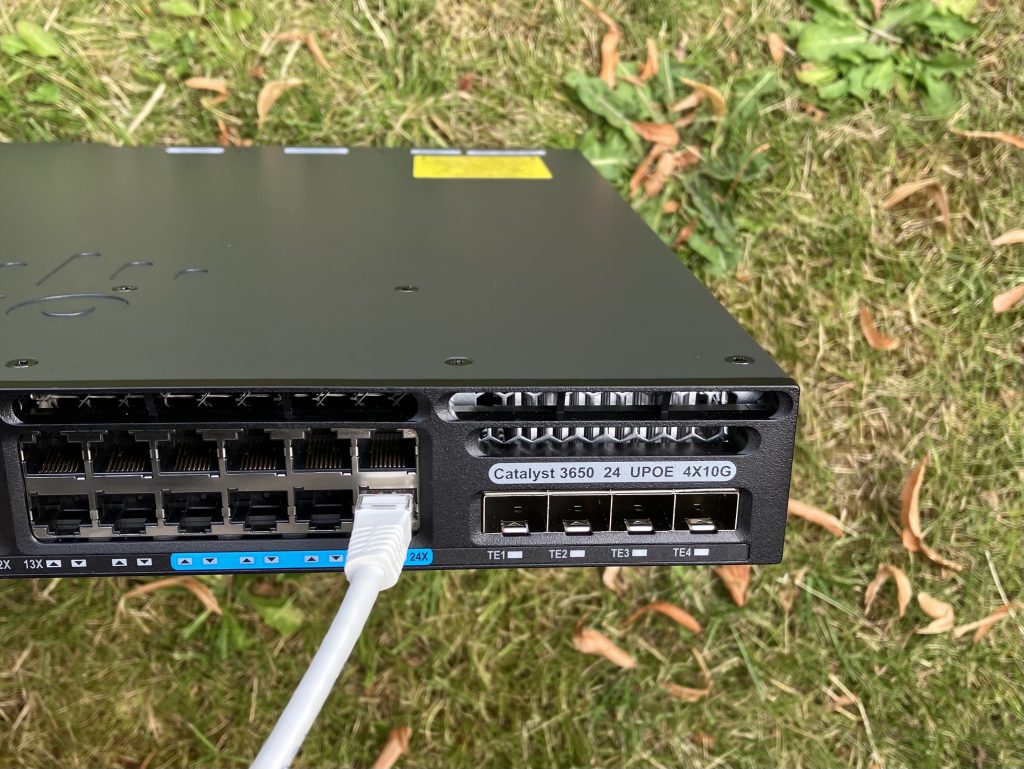
I still use C3650 UPOE mGig switch in my lab. Catalysts 9300 and 9400 the best choice these days.UPOE and mGig capable C3650 providing full power to the AP
Final look
Carrying a full-size switch is not really an option for me, because small form factor is my main goal. So a power injector works best for me. But if I could I would love to use a compact 802.3bt switch.
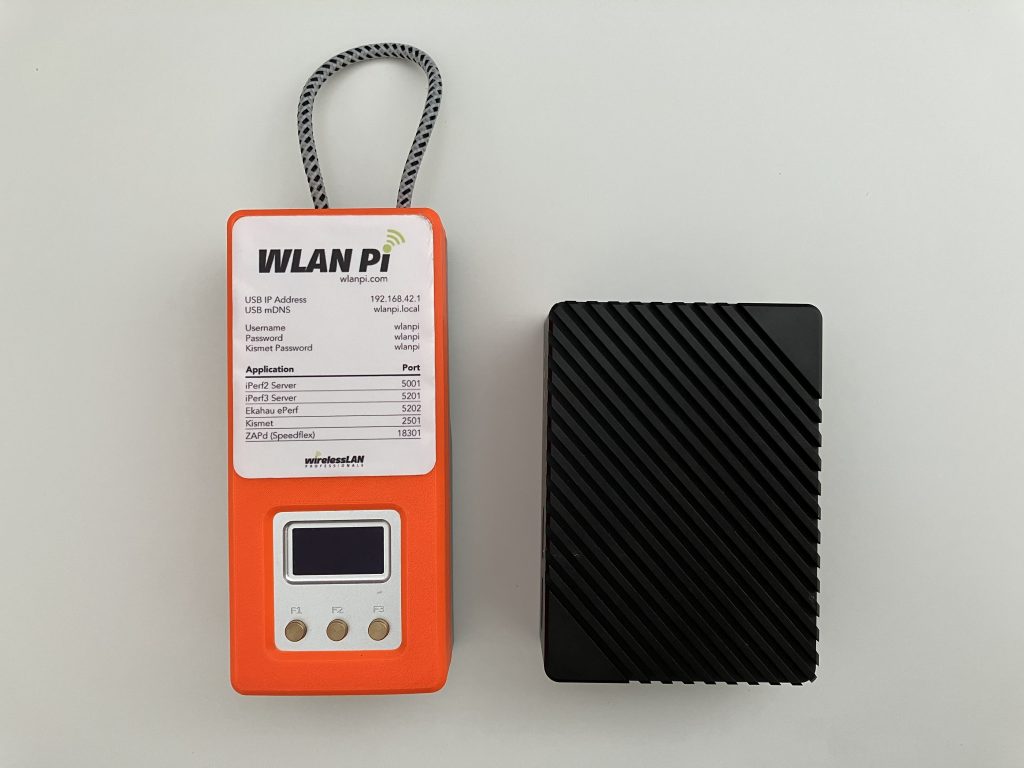
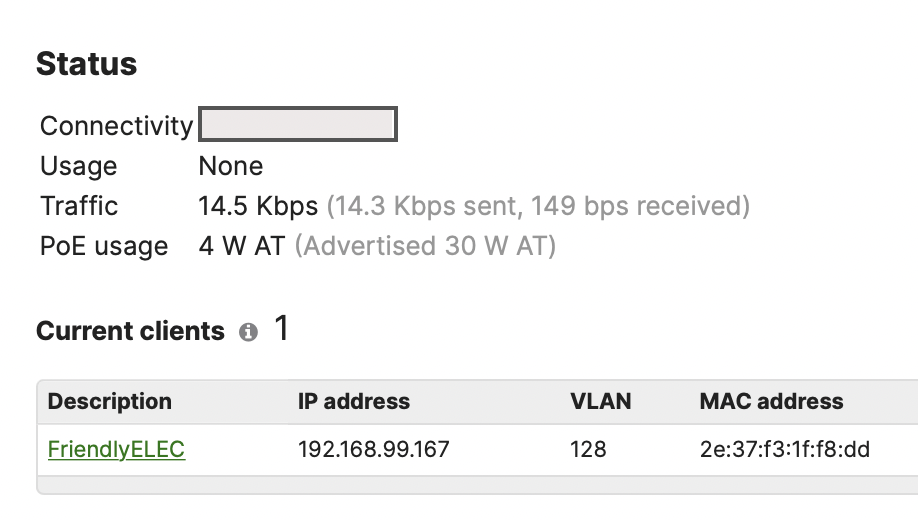
Are you wondering if the PoE splitter connected to my iperf3 server (the little black box with 3 Ethernet interfaces) actually negotiated 2.5 Gbps Full duplex with the switch? Yes, it did. But keep in mind that the PoE splitter is technically only rated for 1 GbE. So use as short patch cable as possible and ideally CAT6.
Still few things to tidy up and perhaps I could build this into a nice Pelican case
Or you can consider an add-on 10 Gigabit Ethernet Thunderbolt 3 adapter for your current Mac.
We will focus on the latter today.
Thunderbolt 3, not USB
While the USB-C connector might temp you to connect these adapters to a standard USB port, these adapters don’t support USB protocol. They use Thunderbolt 3 and they happen to use the same USB-C connector as USB. That’s the only thing USB and Thunderbolt have in common. Before you order one of these adapters, double-check that your computer supports Thunderbolt 3. That should be most new MacBooks, Mac Minis, Intel NUCs and similar platforms.
Which 10 GbE adapter shall I buy?
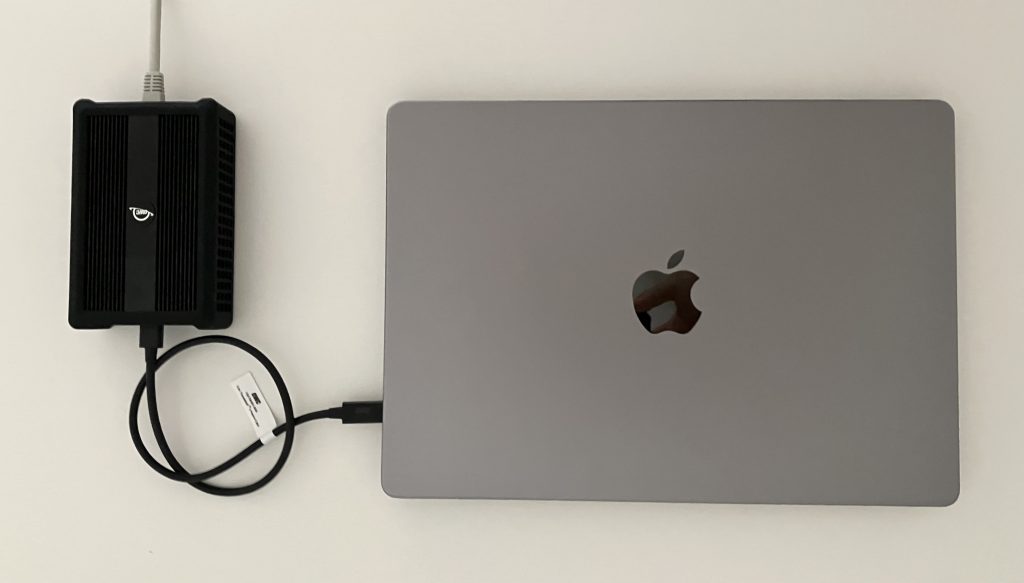
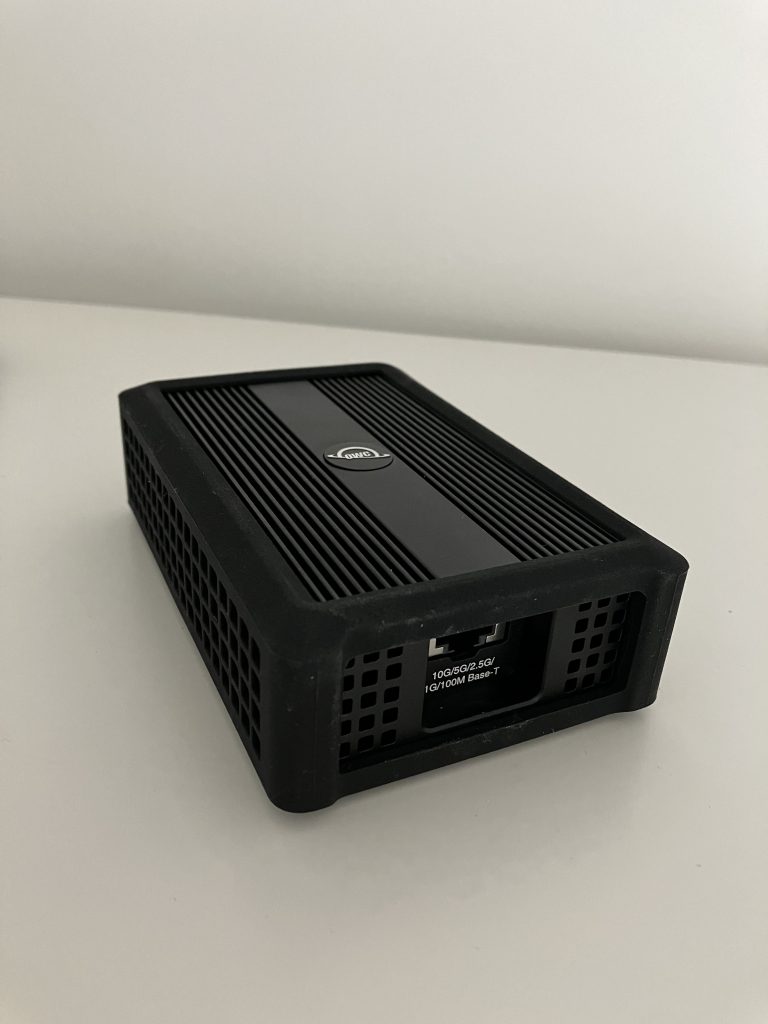
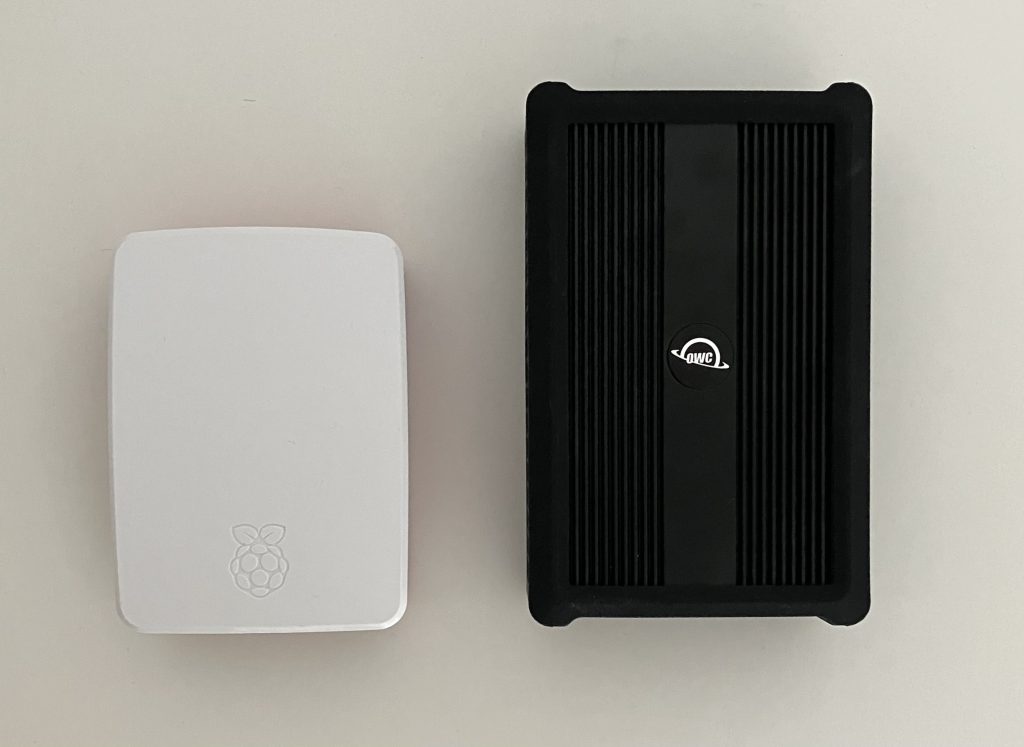
I tested two of these Thunderbolt 10 GbE adapters. One made by Sabrent, and the other by OWC. They both look alike, both perform very well, both get quite warm, and bothwork out of the box on macOS. Yes, no driver installation required on your part on macOS! 🎉
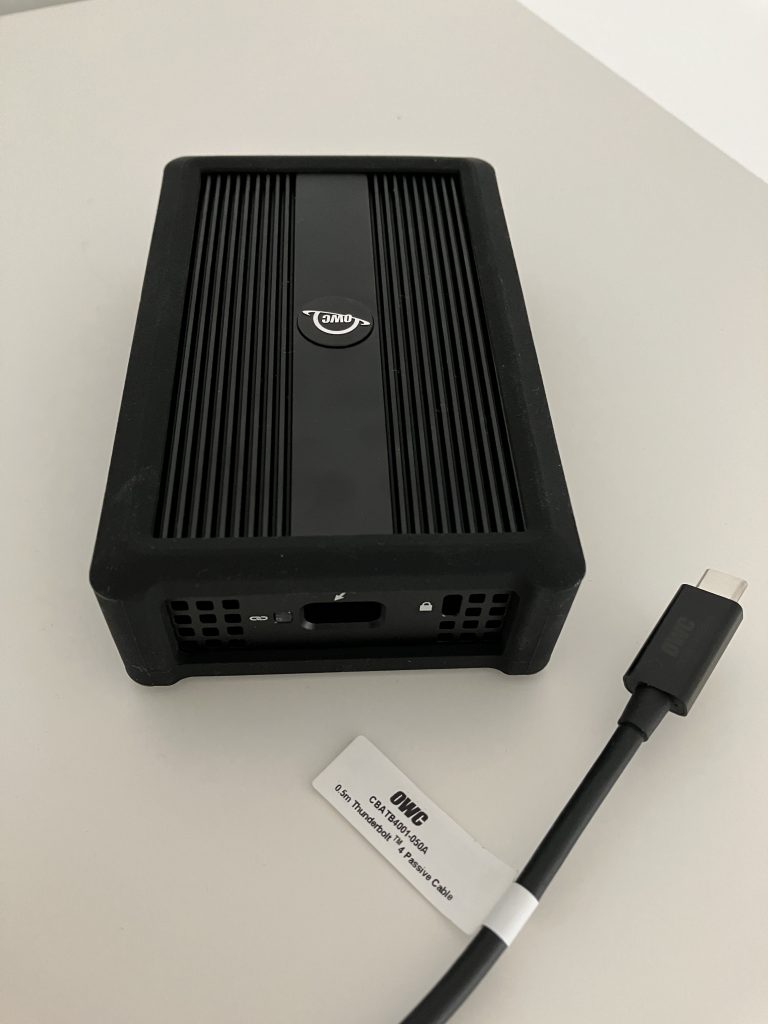
Mainly because of the loose Sabrent cable issue explained below, I recommend the OWCadapter. It comes with great documentation, and even the Thunderbolt cable itself is thicker, feels premium, and most likely delivers better shielding.
From throughput perspective, I personally tested it up to 3 Gbps down and 3.3 Gbps up using iperf3 with default settings. The limitation is on my part, I just don’t have another 10 GbE computer I could test against.
I’ve seen reports of:
between 7 Gbps and 8.74 Gbps uplink speeds with default iperf3 settings
9.5 Gbps uplink iperf3 speeds with Jumbo frames enabled
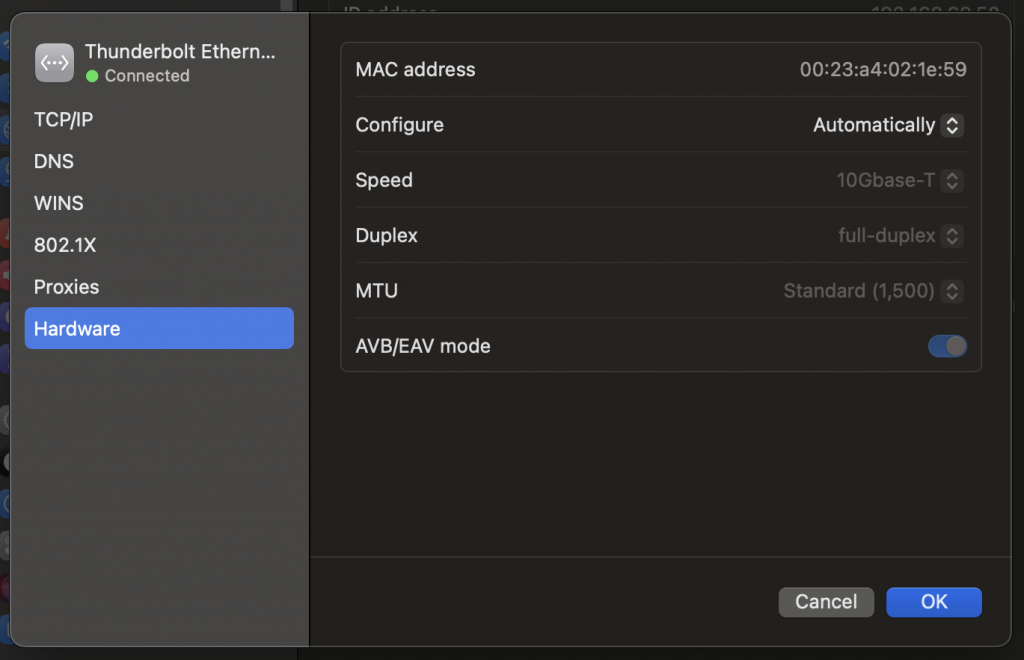
When I reviewed 2.5 GbE and 5 GbE adapters, this setup has become my reference I ran all iperf3 tests against.
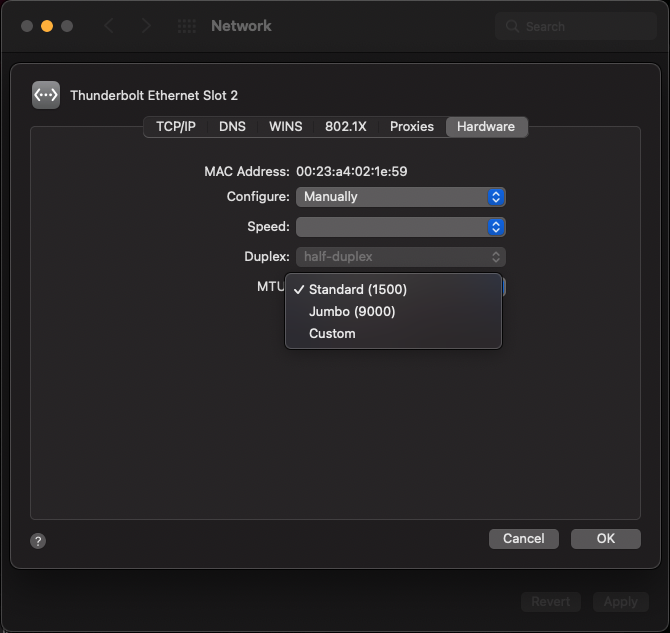
OWC connected to an M1 MacBook ProThunderbolt sideEthernet sideRaspberry Pi 4 for scale10 Gbps Full DuplexIt supports Jumbo frames including a custom MTU setting
VLAN tagging
The OWC adapter also supports VLAN tagging. Here is my Trunk port with Native VLAN 129:
Trunk port configured on the access switch
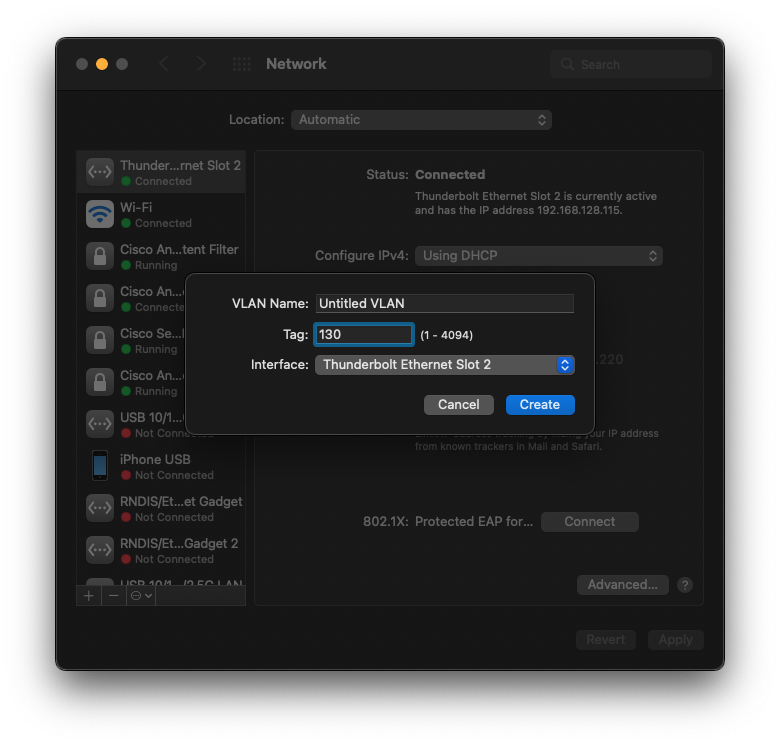
Let’s tag all traffic with VLAN 130:
Create VLAN interface on macOS
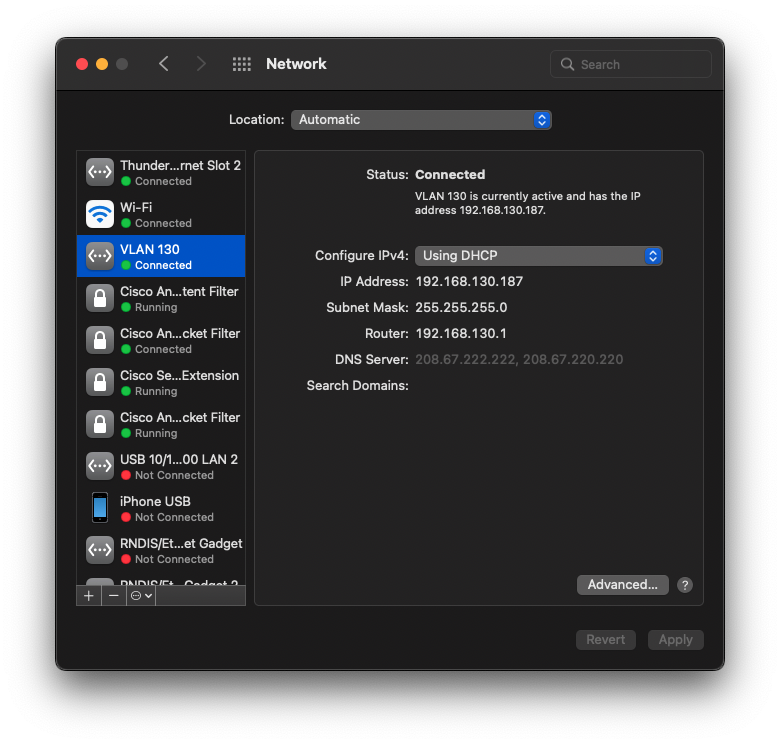
Verify that we are indeed in VLAN 130:
VLAN 130 is being used instead of the Native VLAN 129
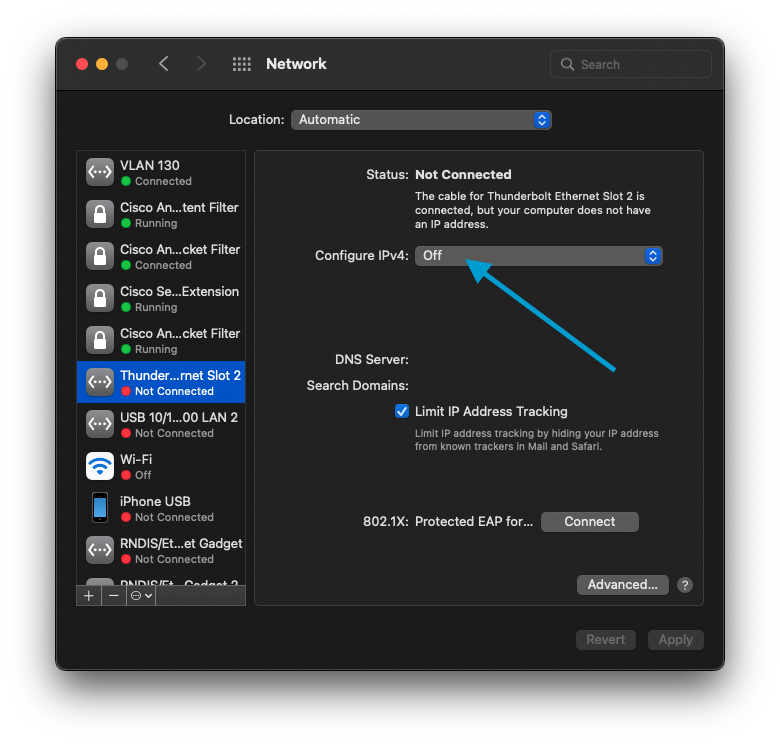
If you only want to use VLAN 130 (without touching the Native VLAN 129), you can disable the adapter itself. VLAN 130 virtual interface will stay up and forward traffic.
Disable the Native VLAN 129 and only use VLAN 130 for all traffic
Sabrent Thunderbolt 3 to 10 Gbps Ethernet Adapter TH-S3EA
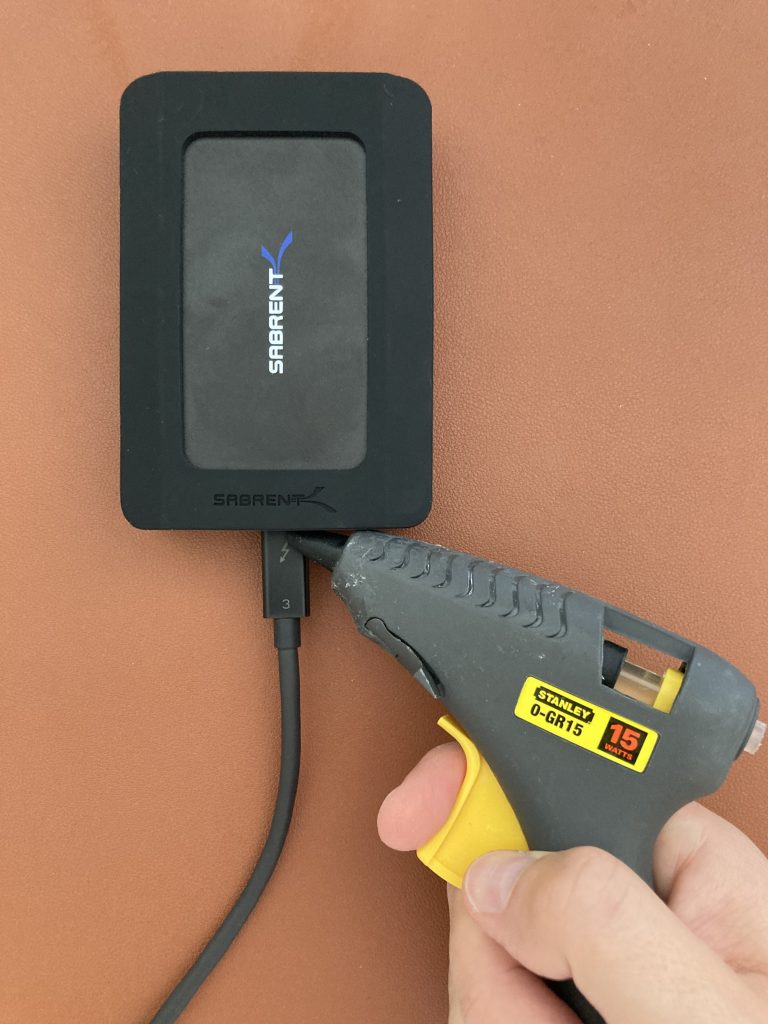
I won’t go into the detail, but my main challenge with the Sabrent adapter was its loose Thunderbolt cable. The connection between the USB-C socket on the adapter and the USB-C connector on the Thunderbolt cable is very loose and practically pulls out just by the tension of the cable itself. It might have been just my unit, but I can’t recommend it.
Sabrent Thunderbolt 3 to 10Gbps Ethernet Adapter on the leftIt almost felt like it needed some hot glue to keep the Thunderbolt cable connected
What about Windows and Linux support?
I tested the Sabrent adapter on Windows 10. It required a Sabrent driver installation and then it worked just fine. I would assume the same for the OWC.
I don’t have a Linux computer with a Thunderbolt port, so I can’t share anything on that front.
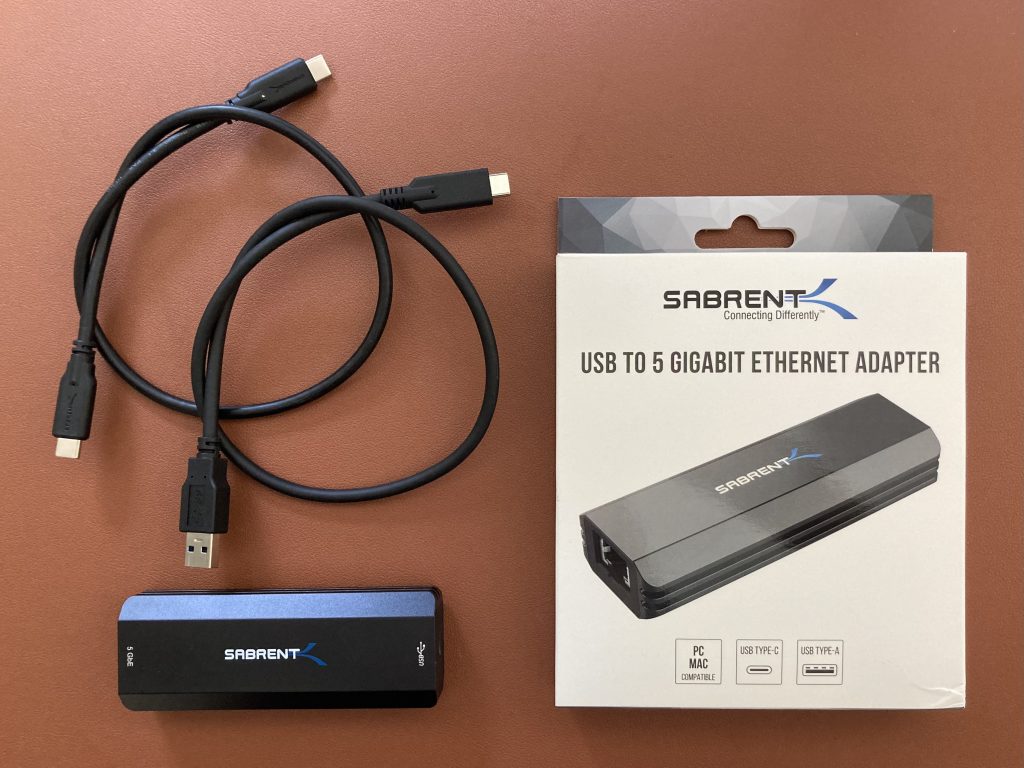
Sabrent NT-SS5G is a 5 GbE USB adapter, which allows you to achieve higher throughput than 2.5 GbE adapters, and break the 2.35 Gbps barrier. It works great on Windows. If you are a macOS or Linux user, I recommend you consider other options like this instead.
The adapter itself is larger than 2.5 GbE adapters, it uses AQC111U chip, and ships with short 2 detachable USB-A and USB-C cables. USB-C port on its back connects the adapter to your computer. A metal shell protects it, serves as a heatsink, and also adds to its weight.
Windows 11
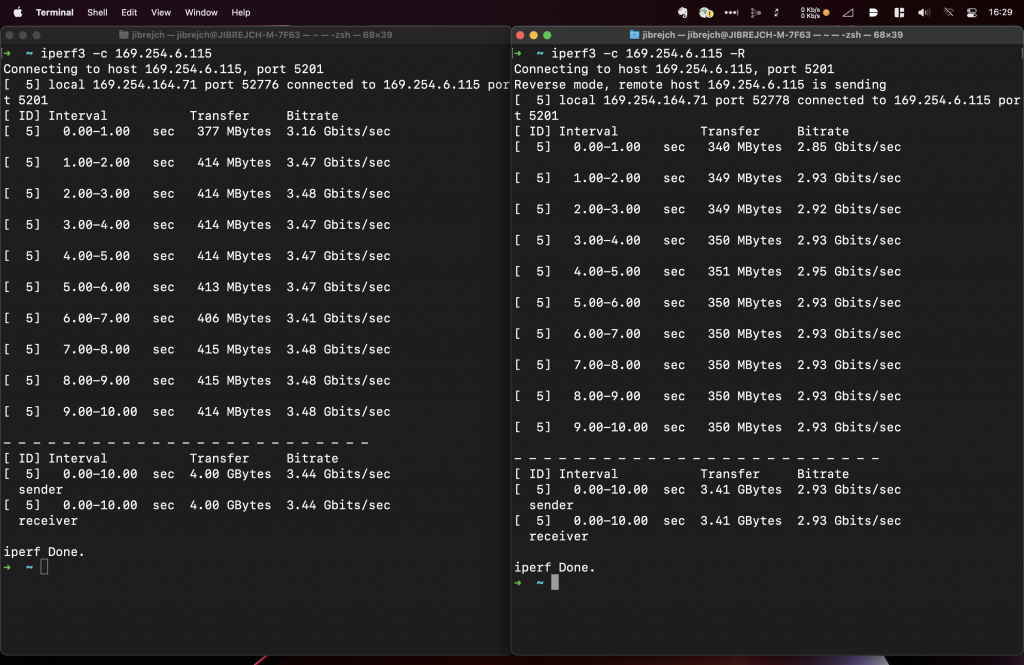
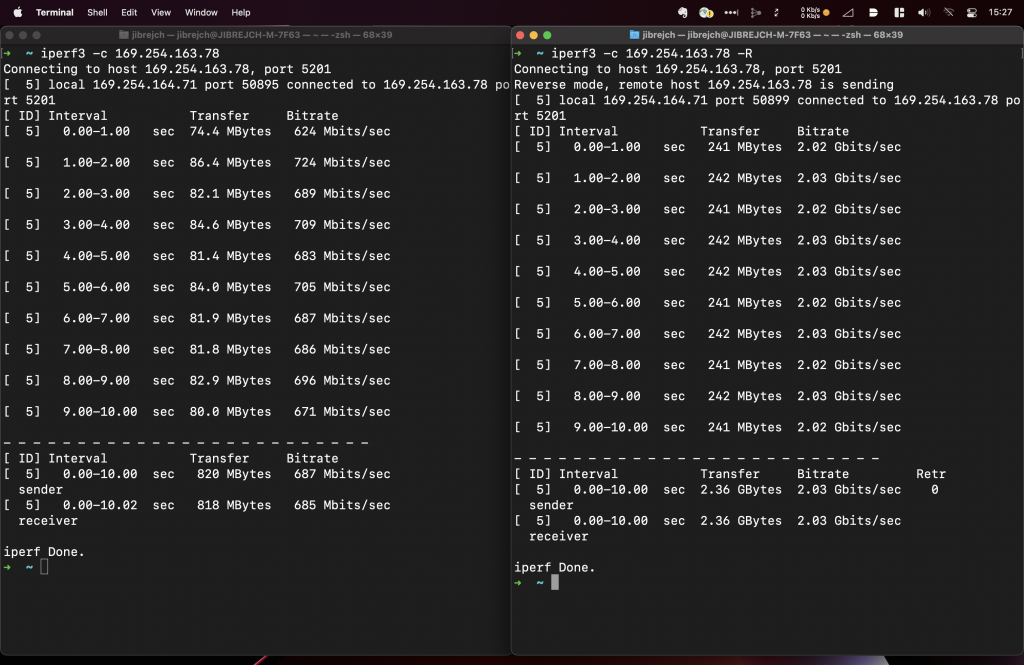
Install the driver from Sabrent’s website and you are good to go. In my tests with this Topton M6 Mini PC, I measured 2.93 Gbps down and 3.44 Gbps up with default iperf3 settings.
2.93 Gbps down and 3.44 Gbps up with default iperf3 settings
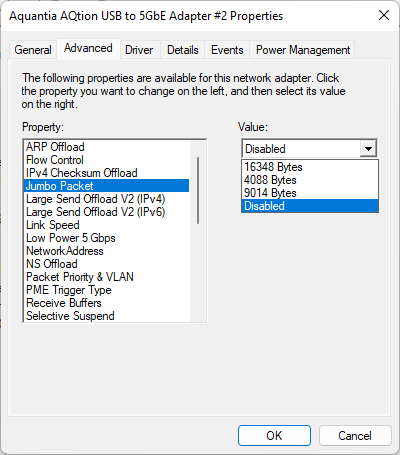
In adapter options, you can actually configure quite a few things including Jumbo frame support. Note that these are fixed values.
macOS
I can’t recommend this adapter for macOS users. It forces you to disable macOS System Integrity Protection (csrutil), otherwise it won’t work. It might be okay for a proof of concept or lab setup, but I would hesitate from using it in production.
This is how to install the driver if you were interested:
Install the driver using the pkg file provided by Sabrent. It installs a Kernel Extension (kext), which drives this adapter.
Enable the extension by going to System Preferences > Security & Privacy > enable the extension > Reboot.
After reboot, unplug the adapter and plug it back in.
It should work as long as you leave the System Integrity Protection disabled.
From throughput perspective, it saw download speeds of 3.30 Gbps, and upload of 3.45 Gbps. This was with default iperf3 settings, standard 1500-byte MTU and one stream. Great results considering that this adapter’s USB interface maximum theoretical throughput is 5 Gbps.
In my view, you might be better off buying a 2.5 GbE adapter, which can push 2.35 Gbps up and down consistently and with no driver installation needed. I tested one here. Alternatively, a 10GbE Thunderbolt Ethernet adapter is even faster choice, but more costly, and larger form factor. Or, if your other half approves, treat yourself to an M1 Mac Mini with built-in 10 GbE 😉
Linux
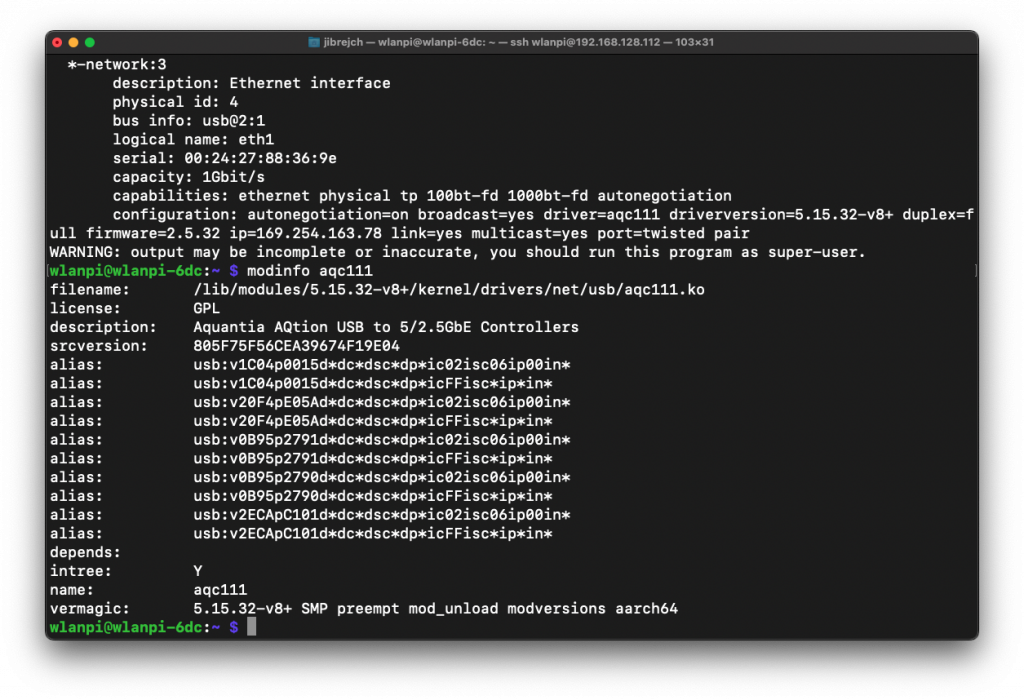
I tested this adapter on 64-bit Raspberry Pi OS running on Raspberry Pi 4. Although the default driver distributed in Linux Kernel 5.15 works, it doesn’t even deliver symmetric 1 Gbps.
Sabrent connected to Raspberry Pi 4Upload speeds well below 1 GbpsDefault aqc111 driver details
Let’s download the latest driver from Sabrent’s website. Unfortunately that doesn’t seem to be able to compile for 64-bit OS. I tried compiling on 32-bit Raspberry OS, to no avail. If you have any ideas, please do let me know.
So, on Linux, a Realtek RTL8156B based 2.5 GbE adapter might be a better choice for you. Here is the one I tested.
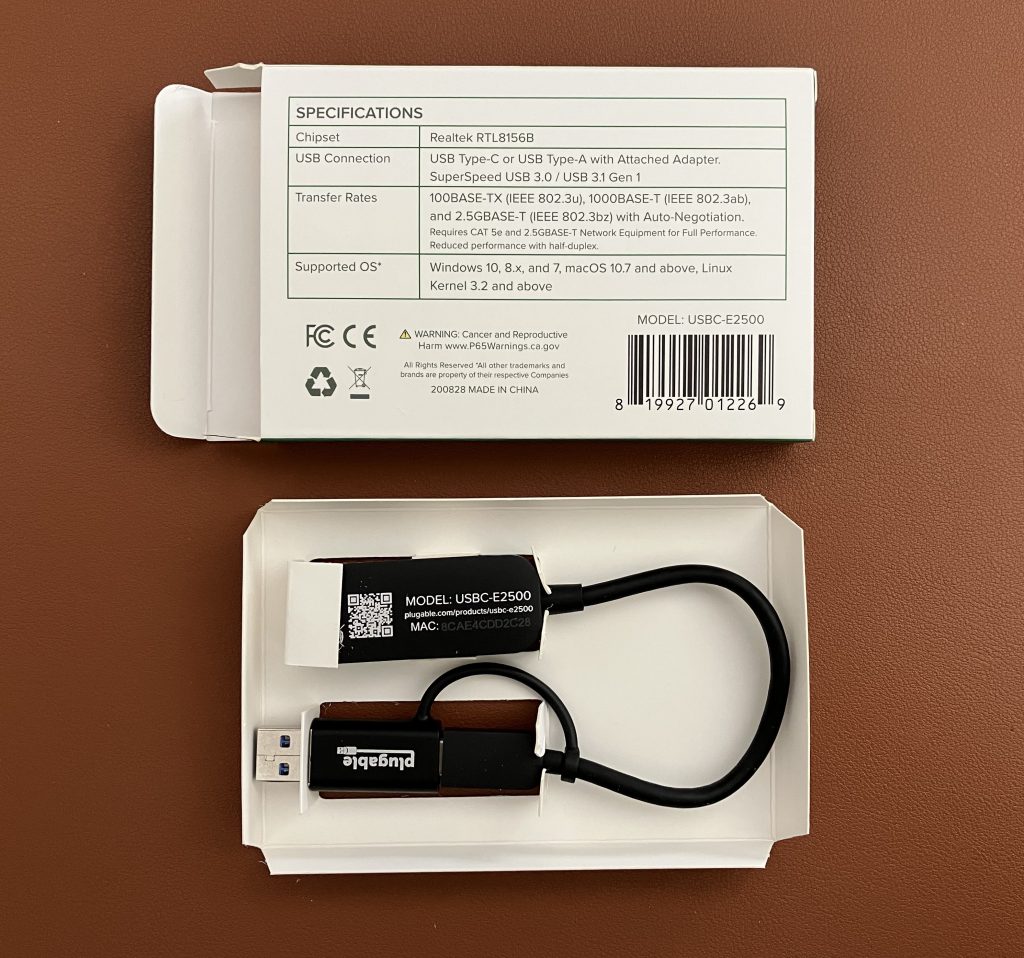
Plugable makes this inexpensive 2.5 Gigabit Ethernet USBC-E2500 adapter. It is based on Realtek RTL8156B chip. On Windows and macOS it works out of the box. If you want to use it on a Linux machine like WLAN Pi Pro or Raspberry Pi 4, expect some troubles along the way, but good performance when you get there.
The USB-C to USB-A adapter is allows you to use it with a MacBook (USB-C) or Raspberry Pi 4 (USB-A)The adapter itself has a plastic shell and is very lightweight
Windows 11
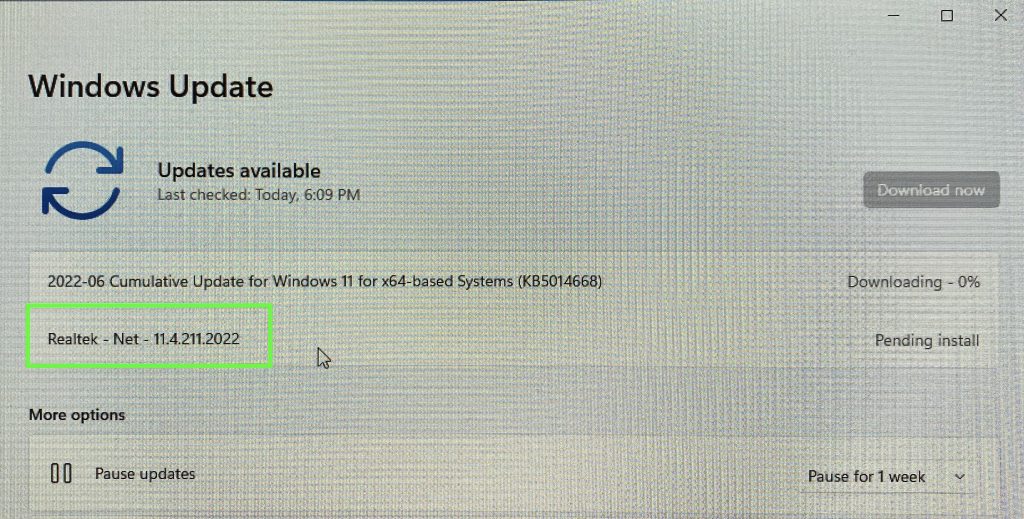
When they say “update the driver using Windows Update first”, they mean it. Windows 11 will recognise the adapter and you can start using it, but the default driver distributed with Windows 11 significantly reduces this adapter’s performance.
727 Mbps down and 2.34 Gbps up with default driver
Now, let’s use Windows Update to download the latest driver.
Don’t forget to update the driver using Windows Update
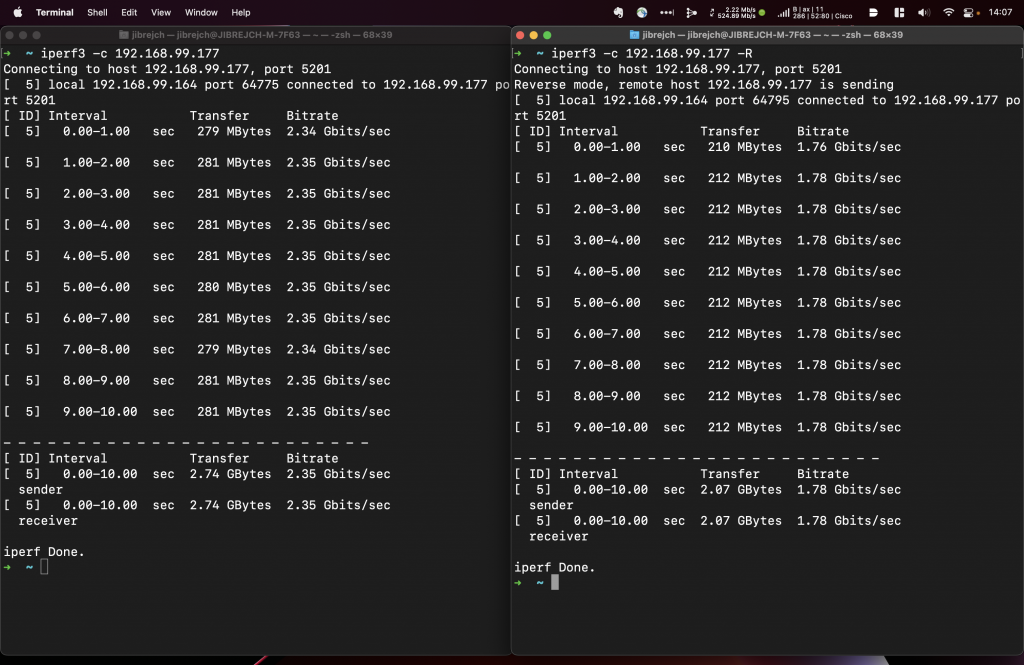
As you can see, download throughput (from iperf3 server to iperf3 client) has dramatically improved.
1.78 Gbps down and 2.35 Gbps up with updated driver
Although the box suggests Jumbo frame support, Windows driver settings don’t give me any option to edit the MTU size. So, I assume Jumbo frames are not supported.
MacOS Monterey
On macOS, this adapter works out of the box with no additional driver installation required. That’s a very nice surprise. And performance is great.
Symmetric 2.35 Gbps throughput on macOS
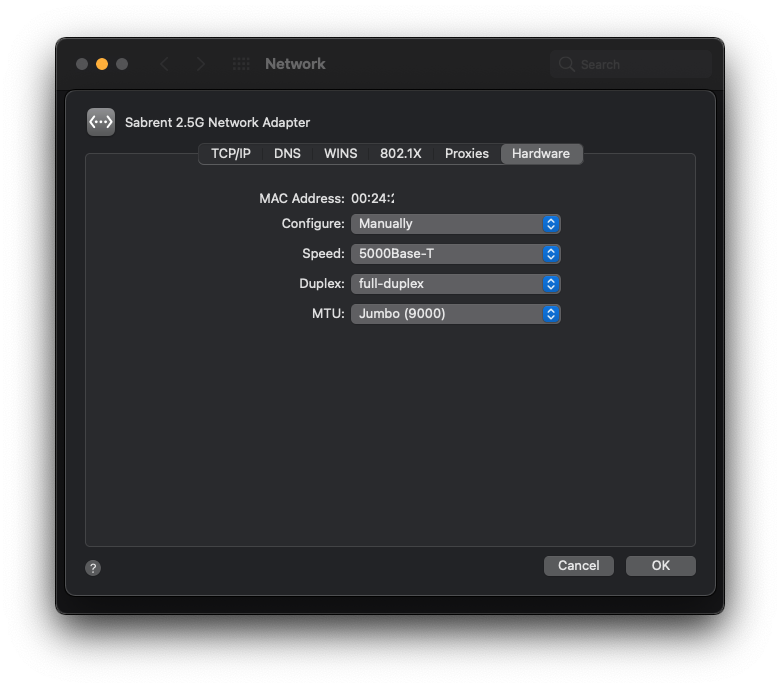
Auto-negotiation worked just fine. If you want to configure speed or MTU manually, you can, but Jumbo frames are not supported on macOS either.
Jumbo frames are not supported
Linux
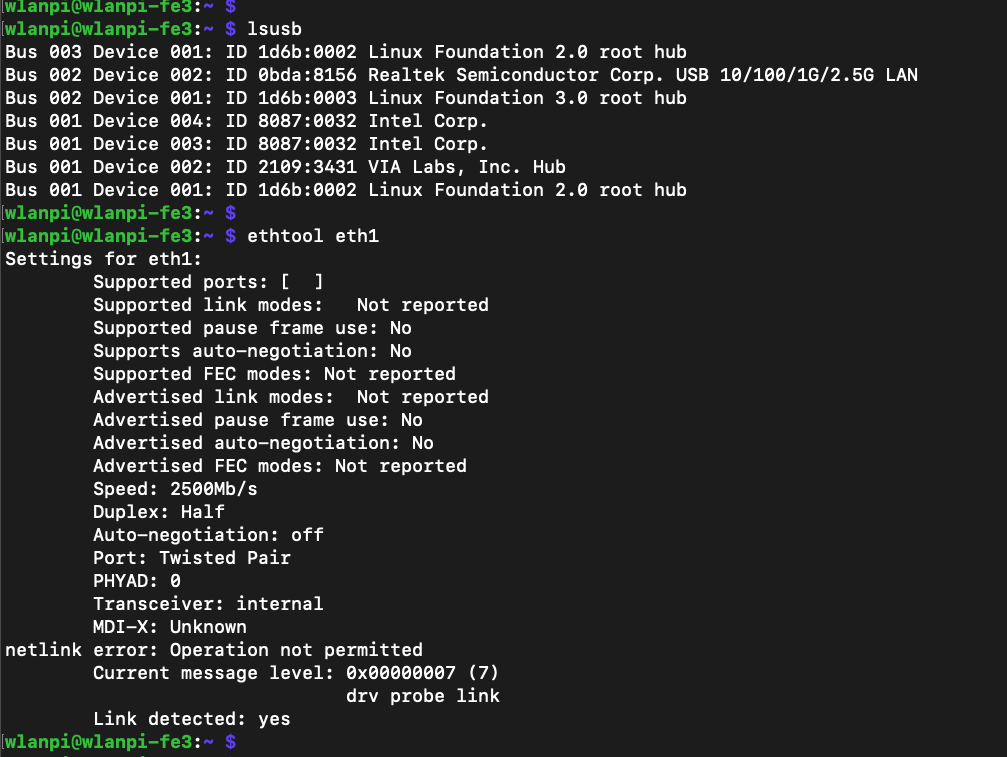
Now the bad news. If you are considering to use this adapter on a Linux machine, the default driver cdc_ncm is a trouble as it only supports 2.5 Gbps Half duplex. Setting Full duplex manually using ethtool command doesn’t work either.
Default driver only supports Half duplex
As you might expect, with the default driver and Half duplex, throughput is very poor.
1.22 Gbps down and 704 Mbps up with the default cdc_ncm driver on WLAN Pi Pro
On WLAN Pi Pro and Raspberry Pi 4 running 5.15 Linux Kernel I managed to fix the duplex issue by the steps listed below. But I hit new auto-negotiation issue between the Plugable adapter and Cisco Catalyst WS-C3560CX-8XPD switch. It took the adapter to eventually negotiate 2.5 Gbps Full duplex around 15 minutes of constantly flapping the interface. Forcing speed and duplex on the Plugable adapter by ethtool did not work. Certainly not ideal, and definitely worth testing before you commit to the Plugable adapter. With other multigigabit adapters, the Plugable had no negotiation issues.
1.7 Gbps down and 2.09 Gbps up with r8156 driver on WLAN Pi Pro1.91 Gbps down and 2.06 Gbps up on Raspberry Pi 4 using the correct r8156 driverRaspberry Pi 4 also known as WLAN Pi Community Edition
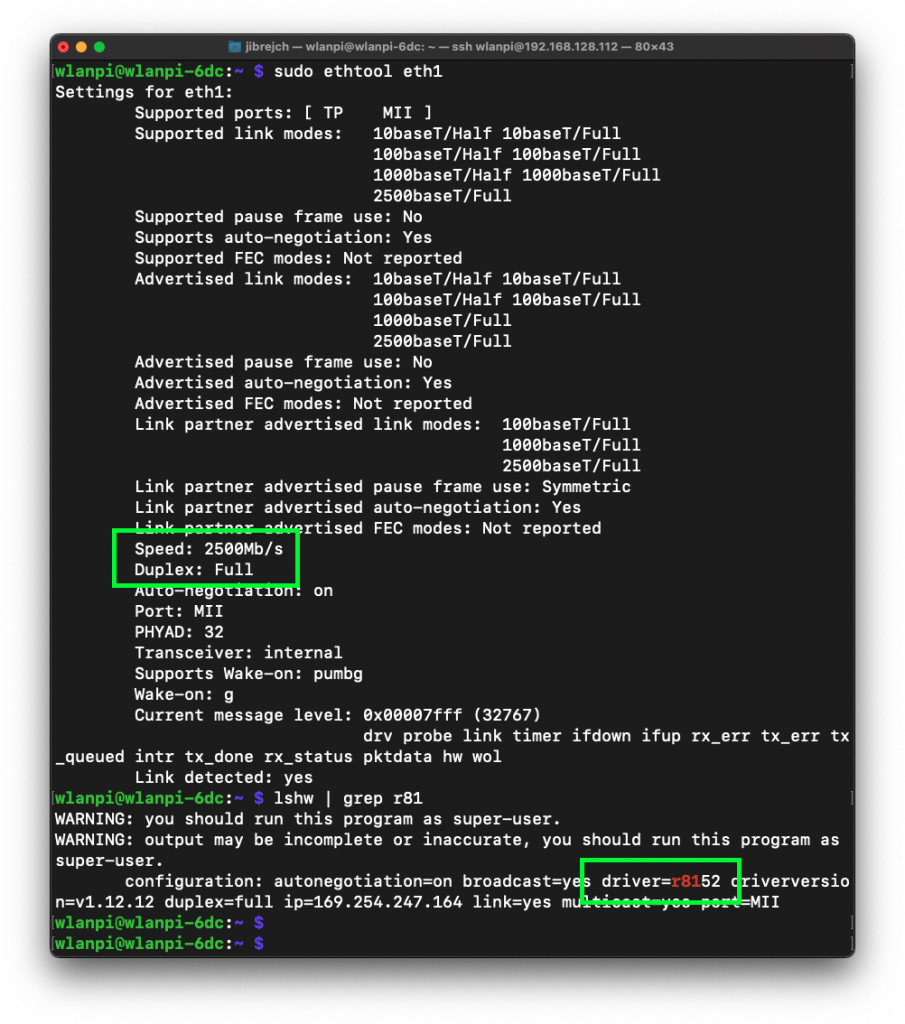
How to force Linux to use the right driver
To enable Full duplex capability, we need to tell Linux to use Realtek r8156 driver instead of the default cdc-ncm.
Wi-Fi standards have developed and also WAN links are fast and reasonably priced these days. When it comes to throughput testing tools like iperf3 servers, 1 Gigabit Ethernet has become a bottleneck. A Wi-Fi 6E client can now easily generate more than 1 Gbps of traffic, but how do we measure it?
To overcome that issue, I am looking for a reasonably priced portable single-board computer, which can push more than 1 Gbps of traffic. It should be powered via USB-C, battery, or PoE powered, and should be portable to fit in my “just in case I need it” tool bag.
FriendlyElec NanoPi R5S
This little FriendlyElec NanoPi R5S single-board computer (SBC) delivers everything I mentioned above. Let’s have a look.
Dimensions and case
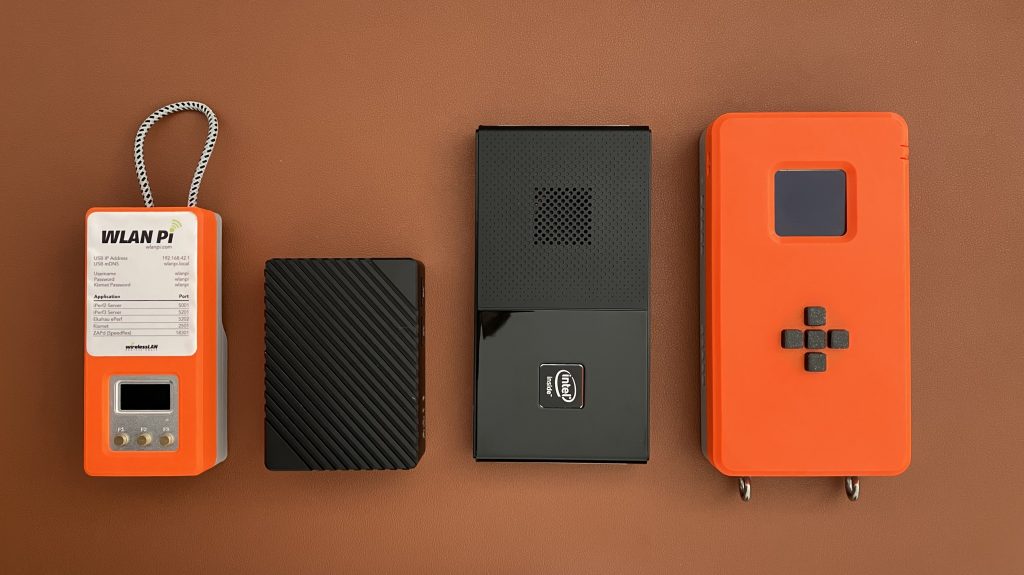
It comes with a well designed aluminium case, which also serves as a heatsink. The whole unit is smaller than the smallest iPhone, slightly thicker obviously. It runs silent. There is no built-in fan whatsoever.
Portable? Tick! By the way, did you know that the original WLAN Pi uses NanoPi NEO2?Left to right: WLAN Pi, R5S, Intel-based SBC I am also testing, WLAN Pi Pro
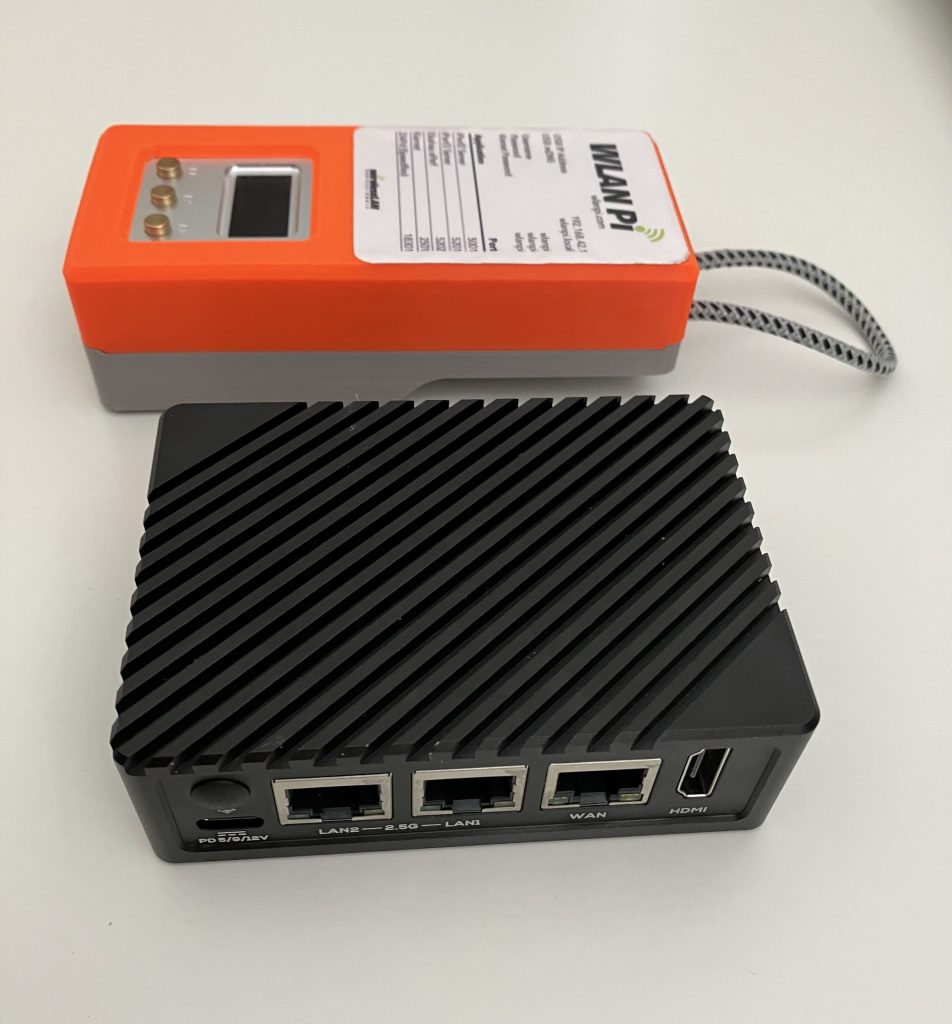
Ports
USB-C power input, two 2.5 GbE, one 1 GbE, HDMI useful troubleshooting or demos, two USB-A 3.0 ports
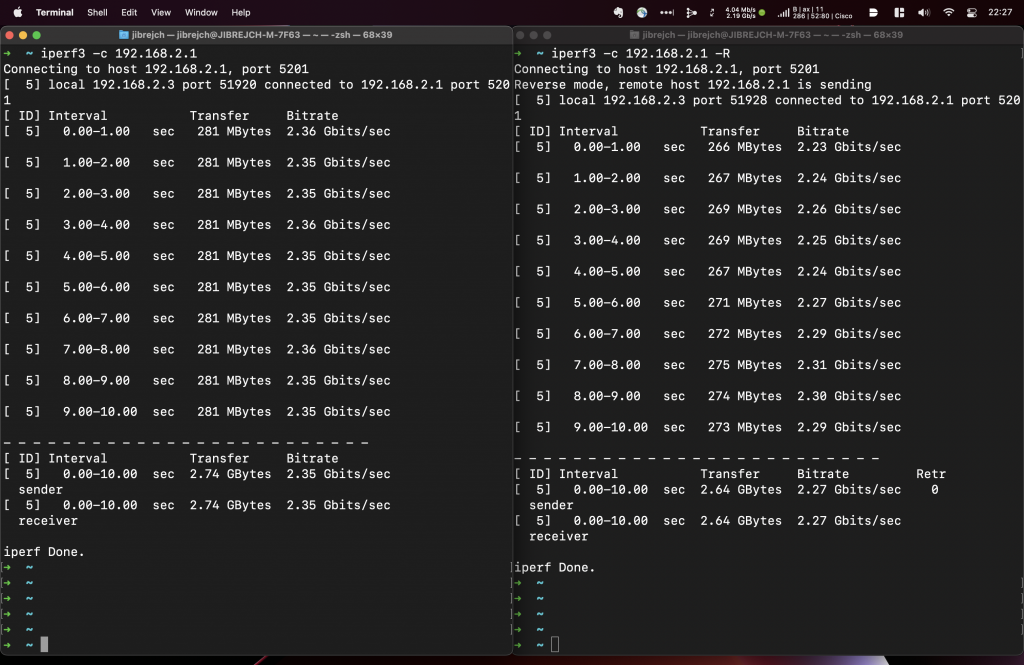
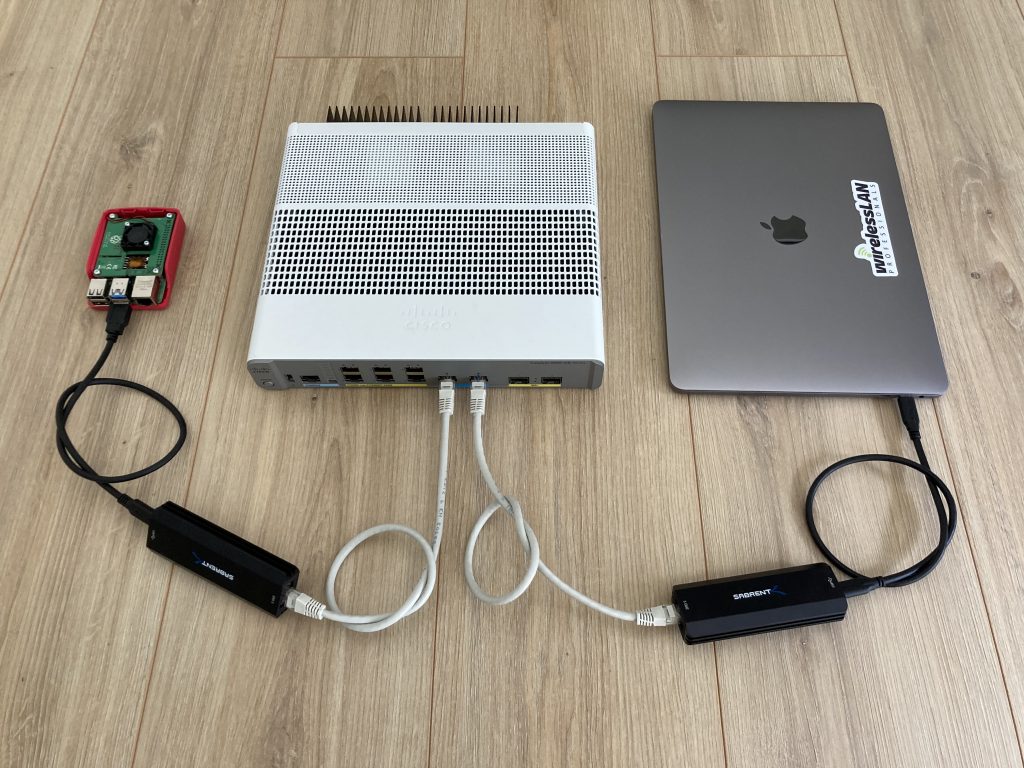
It has two 2.5 Gigabit Ethernet interfaces (LAN1 and LAN2) and one 1 Gigabit Ethernet interface (WAN). Either of the LAN ports delivers 2.3 Gbps of actual useful iperf3 throughput with default 1500-byte MTU and single stream. I used MacBook with OWC 10 Gigabit Ethernet Thunderbolt 3 Adapter and Cisco WS-C3560CX-8XPD switch.
From client’s perspective that’s 2.27 Gbps down and 2.35 Gbps up
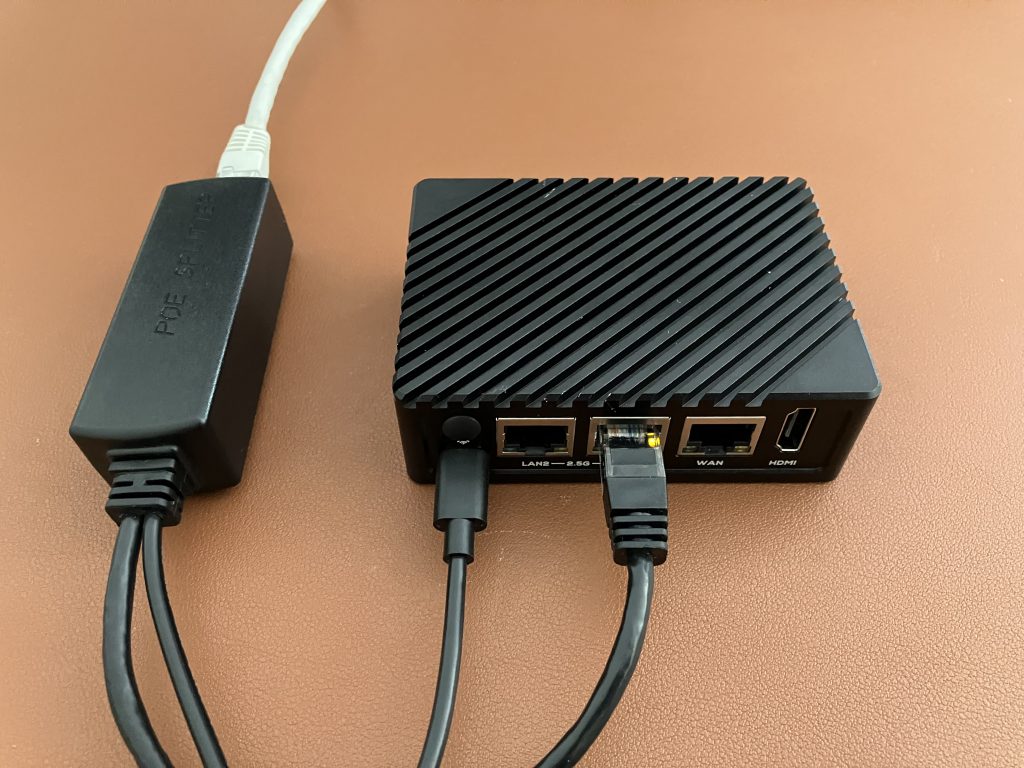
Power
The R5S only draws 4 Watts in idle, and can be powered by any USB-C 5V power source. Your MacBook USB-C charger, iPad/iPhone charger, or USB-C battery pack would do. Alternatively, use a 1 Gigabit Ethernet 5V PoE splitter and PoE power the unit. In my lab with a 2 meter cable, the 1 Gigabit Ethernet PoE splitter actually allowed the R5S auto negotiate stable 2.5 Gbps connection with the switch.
PoE powered
Software
FriedlyElec built and published two operating system SD card images for the R5S – Ubuntu and FriendlyWRT. I tested both, and for my use case FriendlyWRT works best. It has a network-centric and easy to use web UI, has iperf3 preinstalled, and delivers great performance.
Initial setup and tips
R5S ships without any micro SD card, so make sure you have one ready to use. Flash the software image to it using Balena Etcher or similar tool.
Connect the WAN port to a network with existing DHCP server. If you are in the same subnet, simply ping FriendlyWrt.local to get the IP address of the R5S.
Then access the web UI or SSH to the unit, SSH is enabled by default. Change the root password now.
Now, this is important! To achieve maximum throughput, delete the pre-configured bridge interface br0, and configure both multigigabit eth1 (LAN1 port) and eth2 (LAN2 port) as standalone unbridged interfaces. Also, tweak IP address settings to your liking while you are there.
eth1 configured as a standalone interface. Bridge interface removed.
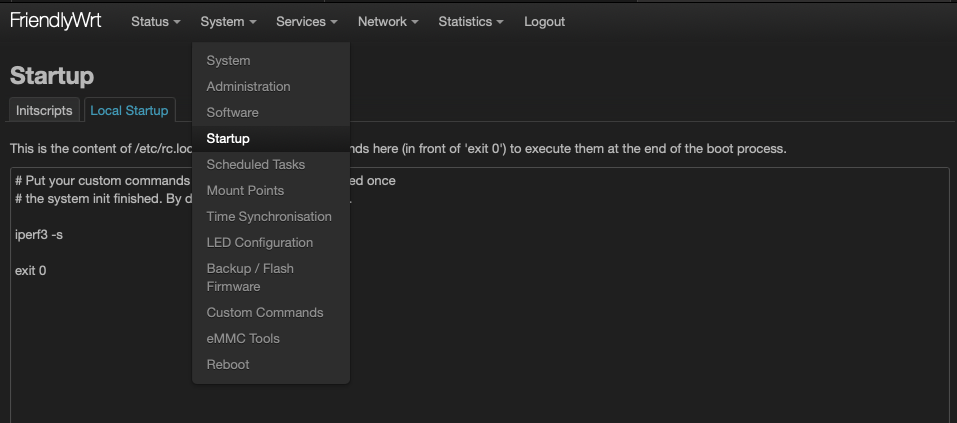
Make iperf3 automatically start by going to System > Startup > Local Startup and add iperf3 -s and hit the Save button.
Change CPU Governor setting to Performance. And CPU Minimum Frequency to the maximum value.
This little single-board computer absolutely deserves its space in my tool bag. For the 2 GB RAM model with case I paid $88 including shipping to the UK. Add a Micro SD card and that’s all you need to get started.
Finally, it you need top performance, don’t care that much about small form factor, and money is no object, the latest Apple M1 Mac Mini can be configured with built-in 10 GbE.
Update: The Linux driver for this adapter does not seem to perform great. I tested a 2.5 GbE adapter based on Realtek chipset, which might work better for you. Here is my review.
I also tested this adapter on Windows 11 and macOS here.
With the first consumer Wi-Fi 6E routers already shipping, and enterprise access points being worked on, I think it is now time to up my iperf3 game. While the standard 1 Gbps adapters push around 950 Mbps of TCP traffic, the iperf3 server will sooner or later become a bottleneck for throughput measurements.
Raspberry Pi 4 (RPi4) is widely available, and there is a chance that you might already own one. So, the question is, can it support multigigabit speeds?
Although it does not have any PCI Express slot available, it does have a couple of USB 3.0 ports. I researched USB 3.0 multigigabit NBASE-T Ethernet adapters, and purchased a few. At the time of writing, Linux kernel 5.10 is the Raspberry Pi OS gold standard, and that’s what I used for all tests.
TL;DR … give me the short answer
The maximum TCP throughput Raspberry Pi 4 iperf3 server can handle with a 5 Gbps USB 3.0 Ethernet adapter. These were 90-second iperf3 tests with standard 1500-byte MTU and a single iperf3 stream.
Download (from RPi4 server to a client): 2.05 Gbps
Upload (from a client to RPi4 server): 528 Mbps
If you can enable 9000-byte Jumbo frames on all devices involved in the data path, the upload speed becomes much healthier.
Download (from RPi4 server to a client): 2.05 Gbps
Upload (from a client to RPi4 server): 1.73 Gbps
USB multigigabit adapters
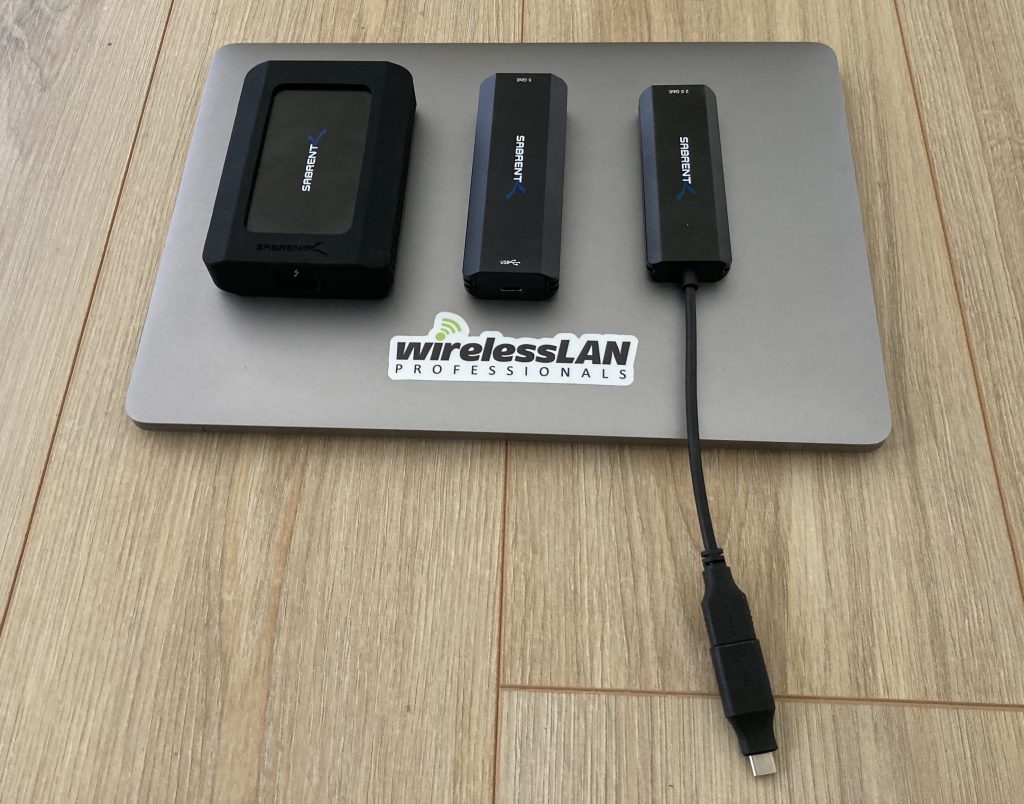
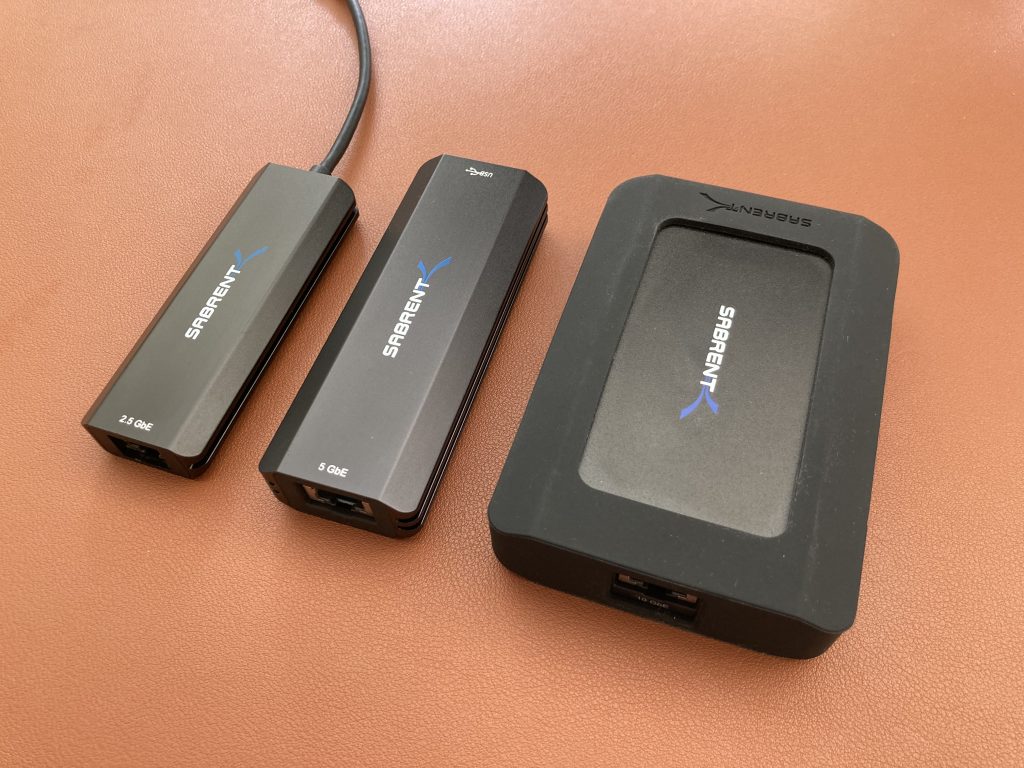
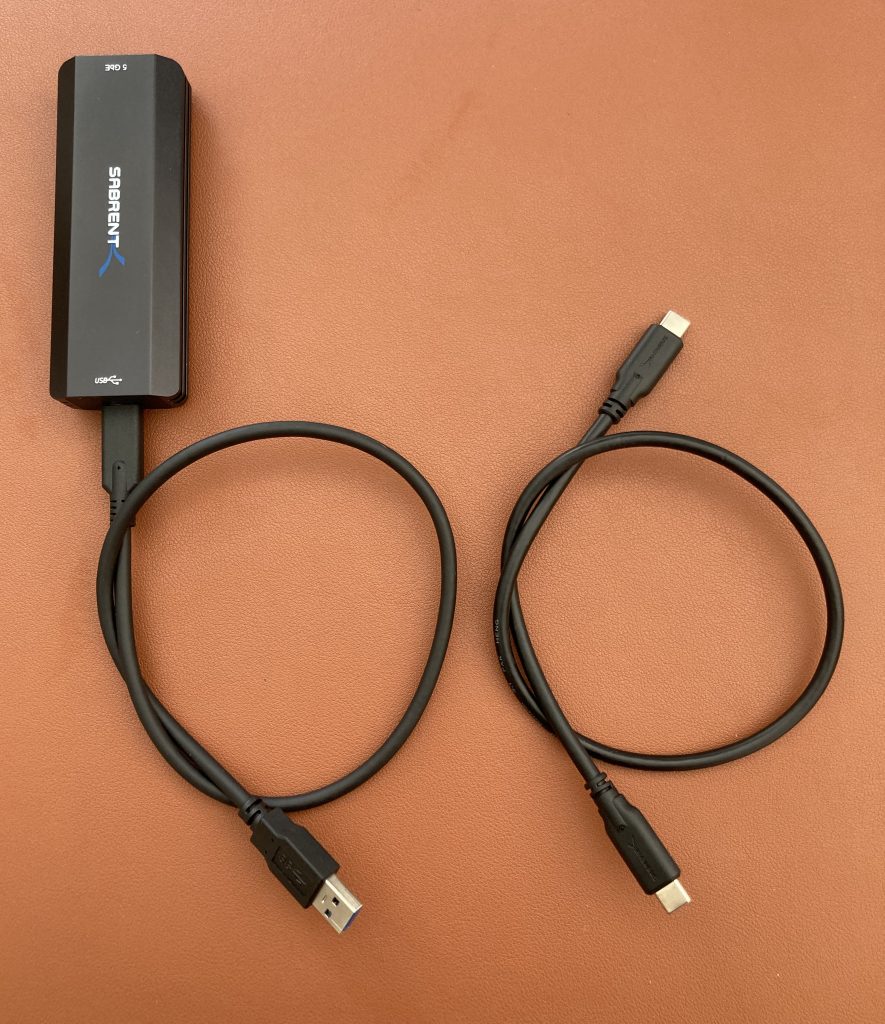
There are a few available on the market. After reading a dozen of reviews, I decided to get 3 adapters from a company called Sabrent. They make adapters with nice metal cases, which helps with dealing with the heat they dissipate.
Left to right: 2.5 GE USB 3.0 Sabrent NT-S25G, 5 GE USB 3.1 Sabrent NT-SS5G, 10 GE Thunderbolt 3 Sabrent TH-S3EA
The 5 GE USB 3.1 Sabrent NT-SS5G is the only I recommend for use with the RPi4:
It uses the Marvell Aquantia AQC111U chipset
It works out of the box with Raspberry Pi OS and
It works on Windows 10 after you install the driver
It ships with USB-C and USB-A cables so you can connect it to your laptop using USB-C or RPi4 using USB-A
Unlike other brands it does not overhead or disconnect due to instability
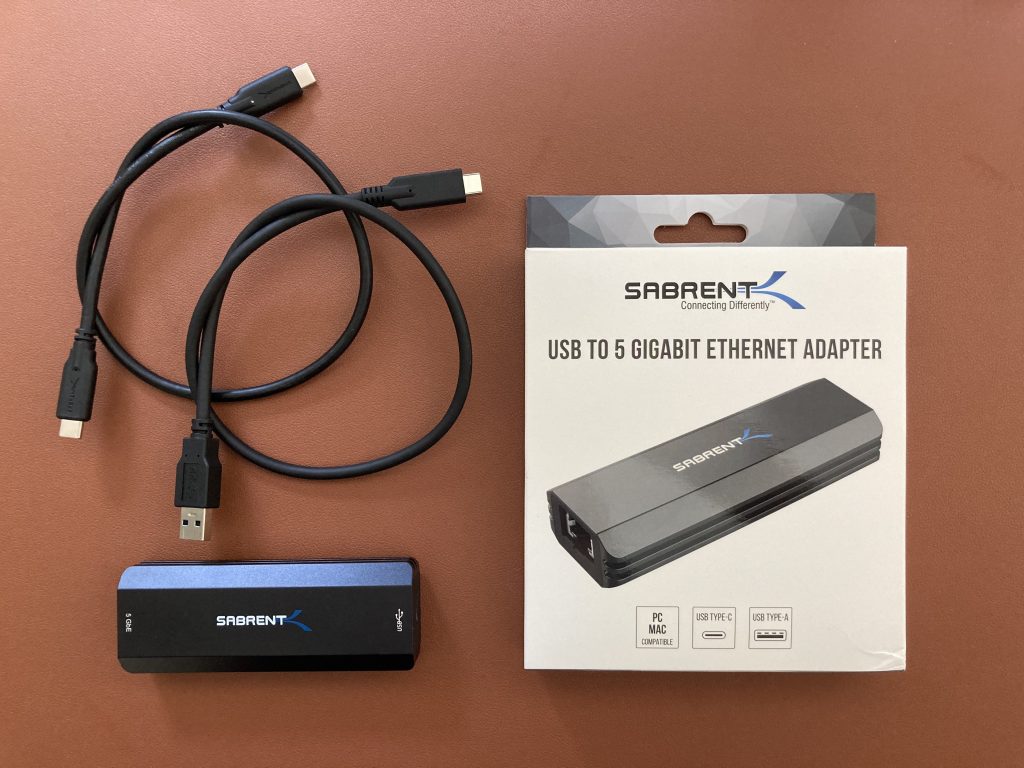
Here is what’s in the box
5 GE USB 3.1 Sabrent NT-SS5G ships with both USB-A and USB-C cables
RPi4 for scale
ServeTheHome team did a great job of comparing the 5 GE adapters using the same chipset as the 5 GE USB 3.1 Sabrent NT-SS5G. It came out as a clear winner:
Credit and kudos to ServeTheHome
Why not use the cheaper 2.5 GE USB 3.0 Sabrent NT-S25G? Because it uses Realtek 8156 chipset, and there is no suitable Linux driver available at the time of writing.
Why not the 10 GE Thunderbolt 3 Sabrent TH-S3EA? Although it has a USB-C connector, it is not a USB adapter. It uses Thunderbolt 3 protocol, which is not supported by the RPi4.
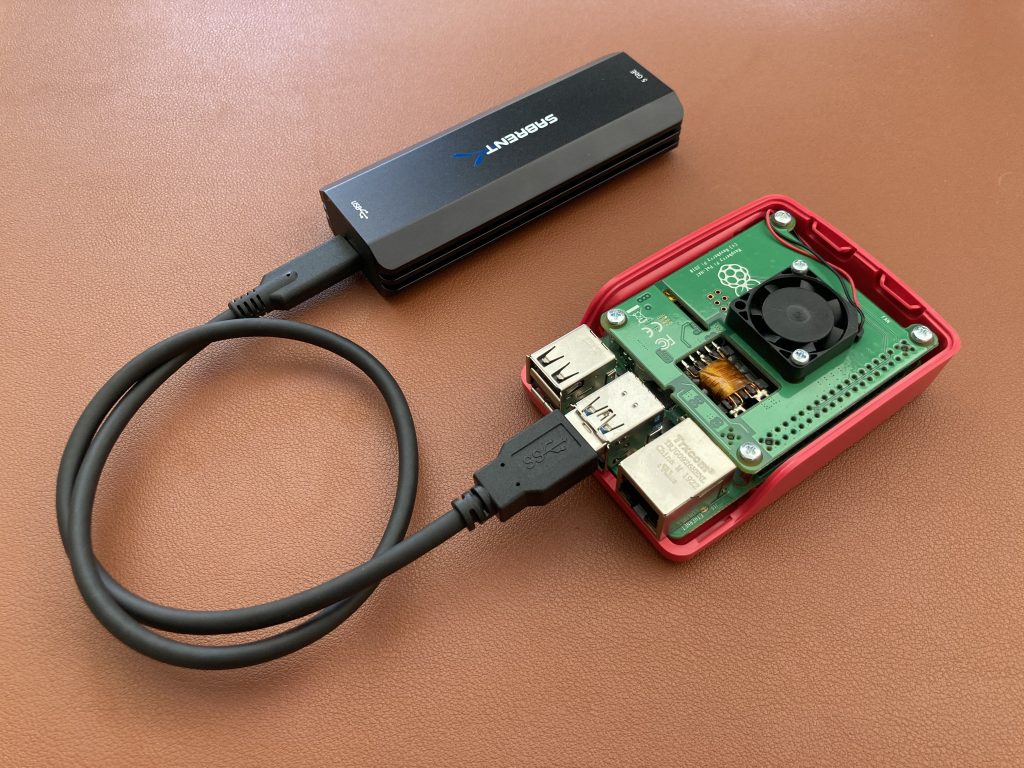
Test setup
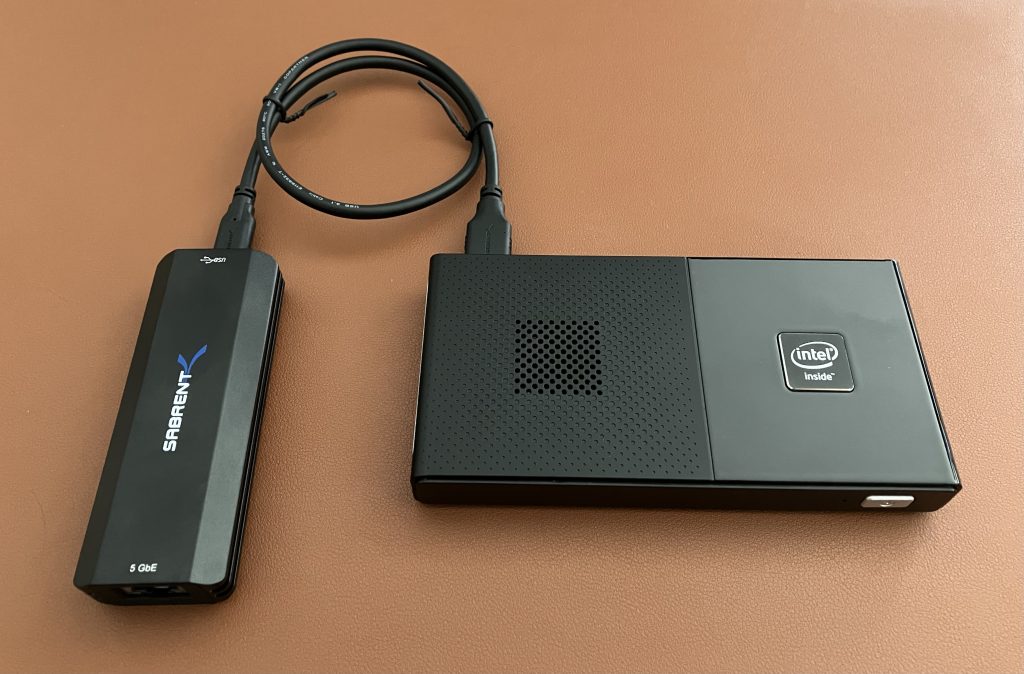
I use RPi4 with PoE HAT, because it has a fan on it, and I power the unit by a USB-C charger. Both multigigabit adapters involved in the test are 5-Gigabit Ethernet capable Sabrent NT-SS5G. The best part is that these work out of the box on the Raspberry Pi OS with no action required on your part.
But, if you are considering the purchase of these adapters for your Mac, please stop. After you plug the adapter in, it uses Apple’s 1 Gigabit Ethernet adapter driver, and it would only auto-negotiate 1 Gbps. To enable 2.5 and 5 Gigabit speeds, and support for Jumbo frames on Mac, you have to disable Apple System Integrity Protection (SIP) tool, and install a legacy kext Sabrent driver. I would discourage you from making these security compromises. If you are interested in a multigigabit adapter that works with macOS out of the box, tune in later and read this review (link to be added).
How to increase the MTU and enable Jumbo frames?
On the Raspberry Pi:
sudo ip link set dev eth1 mtu 9000
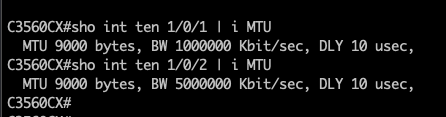
On the Cisco Catalyst switch running IOS:
Configure, save config, reloadVerify after reloadingSystem Preferences > Network > Adapter settings > Hardware > MTU on macOS
Conclusion
The RPi4 allows you to test download-only throughput up to 2 Gbps with standard MTU. Upload speeds are really poor and you would be better off using the built-in 1 Gibabit Ethernet adapter. You can use the RPi4 to run a few other tools, scripts, or take wall attenuation measurements.
With Jumbo frames enabled, 2 Gbps/1.7 Gbps is good enough for lab use or demonstrations. Keep in mind that you would have to enable Jumbo frames on all devices (RPi4, MacBook and the switch in my case).
The main cause of the relatively low performance is the storm of IRQ hammering the RPi4 CPU:
In a computer, an interrupt request (or IRQ) is a hardware signal sent to the processor that temporarily stops a running program and allows a special program, an interrupt handler, to run instead. Hardware interrupts are used to handle events such as receiving data from a modem or network card, key presses, or mouse movements.
Source: Wikipedia.org
If your use case requires a powerful iperf3 server, Apple’s Mac Mini with built-in 10 Gigabit Ethernet adapter would be something to consider today. It won’t be the cheapest option, but you won’t have to worry about performance or USB dongles. From what I’ve found, it uses Marvell AQC 1113 chipset and does 9.4 Gbps with 4 parallel iperf3 streams.
Disclosure
I purchased these adapters myself. No one asked me, or paid me, to write this blog post. I was as curious as you to see how the RPi4 performs when it comes to multigigabit Ethernet.