One step closer to 10 Gigabit Ethernet on Raspberry Pi 5 – it is hot

This journey started as an exploration of maximum PCIe capabilities of Raspberry Pi 5 (and hopefully Compute Module 5) platform. I am mainly interested in multi-gigabit Ethernet and Wi-Fi 7 adapters connected via the PCI Express (PCIe) x1 bus.

Last time, we got throughput of 3.44 Gbps. The adapter and the Pi hit the bottleneck of PCIe Gen 2. Unfortunately, they failed to establish PCIe Gen 3 mode.

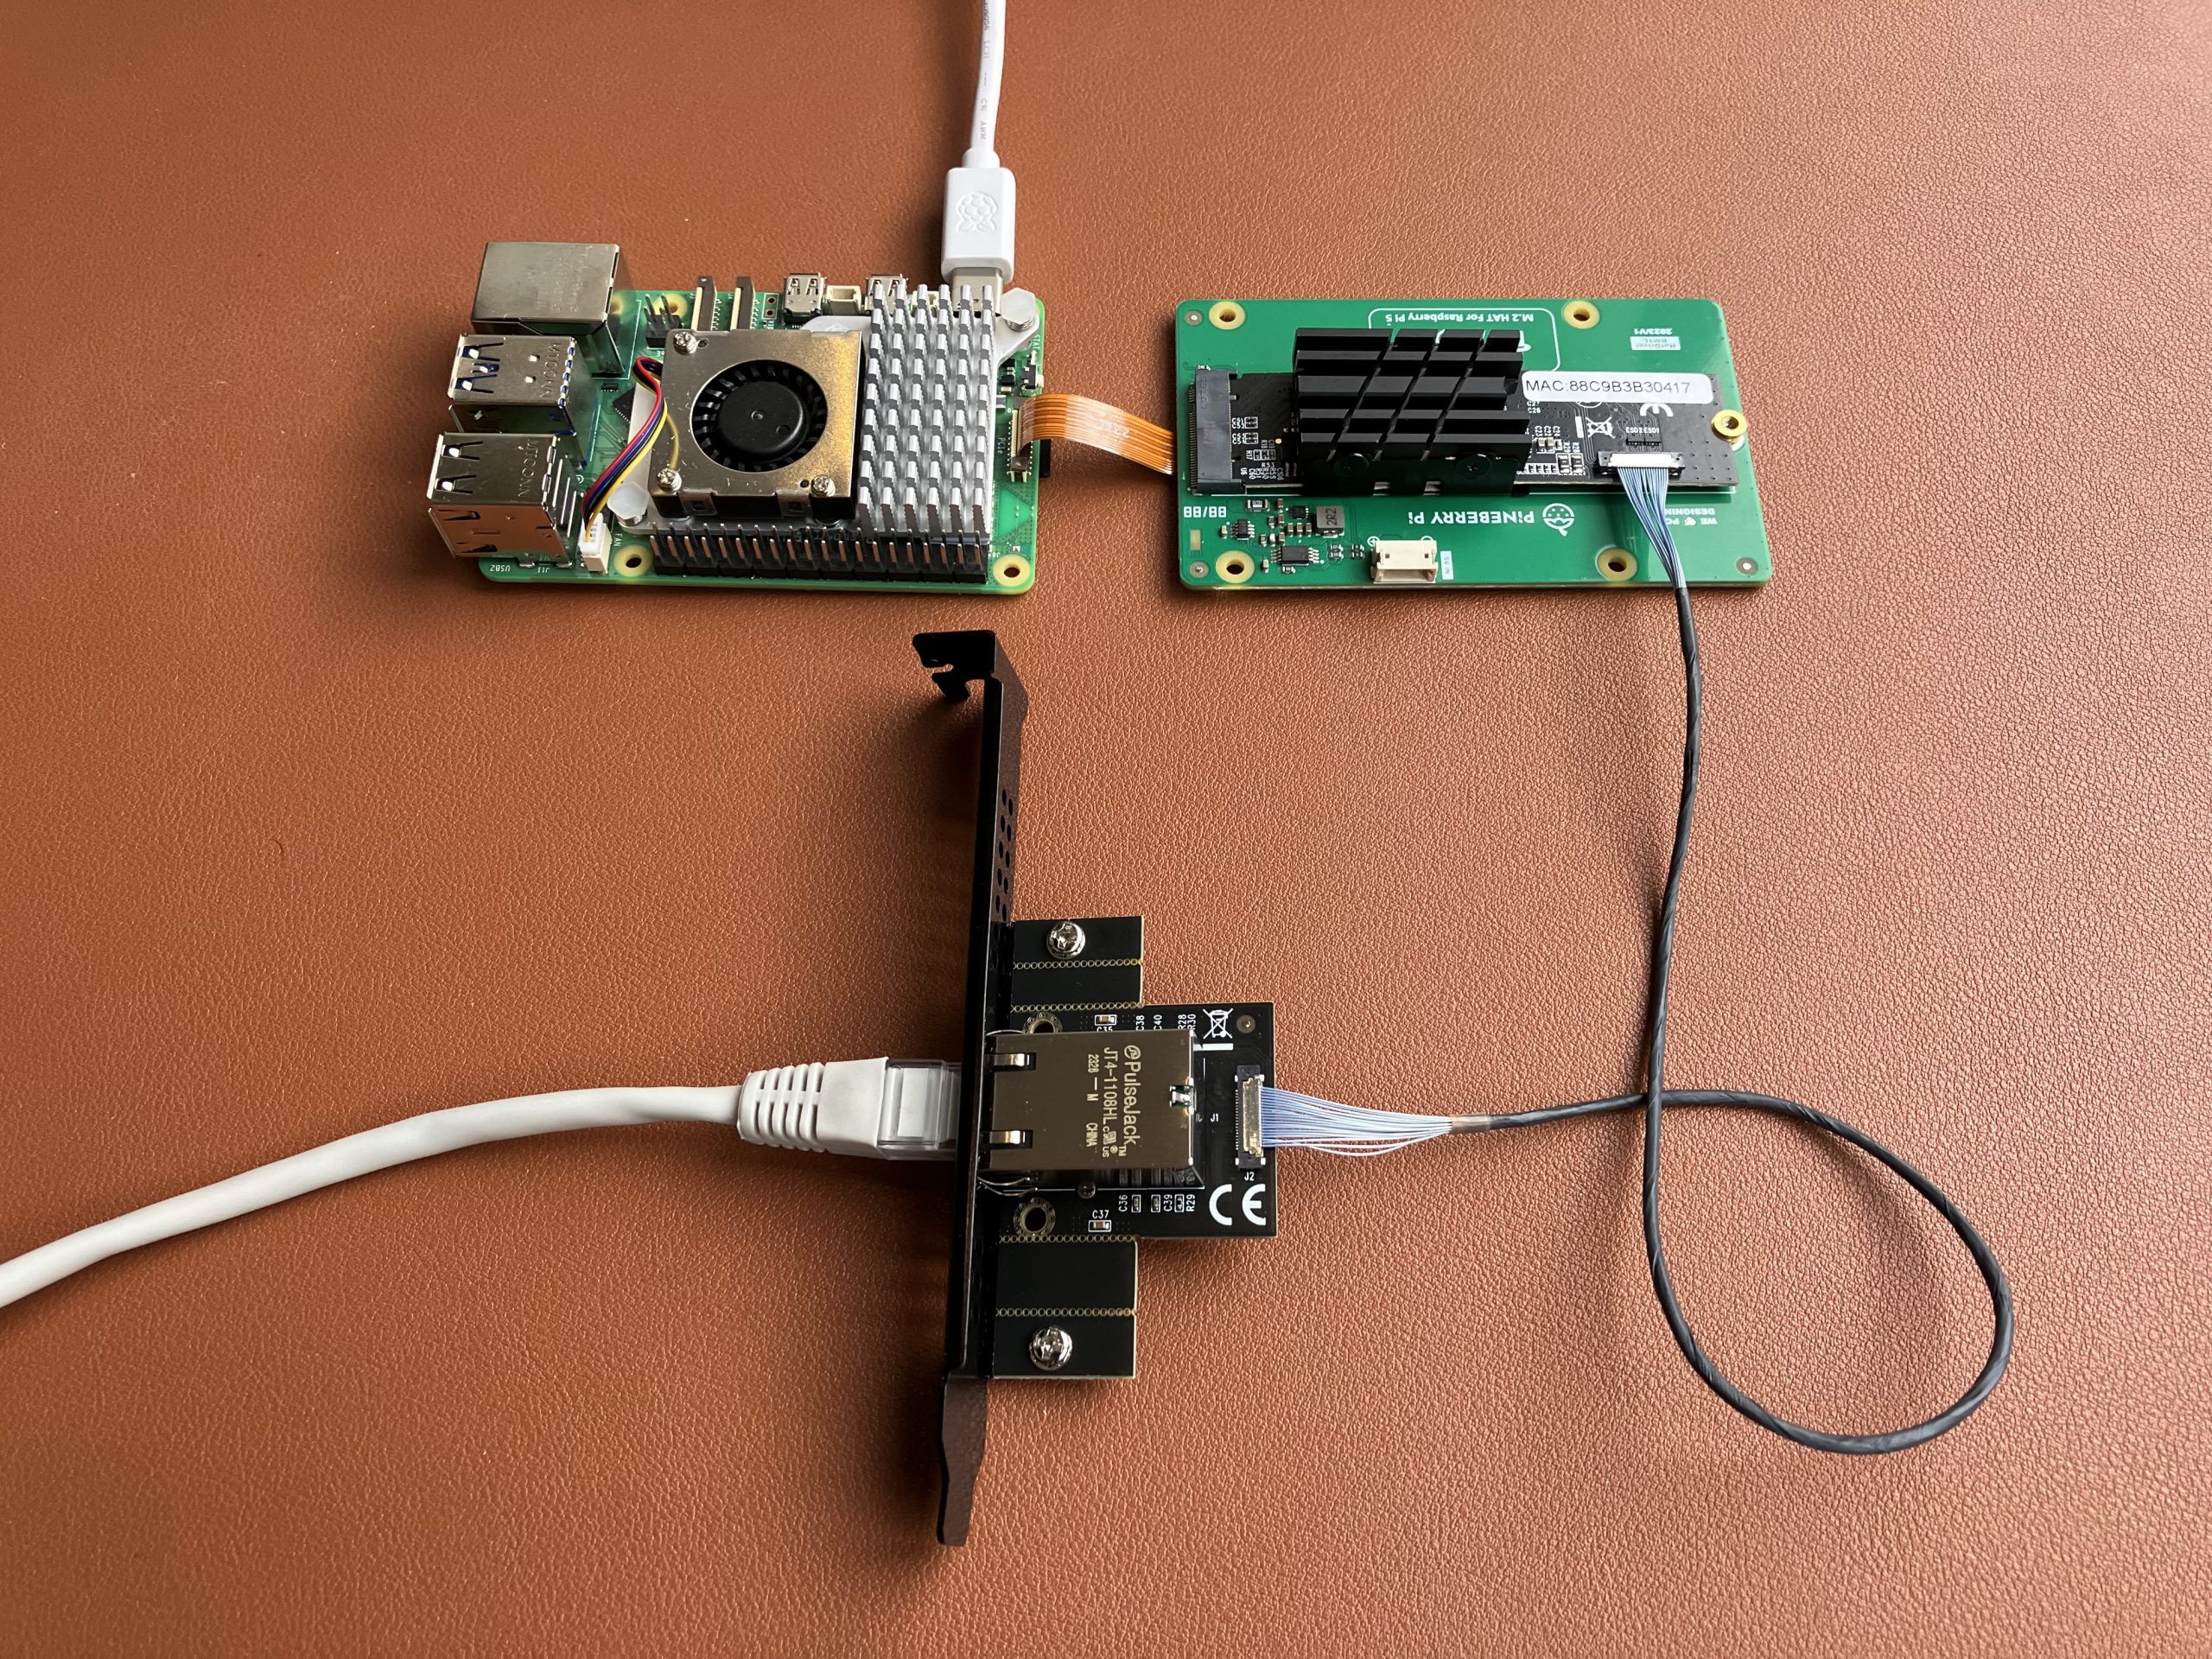
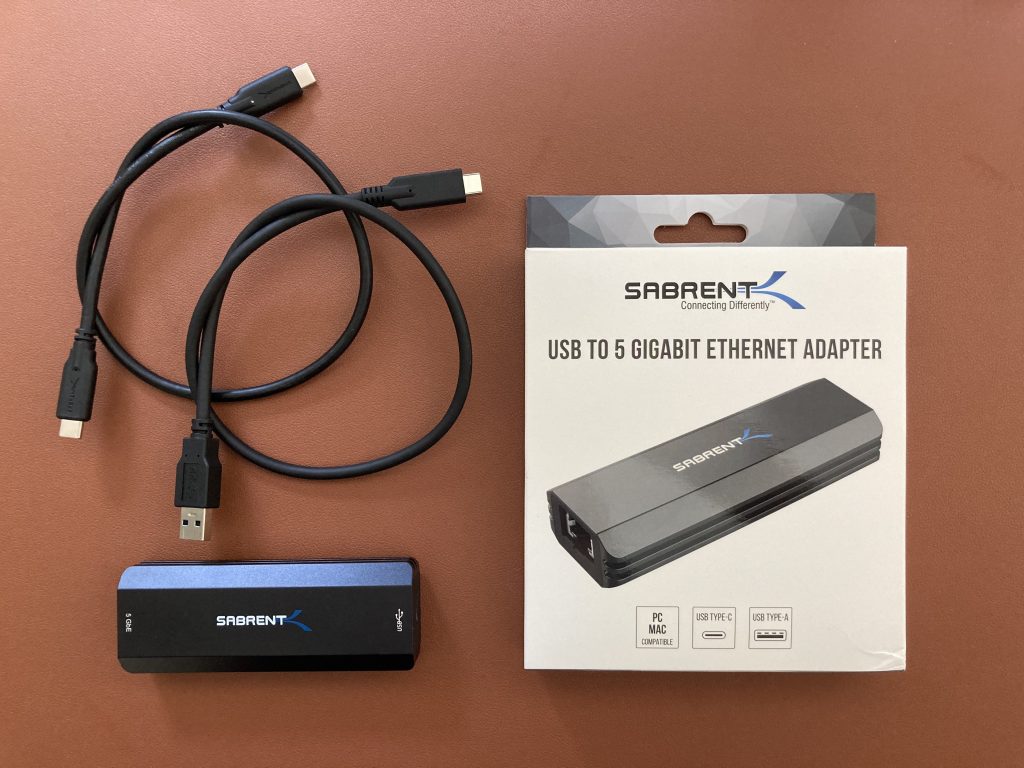
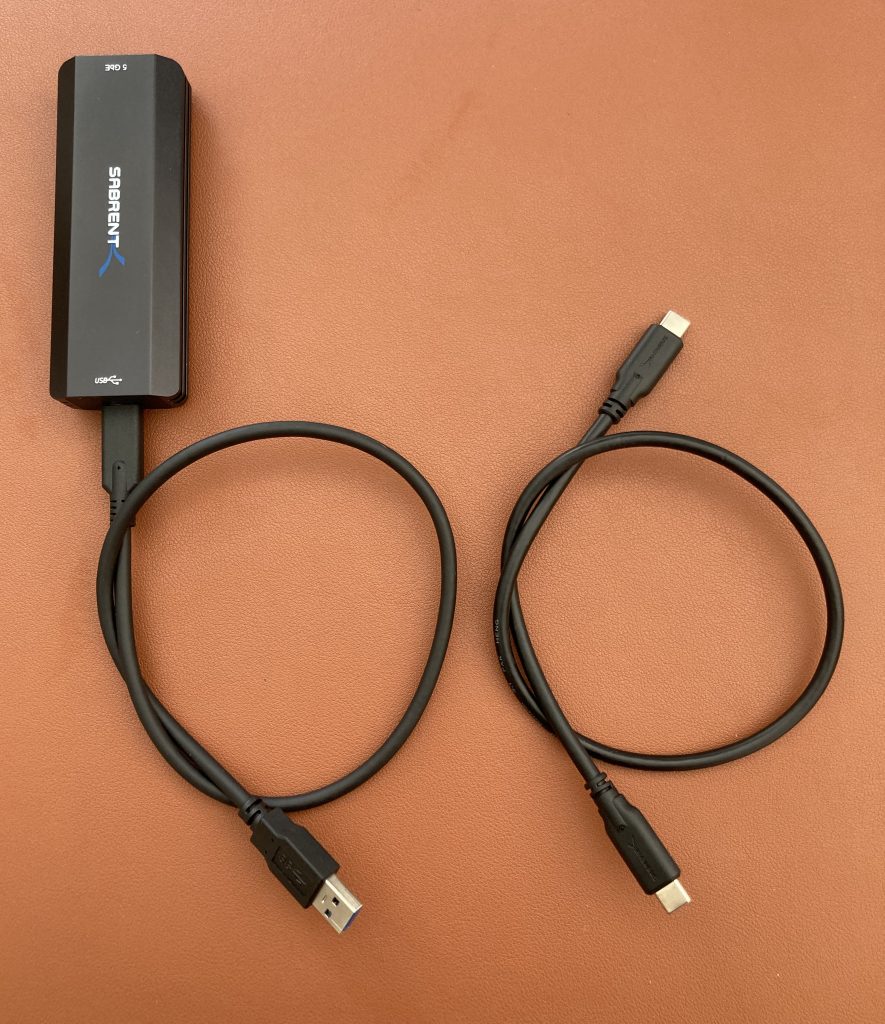
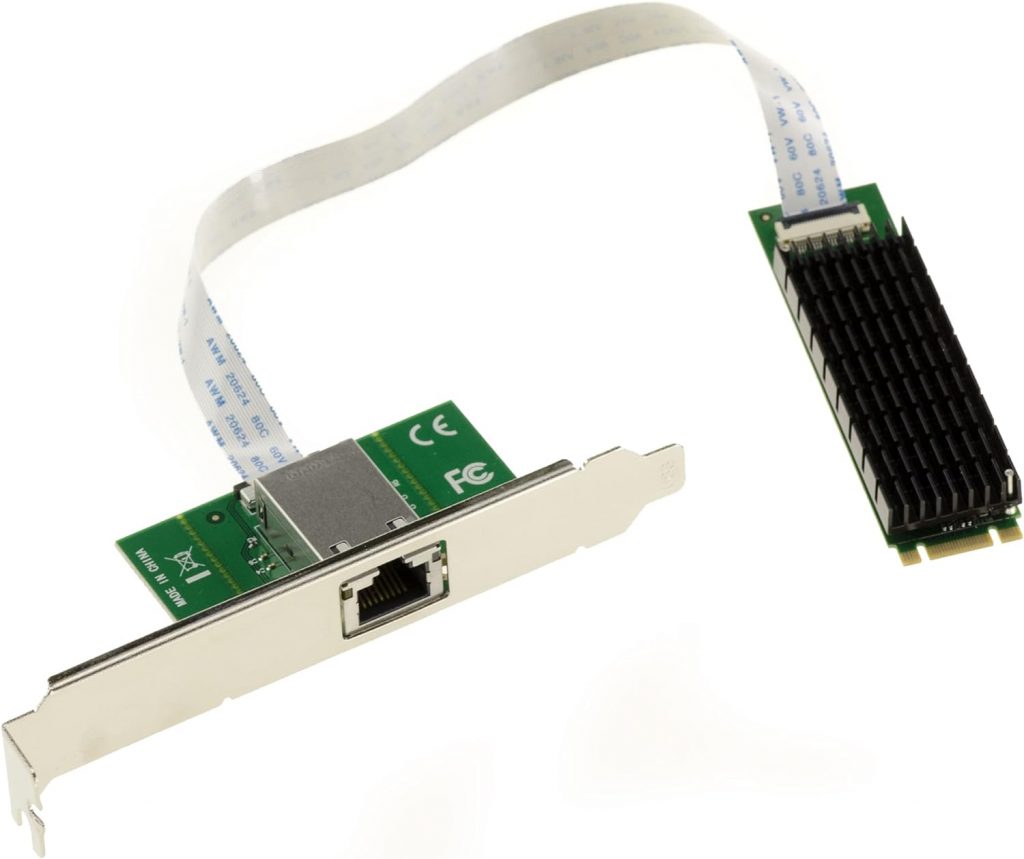
Generic 10 GbE adapter in M.2 form factor

This time we are going to use a slightly different adapter. It is available from various sellers under different names, but they all look and work the same. I picked up one from “KALEA-INFORMATIQUE” which happened to be readily available in the UK.

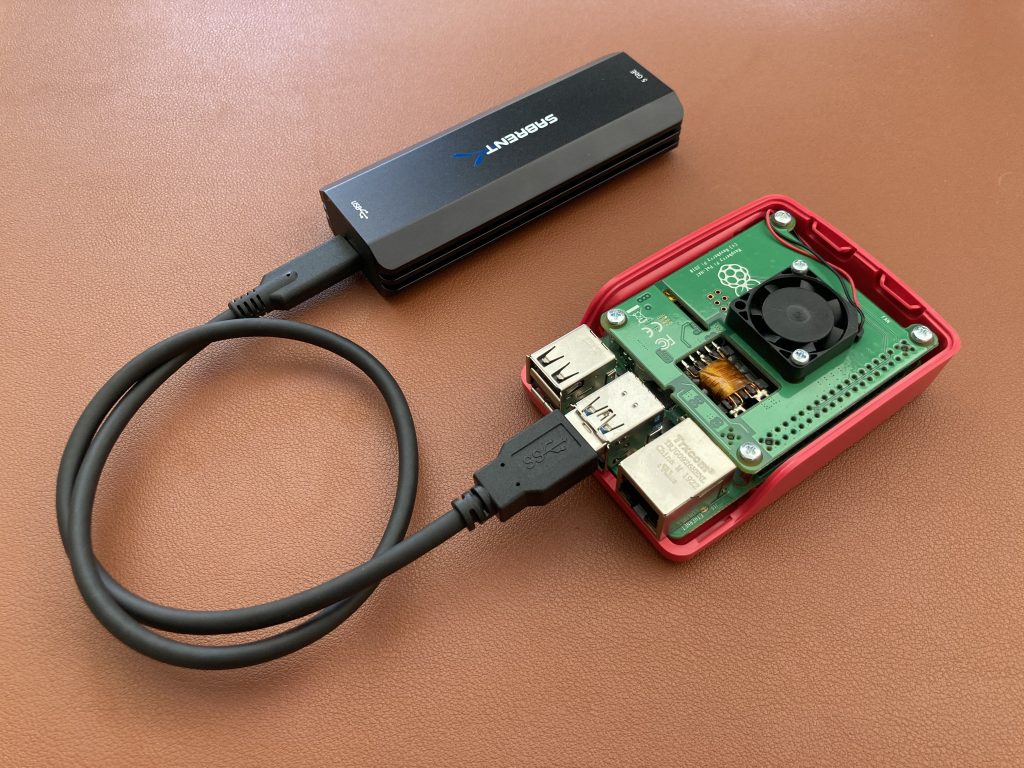
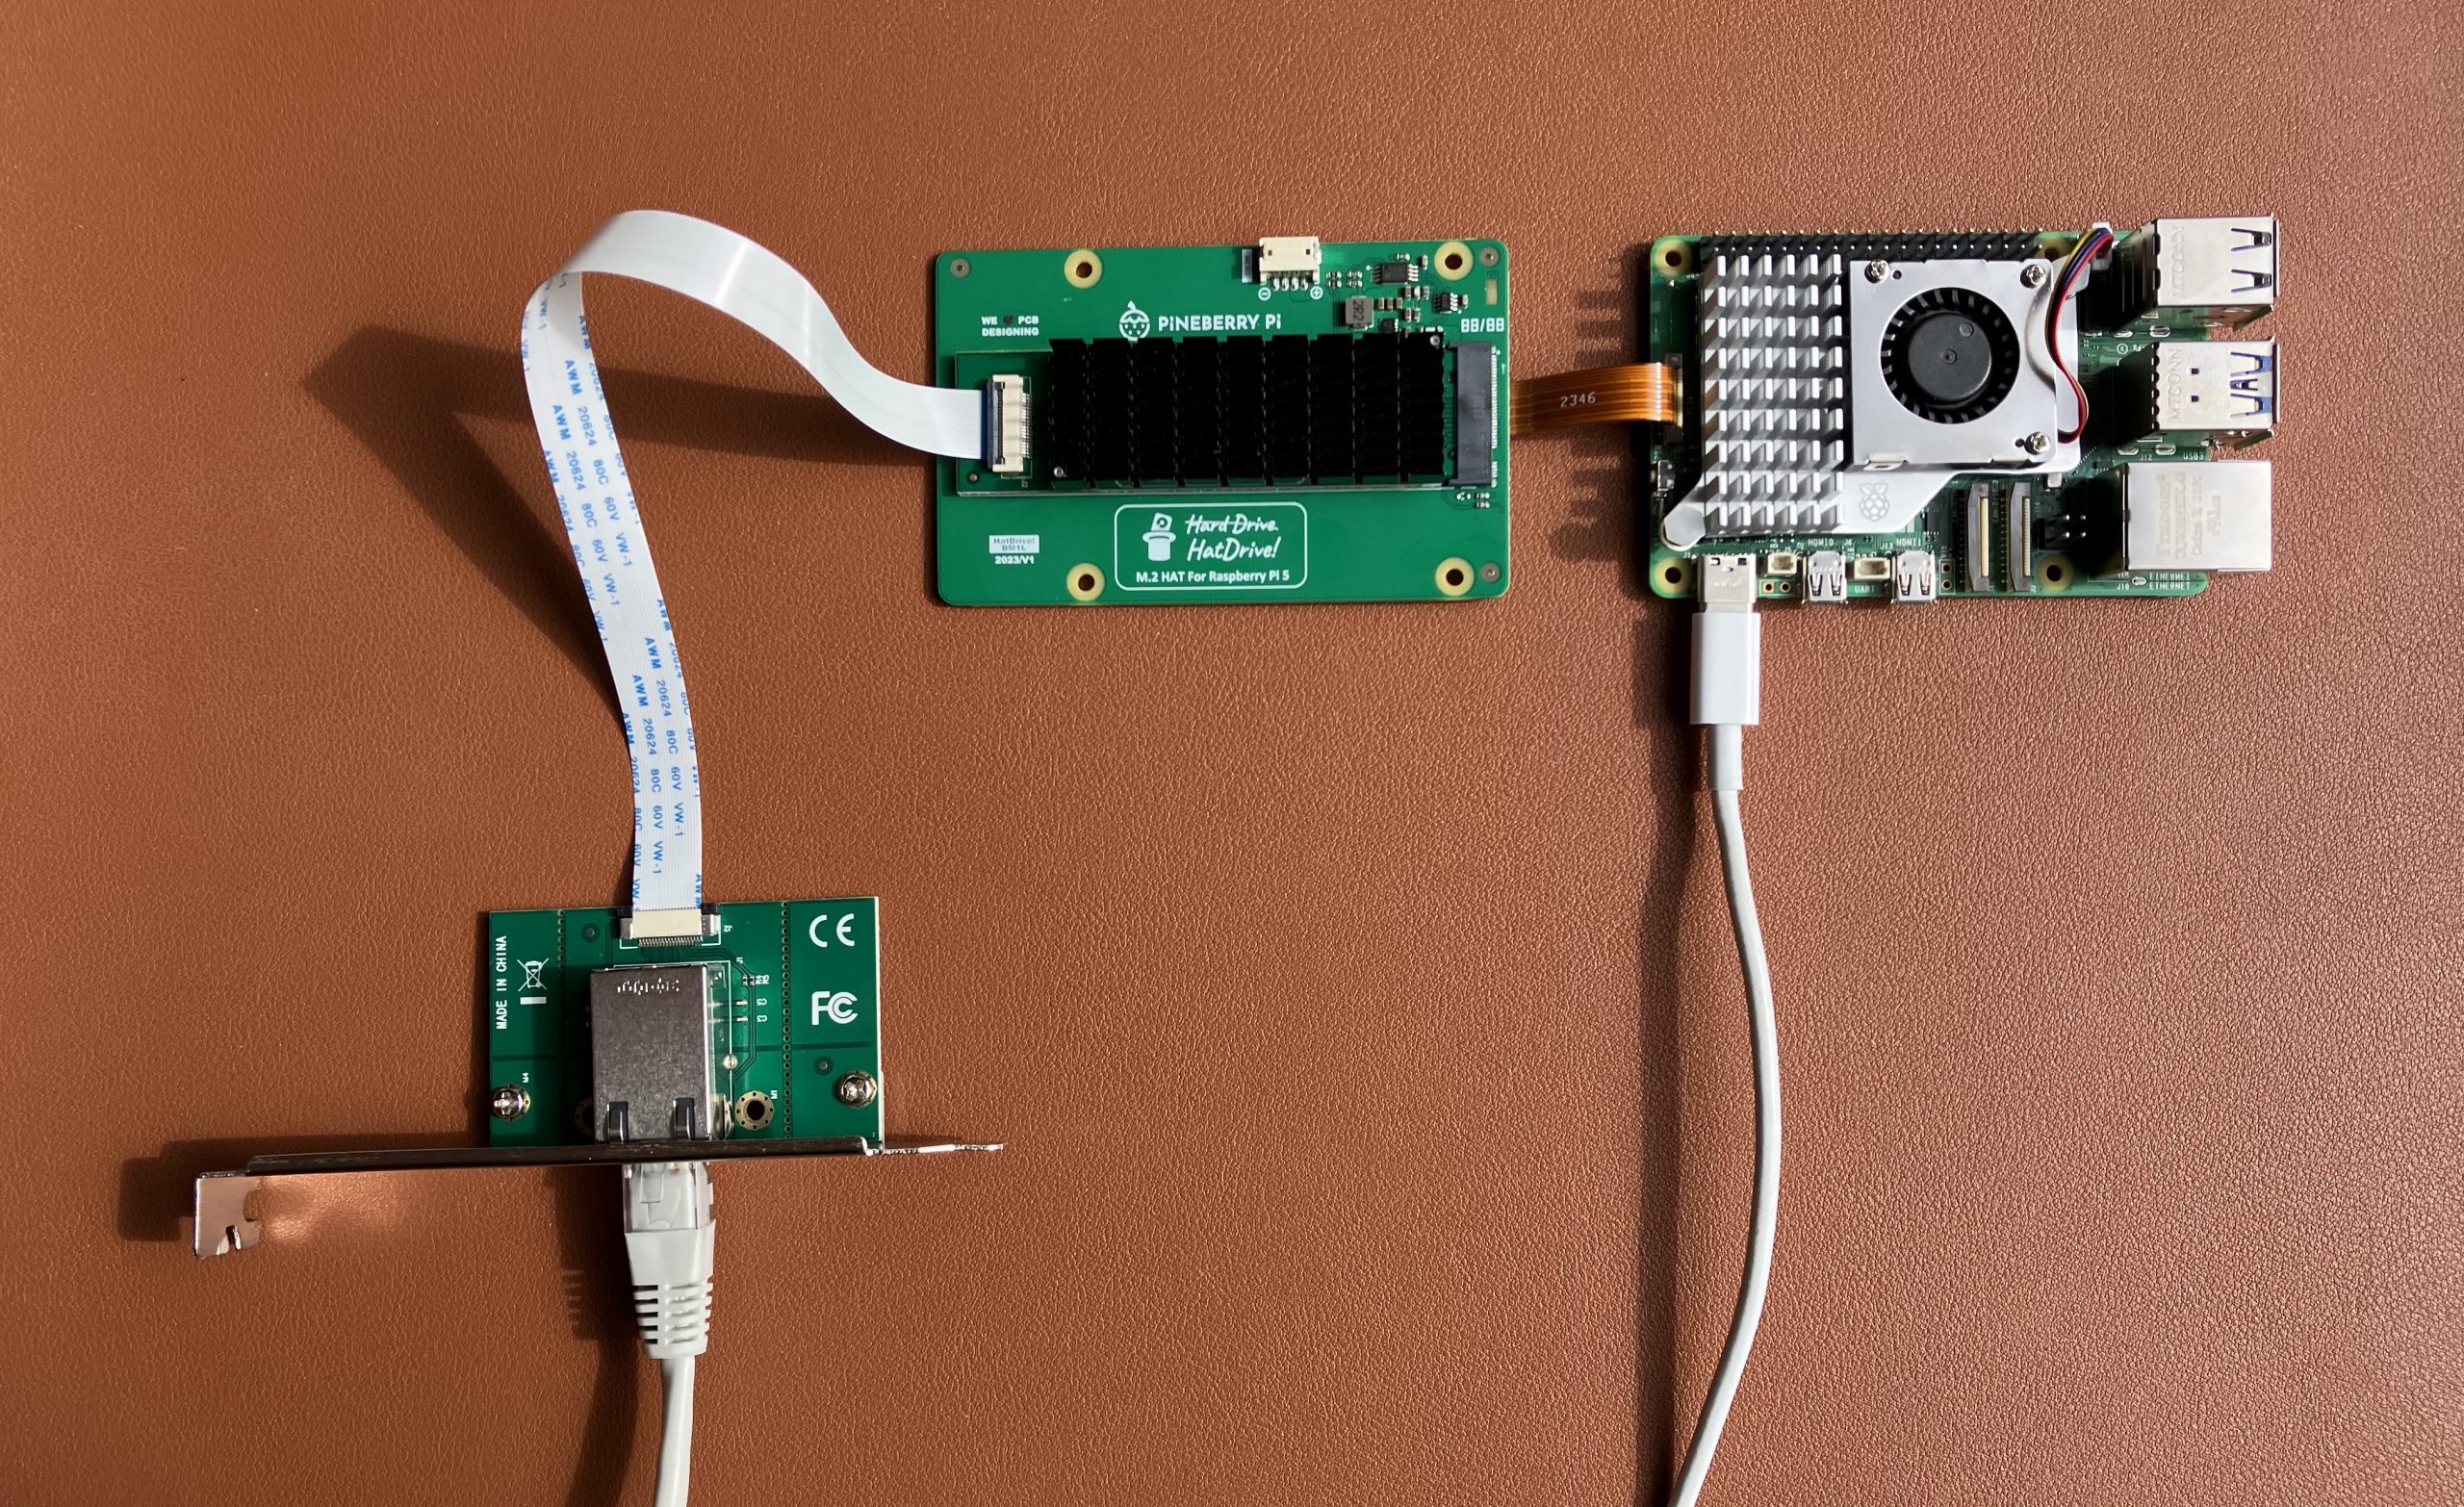
Pineberry’s HatDrive! Bottom breaks out Raspberry Pi’s PCIe connection to M.2 M-key format, and that’s where this 10 Gigabit Ethernet adapter plugs into.

Raspberry Pi 5 with 10 GbE adapter

Detail of the Ethernet adapter

Build custom kernel with AQC107 support

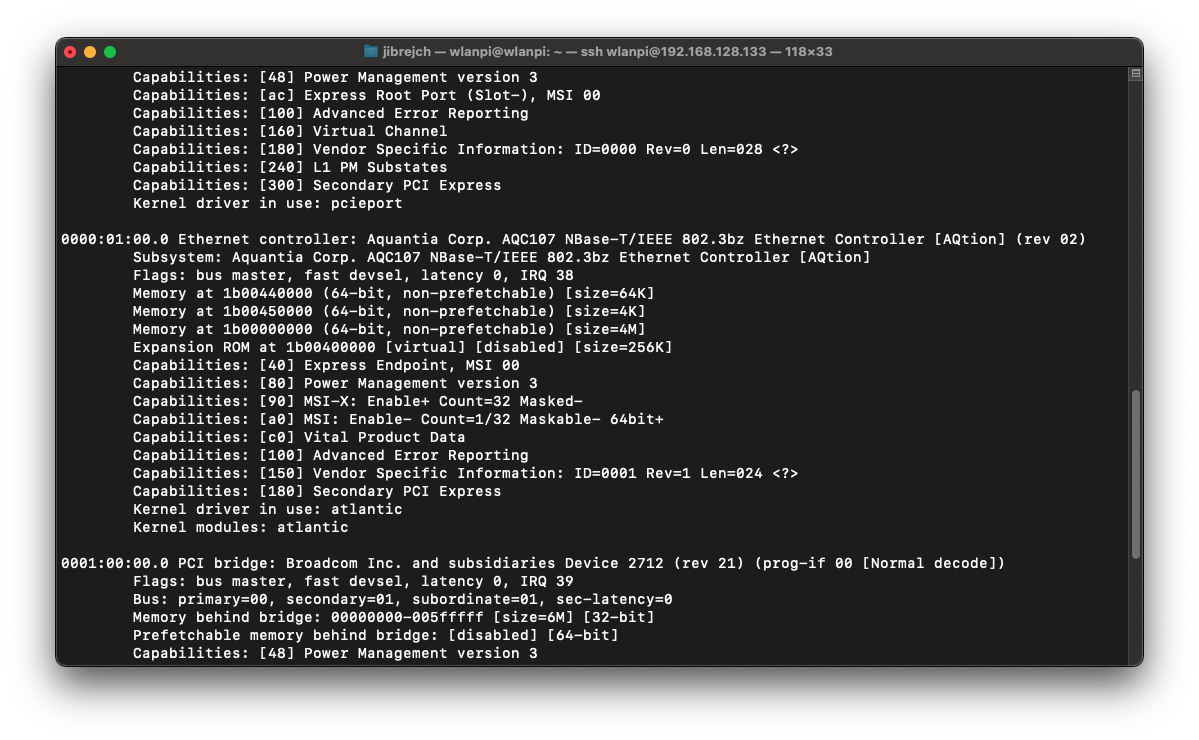
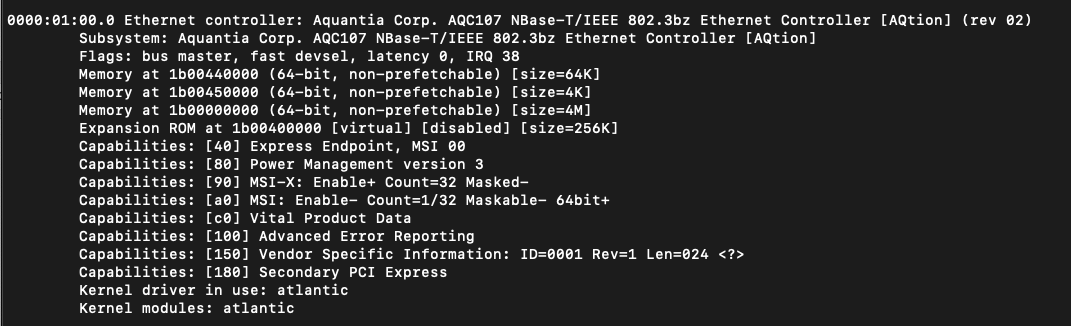
This Ethernet adapter uses the same chip and driver the one we previously tested. Here are the steps to make compile a custom Linux kernel that supports the adapter.

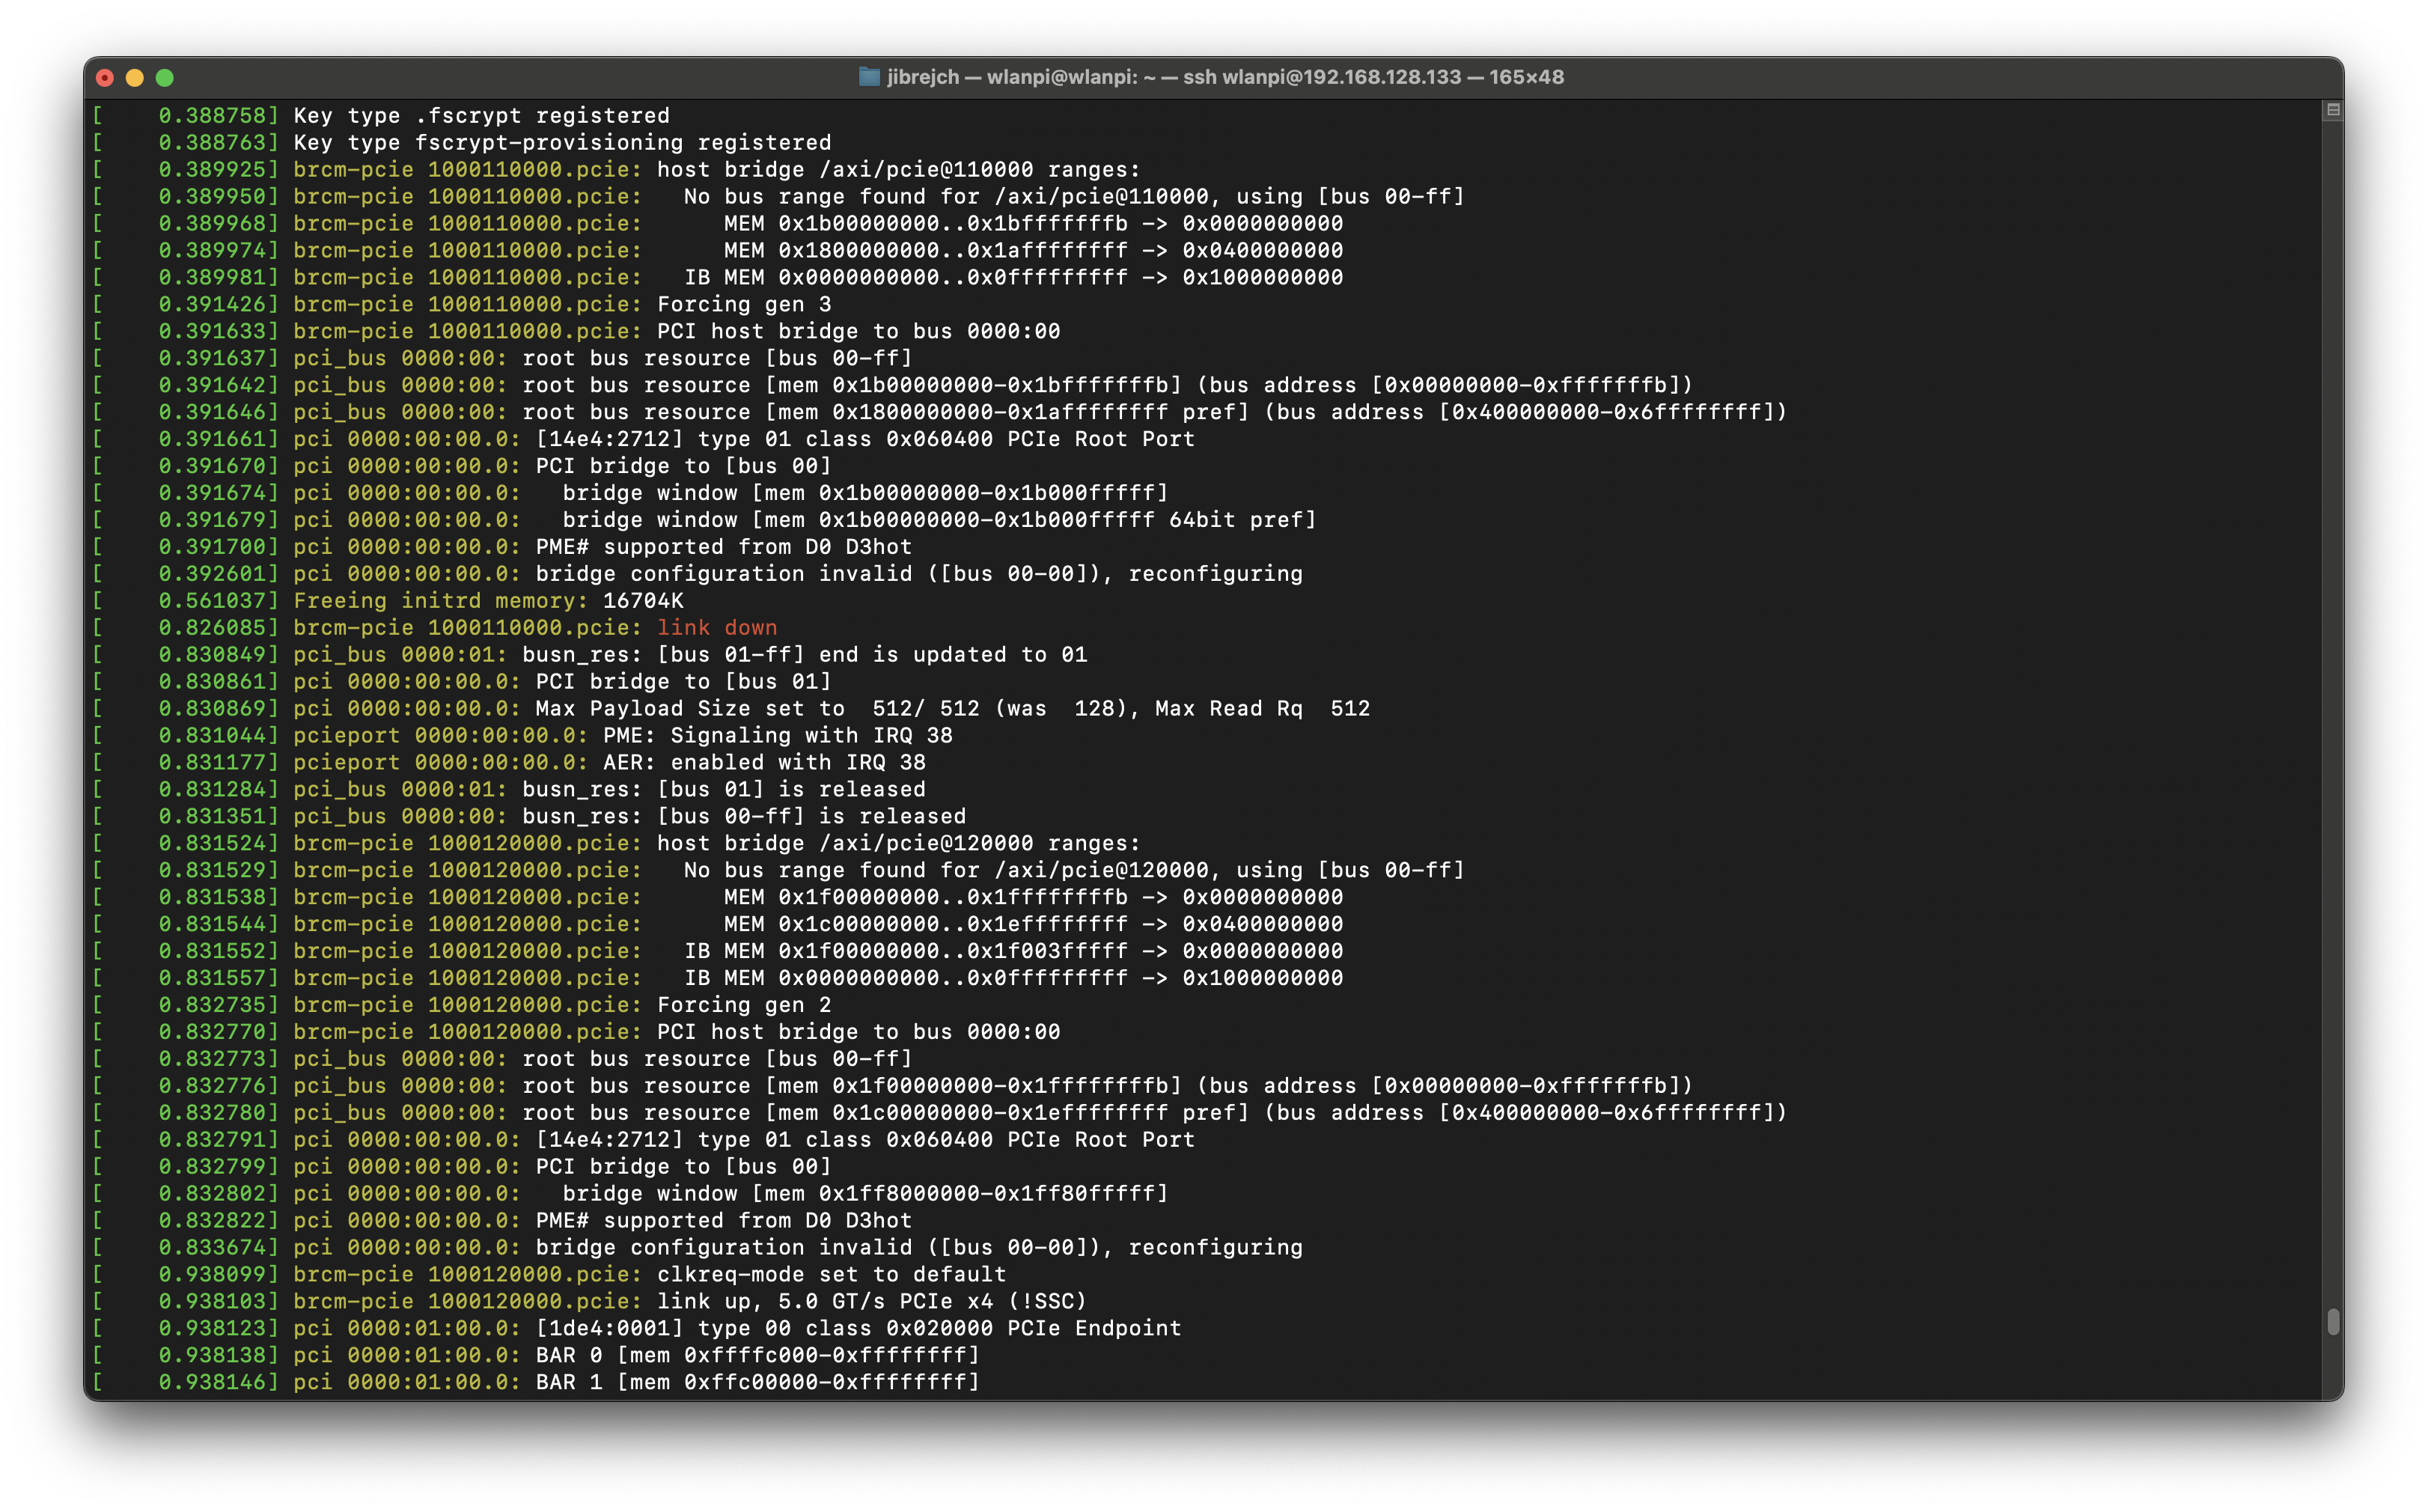
Wait, why is it still not working?

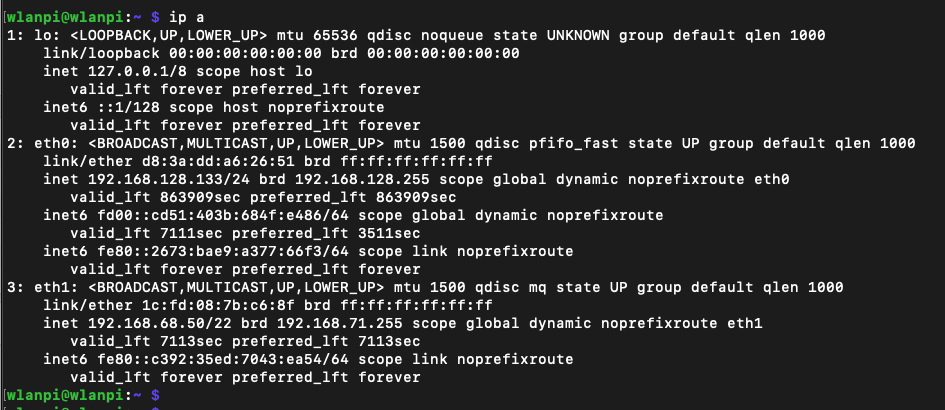
We have connected everything, built a custom kernel, we can see the device, but the Ethernet interface is not coming up.

lspci
lspci -v output

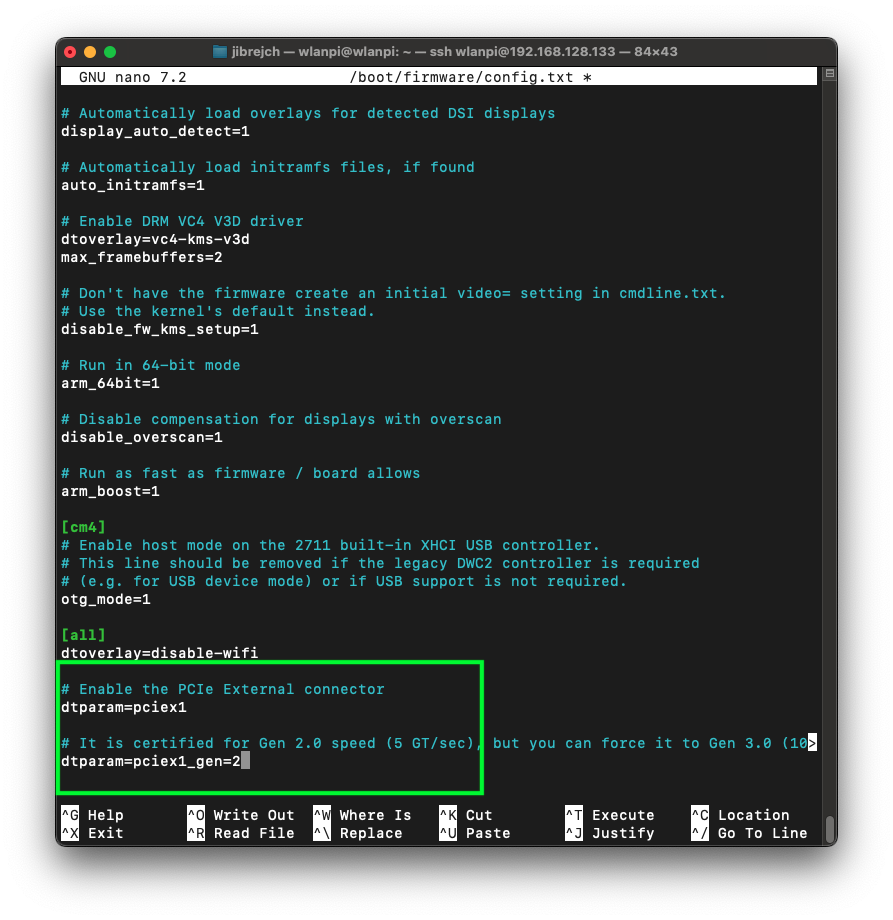
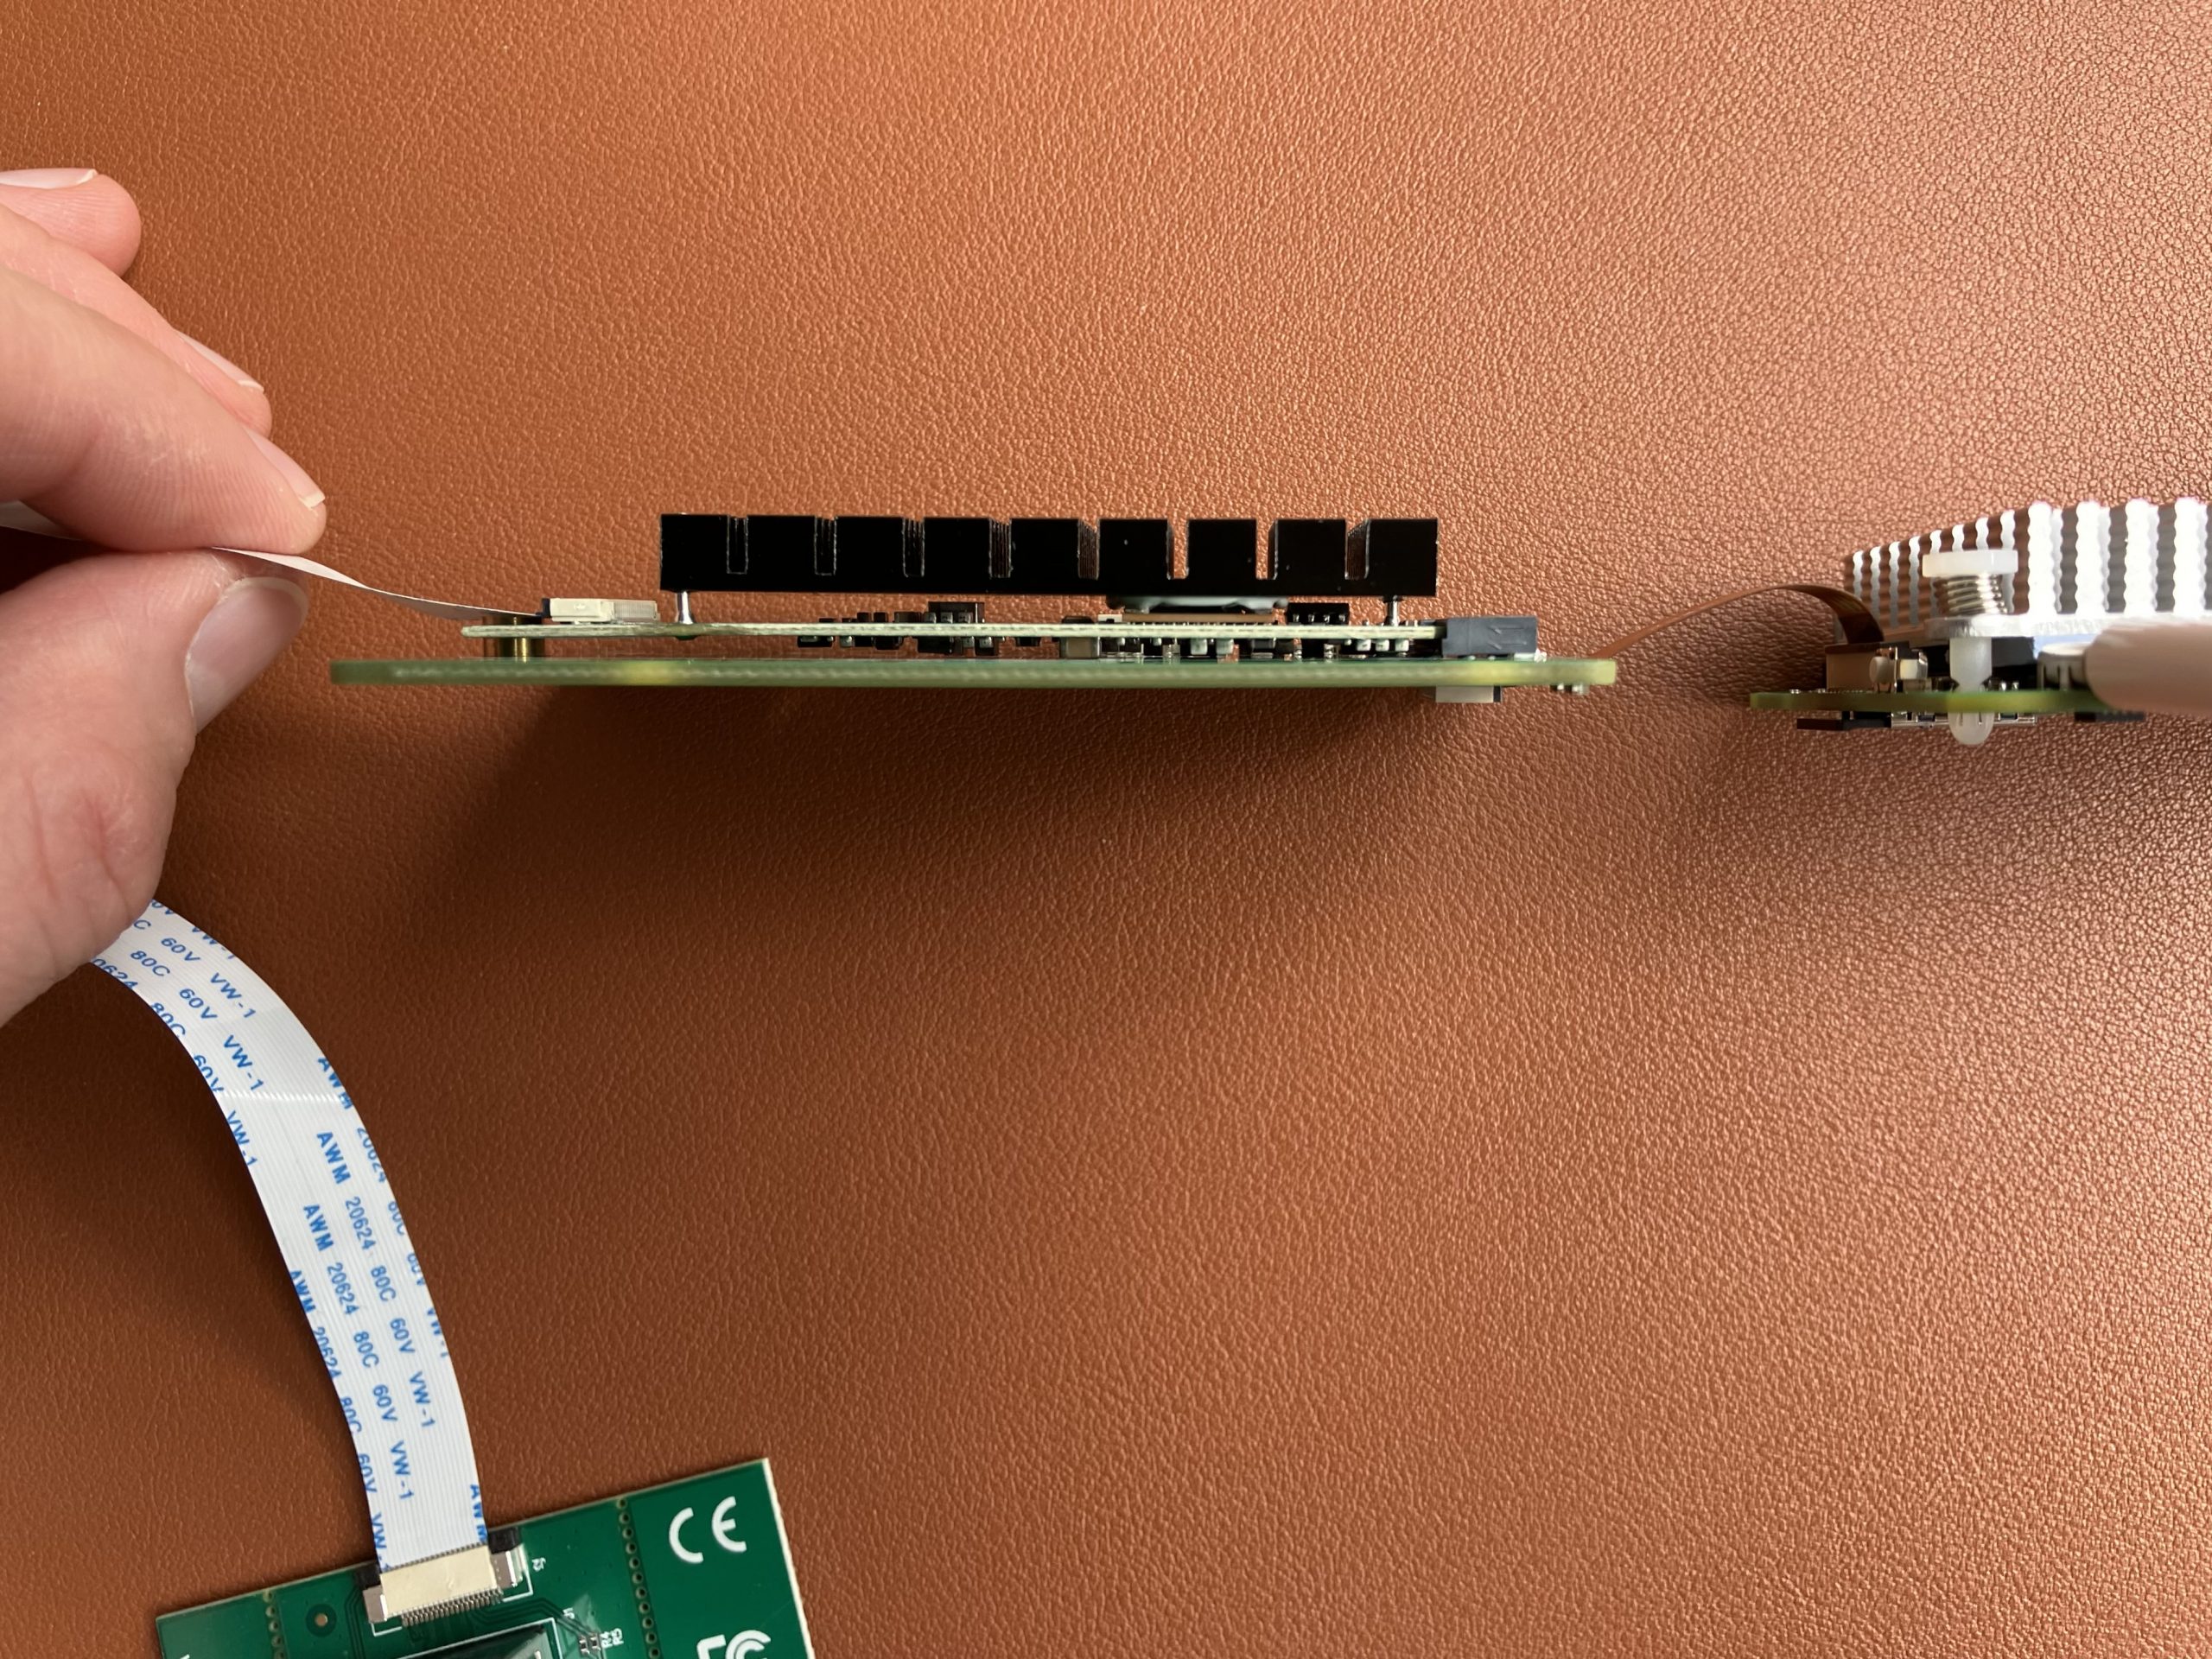
Look at this official product photo and my photo below. Spot one difference 😉

The official product photo

The actual correct setup

Did you notice the orientation of the white ribbon cable? The official photo got it wrong. The printed text on the cable needs to be on the top on one side, and on the bottom on the other one.

The eth1 interface and its IP details

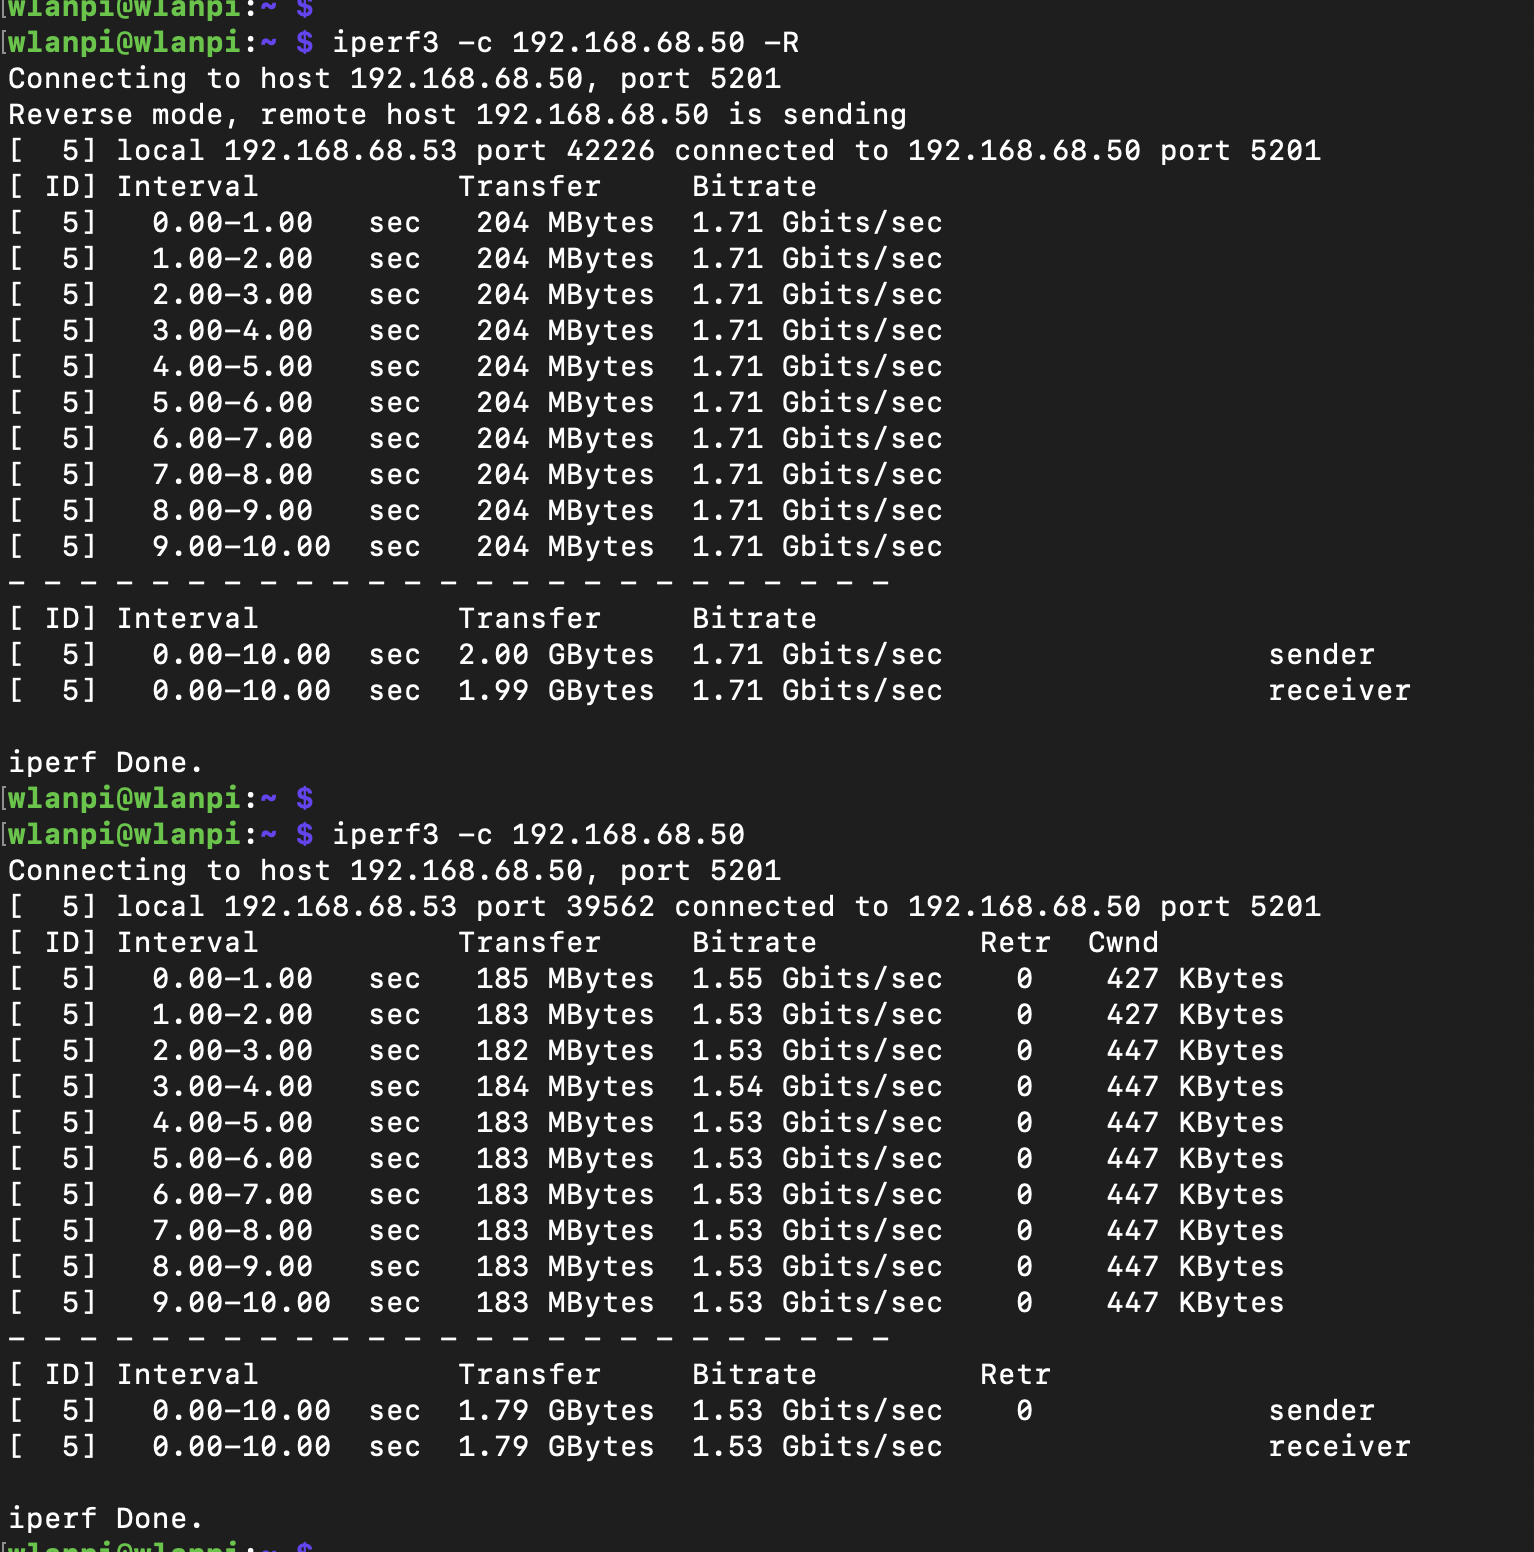
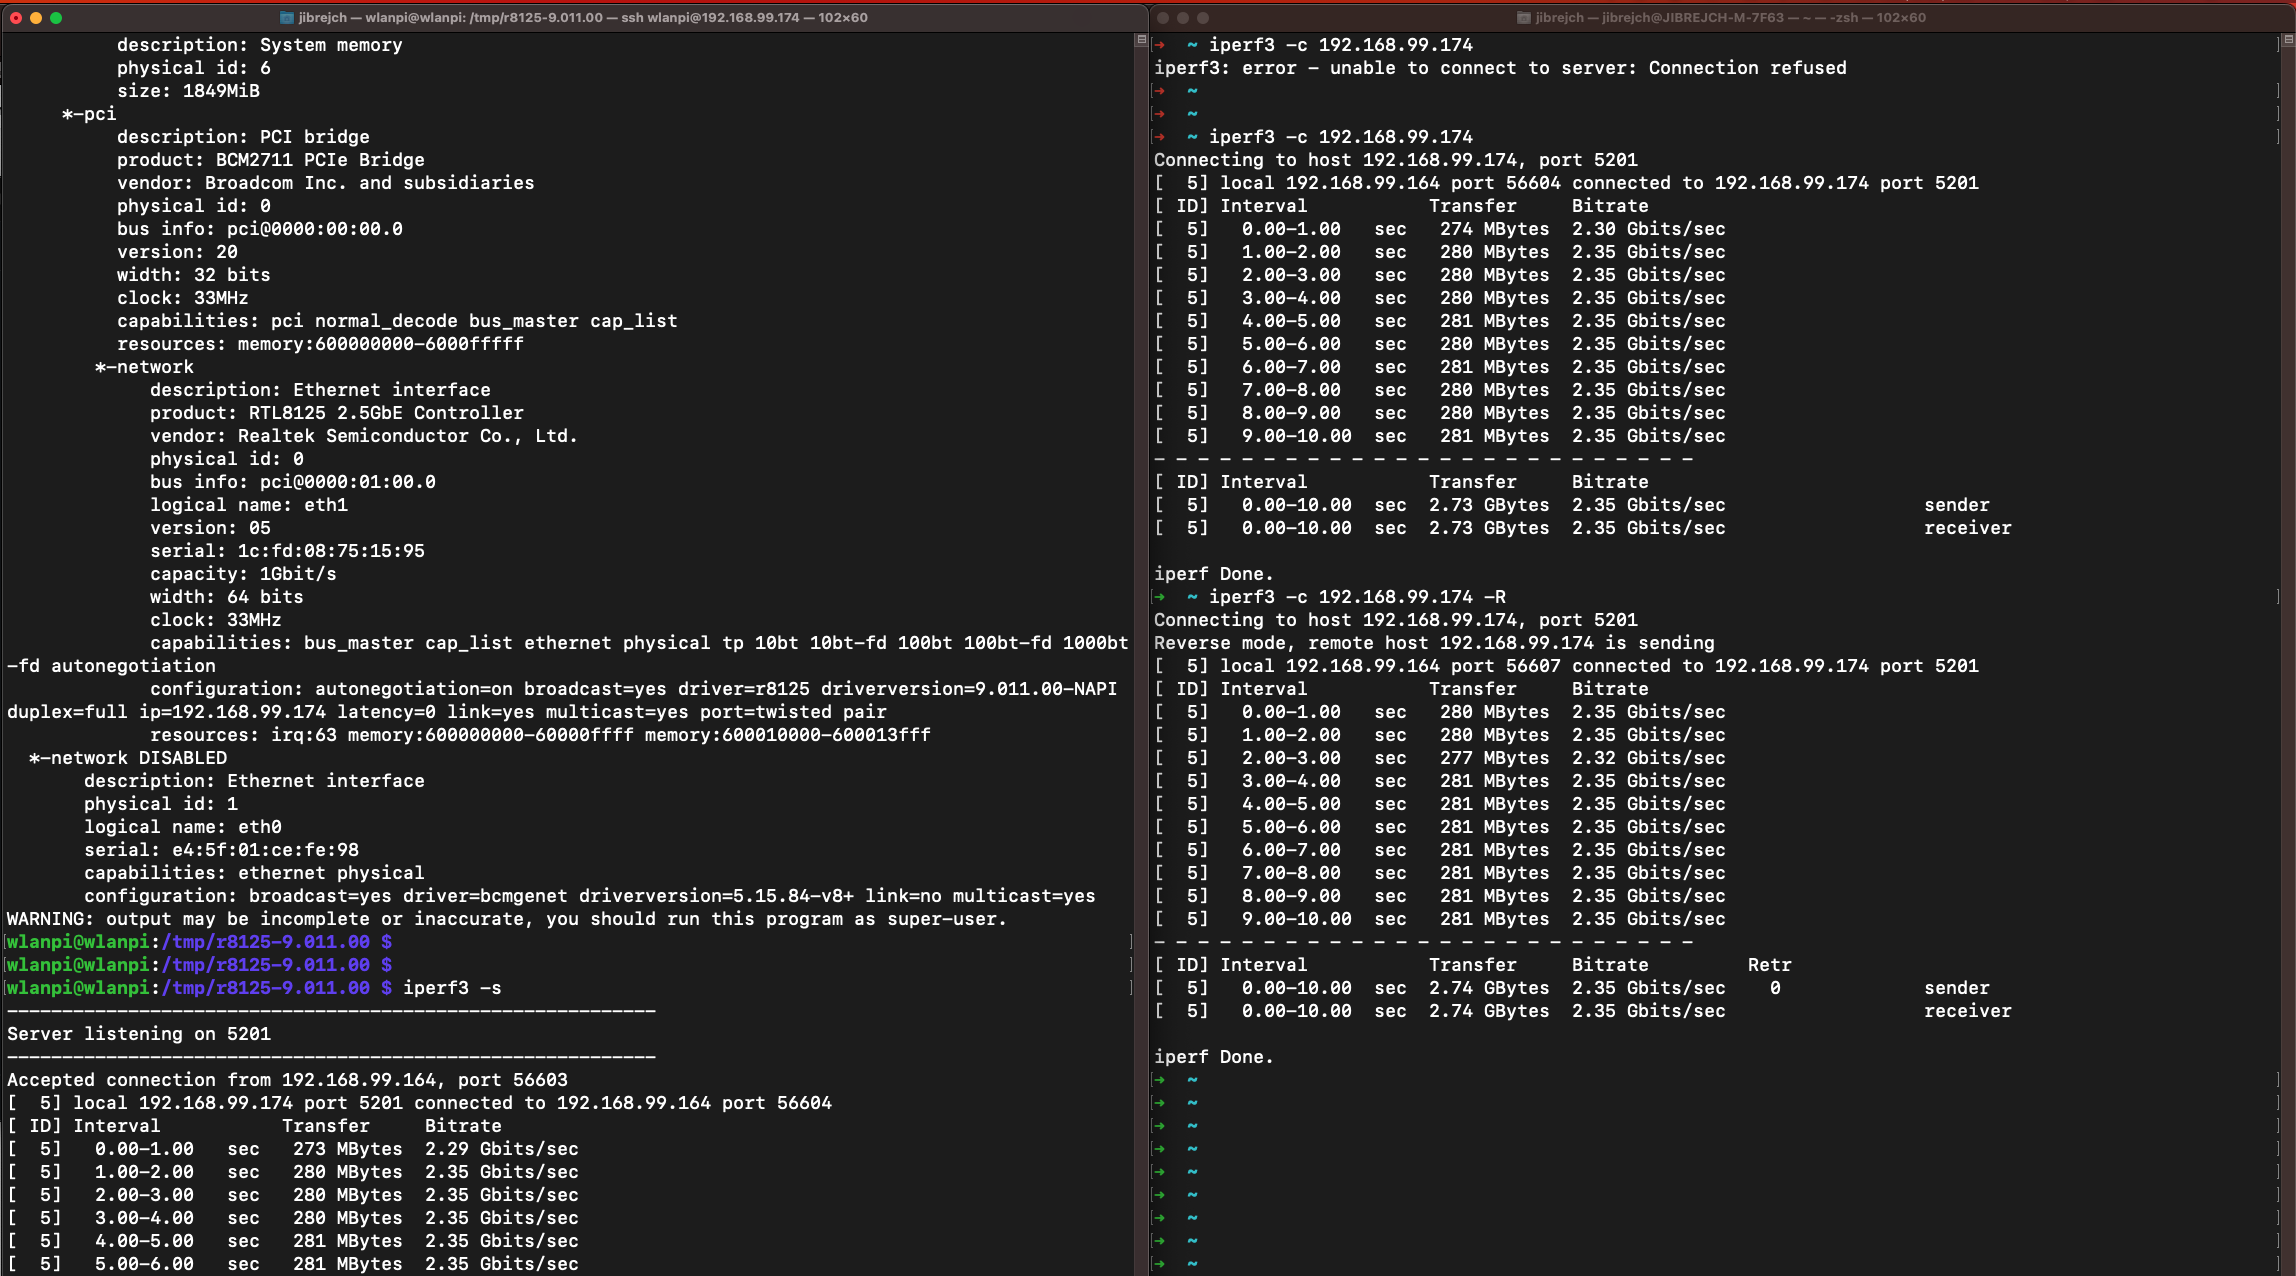
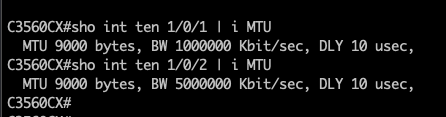
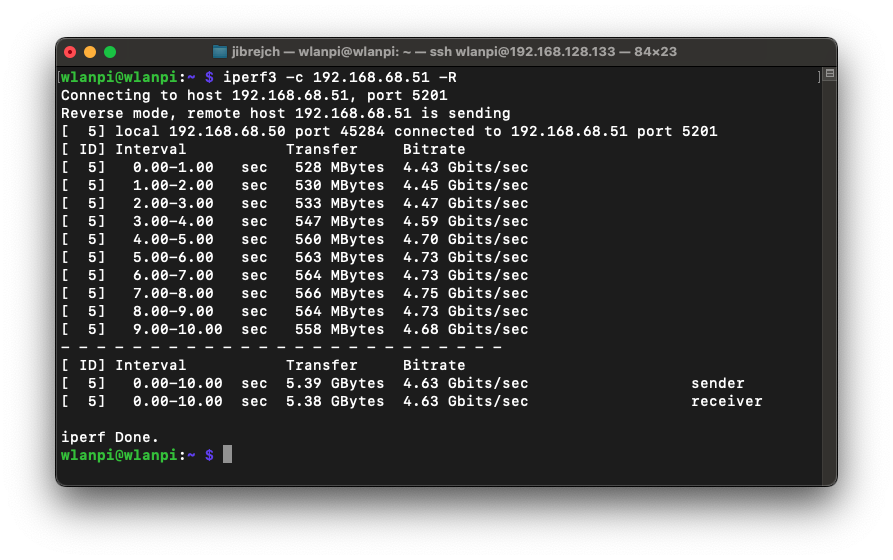
What speeds did you get in PCIe Gen 2 mode?

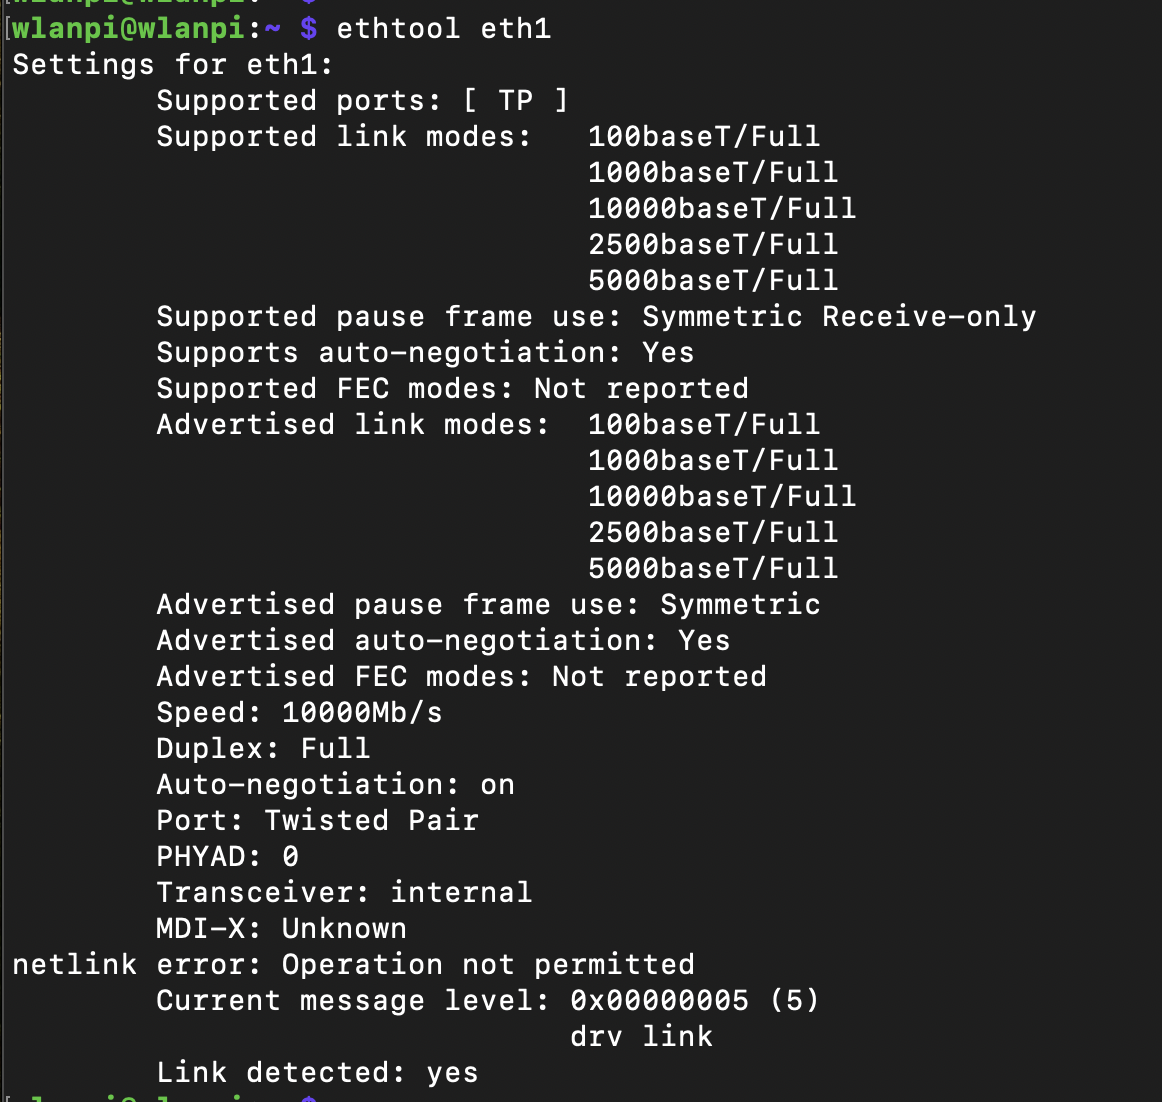
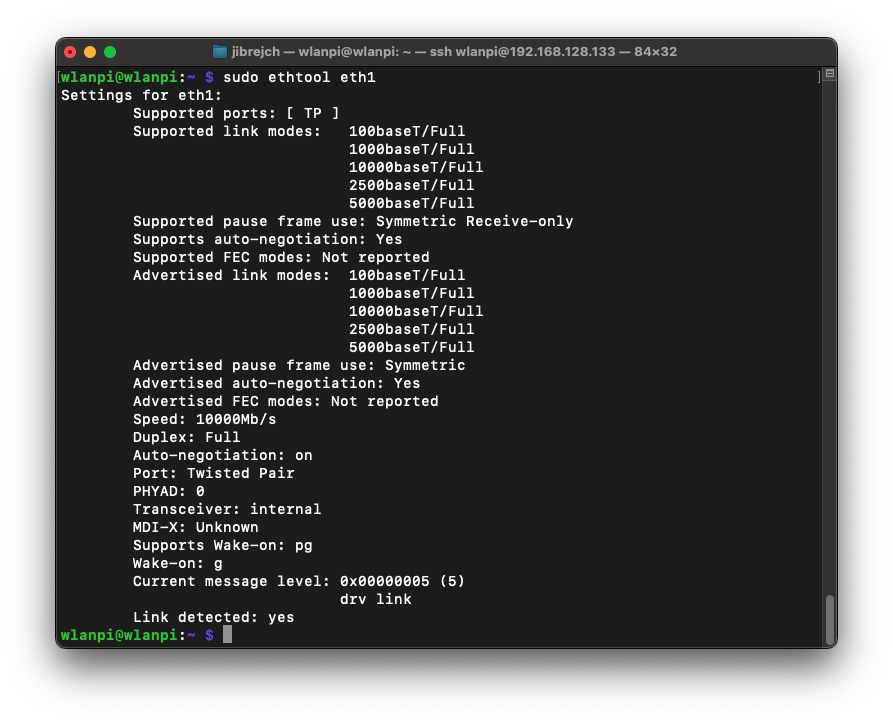
After correcting the orientation of the flexible cable, the interface came up, negotiated 10 Gbps full duplex.

10 Gbps full

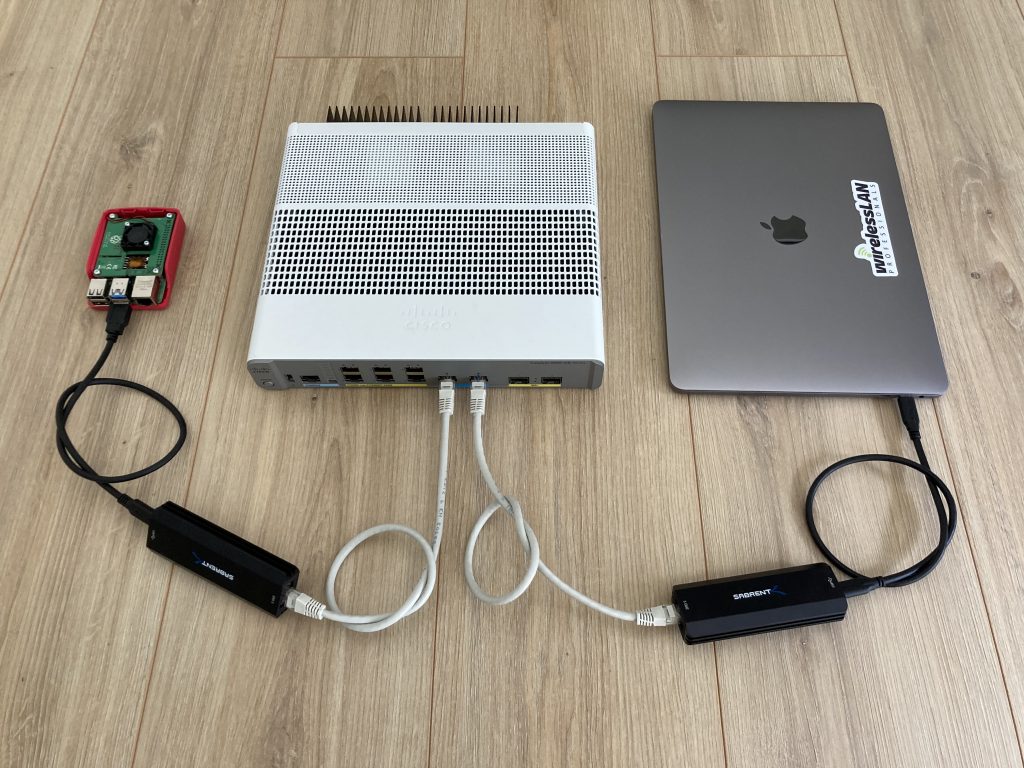
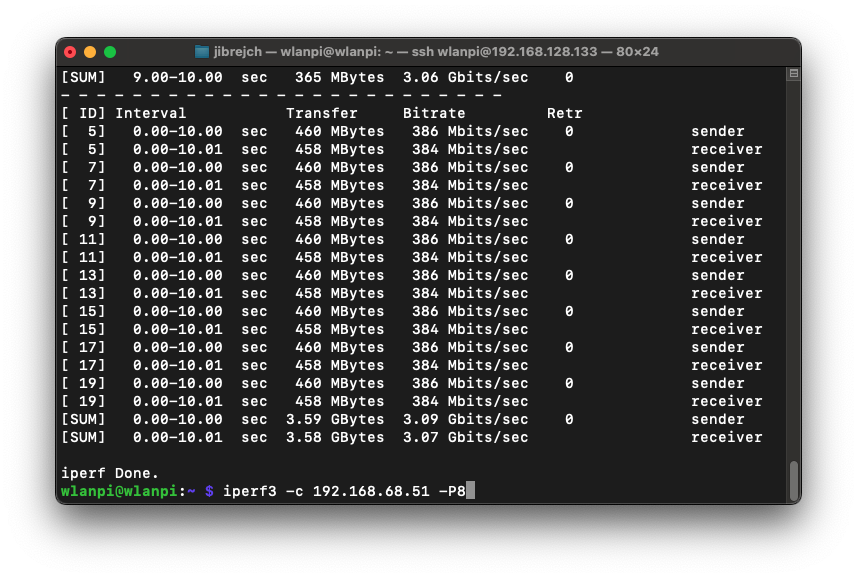
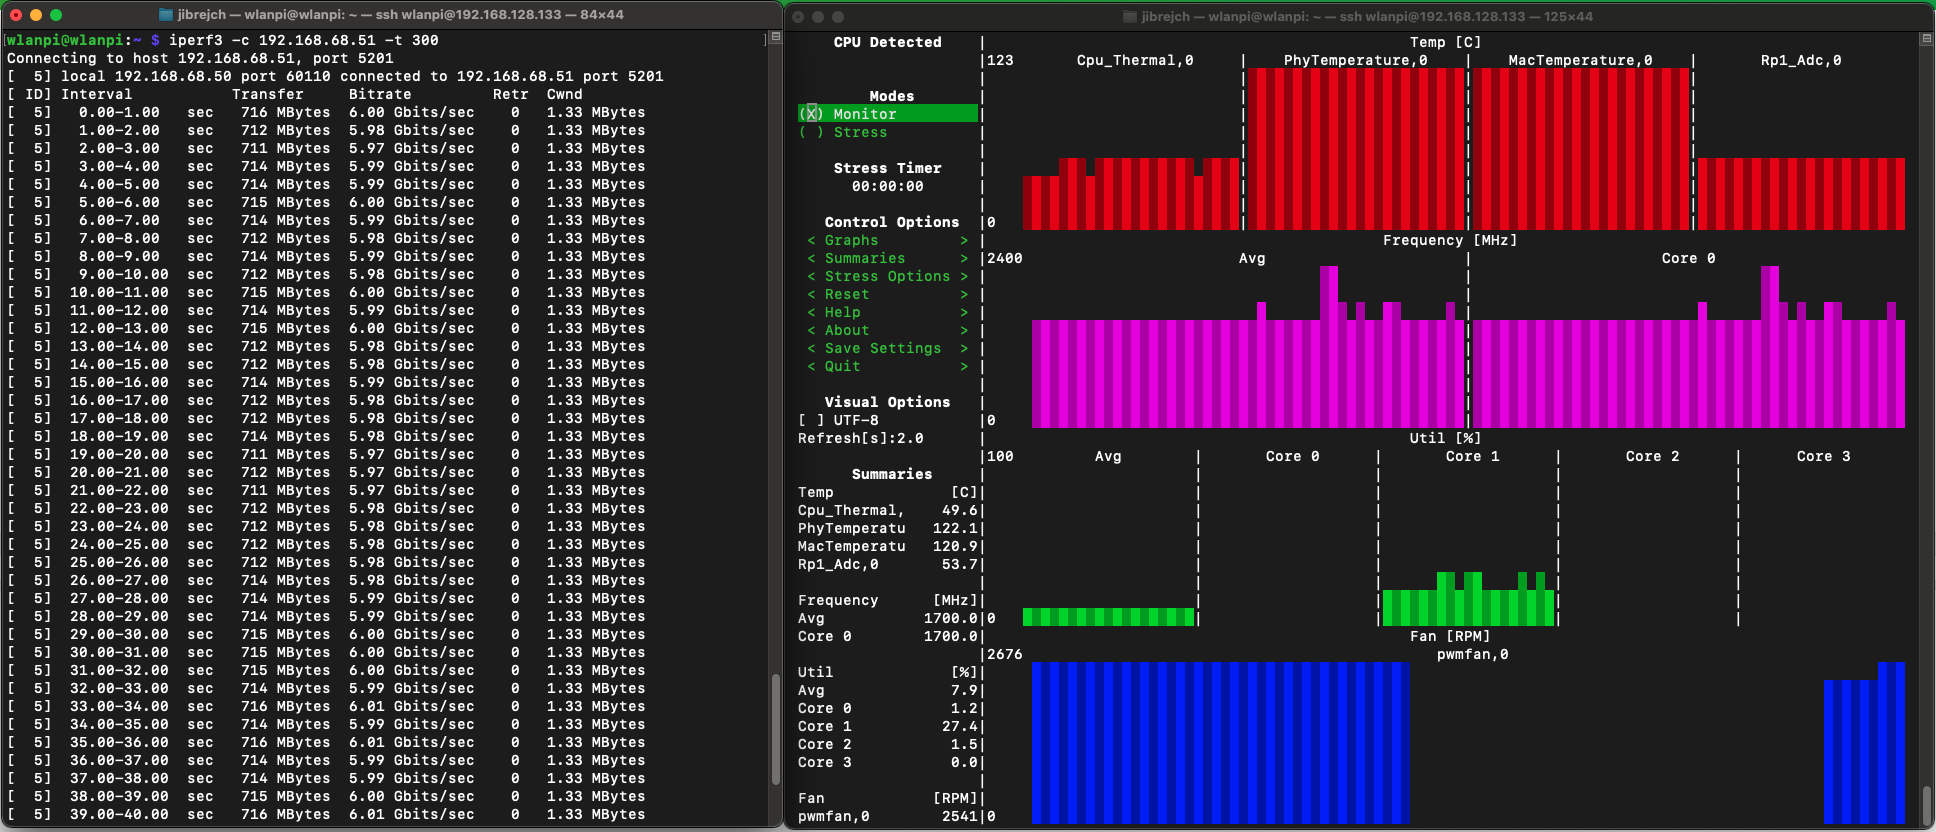
I started throughput testing against MacBook with my trusty 10 GbE Thunderbolt adapter.

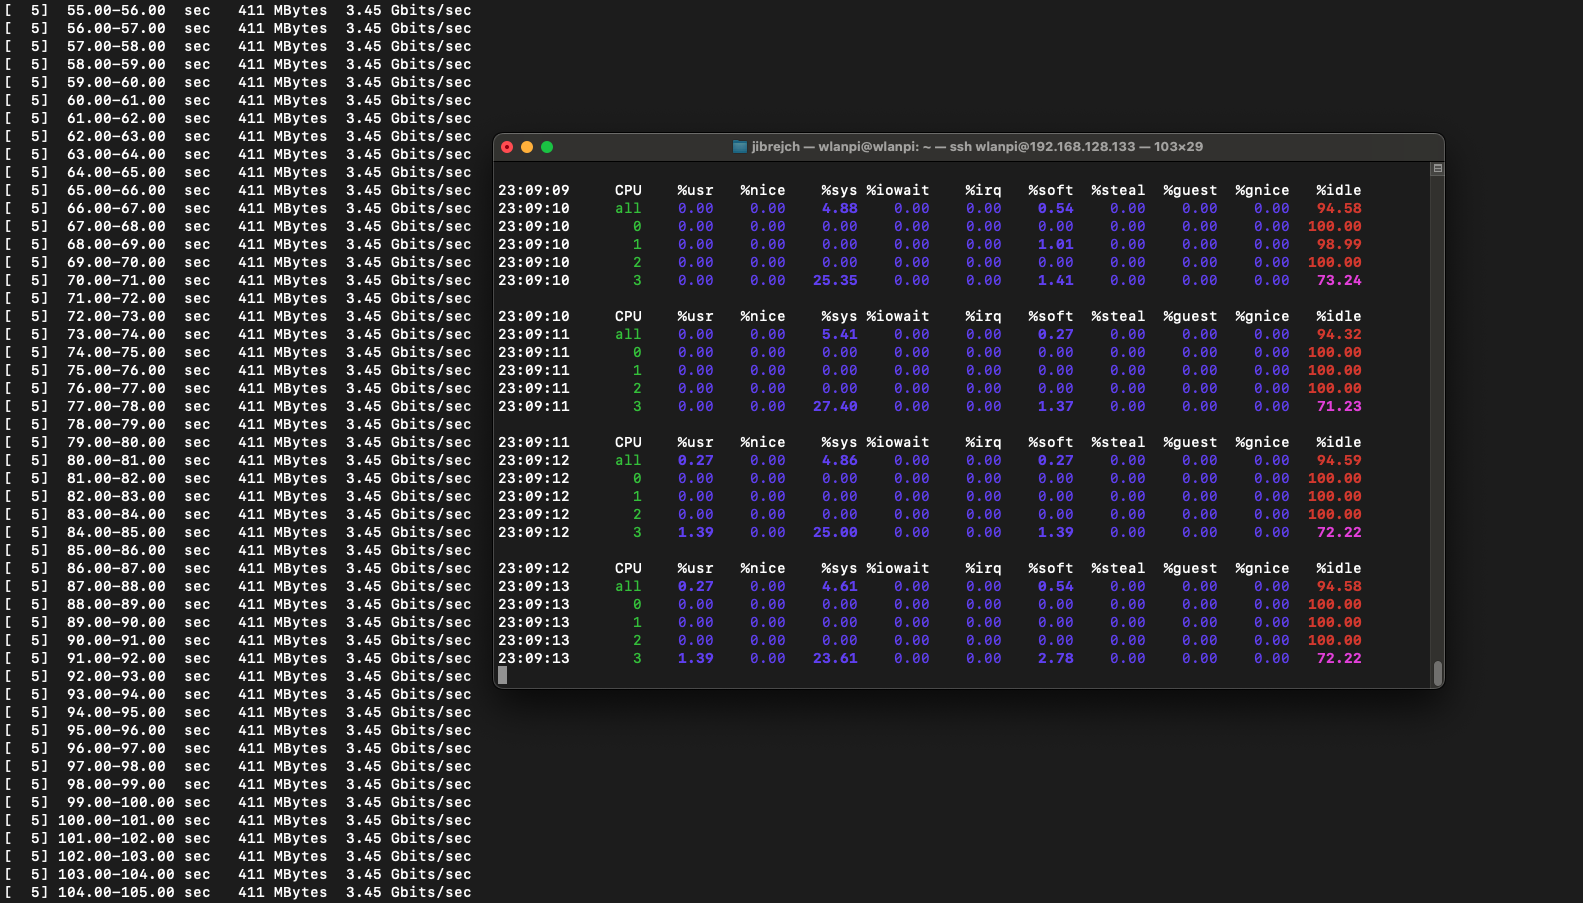
In PCIe Gen 2 mode, we got TCP throughput of 3.45 Gbps on the downlink and 3.07 Gbps in the upstream direction. Using more iperf3 parallel streams did not increase performance.

Downstream throughput

Upstream throughput

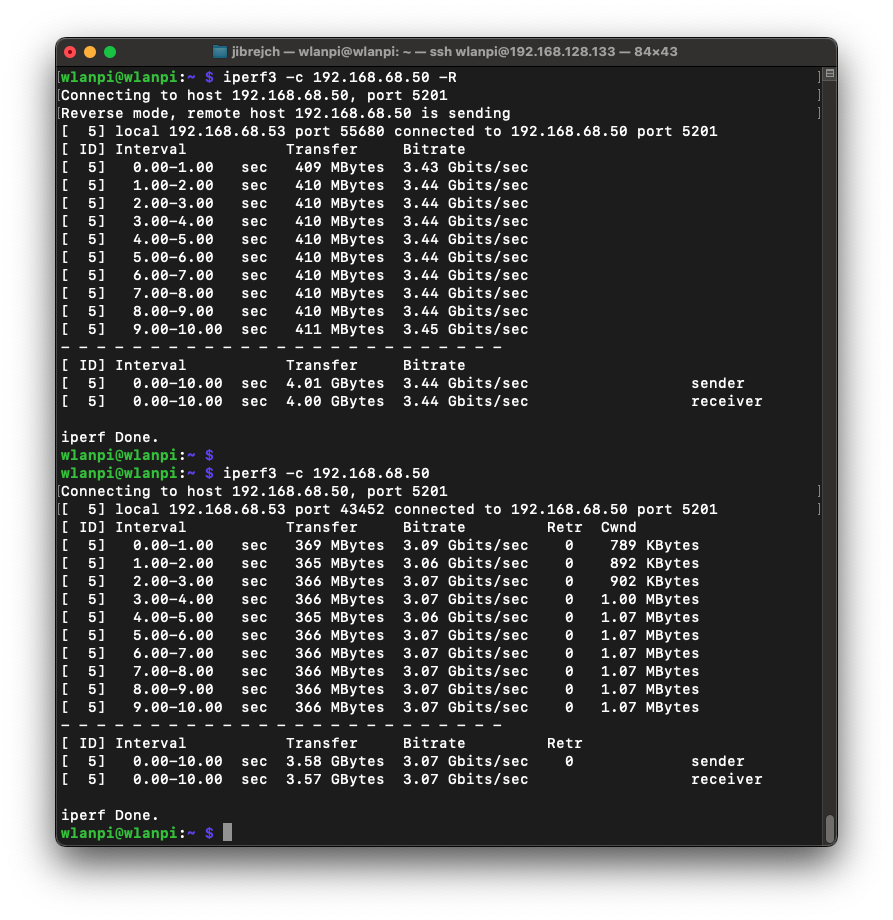
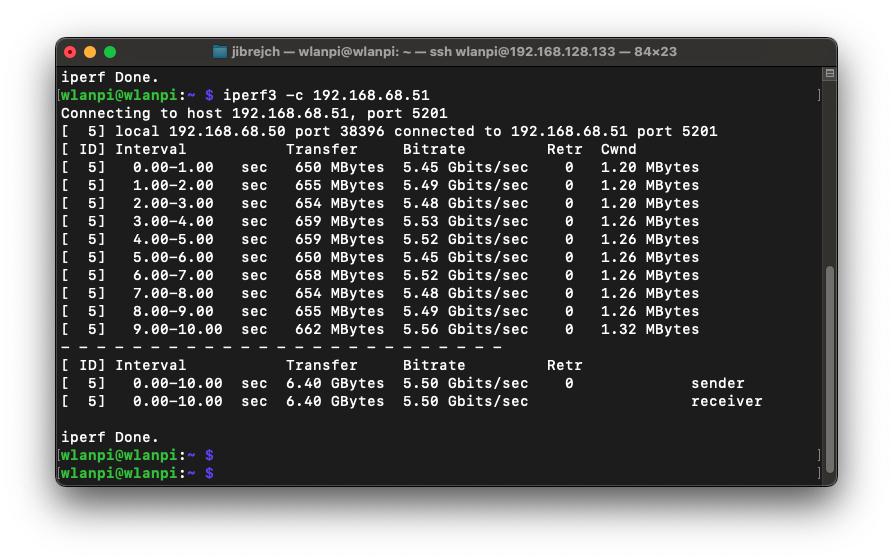
Were you able to use PCIe Gen 3 mode?

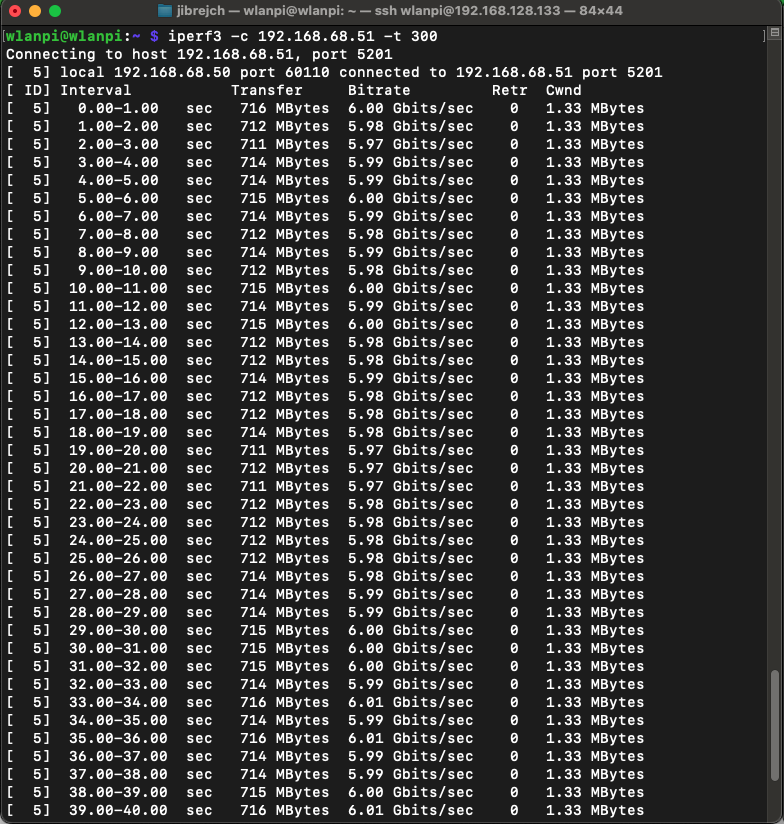
Yes! And I got 4.63 Gbps of TCP downstream and 5.5 Gbps (potentially up to 6 Gbps) upstream.

PCIe Gen 3 download
PCIe Gen 3 upload
I managed to get up to 6 Gbps in the upstream direction

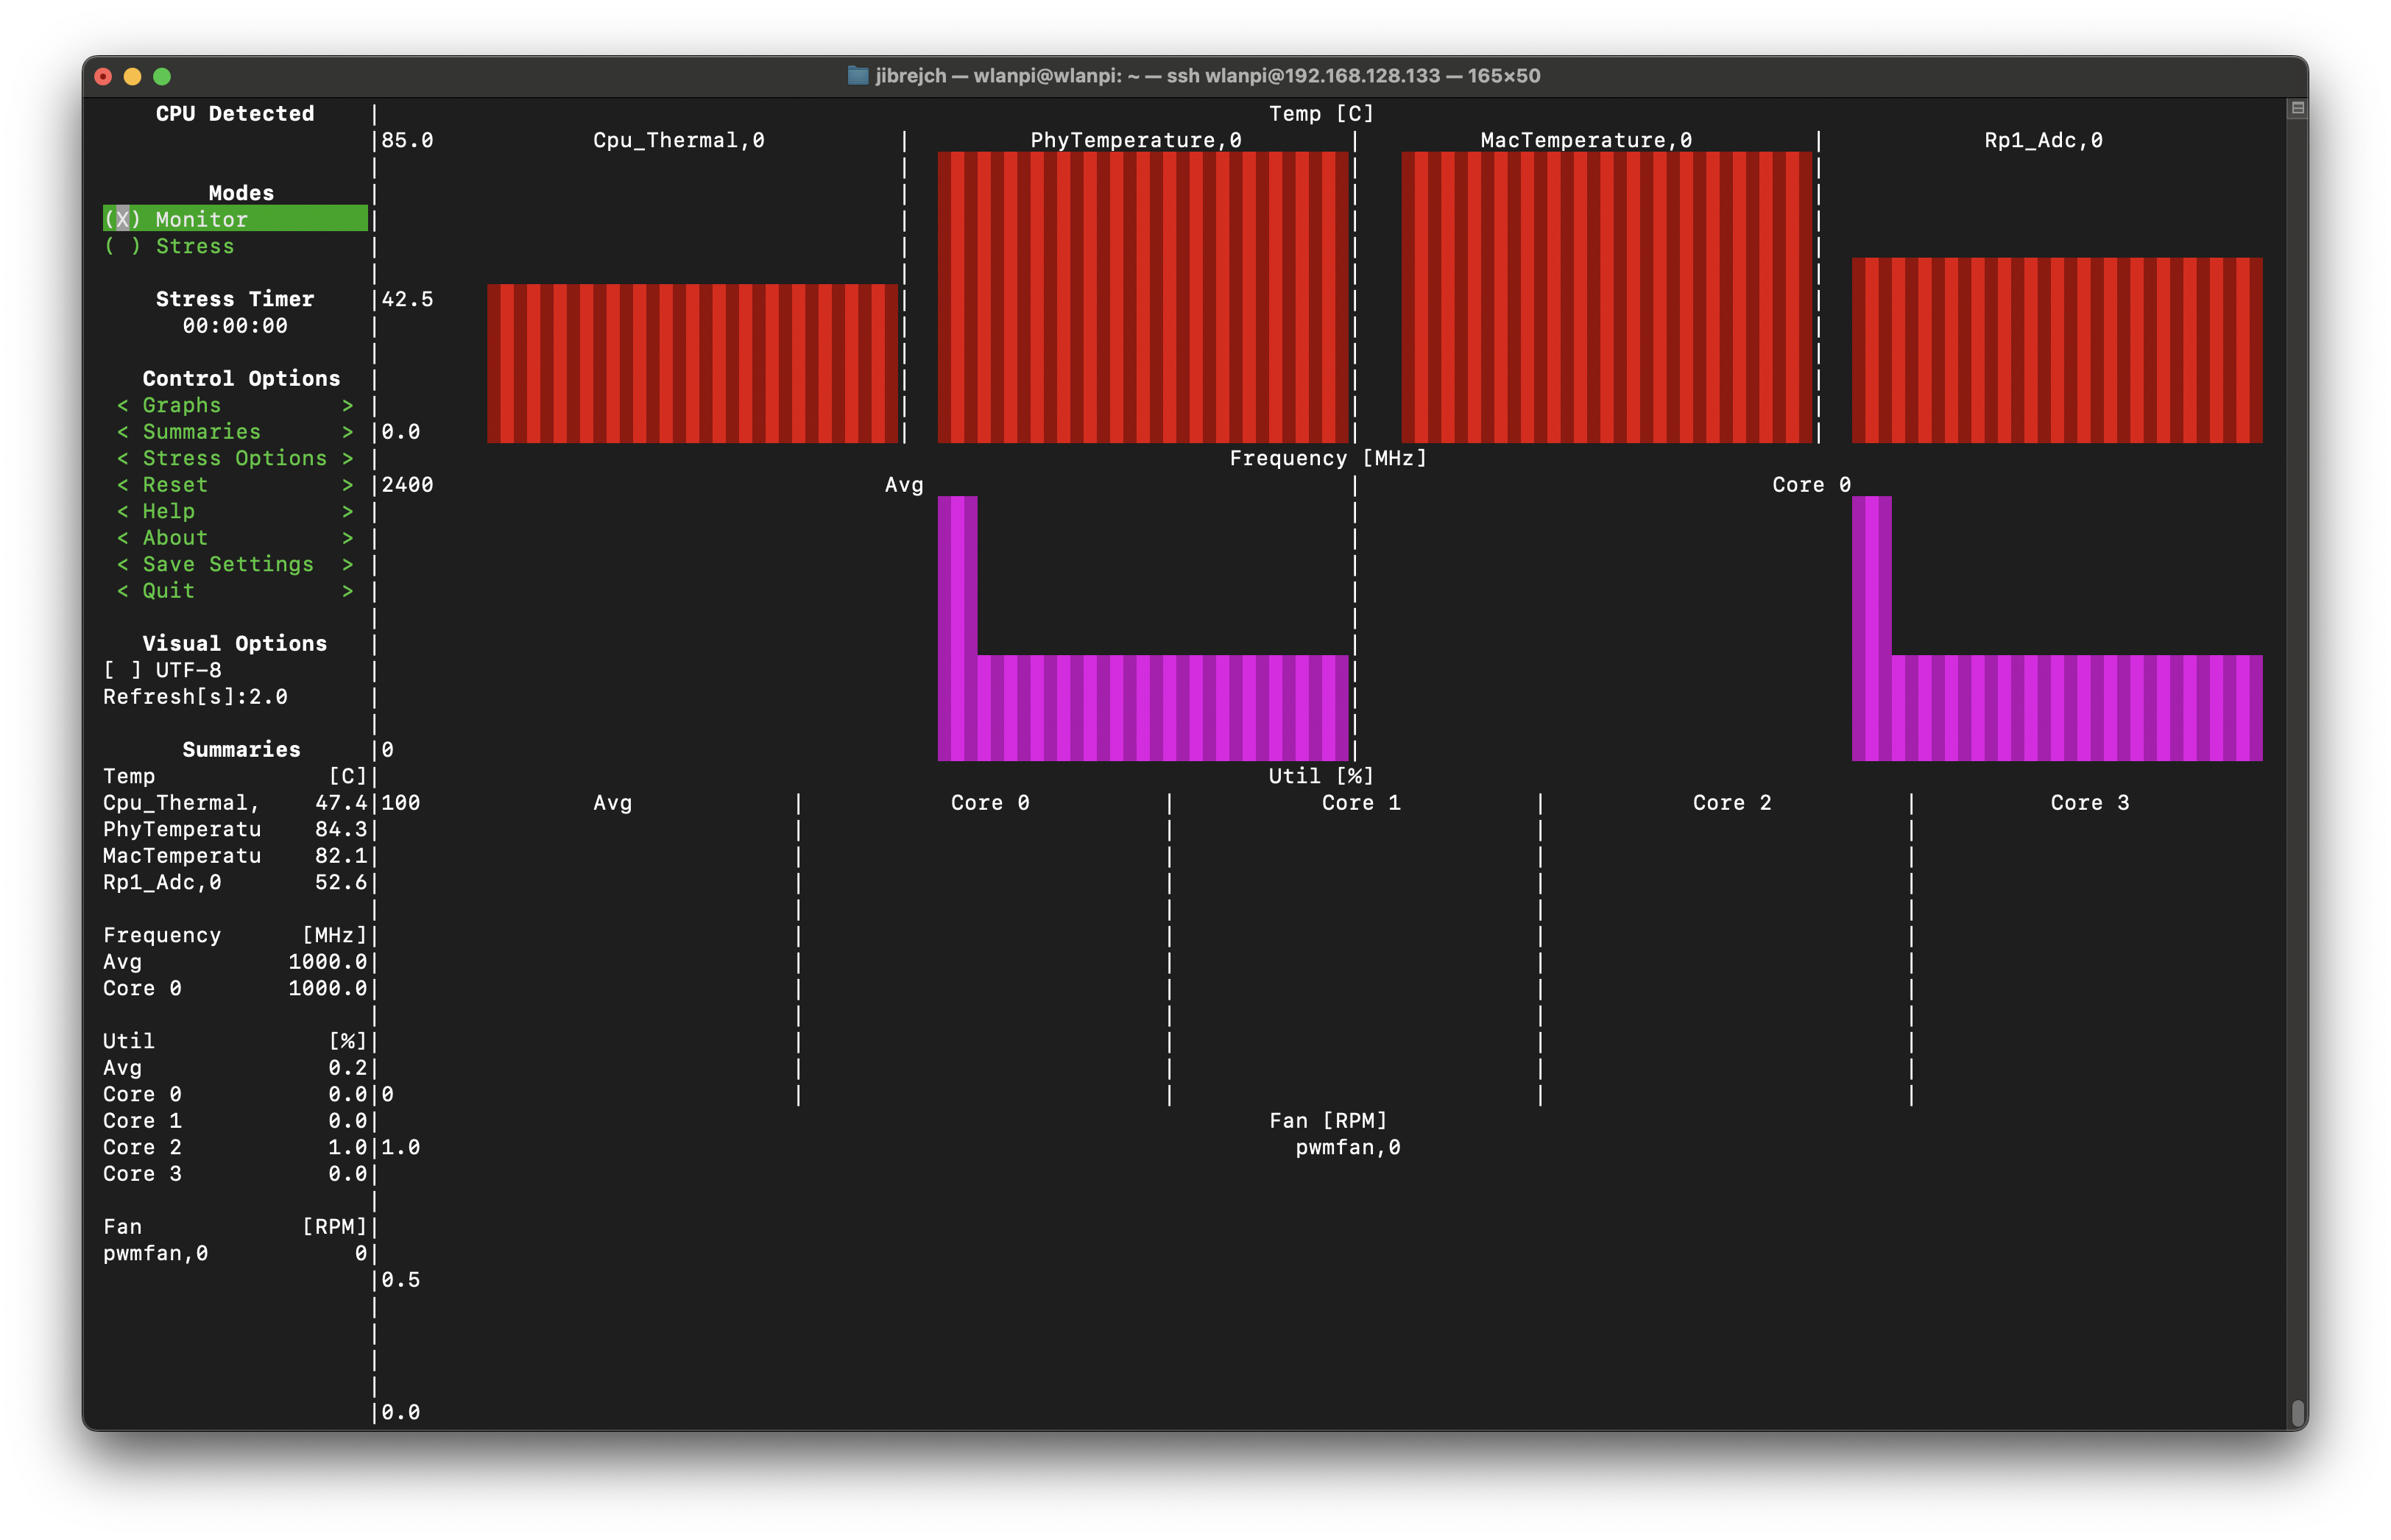
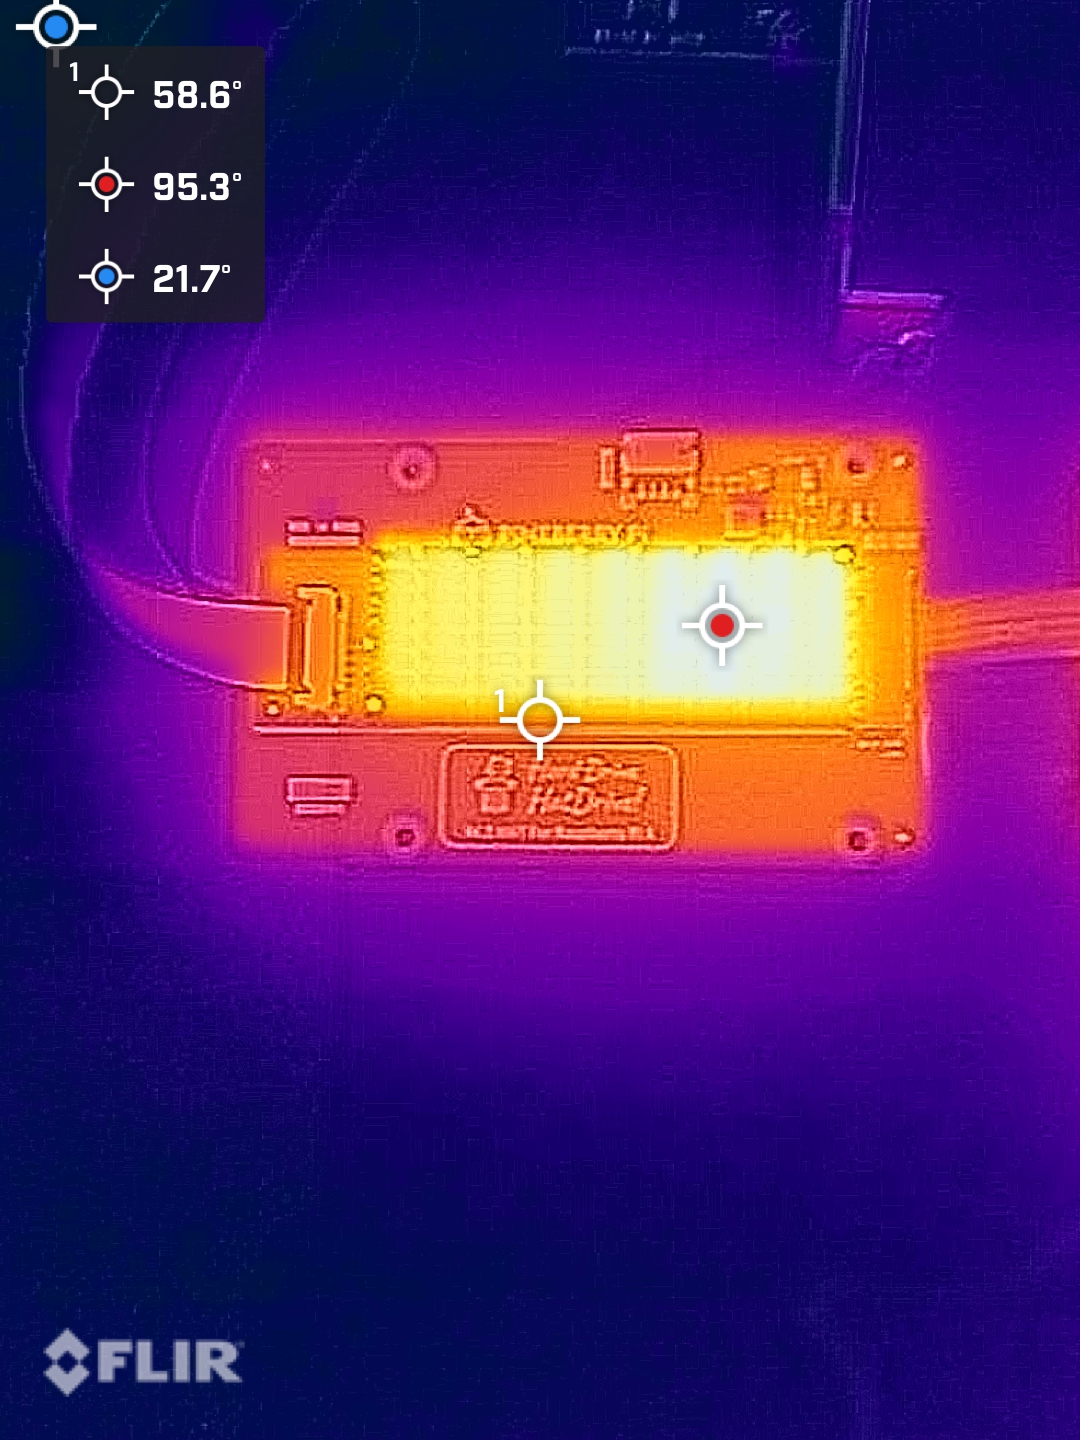
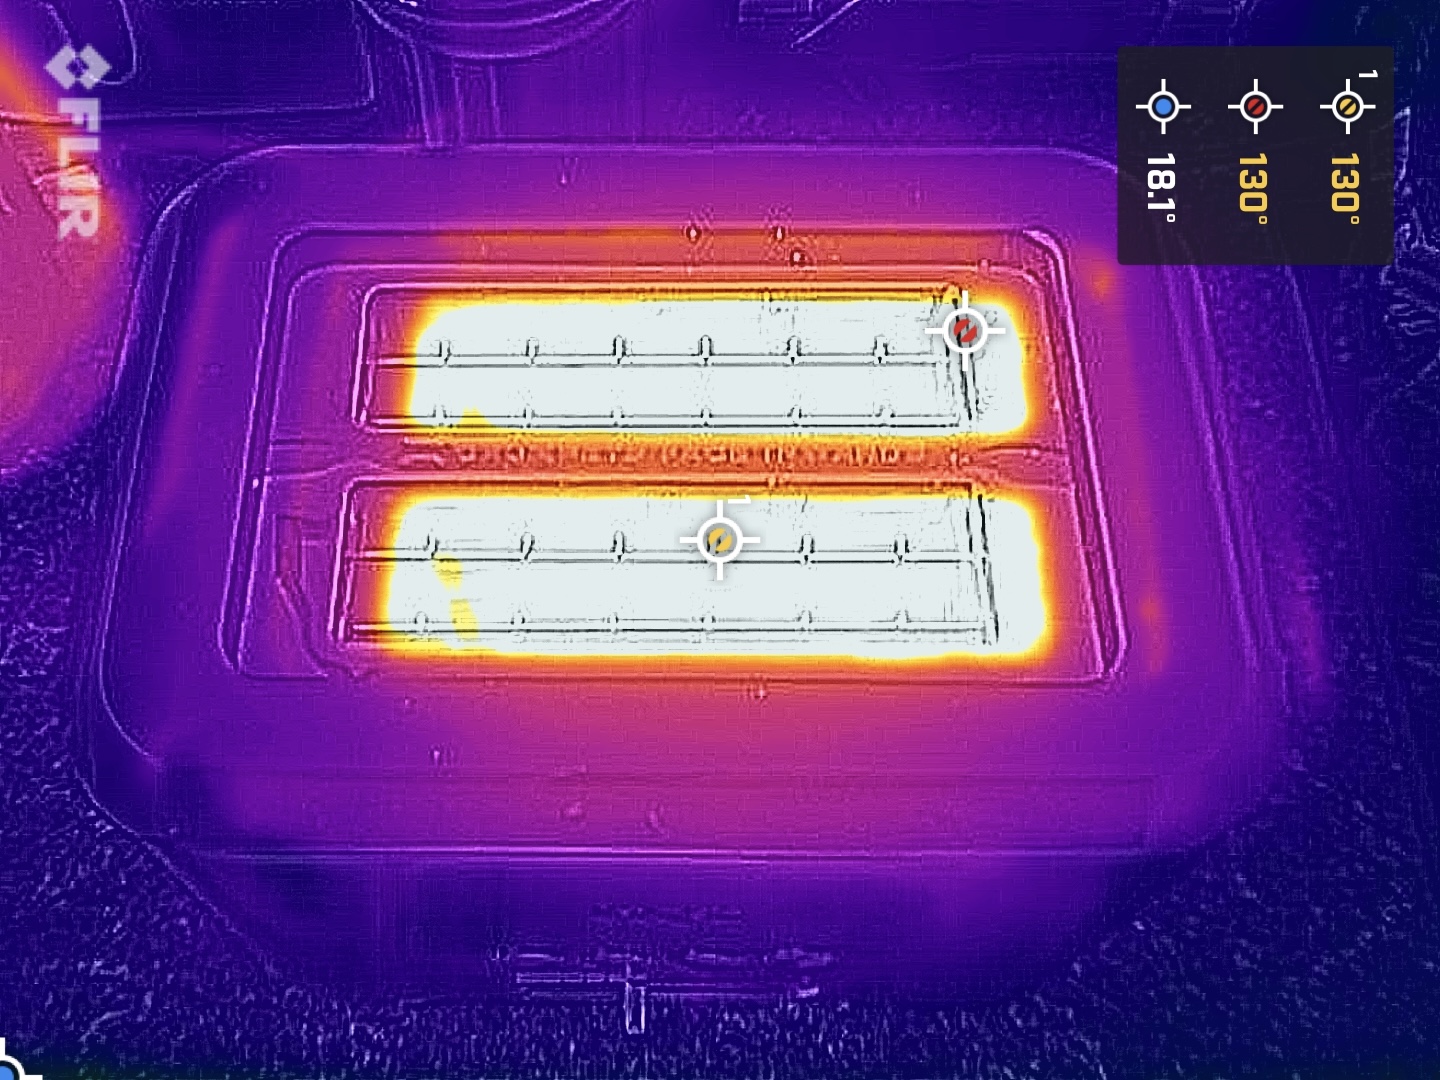
That’s hot news… yes 122° Celsius hot!

This adapter has a thermal problem. It comes with a heatsink, but even in idle mode it overheats.

Detail of the heatsink
107.7° C in idle

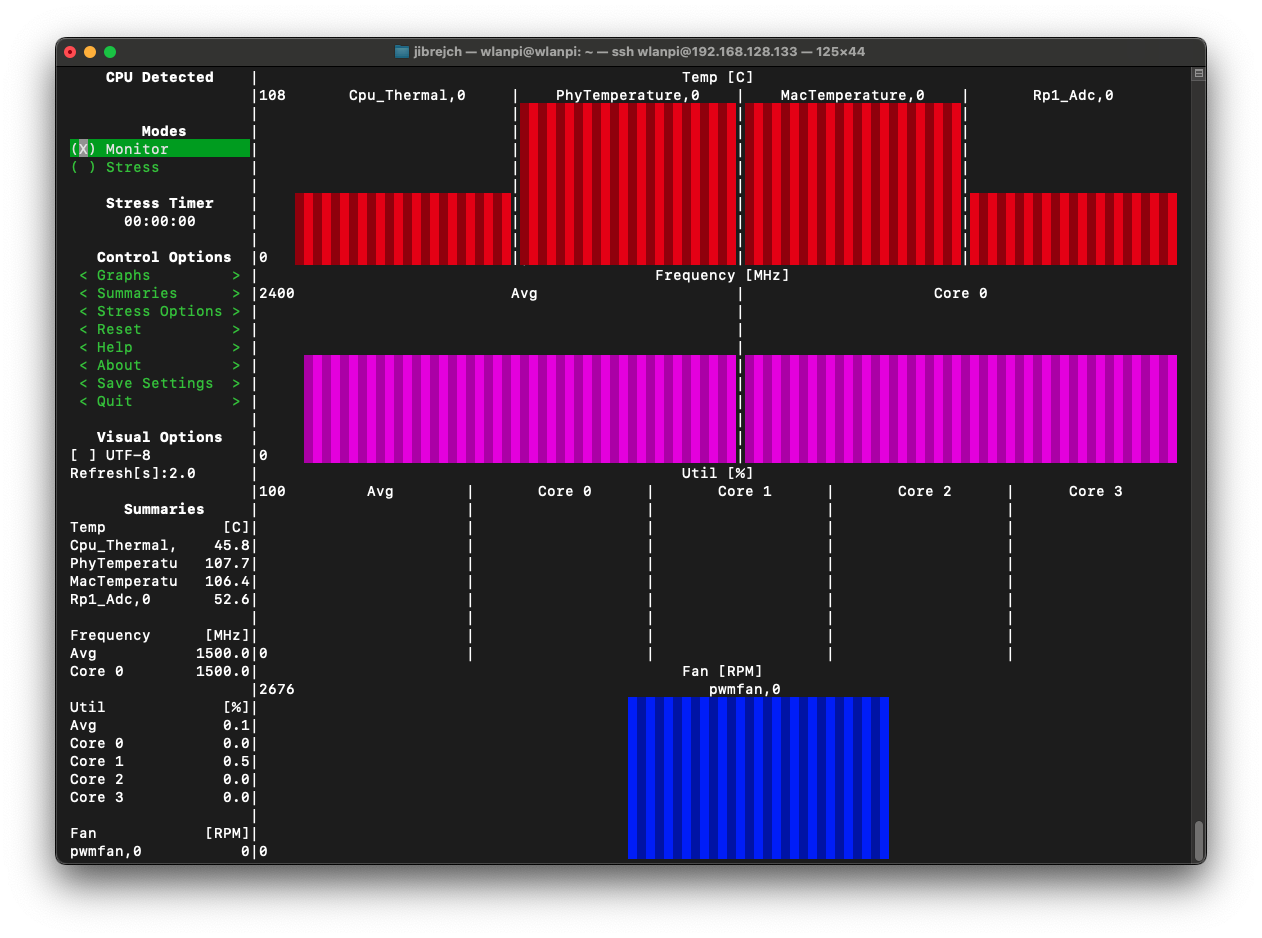
In PCIe Gen 3 mode with iperf3 test running, we are talking 122.1° C hot! The Pineberry board was very hot and you can literally burn your fingers by touching the heatsink.

122.1° C hot under load
In PCIe Gen 2 mode, it ‘only’ runs at 96.4° C

Long story short. Don’t buy this adapter, unless you want to add a fan or significantly larger heatsink.

Toaster, 10 Gigabit adapter, aren’t they the same thing?

Make your own opinion based on these couple of thermal photos.

Thermal IR footprint of the Ethernet adapter
And here is a toaster for scale 😅

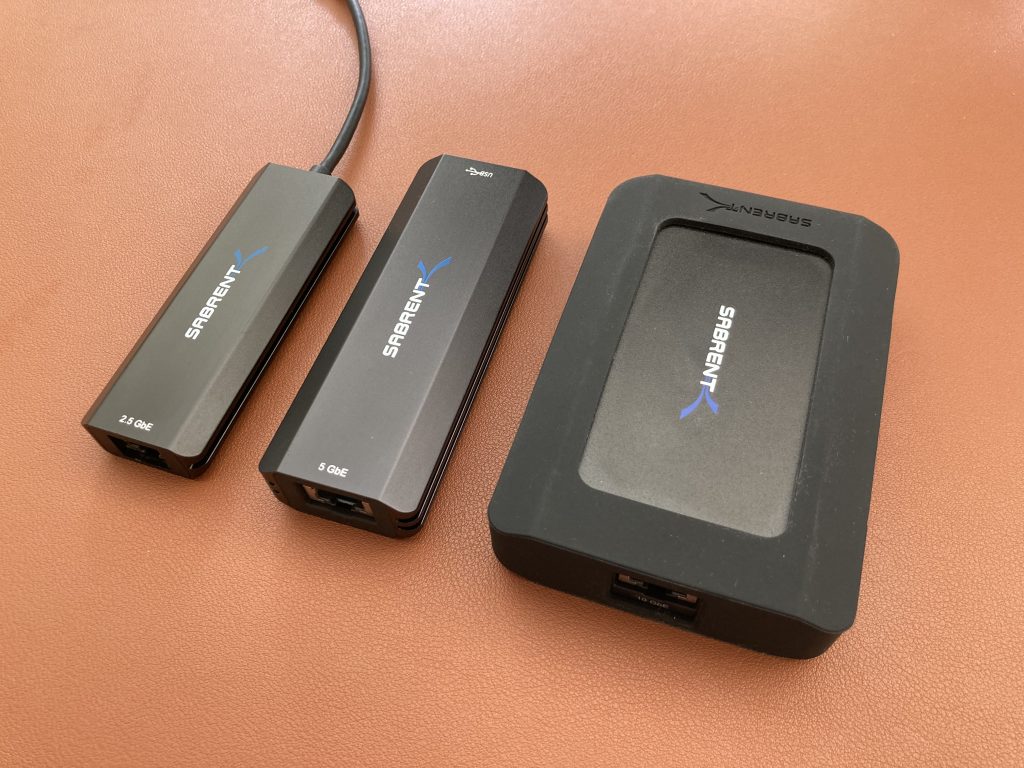
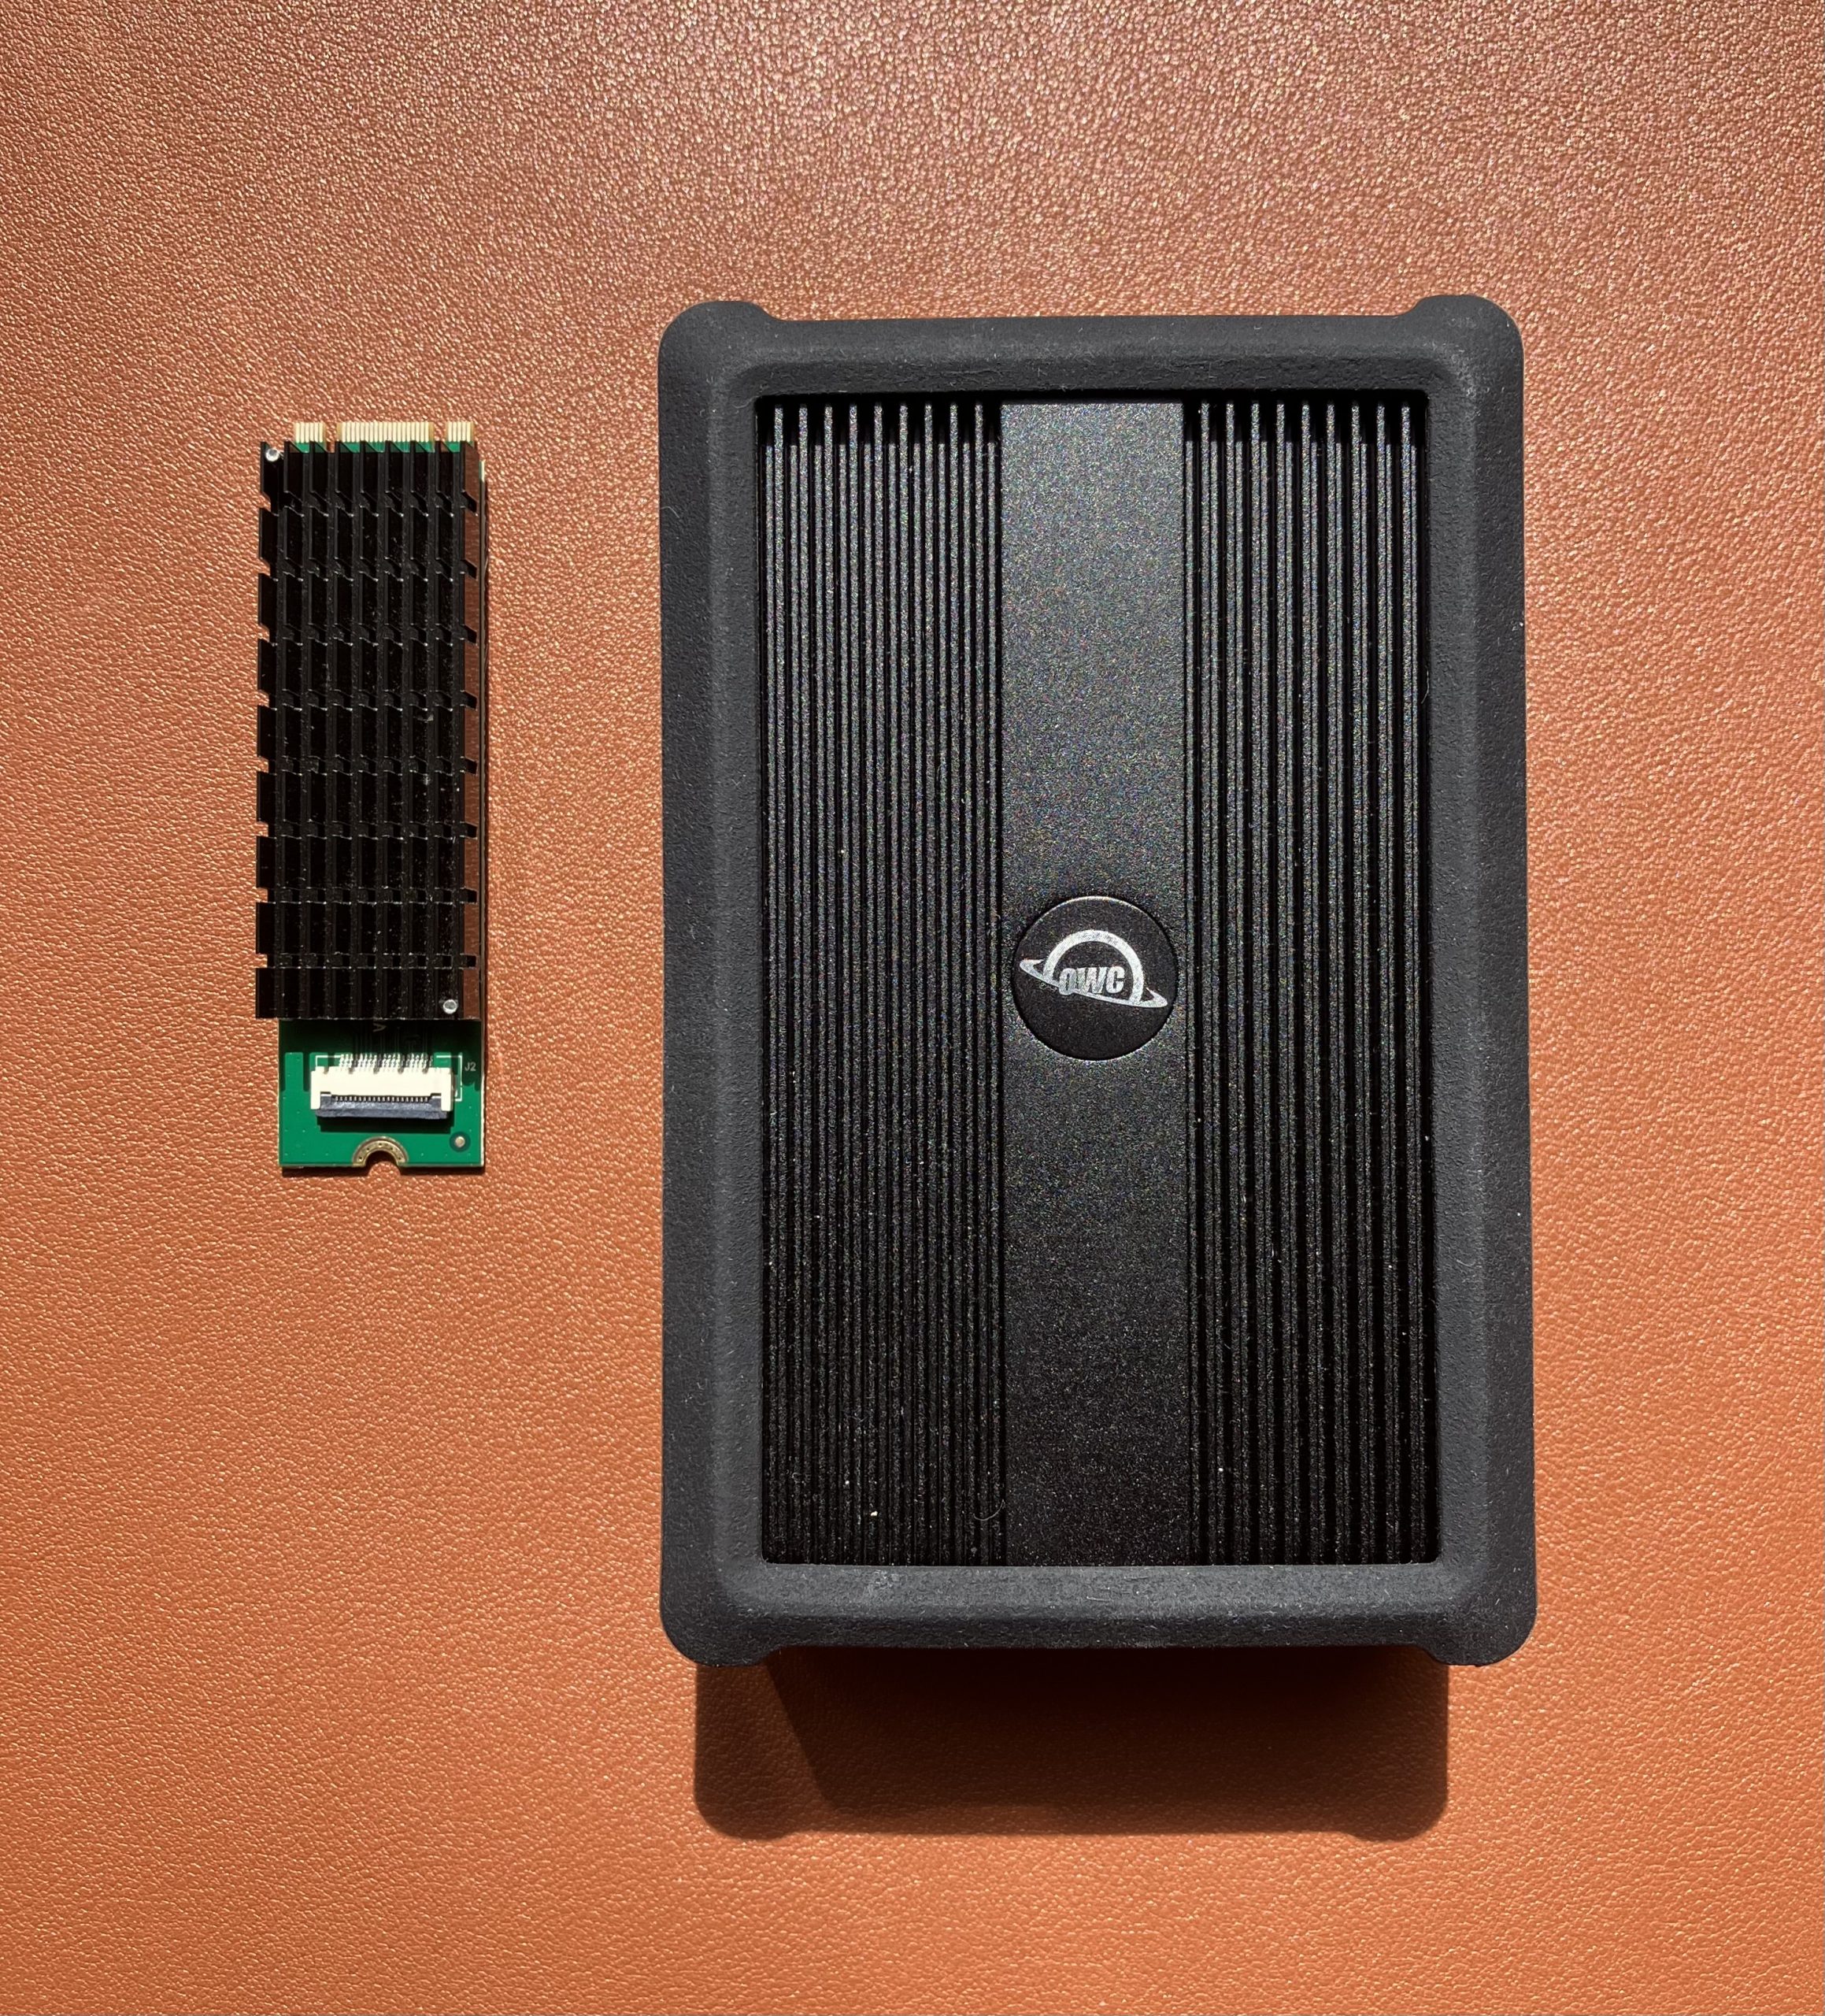
This Ethernet adapter as well as the OWC 10 GbE Thunderbolt both use the same Aquantia AQC107 (part of Marvell now) chip. It does really good job at keeping CPU utilisation low. I’ve seen much cheaper 2.5 GbE adapters that hammer CPU with interrupts until the CPU just can’t take no more.

But, compare size of the two heatsinks. Unlike this one, the OWC adapters delivers good thermal results. Don’t take me wrong, it still runs warm, but not anywhere near.

Same AQC107 chip, massive thermal mass difference

Summary

On the positive side, this is the first 10 Gigabit adapter I tested which actually worked in PCIe Gen 3 mode on Raspberry Pi 5. I got TCP throughput of up to 6.0 Gbps.

As far as I can tell, the limit of Raspberry Pi 5’s PCIe bus is around 6 Gbps if you look at it through the iperf3 TCP traffic lens. AQC107 silicon does an amazing job at keeping the Raspberry Pi’s CPU utilisation low. This helps us get as much throughput as we can from the Pi. But it produces a significant amount of heat.

The fact is that this adapter overheats. Don’t buy it unless you wish to use it with a fan or design a much larger heatsink yourself.

10 Gigabit Ethernet on Raspberry Pi 5

Raspberry Pi 5 comes with PCI Express connection and a number of HATs (hardware attached on top) and Bottoms (the opposite of that) are now available for sale. That unlocks some very exciting options. Let’s see how fast can a 10 Gigabit Ethernet adapter on Raspberry Pi 5 go, shall we?

Pineberry’s HatDrive! Bottom proved to be really handy for converting Pi’s PCIe connection to M.2 M-key format. My Kalea-Informatique 10 Gigabit adapter uses exactly that, so that’s a match. Why did I choose this adapter? Very unscientifically this time – it was the first readily available and I was in a fail-fast mood :)

10 GbE adapter connected to Raspberry Pi 5
Pineberry HatDrive! Bottom board with 10 GbE network adapter
Detail of the AQC107 chip powering the network adapter

Enable PCIe port on Raspberry Pi 5

First things first. We need to enable the PCIe connector on the Pi.

sudo nano /boot/firmware/config.txt

# Enable the port
dtparam=pciex1

# Configure PCIe Gen
dtparam=pciex1_gen=2
Enable PCIe and configure mode

Build custom Linux kernel and include the Aquantia driver module

Vanilla Raspberry Pi OS doesn’t include the Aquantia AQC107 kernel module. So we need to burn a micro SD card with a vanilla Raspberry Pi OS Bookworm image, boot the Pi 5 and build a customised kernel.

git clone --depth=1 --branch rpi-6.8.y https://github.com/raspberrypi/linux
cd linux/
sudo apt install flex bison aptitude -y
sudo aptitude install libssl-dev
make bcm2712_defconfig

Edit the config file:

sudo nano .config

Add these 2 lines to .config file:

CONFIG_AQTION=m
CONFIG_AQUANTIA_PHY=m

Trigger customised kernel build on the Pi. This will take some time, so bear with us, please.

sudo make -j4 Image.gz modules dtbs
sudo make modules_install
sudo cp -v arch/arm64/boot/dts/broadcom/*.dtb /boot/firmware/
sudo cp -v arch/arm64/boot/dts/overlays/*.dtb* /boot/firmware/overlays/
sudo cp -v arch/arm64/boot/dts/overlays/README /boot/firmware/overlays/
KERNEL=kernel_2712
sudo cp -v arch/arm64/boot/Image.gz /boot/firmware/$KERNEL.img
uname -a
sudo reboot

After reboot, the LED light on the network adapter should come to life and we can capture first impressions.

Adapter recognised
10 Gbps Full Duplex
lspci -v output

Temperature

First thing you will likely notice is how hot this network adapter runs. It runs at 85° Celsius in idle which is slightly worrying and you can literally burn your fingers if you are not careful. Thumbs down on the thermal design front.

High idle temperature

Under load, surprisingly, it ‘only’ runs 0.5° warmer.

High temperature under load

How fast can it go then?

Raspberry Pi 5 officially supports PCIe Gen 1 and Gen 2. It is not certified for Gen 3.

PCIe Gen 1 mode

In this slowest mode, I got 1.71 Gbps/1.53 Gbps iperf3 TCP results with standard iperf3 settings. No jumbo frames, no other tweaks.

PCIe Gen 1 throughput

PCIe Gen 2 mode

Again, with standard iperf3 settings, I measured 3.44 Gbps/3.04 Gbps TCP throughput between 2 computers both connected to 10 Gbps switch ports via 10 GbE Full Duplex.

PCIe Gen 2 throughput

In idle conditions, this setup draws 7.5 W, and 8.9 W under 10GbE adapter iperf3 -R load (3.45 Gbps). Using more iperf3 parallel streams (the -P parameter) did not help at all.

Power draw

PCIe Gen 3 mode

The adapter supports PCIe Gen 3, but it doesn’t work with the Pi. The Pi is not certified for Gen 3, so I can’t say anything bad about this. The Ethernet adapter is not recognised in Gen 3 mode, and no interface is present in ip a. Sometimes the Pi will fail to boot.

According to dmesg, the Pi forced Gen 2 mode:

brcm-pcie 1000110000.pcie: link down
brcm-pcie 1000120000.pcie: Forcing gen 2
Forcing PCIe Gen 2 mode athough Gen 3 has been configured

I powered my Pi from M2 MacBook USB-C port. So I thought, I might be running into under-voltage issues. I tested the official Raspberry Pi 27 W (5 V * 5 A) AC power and it made no difference.

Did you upgrade Raspberry Pi 5 firmware?

Yes, I did. It is running the latest version available as of March 2024.

Latest firmware installed

Low CPU utilisation

One feature I really enjoyed is the extremely low CPU utilisation under load. I saw slower 2.5 GbE adapters hammer CPU with interrupts, but that’s not the case for this NIC. AQC107 does really good job at keeping the CPU cool.

Low Raspberry Pi 5 CPU load under network load

Cable analytics

Marvell supports Cable Diagnostics feature which uses TDR to measure cable length and detect Ethernet cable for defects. Unfortunately, it doesn’t seem to be supported on the AQC107 chip.

Cable Diagnostics not supported

Can you get 10 Gbps out of this adapter at all?

I am glad you asked. How does an Intel NUC with this 10 GbE adapter sound? I’ve just tested it, here you go.

Intel NUC with 10 GbE adapter

Summary

The high operating temperature really makes this adapter something I can’t recommend. With maximum throughput below 3.5 Gbps, I think you would be better off choosing a 2.5 Gigabit Ethernet adapter, which runs cool and delivers 2.35 Gbps/2.35 Gbps throughput.

Have you tested any other 10 GbE adapter? Did you get better results? Did you find any 2.5 Gbps Ethernet adapter that supports Cable Diagnostics? I am all ears.

Special thanks

Thanks to Luke Jenkins for exploring and sharing the kernel build instructions. Also, thanks to the WLAN Pi team. You can buy the team a coffee using this link.

2.5 Gbps Ethernet on WLAN Pi M4

WLAN Pi is primarily a Wi-Fi tool, but occasionally I need an iperf server that would be able to deliver more than 1 Gbps of TCP throughput. In a controlled lab environment, I normally use PoE powered NanoPi R5S. I know the IP address of the iperf server by heart. Outside of the lab, I could really do with a WLAN Pi, its preinstalled software, display, buttons and everything it does out of the box. So the question is: “Can we add 2.5 GbE to WLAN Pi M4?”

M.2 slot to the rescue

WLAN Pi M4 doesn’t have any USB 3 ports. How do we add 2.5 Gbps Ethernet to it? If you don’t mind losing the Wi-Fi adapter in favour of 2.5 GbE mGig port, we can install this 2.5 Gbps Ethernet adapter in M4’s PCIe M.2 slot. It is based on Realtek RTL8125B chipset. I paid £17 for it including shipping to the UK.

M.2 A+E KEY 2.5G Ethernet RTL8125B PCI Express Network Adapter

It just works*

To my surprise, it just works*. Yes, I hear you, no one likes these asterisks, do you? 😉 Continue reading, it’s not the end of the story.

WLAN Pi M4 with 2.5 Gbps Ethernet
2.5 Gbps full duplex

The underwhelming default driver

Linux (and WLAN Pi image) has a driver for this adapter, but upload speeds, that is from iperf client to WLAN Pi iperf server, are very poor. We are talking 300 Mbps poor.

Poor 300 Mbps upload speed

Install Realtek’s latest driver to fix performance

Downloading, compiling and installing the latest Linux driver from Realtek’s website fixes the performance issue. We get symmetric 2.35 Gbps of TCP throughput with standard packet size.

2.35 Gbps of iperf3 TCP throughput

Installation of this driver isn’t as straightforward as it might look. I ended using vanilla Raspberry Pi OS image instead of the WLAN Pi one. Mainly because it is not easy to get the kernel headers for WLAN Pi image and we need them to be able to compile the new driver.

Summary

Yes, it is possible to achieve 2.35 Gbps symmetric TCP throughput on the WLAN Pi M4 with this adapter. But you should be aware of these facts:

  • This Ethernet adapter doesn’t fit inside WLAN Pi M4 case
  • You will have to give up the M.2 Wi-Fi adapter in favour of mGig Ethernet
  • From software perspective, the Realtek driver that ships in WLAN Pi image doesn’t unlock full performance of this adapter (iperf client pushing traffic to WLAN Pi iperf server). Installing the latest driver isn’t trivial on WLAN Pi.
  • We, WLAN Pi team, currently don’t support this setup. If you have a use case for 2.5 GbE support on the M4, please let us know.

Multigigabit Ethernet on the Raspberry Pi 4

Update: The Linux driver for this adapter does not seem to perform great. I tested a 2.5 GbE adapter based on Realtek chipset, which might work better for you. Here is my review.

I also tested this adapter on Windows 11 and macOS here.

With the first consumer Wi-Fi 6E routers already shipping, and enterprise access points being worked on, I think it is now time to up my iperf3 game. While the standard 1 Gbps adapters push around 950 Mbps of TCP traffic, the iperf3 server will sooner or later become a bottleneck for throughput measurements.

Raspberry Pi 4 (RPi4) is widely available, and there is a chance that you might already own one. So, the question is, can it support multigigabit speeds?

Although it does not have any PCI Express slot available, it does have a couple of USB 3.0 ports. I researched USB 3.0 multigigabit NBASE-T Ethernet adapters, and purchased a few. At the time of writing, Linux kernel 5.10 is the Raspberry Pi OS gold standard, and that’s what I used for all tests.

TL;DR … give me the short answer

The maximum TCP throughput Raspberry Pi 4 iperf3 server can handle with a 5 Gbps USB 3.0 Ethernet adapter. These were 90-second iperf3 tests with standard 1500-byte MTU and a single iperf3 stream.

  • Download (from RPi4 server to a client): 2.05 Gbps
  • Upload (from a client to RPi4 server): 528 Mbps

If you can enable 9000-byte Jumbo frames on all devices involved in the data path, the upload speed becomes much healthier.

  • Download (from RPi4 server to a client): 2.05 Gbps
  • Upload (from a client to RPi4 server): 1.73 Gbps

USB multigigabit adapters

There are a few available on the market. After reading a dozen of reviews, I decided to get 3 adapters from a company called Sabrent. They make adapters with nice metal cases, which helps with dealing with the heat they dissipate.

Left to right: 2.5 GE USB 3.0 Sabrent NT-S25G, 5 GE USB 3.1 Sabrent NT-SS5G, 10 GE Thunderbolt 3 Sabrent TH-S3EA

The 5 GE USB 3.1 Sabrent NT-SS5G is the only I recommend for use with the RPi4:

  • It uses the Marvell Aquantia AQC111U chipset
  • It works out of the box with Raspberry Pi OS and
  • It works on Windows 10 after you install the driver
  • It ships with USB-C and USB-A cables so you can connect it to your laptop using USB-C or RPi4 using USB-A
  • Unlike other brands it does not overhead or disconnect due to instability

Here is what’s in the box

5 GE USB 3.1 Sabrent NT-SS5G ships with both USB-A and USB-C cables

RPi4 for scale

ServeTheHome team did a great job of comparing the 5 GE adapters using the same chipset as the 5 GE USB 3.1 Sabrent NT-SS5G. It came out as a clear winner:

USB 3.1 Gen1 To 5GbE Comparison Table AQC111U Based Q1 2021
Credit and kudos to ServeTheHome

Why not use the cheaper 2.5 GE USB 3.0 Sabrent NT-S25G? Because it uses Realtek 8156 chipset, and there is no suitable Linux driver available at the time of writing.

Why not the 10 GE Thunderbolt 3 Sabrent TH-S3EA? Although it has a USB-C connector, it is not a USB adapter. It uses Thunderbolt 3 protocol, which is not supported by the RPi4.

Test setup

I use RPi4 with PoE HAT, because it has a fan on it, and I power the unit by a USB-C charger. Both multigigabit adapters involved in the test are 5-Gigabit Ethernet capable Sabrent NT-SS5G. The best part is that these work out of the box on the Raspberry Pi OS with no action required on your part.

But, if you are considering the purchase of these adapters for your Mac, please stop. After you plug the adapter in, it uses Apple’s 1 Gigabit Ethernet adapter driver, and it would only auto-negotiate 1 Gbps. To enable 2.5 and 5 Gigabit speeds, and support for Jumbo frames on Mac, you have to disable Apple System Integrity Protection (SIP) tool, and install a legacy kext Sabrent driver. I would discourage you from making these security compromises. If you are interested in a multigigabit adapter that works with macOS out of the box, tune in later and read this review (link to be added).

How to increase the MTU and enable Jumbo frames?

On the Raspberry Pi:

sudo ip link set dev eth1 mtu 9000

On the Cisco Catalyst switch running IOS:

Configure, save config, reload
Verify after reloading
System Preferences > Network > Adapter settings > Hardware > MTU on macOS

Conclusion

The RPi4 allows you to test download-only throughput up to 2 Gbps with standard MTU. Upload speeds are really poor and you would be better off using the built-in 1 Gibabit Ethernet adapter. You can use the RPi4 to run a few other tools, scripts, or take wall attenuation measurements.

With Jumbo frames enabled, 2 Gbps/1.7 Gbps is good enough for lab use or demonstrations. Keep in mind that you would have to enable Jumbo frames on all devices (RPi4, MacBook and the switch in my case).

The main cause of the relatively low performance is the storm of IRQ hammering the RPi4 CPU:

In a computer, an interrupt request (or IRQ) is a hardware signal sent to the processor that temporarily stops a running program and allows a special program, an interrupt handler, to run instead. Hardware interrupts are used to handle events such as receiving data from a modem or network card, key presses, or mouse movements.

Source: Wikipedia.org

If your use case requires a powerful iperf3 server, Apple’s Mac Mini with built-in 10 Gigabit Ethernet adapter would be something to consider today. It won’t be the cheapest option, but you won’t have to worry about performance or USB dongles. From what I’ve found, it uses Marvell AQC 1113 chipset and does 9.4 Gbps with 4 parallel iperf3 streams.

Disclosure

I purchased these adapters myself. No one asked me, or paid me, to write this blog post. I was as curious as you to see how the RPi4 performs when it comes to multigigabit Ethernet.