How to connect full-size 10 Gigabit Ethernet PCIe adapter TP-Link TX401 to Raspberry Pi 5 and Intel NUC

It is refreshing to be able to test hardware which actually has a product name :) TP-Link TX401 is a 10 Gigabit Ethernet copper PCIe adapter.

TP-Link TX401 PCIe 10 GbE card

How to connect standard PCIe card to Raspberry Pi 5

I am testing on Raspberry Pi 5 and Intel NUC. Both do have an M.2 M-key slot and they won’t take this card natively, will they?

Pineboards (previously known as Pineberry Pi) makes a great PCIe Gen 3 compatible board that breaks out Raspberry Pi 5 PCIe connector to M.2 M-key slot. And from there we can use another adapter – MZHOU M.2 to PCIe 4X Adapter. It allows us to insert a standard size PCIe card into M.2 M-key slot.

Pineberry Pi M.2 M-key adapter -> M.2 to PCIe adapter -> PCIe card

The Ethernet adapter is correctly recognised. We just need to build a custom Linux kernel with AQC107 kernel module enabled. Steps by steps instructions are here for your reference. They work for all AQC107 based adapters I’ve tested.

It negotiates 10 Gbps Full duplex link with my switch.

But it only works in PCIe Gen 2 mode on Raspberry Pi 5 in this setup. That means that throughput will be significantly limited to 3.44 Gbps download TCP speed and 3.07 Gbps upload. Using more parallel streams did not help in any way. We are limited by the 4 Gbps throughput of PCIe Gen 2.

I was not able to make PCIe Gen 3 work using this setup. Understandably, high-speed buses don’t like the extra connectors and adapters.

Limited throughput due to PCIe Gen 2

Updated: It wasn’t available back then when I tested this, but Pineboards now sells uPCIty Lite HAT for Raspberry Pi 5 which completely removes the need for the intermediate MZHOU adapter.

How to connect standard PCIe card to Intel NUC

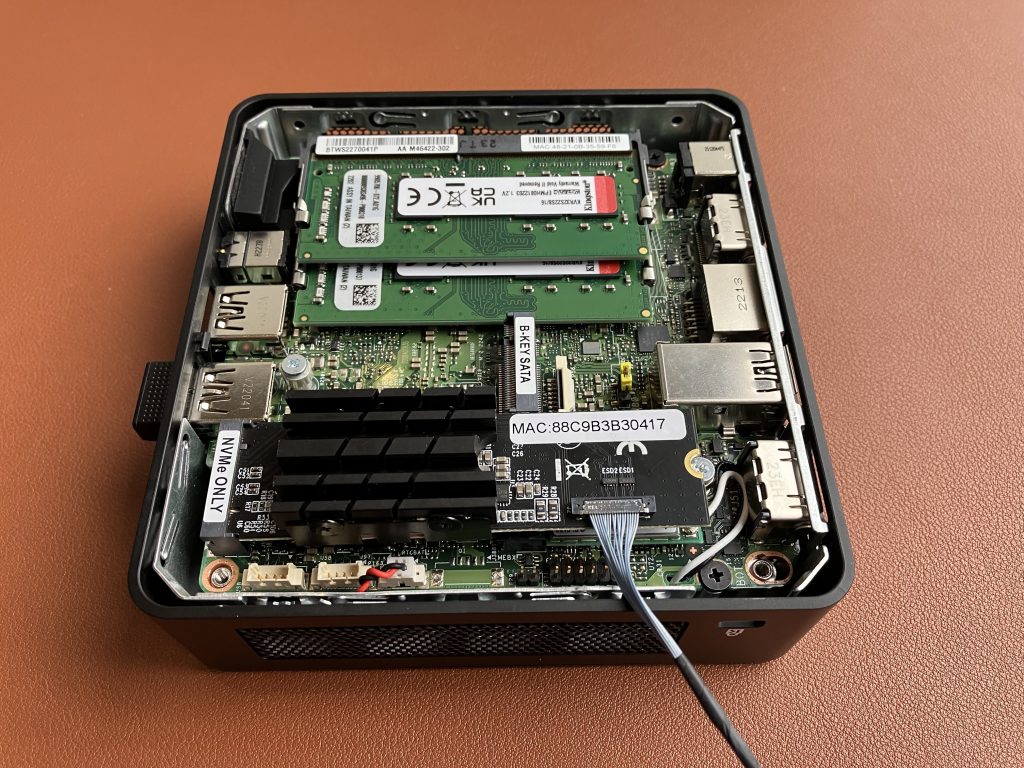
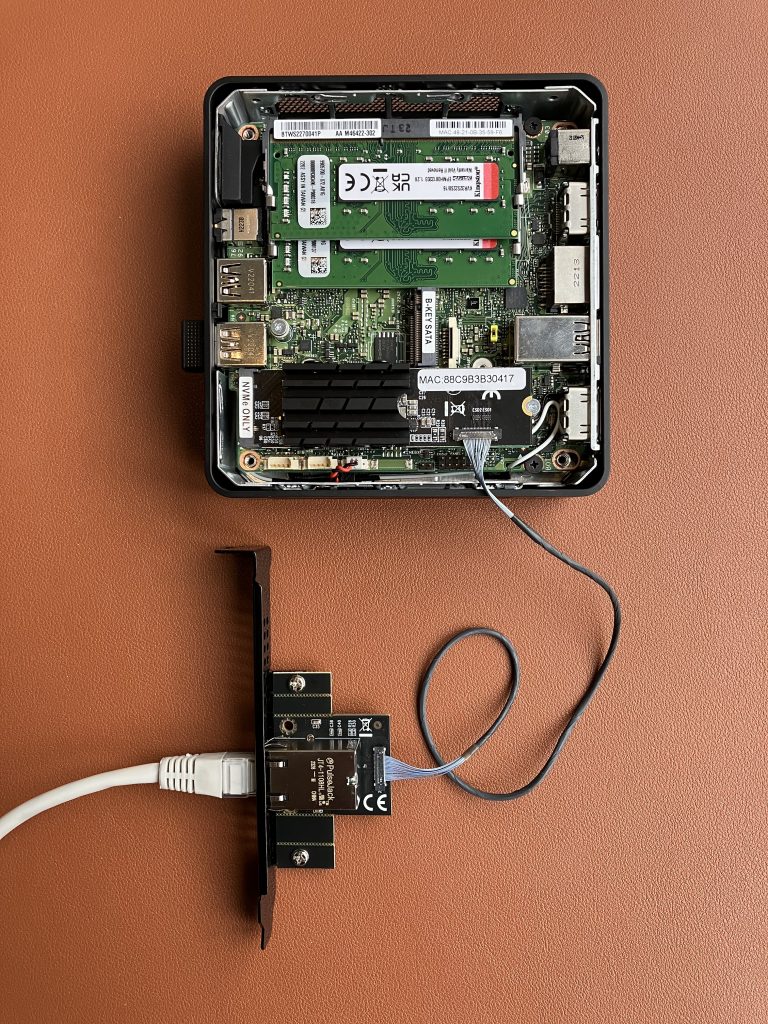
The same M.2 M-key to standard PCIe card adapter works with my Intel NUC 12th Generation.

Standard PCIe card in Intel NUC

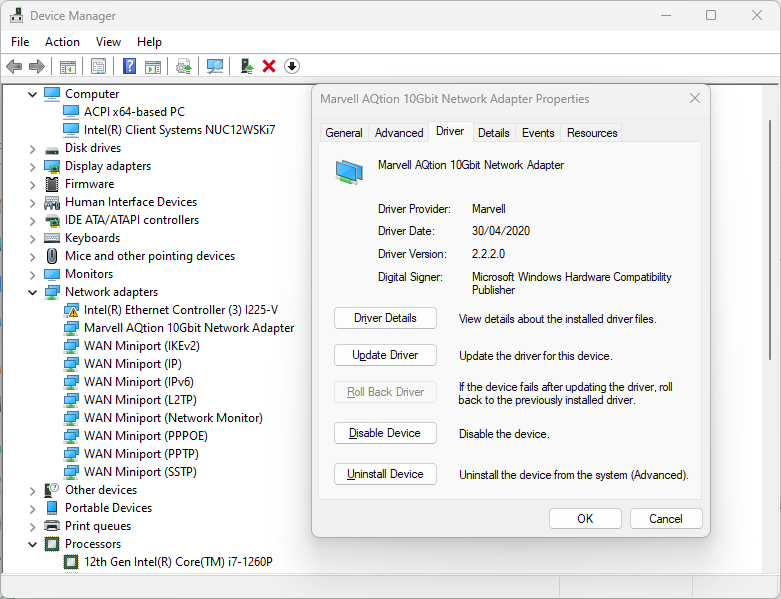
Windows 11 automatically downloads the latest AQC107 driver using Windows Update.

Driver is downloading

It negotiates 10 Gbps Full duplex.

10 Gbps link

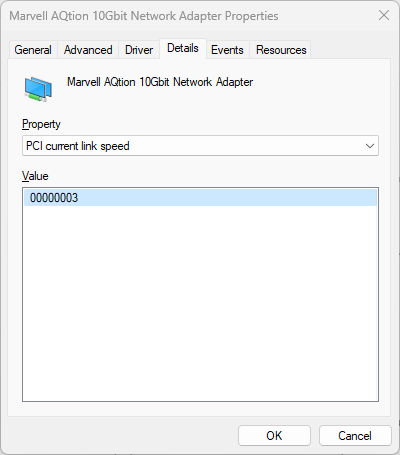
The TP-Link card successfully negotiates PCIe Gen 3 x4.

PCIe Gen 3 link speed and x4 width

PCIe Gen 3 allows us to achieve TCP throughput of 9.48 Gbps with no effort in the download direction and 9.49 Gbps in the upload. So this card can clearly do 10 Gigabit Ethernet, it just needs PCIe Gen 3 link speed.

Download TCP throughput 9.48 Gbps
Upload speed 9.49 Gbps

No overheating problem

Unlike unbranded Chinese adapters using the same AQC107 chip, this adapter is designed does not overheat. You can read some horror stories about chip temperatures of 122° degree Celsius (252° F) here.

Idle PHY temperature 58.1° C
PCIe Gen 2 full load temperature 63.3° C
TP-Link TX401 in PCIe Gen 3 mode on Windows 11 runs at normal temperature
Closer look at the heatsink

Summary

This adapter achieves nearly 9.5 Gbps of TCP throughput in either direction on Windows if you allow it to use PCIe gen 3 link speed.

Unfortunately, it only negotiated PCIe Gen 2 with Raspberry Pi 5 and Ethernet throughput is limited to about 3.4 Gbps. So for Raspberry Pi, I would recommend a 2.5 GbE adapter which it can fully handle. Alternatively, a 5 GbE adapter. Coming up next. Stay tuned.

It is a good product though with solid cooling. It still produces some heat but that’s a feature of the AQC107 chip. Its advantage is that it keeps the actual system CPU utilisation low even when fully loaded.

The TX401 is a great fit for a desktop machine. If you run a Mac or NUC, I recommend the external 10 Gigabit Ethernet network adapter connected via USB-C using Thunderbolt 3 protocol. No drivers needed.

Direct 20 Gbps connection between Mac and Windows 11 machine with no Ethernet adapters

Problem statement

Here is the challenge. We have a MacBook Pro M2 and an Intel NUC 12th generation PC running Windows 11. We want to transfer a significant amount of data between the two and potentially sync content of 2 directories. The Mac has no Ethernet adapter.

Solution

Both machines support Thunderbolt 4 and USB4. I happen to have a 0.5 m (1.6 ft) Thunderbolt 4 cable in my tools bag. We connect the two machines back to back. They establish USB4 peer to peer 20/20 Gbps connection, and automatically assign locally significant IP addresses from the 169.254.0.0/16 APIPA range.

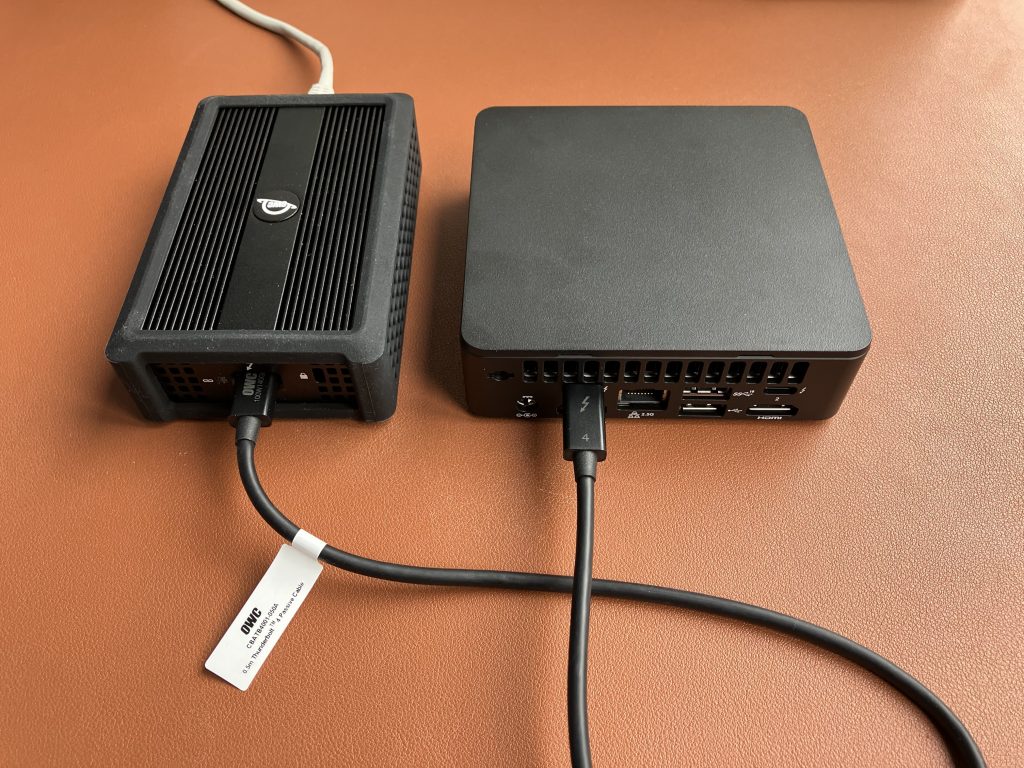
For the record, I am using the Thunderbolt 4 cable shipped with my trusty OWC 10 Gigabit Ethernet Thunderbolt adapter.

Direct MacBook to Intel NUC USB4 20/20 Gbps connection

The MacBook side

Let’s start with the Mac. Head over to System Settings and Network. Select the Thunderbolt Bridge adapter and explore its config.

Thunderbolt bridge interface and IP address

As far as I can tell, the machines have decided to use USB4. From what Windows network manager is telling us, they negotiated 20/20 Gbps link speed. I expected 40 Gbps but I think I set a wrong expectation in my head. 20 Gbps up and 20 Gbps down full duplex makes up 40 Gbps.

Windows PC on the other end of the Thunderbolt link

A quick iperf3 test gives us amazing throughput of 16.4 Gbps of TCP traffic from the Mac client to PC server. That’s fast!

16.4 Gbps of TCP traffic from Mac to PC

By default macOS uses standard MTU size of 1500 Bytes. This is important hold that thought.

Standard MTU

In the downstream direction, that is from Windows PC towards the Mac, we “only” get 5.3 Gbps. Windows claims 20/20 Gbps link speed, so what’s wrong?

Limited 5.3 Gbps TCP throughput from PC to Mac

Yes, we need to bump MTU (Maximum Transmission Unit) size to the maximum value of 9000 Bytes on my Mac. Apparently, Windows defaults to 62000 Bytes MTU on this peer to peer link type, and there is no UI option to change it. But that’s fine for now.

Enable Jumbo frame support on Mac

Let’s retest upload speed. Now we are talking. That’s 16.4 Gbps TCP from Mac to PC and 12.8 Gbps from PC to Mac. I am starting the file transfer.

12.8 Gbps TCP from PC to Mac with Jumbo frames enabled

We are not done yet.

Intel NUC and the Windows part

Windows sees this link as a peer to peer USB4 connection.

Connection status

The two machines negotiated a 20/20 Gbps link. Windows uses 62000 Bytes MTU by default with no obvious UI option to change it. Mac uses 9000 Bytes. MTU mismatch is bad and we should fix that.

20/20 Gbps USB4 P2P link
Adapter settings don’t offer MTU adjustment in the UI

Let’s deal with the MTU, and set it to 9000 Bytes on Windows. Same as the Mac.

Set MTU to 9000 Bytes on Windows 11 for this adapter

With matching MTU on both sides of the pipe, we get 15.1 Gbps TCP throughput from Mac to PC, and 13.6 Gbps from PC to Mac. Slightly more symmetrical in both directions.

Mac to PC
PC to Mac

Summary

I knew Thunderbolt 4 peer to peer connection was possible between 2 Macs but I’ve never tried connecting a Mac to a PC. It works.

Use a Thunderbolt 4 cable, not just a regular “USB-C to USB-C” cable. If there is a Mac involved, increase macOS MTU size to Jumbo 9000 Bytes and match MTU setting on both machines.

The outcome is a peer to peer 20/20 Gbps USB4 link with TCP throughput around 15 Gbps in either direction.

Wi-Fi 7 on Windows 11

The other week I tested Wi-Fi 7 on Linux. It worked great. Let’s see how Intel BE200 Wi-Fi 7 adapter performs on Windows 11 23H2.
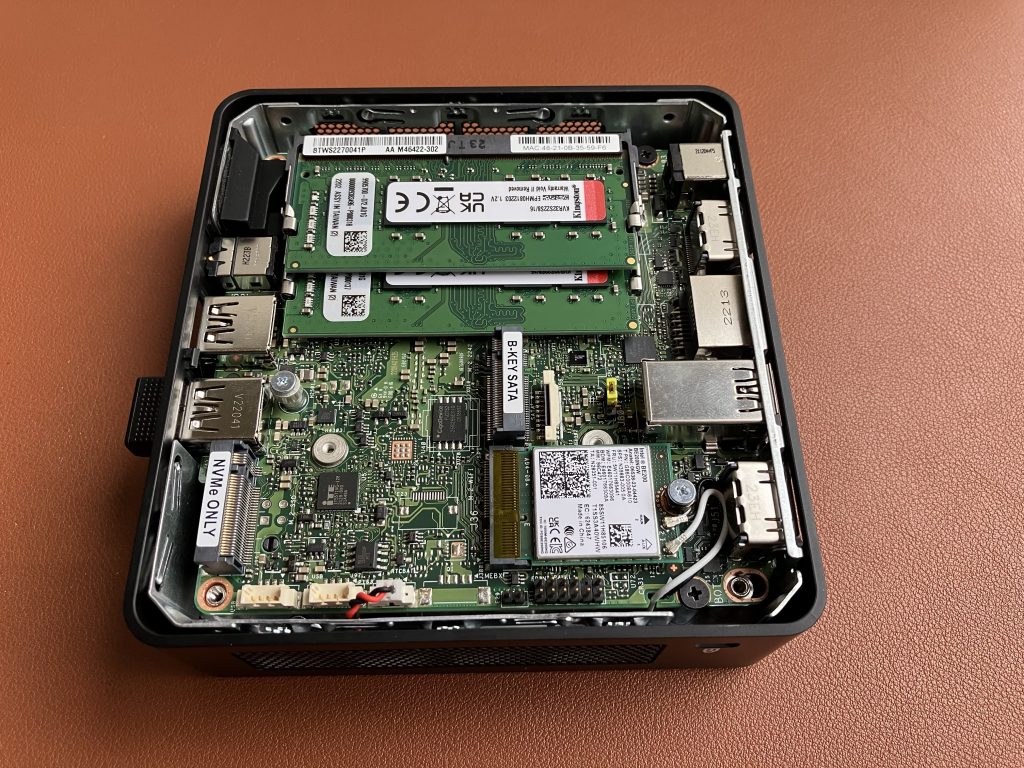
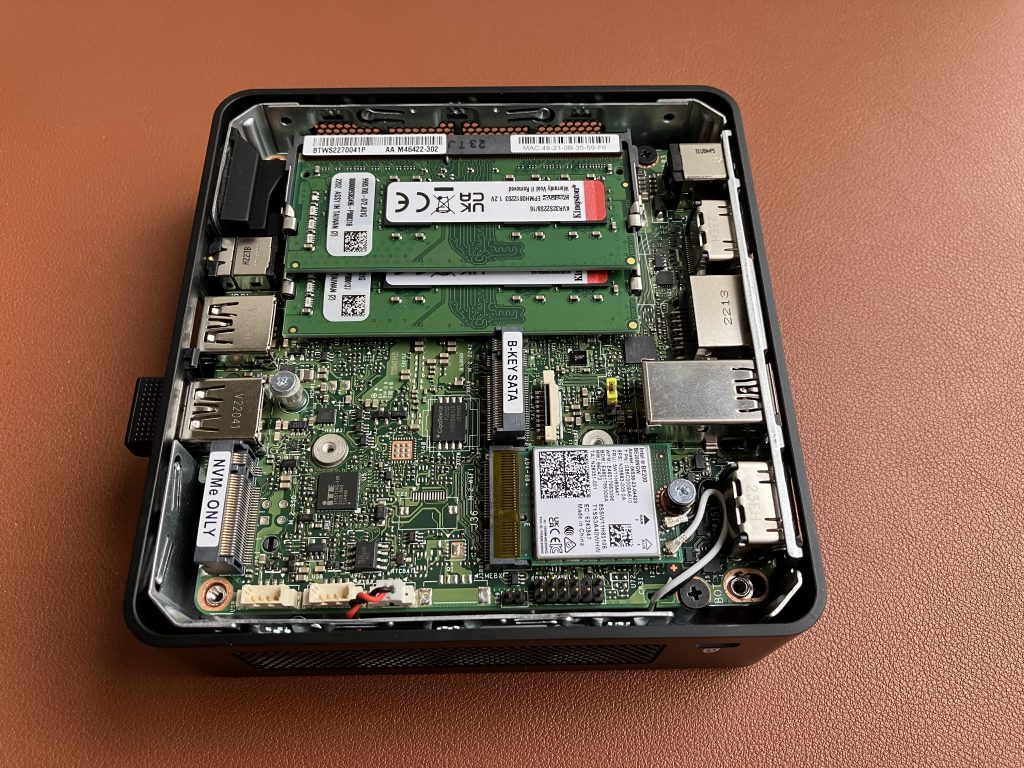
Intel NUC 12th generation with Intel BE200 Wi-Fi 7 adapter

Drivers

Download and install latest driver from Intel’s website. Windows Update itself won’t install any driver, so some manual steps are required. I originally tested driver version 23.20.0.4, and now updated to 23.30.0.6.

Setup

We are using TP-Link Deco BE85 BE19000 consumer Wi-Fi 7 router connected to a 10 Gigabit iperf3 server running on MacBook connected via OWC 10 GbE to Thunderbolt adapter. We have done this on Linux before, so let’s see how the same Wi-Fi adapter performs on Windows.
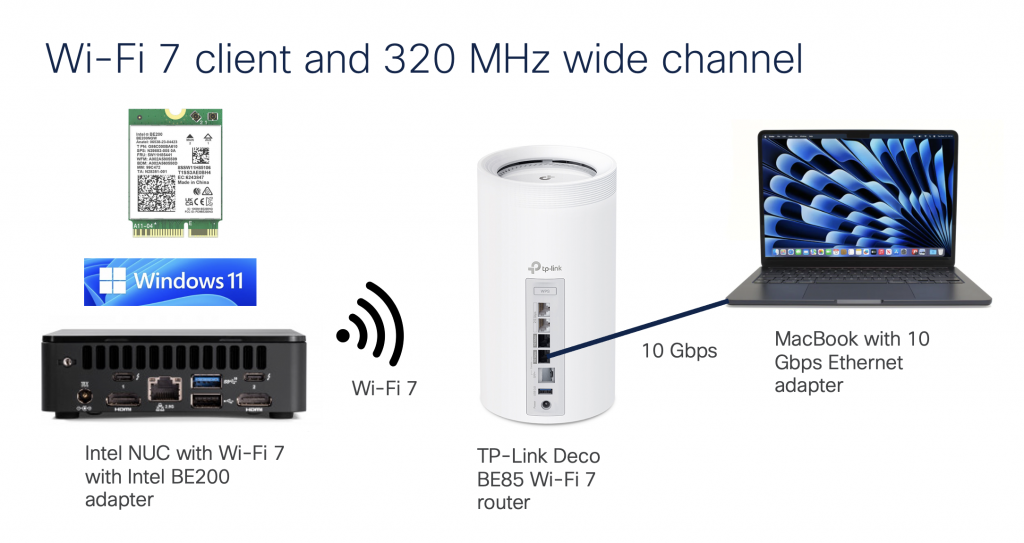
Wi-Fi 7 on Windows 11 test topology

Performance

On the router, we have configured and verified 320 MHz wide Wi-Fi 7 channel. But when we connect the Windows client, looking at the data rate, it is surprisingly low – if you forgive me calling 2882 Mbps ‘low’ 😊 Considering that the NUC is about 1 meter away from the router, I would expect ~5 Gbps data rate. So what’s going on here?
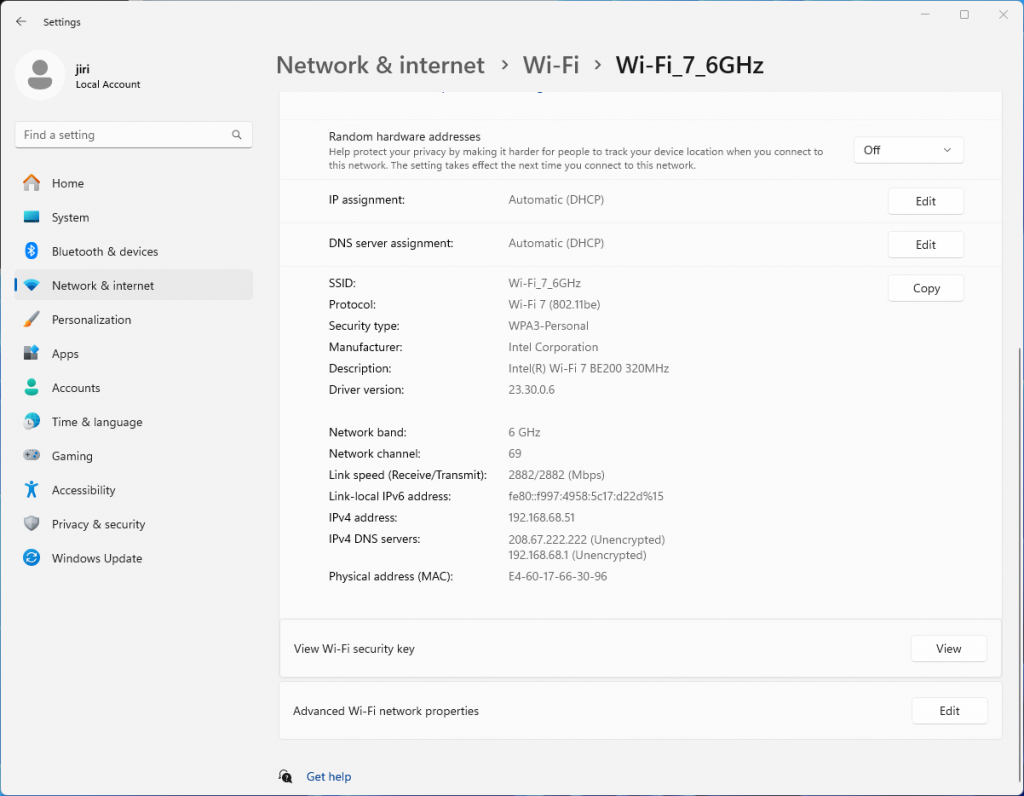
Connected Wi-Fi 7 client, but low data rate

Interestingly enough, it is the same data rate as we see when connected using 5 GHz 160 MHz channel. Yes, I know, that’s a no-no in Wi-Fi design. We are just testing here.
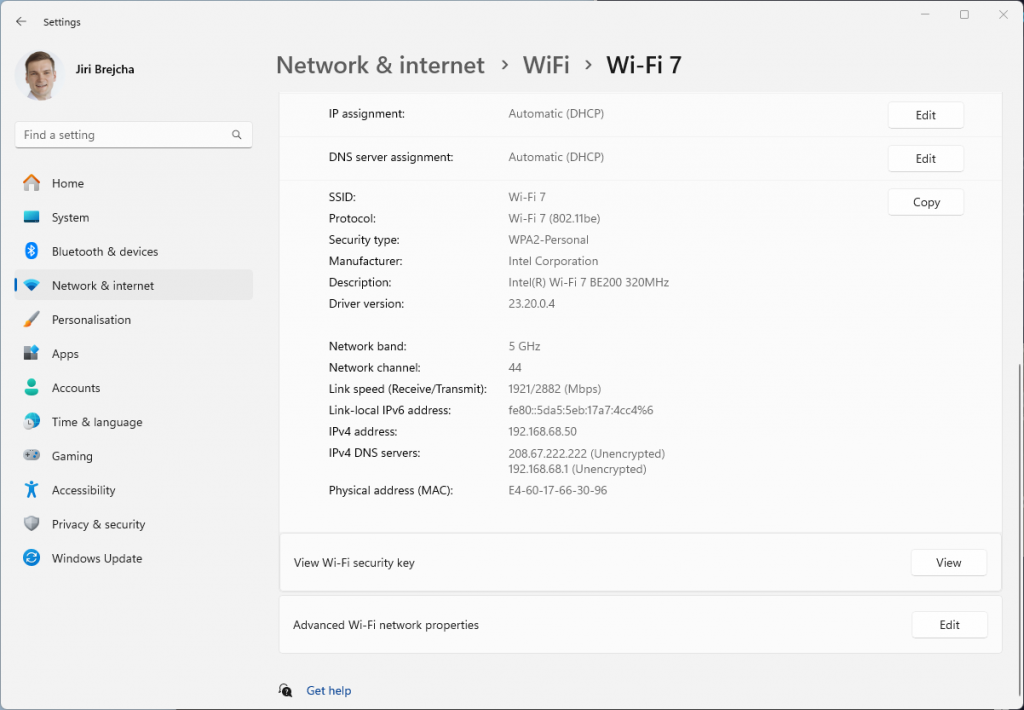
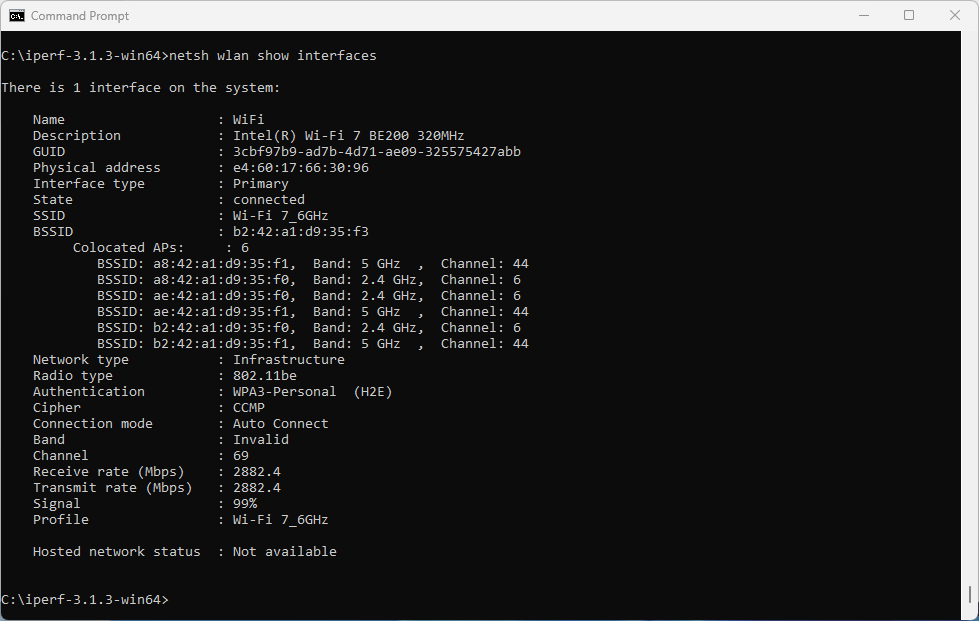
Hmm, 160 MHz wide 5 GHz channel gives us the same data rate
netsh wlan show interfaces command output

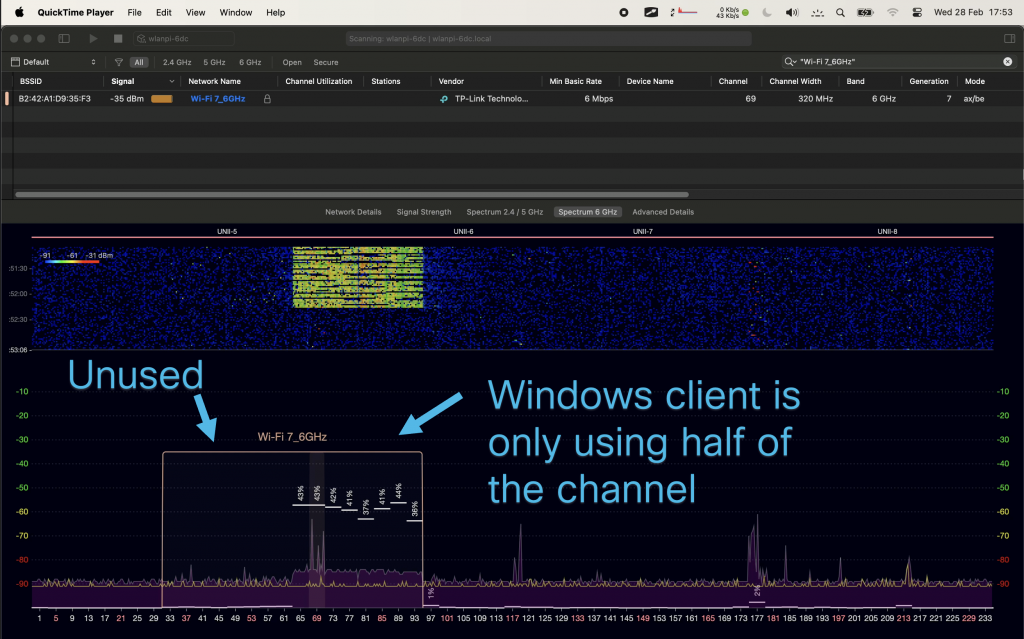
Since Windows doesn’t expose the channel width in the UI, we don’t quite know what is happening on the air. Let’s generate some 6 GHz traffic, and check using Oscium’s WiPry Clarity tri-band spectrum analyser. I love this little USB tool. In this example I use a WLAN Pi as a Remote Sensor. It scans for Wi-Fi networks and streams spectrum information to WiFi Explorer Pro on Mac.
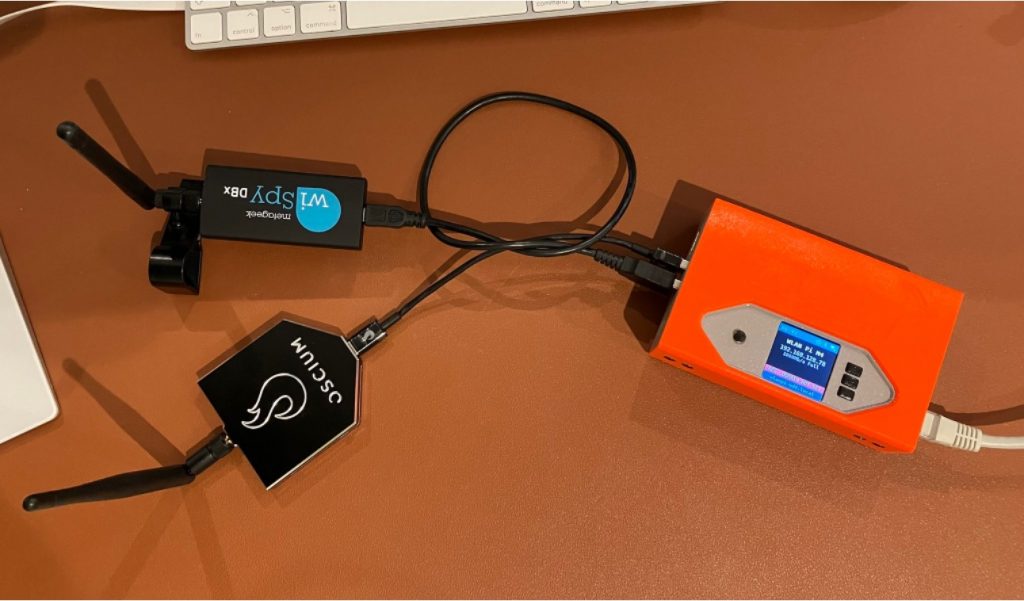
WLAN Pi Remote Sensor with Oscium WiPry Clarity scanning 6 GHz
Windows client is using 160 MHz instead of 320 MHz

Bingo! Apparently, on Windows Intel BE200 uses 160 MHz channel width and doesn’t support 320 MHz wide channel. That halves our data rate and throughput. I wish Windows made channel width more obvious in the UI. Intel BE200 adapter supports 320 MHz wide channels on Linux without a sweat, so hopefully it will get fixed in a future Intel driver or Windows release.

Updated: Apparently, I didn’t read Intel’s release notes closely enough, my bad 😊 Intel BE200 adapter on Windows 11 is only able to use Wi-Fi 6E today. Windows 11 will introduce Wi-Fi 7 support in a future update. Since Wi-Fi 6E supports channel widths up to 160 MHz, that’s why we are not being able to use full 320 MHz channel width. What really confused me was the “Protocol: Wi-Fi 7 (802.11be)” misleading Wi-Fi network status reported by Windows. Thank you Ben for spotting the note in Intel’s documentation.

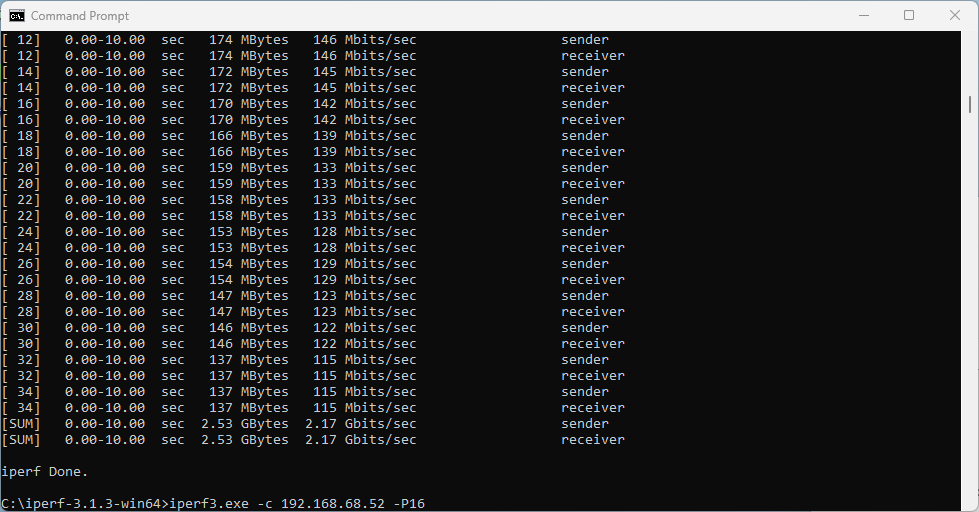
What does that translate to? Lower data rate and lower throughput. I would expect download and upload to be around 2.5 Gbps using 320 MHz wide channel. With the latest Intel driver 23.30.0.6, we get 1.71 Gbps TCP download speed with 16 parallel streams, and upload of 2.17 Gbps. But only the upper 160 MHz half of the 320 MHz wide channel is used.
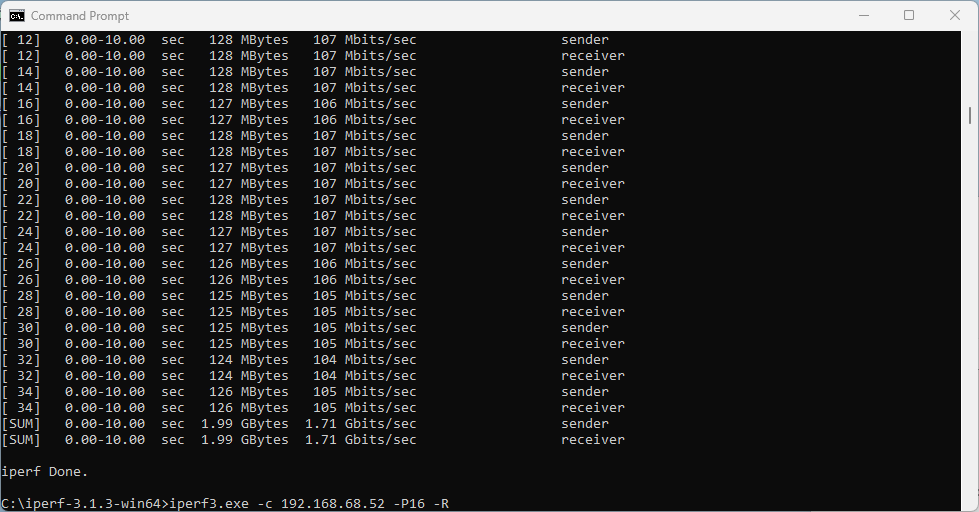
1.71 Gbps TCP download speed with 16 parallel streams
Upload TCP speed 2.17 Gbps with 16 streams

I also ran a quick Speedtest.net test (I know it is not a proper throughput testing tool) on a 900/900 Mbps WAN link.

On a Linux Wi-Fi 7 client, I measured nearly 890/890 Mbps. Original Intel driver 23.20.0.4 performed 383/818 Mbps. The latest Intel driver 23.30.0.6 delivered more symmetric numbers, and results were closer to the actual WAN link speed.
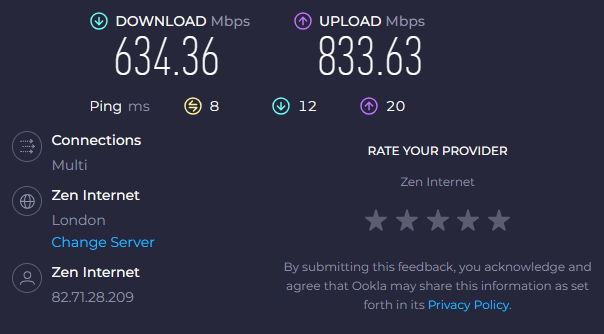
Speedtest.net speeds using the latest 23.30.0.6 Intel driver

Summary

Wi-Fi worked well, but application speeds including Speedtest.net and other tools performed quite poorly and subjectively ‘felt slow’. iperf3 test showed higher performance, but the main problem for the purpose of a throughput test is that the adapter only uses 160 MHz out of the available 320 MHz.

When it comes to recommended channel width in real world, it depends. 80 MHz or 40 MHz wide channels are most likely the best place to start depending on your circumstances and region.

For reference: Disable 6 GHz on Intel BE200 adapter

If you are performing tests on an SSID that has multiple bands enabled, and you want to force the client to drop off 6 GHz and join using a 5 GHz channel instead, Intel BE200 driver has the option to disable the 6 GHz band.
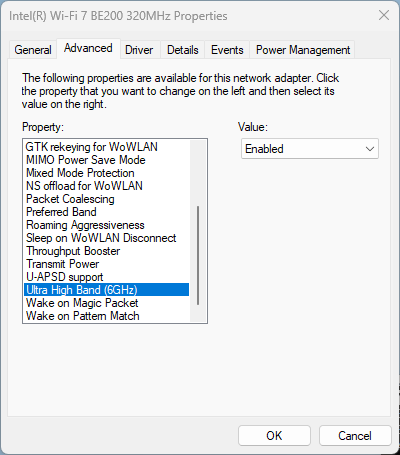
Disable 6 GHz band on Intel BE200

10 Gigabit Ethernet on Intel NUC

Earlier this week, I tested a 10 Gigabit Ethernet M.2 network adapter on Raspberry Pi 5, and it didn’t quite cut it. Mainly due to limited PCIe Gen 2 performance. Now, the question is can this 10 Gigabit adapter actually push 10 Gbps of traffic at all?

To find out, we are going to slightly reconfigure this Intel NUC 12th generation mini PC. It has an M.2 M-key slot for NVMe drive. Let’s use this slot for our 10 GbE adapter. And we will boot Windows 11 off an external USB SSD drive.

Remove NVMe from the M.2 slot
Install 10 GbE network adapter instead
Intel NUC with 10 GbE adapter connected to 10 GbE switch

Install Windows 11 23H2 version on a USB SSD drive, boot Windows, run Windows Update, voila!

Windows Update installed latest driver automatically
It uses PCIe Gen 3
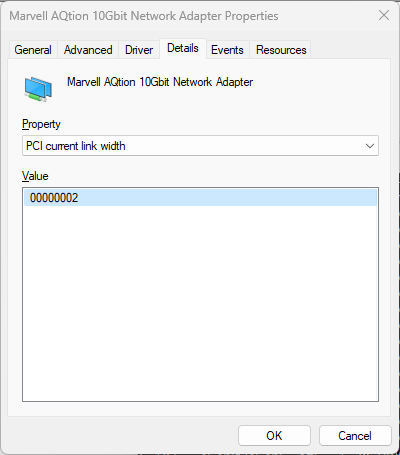
And x2 link width
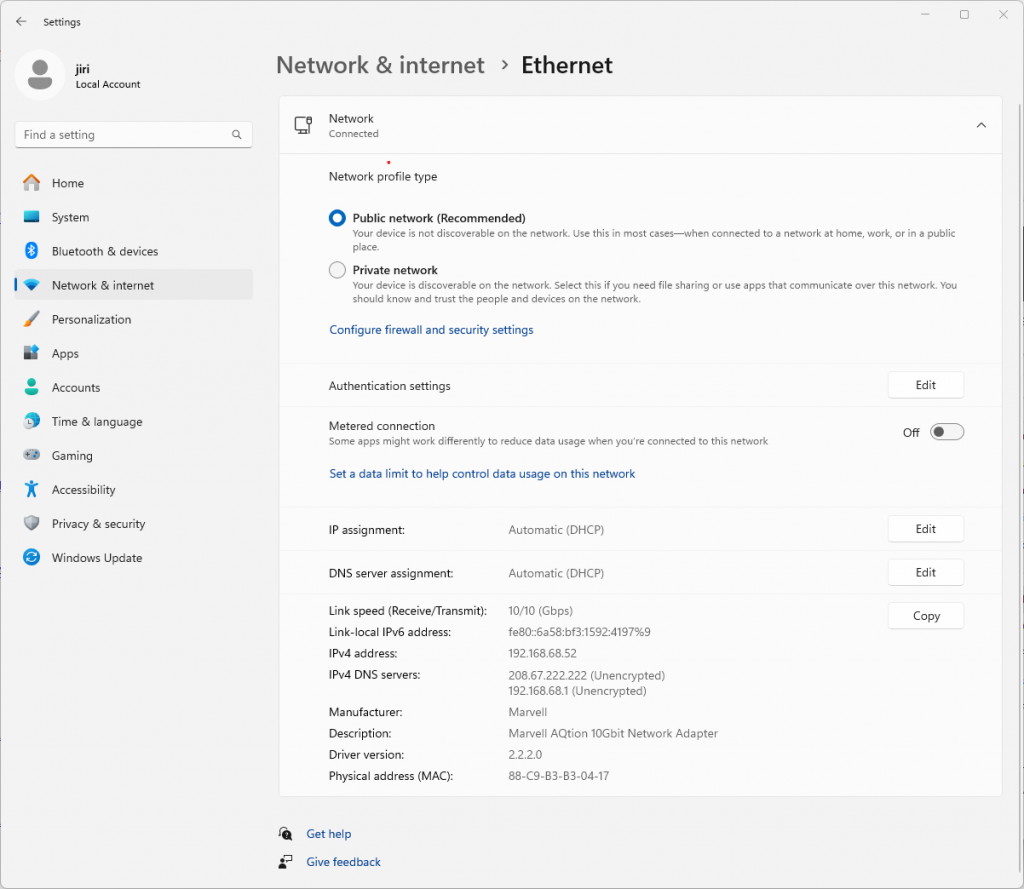
10 Gbps Full Duplex

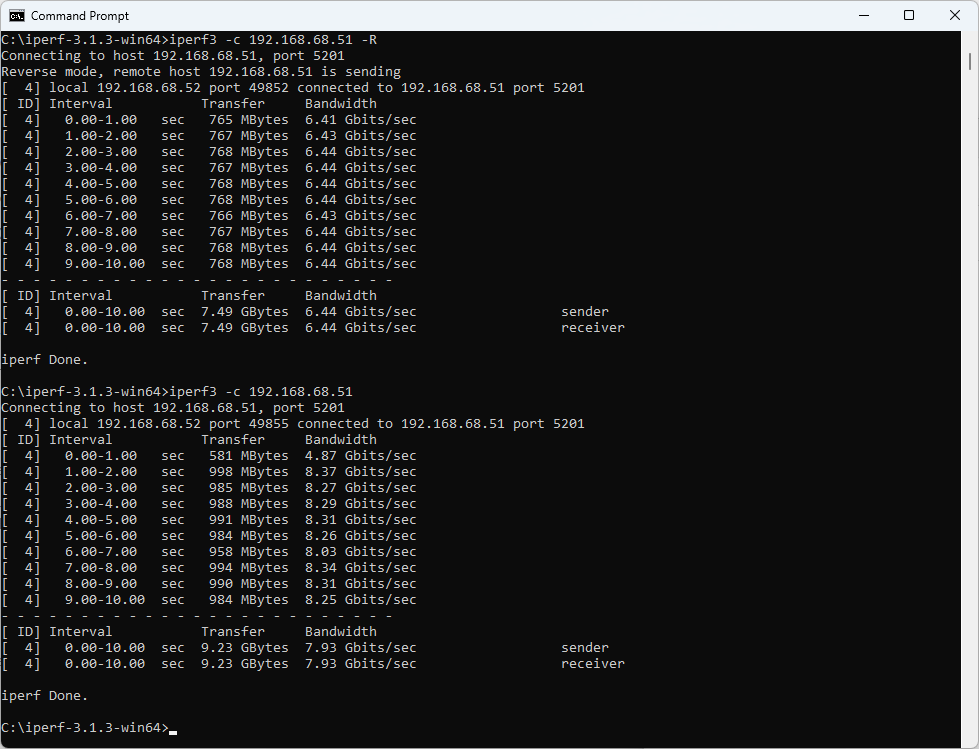
With default iperf3 settings we get 6.44 Gbps/7.93 Gbps in the downlink and uplink direction respectively. Not bad, but is that it? Of course not.

iperf3 with default settings

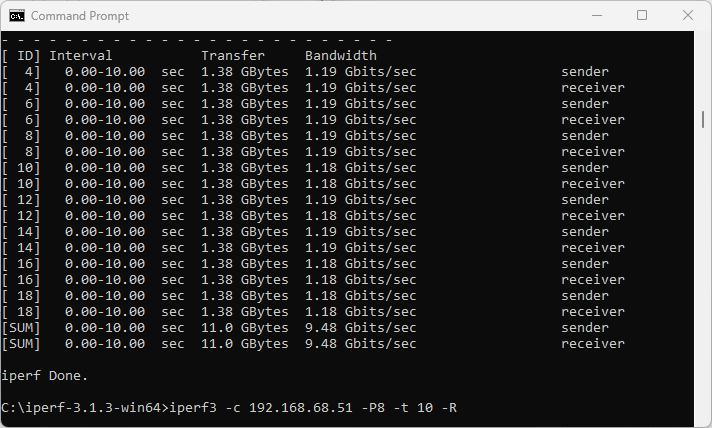
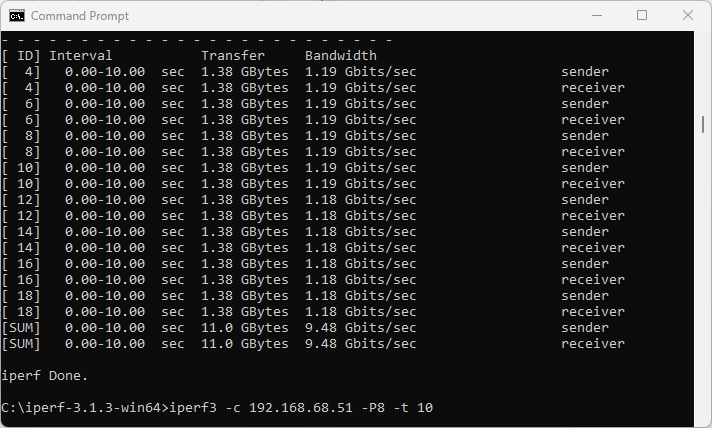
I don’t really want to enable Jumbo frames as it’s not always possible to enable Jumbo frame support end-to-end, especially if part of the network doesn’t support it or isn’t under your management. Fortunately, 8 parallel TCP streams in iperf3 do the trick for us. We get 9.48 Gbps download speed.

9.48 Gbps download

In the upstream direction from this NUC to my MacBook with 10 GbE adapter, we also get 9.48 Gbps. I am happy. You? 😉

9.48 Gbps upload

Summary

After all, this 10 GbE M.2 network adapter is indeed capable of pushing 9.48 Gbps of traffic in either direction. But! It is not really a good choice for a system like Intel NUC. I can’t pop the lid back on, the heatsink is too tall. Frankly, I can’t recommend this adapter at all. It runs hot at 84° Celsius in idle.

If you are looking for a daily driver, and your system supports Thunderbolt, get yourself this OWC 10GbE to Thunderbolt adapter. Here is my test. It works out of the box on Windows (I tested this Intel NUC 12th Gen) and macOS (I tested MacBook Pro M1 and M2). Interestingly, it uses the same chip as the above M.2 adapter. Just compare the two products and their heatsink sizes. The AQC107 keeps the main CPU utilisation very low, but it produces a significant amount of heat.

OWC 10 GbE to Thunderbolt network adapter connected to Intel NUC
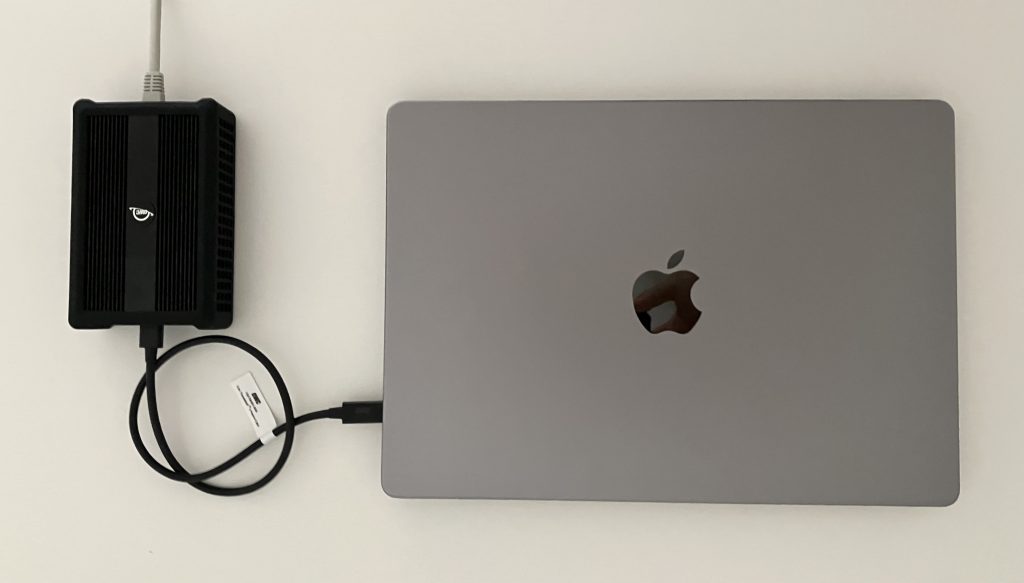
OWC 10 GbE to Thunderbolt network adapter connected to MacBook

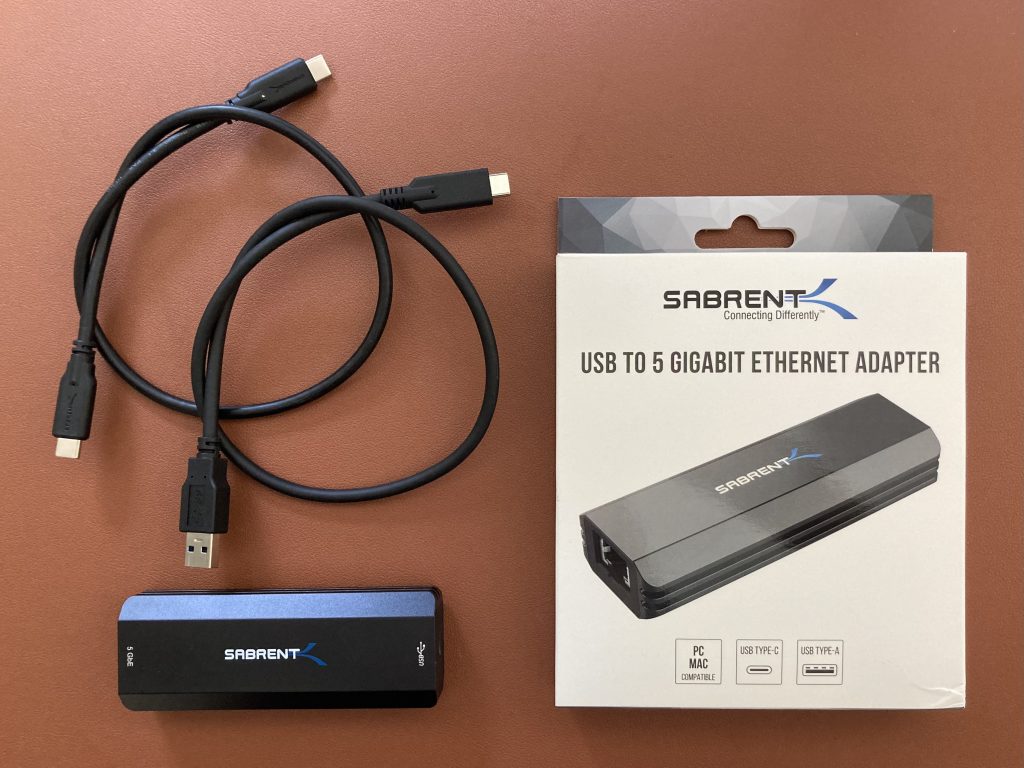
Sabrent 5 GbE Multigigabit Ethernet Adapter

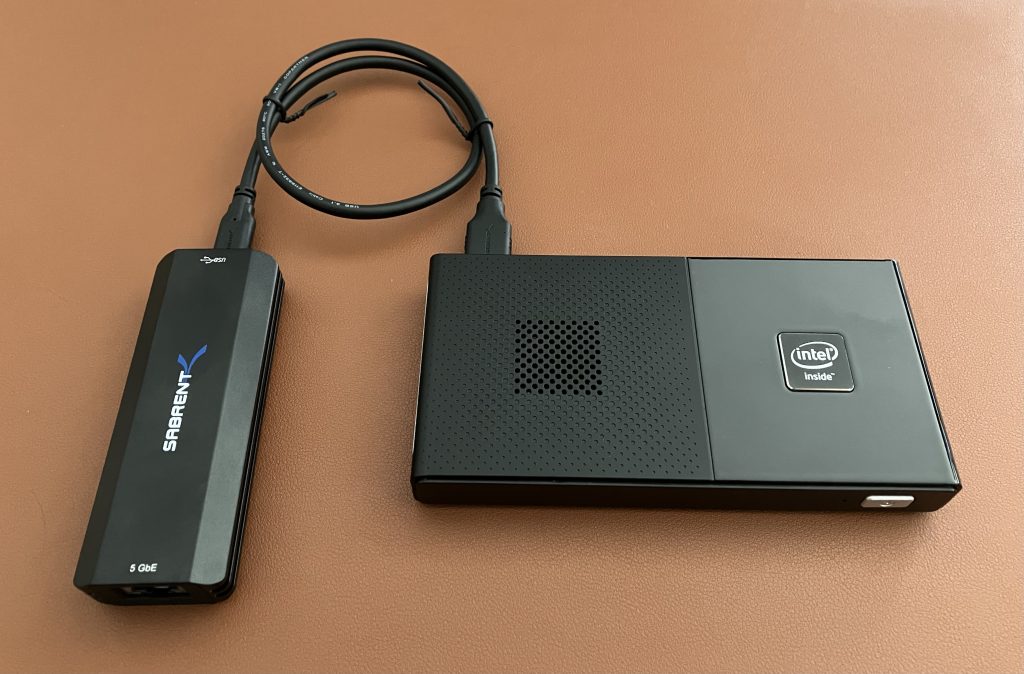
Sabrent NT-SS5G is a 5 GbE USB adapter, which allows you to achieve higher throughput than 2.5 GbE adapters, and break the 2.35 Gbps barrier. It works great on Windows. If you are a macOS or Linux user, I recommend you consider other options like this instead.

The adapter itself is larger than 2.5 GbE adapters, it uses AQC111U chip, and ships with short 2 detachable USB-A and USB-C cables. USB-C port on its back connects the adapter to your computer. A metal shell protects it, serves as a heatsink, and also adds to its weight.

Windows 11

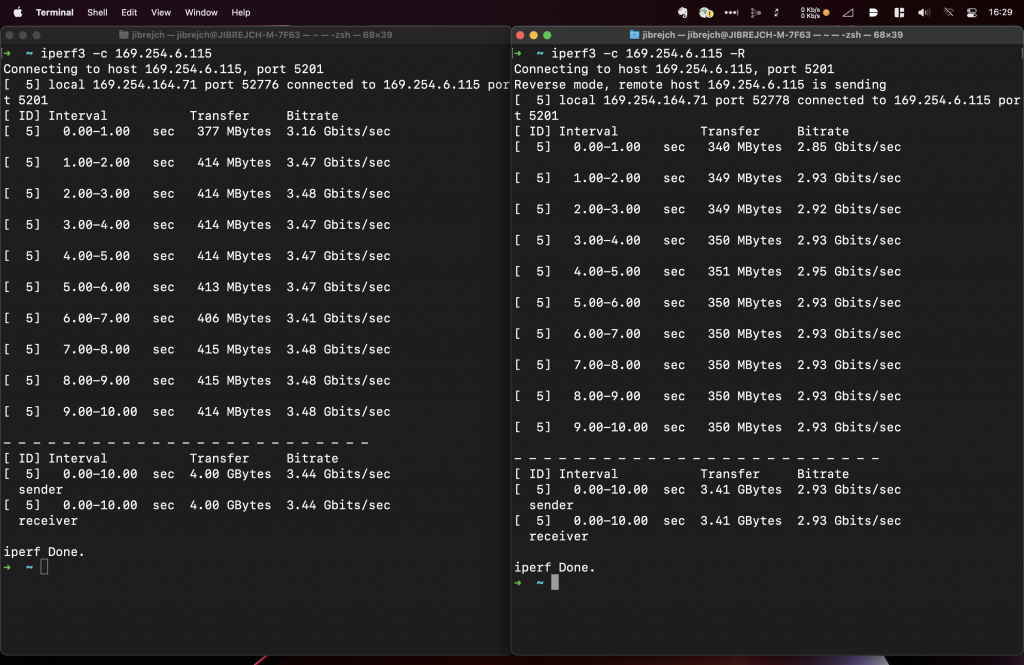
Install the driver from Sabrent’s website and you are good to go. In my tests with this Topton M6 Mini PC, I measured 2.93 Gbps down and 3.44 Gbps up with default iperf3 settings.

2.93 Gbps down and 3.44 Gbps up with default iperf3 settings

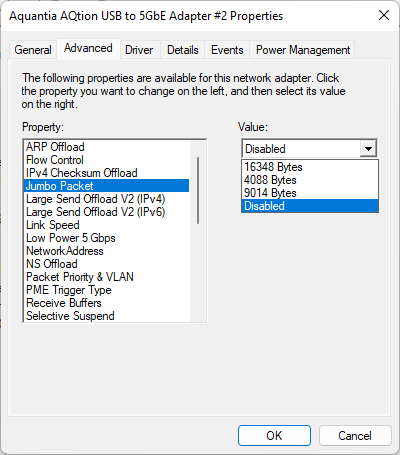
In adapter options, you can actually configure quite a few things including Jumbo frame support. Note that these are fixed values.

macOS

I can’t recommend this adapter for macOS users. It forces you to disable macOS System Integrity Protection (csrutil), otherwise it won’t work. It might be okay for a proof of concept or lab setup, but I would hesitate from using it in production.

This is how to install the driver if you were interested:

  1. Install the driver using the pkg file provided by Sabrent. It installs a Kernel Extension (kext), which drives this adapter.
  2. Enable the extension by going to System Preferences > Security & Privacy > enable the extension > Reboot.
  3. After reboot, unplug the adapter and plug it back in.
  4. It should work as long as you leave the System Integrity Protection disabled.

From throughput perspective, it saw download speeds of 3.30 Gbps, and upload of 3.45 Gbps. This was with default iperf3 settings, standard 1500-byte MTU and one stream. Great results considering that this adapter’s USB interface maximum theoretical throughput is 5 Gbps.

In my view, you might be better off buying a 2.5 GbE adapter, which can push 2.35 Gbps up and down consistently and with no driver installation needed. I tested one here. Alternatively, a 10GbE Thunderbolt Ethernet adapter is even faster choice, but more costly, and larger form factor. Or, if your other half approves, treat yourself to an M1 Mac Mini with built-in 10 GbE 😉

Linux

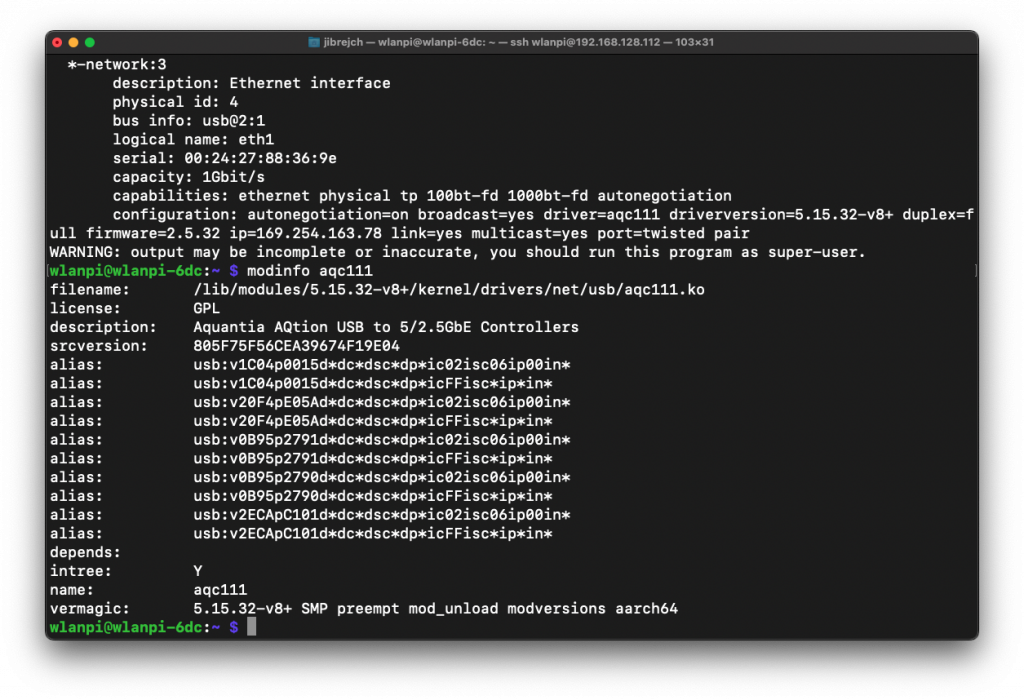
I tested this adapter on 64-bit Raspberry Pi OS running on Raspberry Pi 4. Although the default driver distributed in Linux Kernel 5.15 works, it doesn’t even deliver symmetric 1 Gbps.

Sabrent connected to Raspberry Pi 4
Upload speeds well below 1 Gbps
Default aqc111 driver details

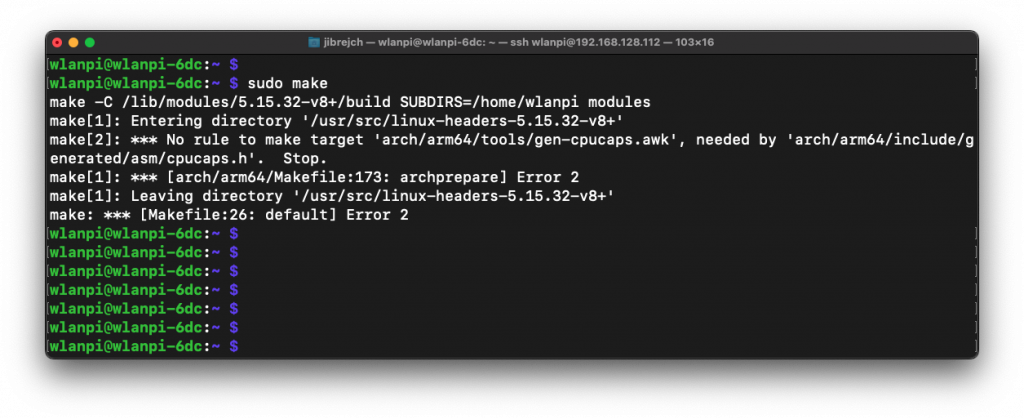
Let’s download the latest driver from Sabrent’s website. Unfortunately that doesn’t seem to be able to compile for 64-bit OS. I tried compiling on 32-bit Raspberry OS, to no avail. If you have any ideas, please do let me know.

So, on Linux, a Realtek RTL8156B based 2.5 GbE adapter might be a better choice for you. Here is the one I tested.

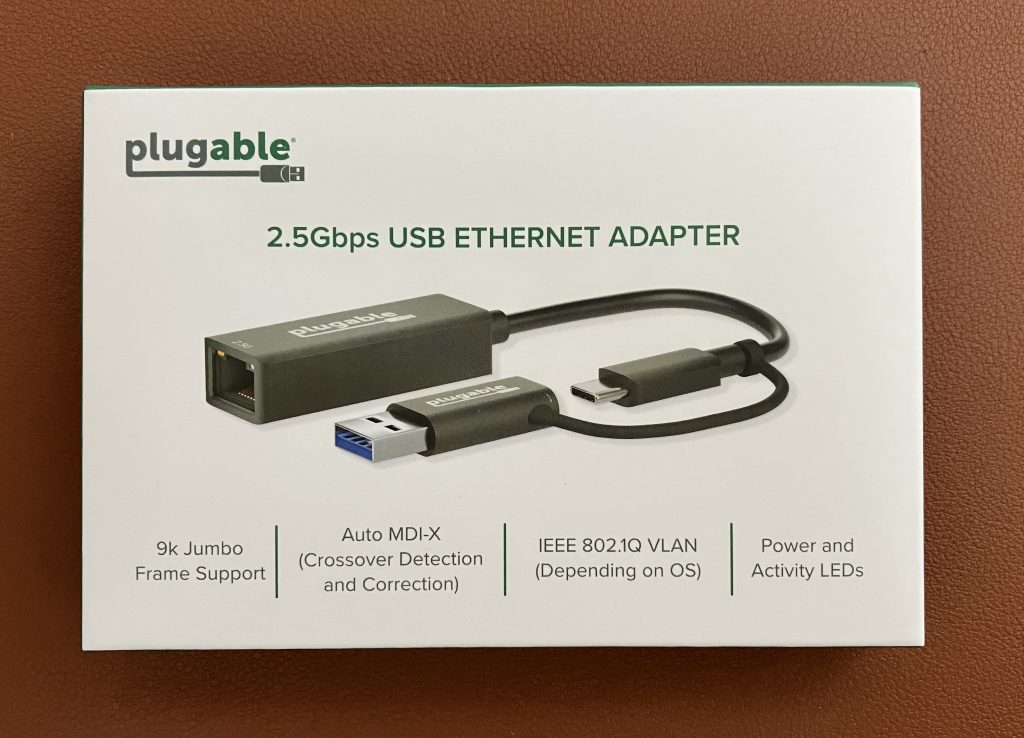
Plugable 2.5 Gigabit Ethernet to USB 3.0 Multigigabit Adapter

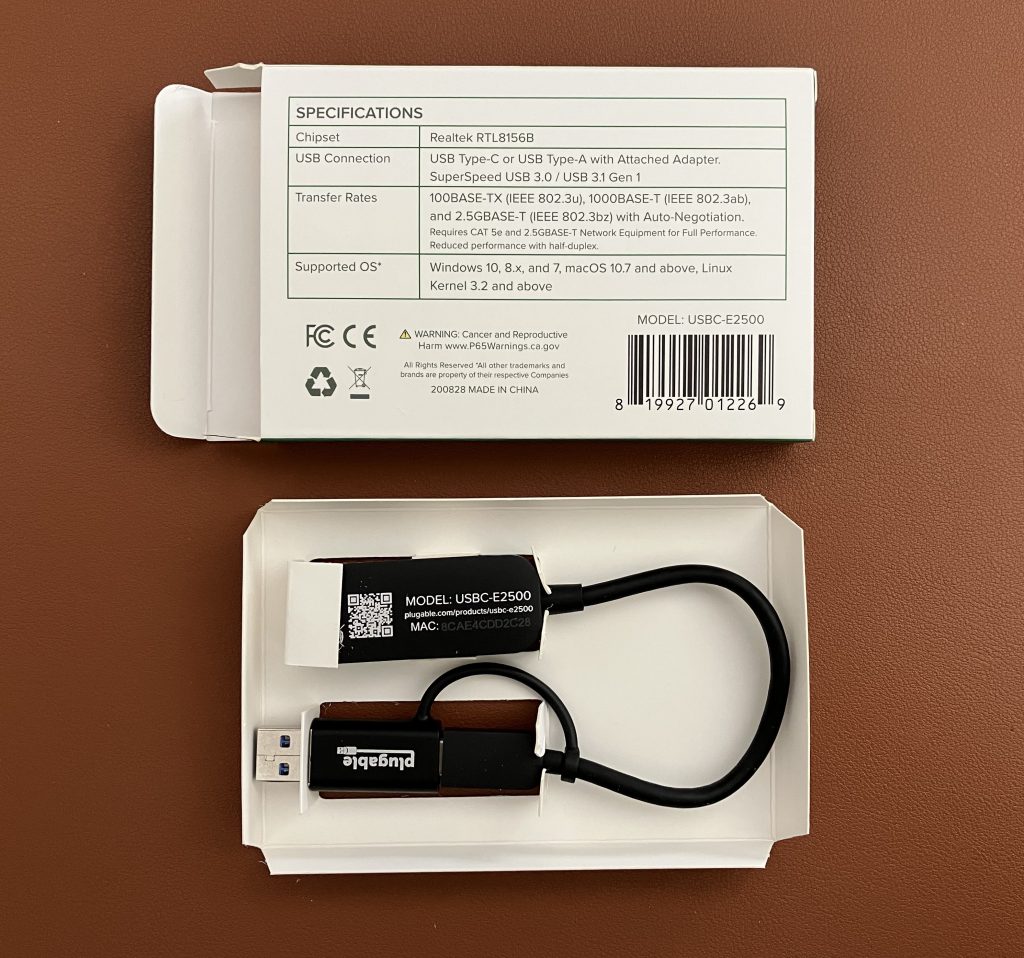
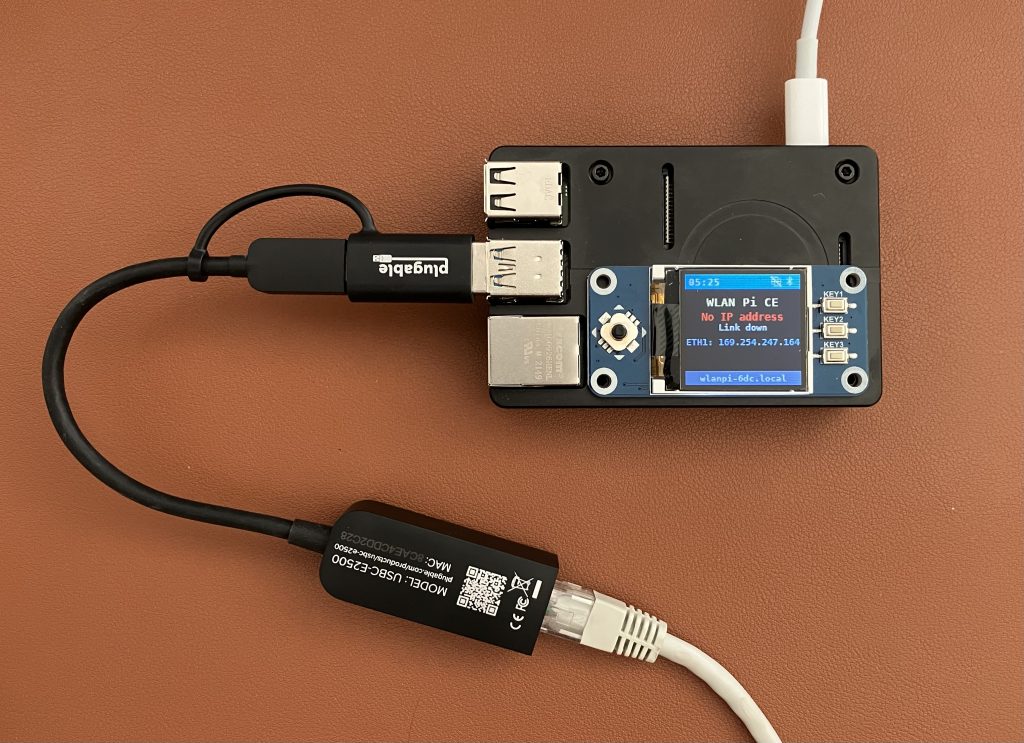
Plugable makes this inexpensive 2.5 Gigabit Ethernet USBC-E2500 adapter. It is based on Realtek RTL8156B chip. On Windows and macOS it works out of the box. If you want to use it on a Linux machine like WLAN Pi Pro or Raspberry Pi 4, expect some troubles along the way, but good performance when you get there.

The USB-C to USB-A adapter is allows you to use it with a MacBook (USB-C) or Raspberry Pi 4 (USB-A)
The adapter itself has a plastic shell and is very lightweight

Windows 11

When they say “update the driver using Windows Update first”, they mean it. Windows 11 will recognise the adapter and you can start using it, but the default driver distributed with Windows 11 significantly reduces this adapter’s performance.

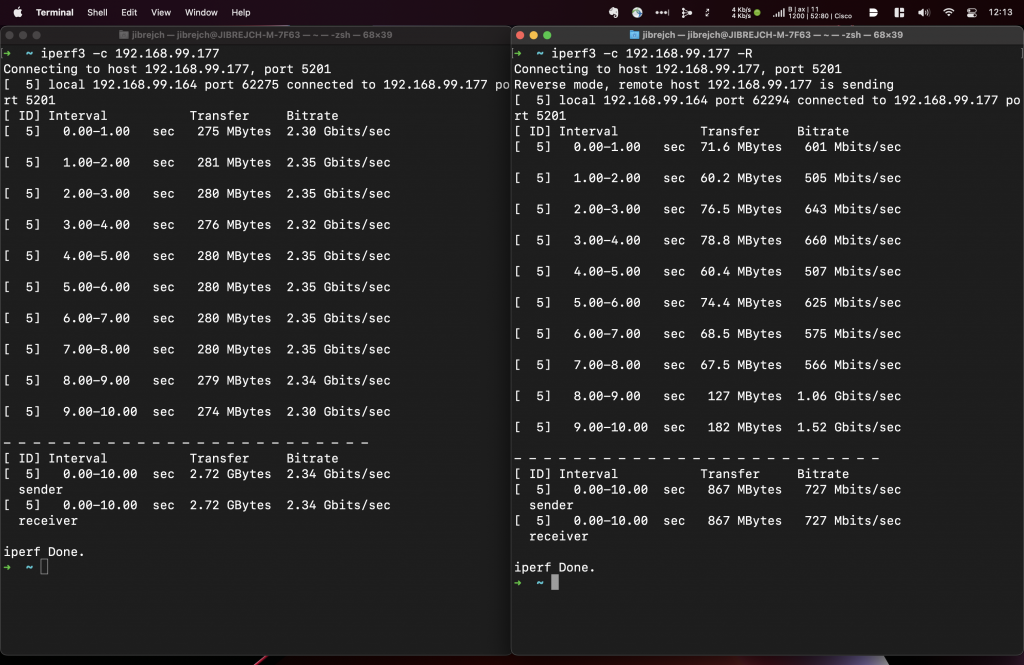
727 Mbps down and 2.34 Gbps up with default driver

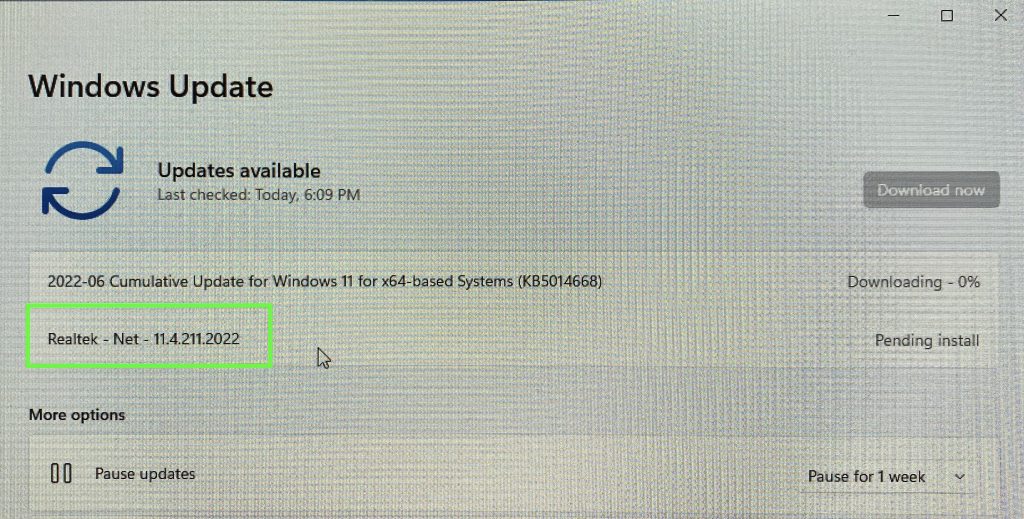
Now, let’s use Windows Update to download the latest driver.

Don’t forget to update the driver using Windows Update

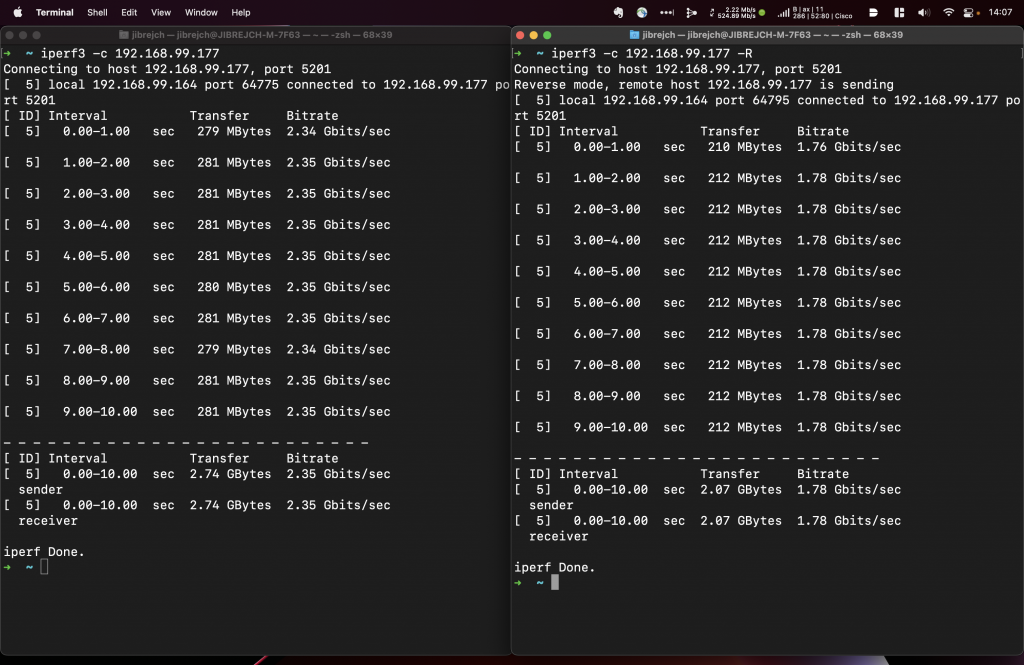
As you can see, download throughput (from iperf3 server to iperf3 client) has dramatically improved.

1.78 Gbps down and 2.35 Gbps up with updated driver

Although the box suggests Jumbo frame support, Windows driver settings don’t give me any option to edit the MTU size. So, I assume Jumbo frames are not supported.

MacOS Monterey

On macOS, this adapter works out of the box with no additional driver installation required. That’s a very nice surprise. And performance is great.

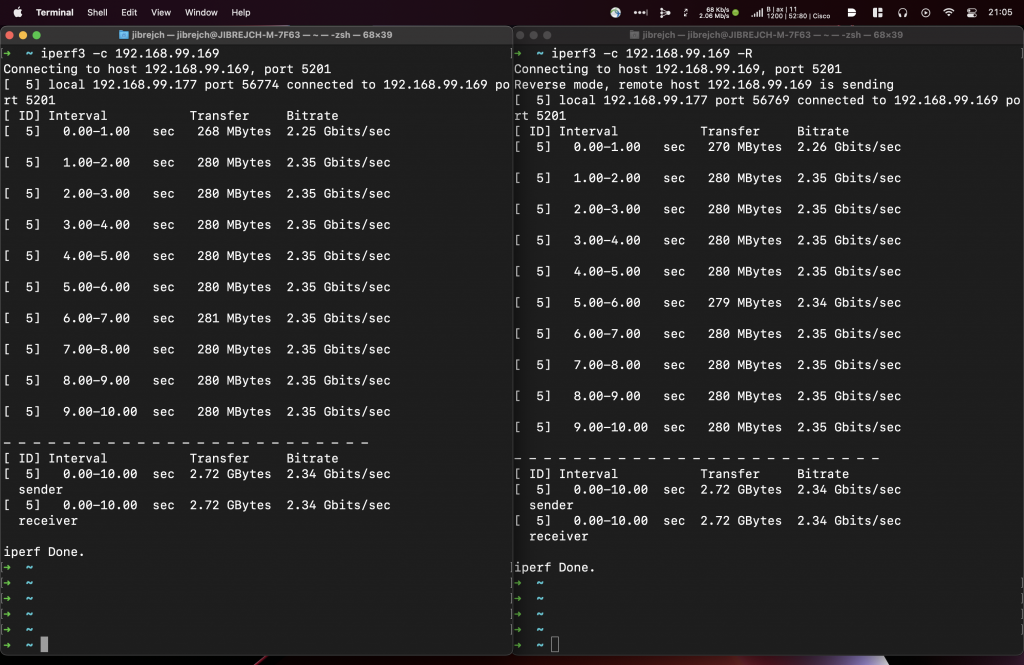
Symmetric 2.35 Gbps throughput on macOS

Auto-negotiation worked just fine. If you want to configure speed or MTU manually, you can, but Jumbo frames are not supported on macOS either.

Jumbo frames are not supported

Linux

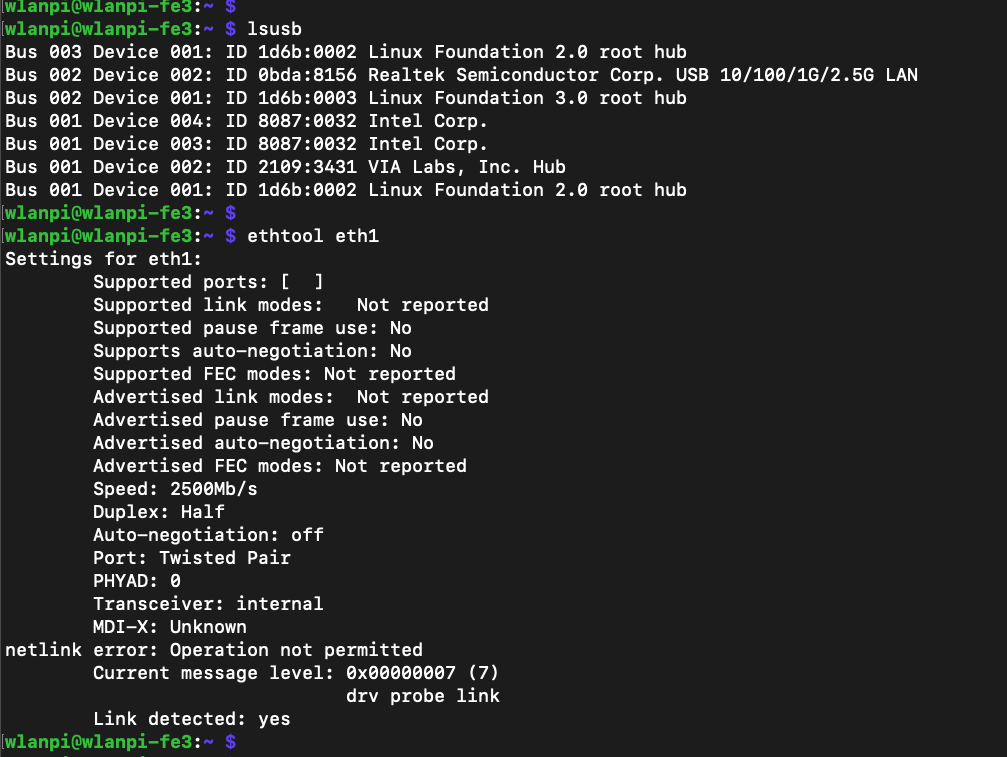
Now the bad news. If you are considering to use this adapter on a Linux machine, the default driver cdc_ncm is a trouble as it only supports 2.5 Gbps Half duplex. Setting Full duplex manually using ethtool command doesn’t work either.

Default driver only supports Half duplex

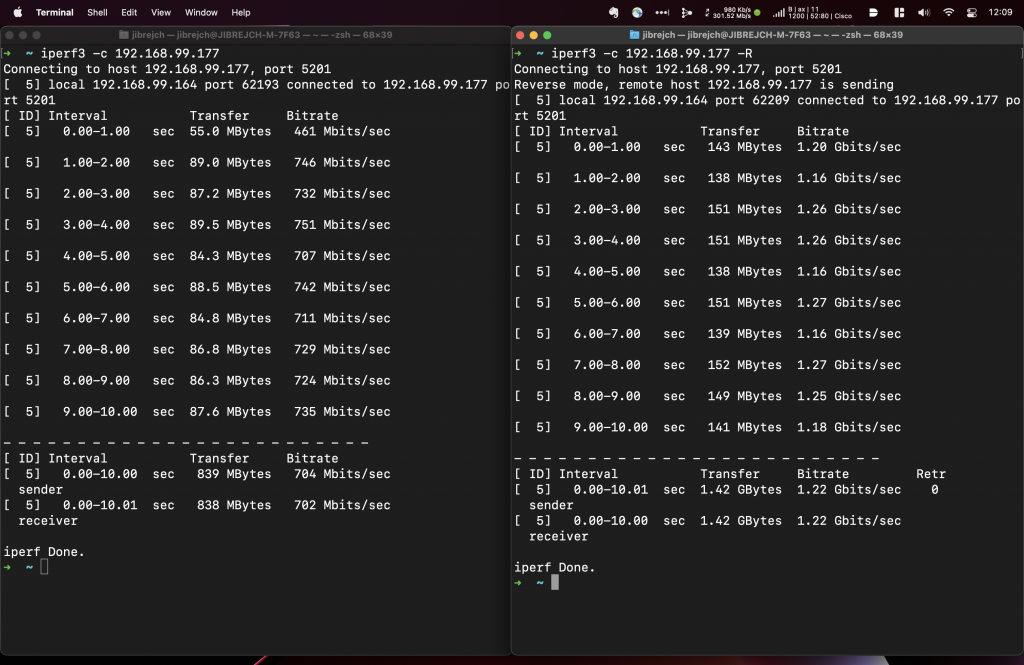
As you might expect, with the default driver and Half duplex, throughput is very poor.

1.22 Gbps down and 704 Mbps up with the default cdc_ncm driver on WLAN Pi Pro

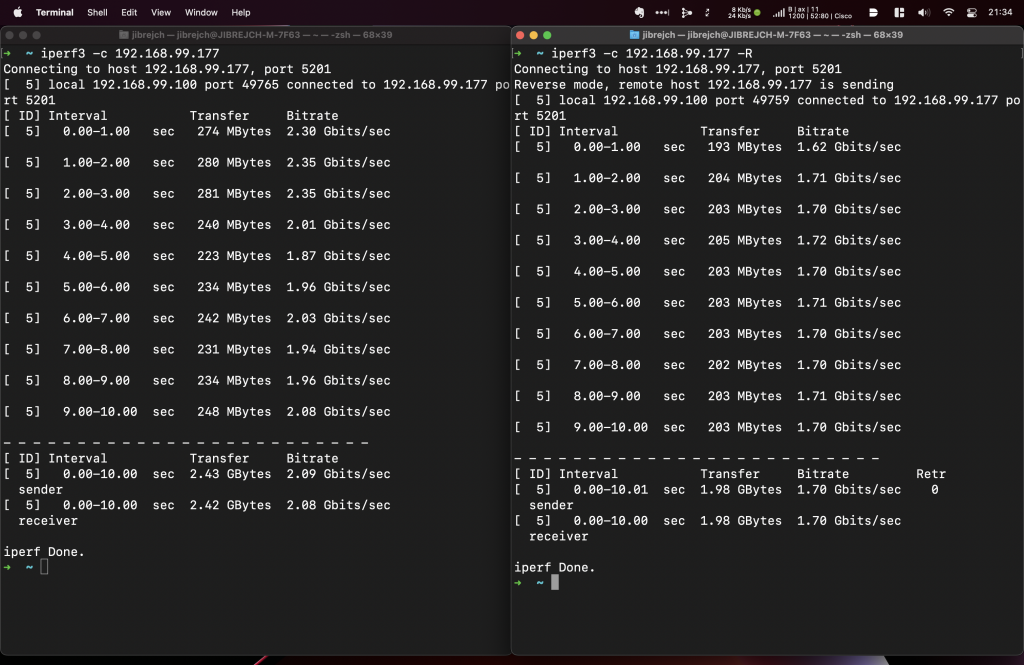
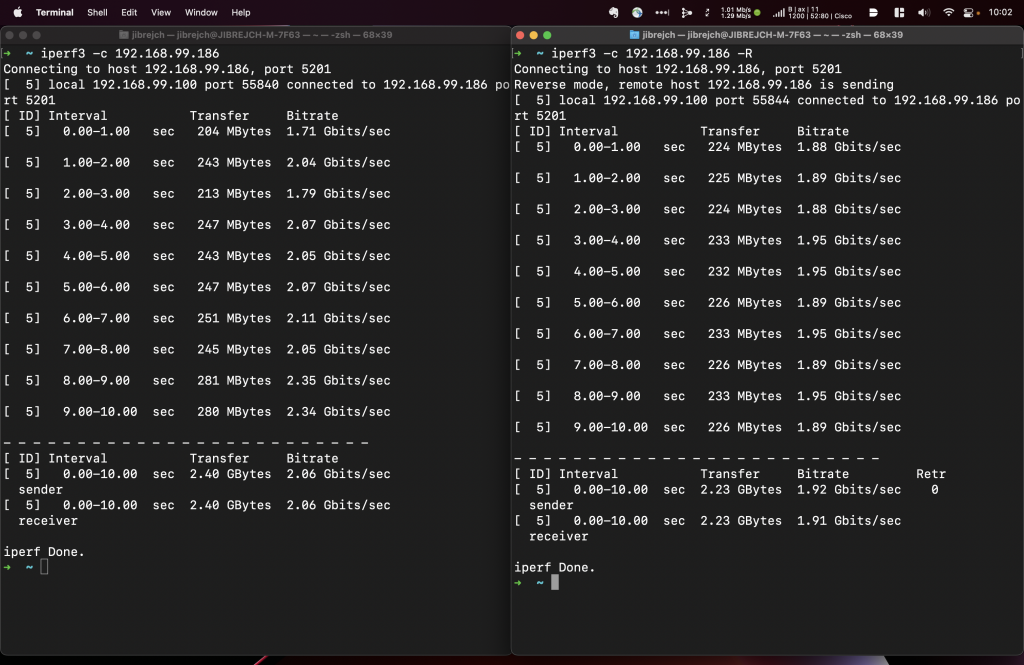
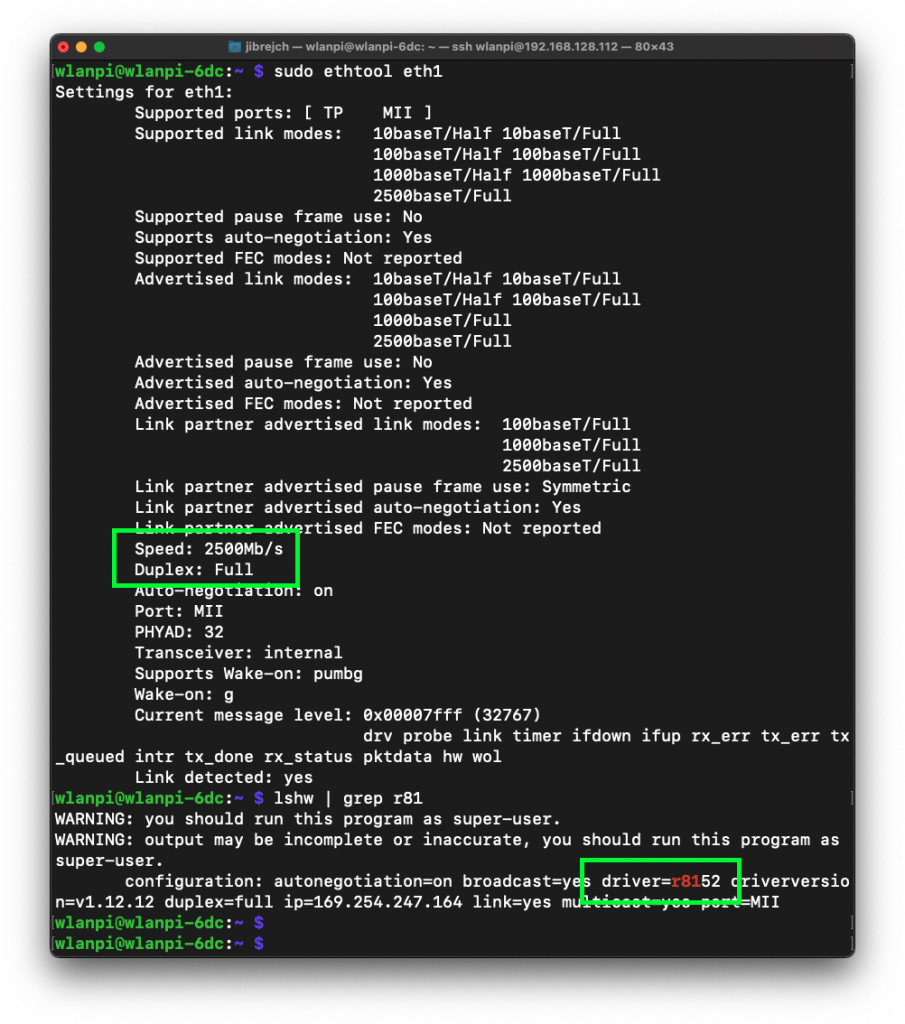
On WLAN Pi Pro and Raspberry Pi 4 running 5.15 Linux Kernel I managed to fix the duplex issue by the steps listed below. But I hit new auto-negotiation issue between the Plugable adapter and Cisco Catalyst WS-C3560CX-8XPD switch. It took the adapter to eventually negotiate 2.5 Gbps Full duplex around 15 minutes of constantly flapping the interface. Forcing speed and duplex on the Plugable adapter by ethtool did not work. Certainly not ideal, and definitely worth testing before you commit to the Plugable adapter. With other multigigabit adapters, the Plugable had no negotiation issues.

1.7 Gbps down and 2.09 Gbps up with r8156 driver on WLAN Pi Pro
1.91 Gbps down and 2.06 Gbps up on Raspberry Pi 4 using the correct r8156 driver
Raspberry Pi 4 also known as WLAN Pi Community Edition

How to force Linux to use the right driver

To enable Full duplex capability, we need to tell Linux to use Realtek r8156 driver instead of the default cdc-ncm.

  1. Download the latest driver from Realtek’s website
  2. Unzip it and copy the 50-usb-realtek-net.rules file to your Linux machine
  3. On the Linux machine copy this file here sudo cp 50-usb-realtek-net.rules /etc/udev/rules.d/
  4. Reboot by sudo reboot
  5. Verify that the adapter negotiated 2.5 Gbps Full duplex and is using the Realtek r8156 driver.