Generate a Wi-Fi QR code offline without relying on random web services

There are many online services that allow you to create a Wi-Fi QR code for free. The problem is that you are giving your SSID and your password (passphrase) in plain text to a random company on the internet. What happens if they sell or leak these?

There is a better way

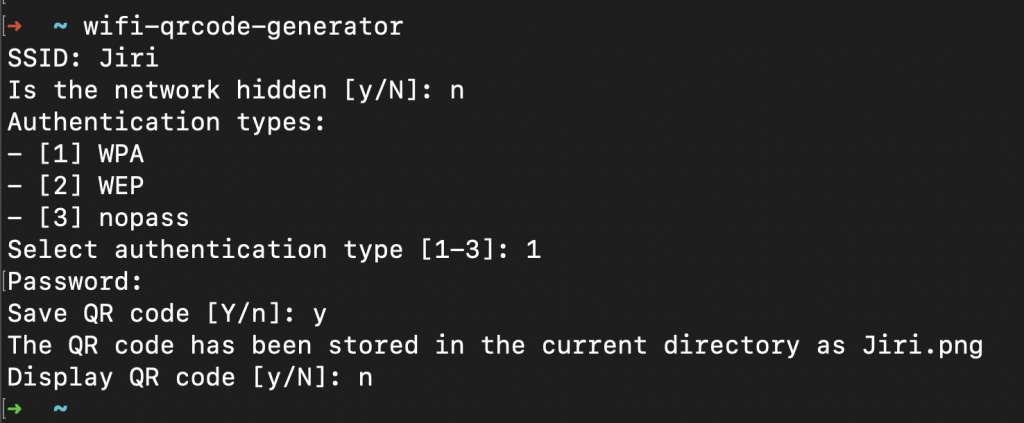
You can easily create a QR code from your Terminal. The tool will guide you through the process.

wifi_qrcode_generator in action

What do we need?

I am using a Mac (it should work the same way on Windows) and we will install wifi_qrcode_generator, which is a Python package. No Python skills needed.

Install the tool

Open macOS Terminal and execute:

pip install wifi-qrcode-generator

Add Python to your PATH variable

You now might be able to start the tool by typing wifi-qrcode-generator in Terminal. If it fails, you might need to add Python to your PATH variable.

  1. Edit this zsh file: nano ~/.zshrc
  2. Add a new line and modify the Python version part if needed: export PATH="$HOME/Library/Python/3.9/bin:$PATH"
  3. Save the file using Control+o and exit using Control+x.

Generate a Wi-Fi QR code the easy way

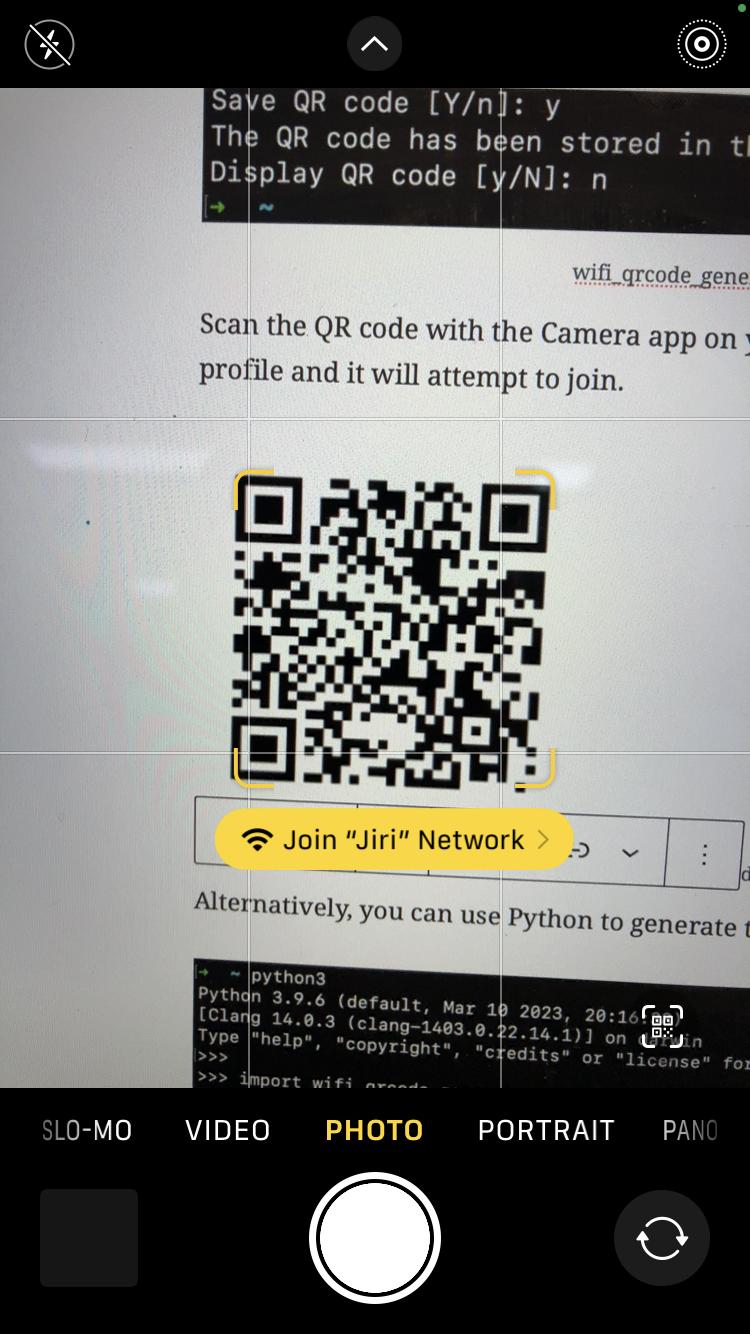
Execute wifi-qrcode-generator in Terminal and follow the instructions.

wifi_qrcode_generator tool in action

If you decide to save it as PNG, the file will save to your home folder.

Generated QR code sample

Scan the QR code with the Camera app on your phone and it will save this new Wi-fi profile and it will attempt to join.

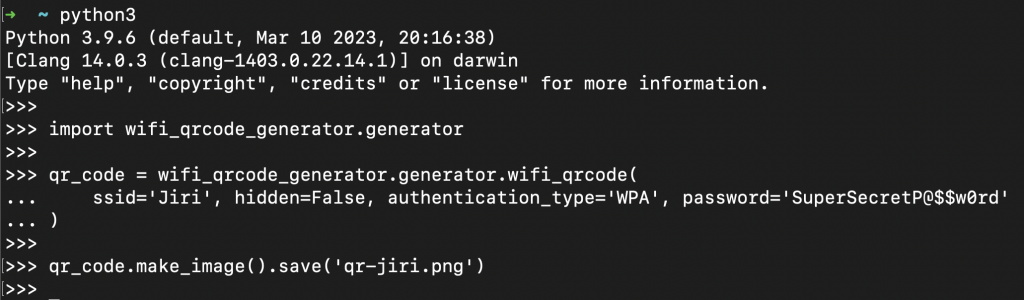
Or use 4 lines of Python to generate the QR code

Alternatively, you can use few lines of Python to generate the code.

import wifi_qrcode_generator.generator
qr_code = wifi_qrcode_generator.generator.wifi_qrcode(ssid='Jiri', hidden=False, authentication_type='WPA', password='SuperSecretP@$$w0rd')
qr_code.make_image().save('qr-jiri.png')

The outcome is the exact same.

New Site Survey mode on Cisco Catalyst Wi-Fi 6E access points

Cisco Catalyst Wi-Fi 6E access points in DNA persona support a new Site Survey mode. It allows you to perform AP-on-a-stick survey, it comes with a fresh web interface, and it supports 6 GHz. This new mode is included in the Lightweight access point software image.

Unlike the Embedded Wireless Controller (EWC) mode, which was available on previous generation of APs, this new Site Survey mode doesn’t require any extra software image download or reflash of the AP.

CW9162 access point in Site Survey mode

What do we need

  • Either of C9136I, CW9166I, CW9164I and CW9162I APs in DNA persona (controller-managed AP running Lightweight software image) works. We are going to use CW9162I-ROW DNA persona AP running 17.9.3 or newer release.
  • Console cable connected to the USB port of your laptop and the RJ45 Console port of the AP
  • PoE injector, PoE-capable battery pack, or switch with PoE support. To power CW916x APs, PoE+ (802.3af) is sufficient. You will need UPOE (802.3bt) to leverage full radio capability of C9136I.

Why the 17.9.3 or newer release

Why am I insisting on 17.9.3 or newer release? There was an issue, which prevented Site Survey mode from working on ROW regulatory domain APs used in the UK. The AP simply won’t accept the GB country code, and it won’t enable 5 GHz and 6 GHz radios. This is fixed in 17.9.3.

How to upgrade the AP to 17.9.3

Simply join the AP to an existing Catalyst 9800 controller running 17.9.3 release. During the join process, the AP will automatically upgrade its software to 17.9.3 to match your controller’s release.

If you don’t have a controller by hand, download and spin up C9800-CL 17.9.3 virtual machine controller on your favourite hypervisor or cloud service and join the AP to it.

How to activate and use the Site Survey mode

  1. Console into the Lightweight AP. Please note Catalyst APs used 9600 baud rate by default, which has recently in 17.12.1 release changed to 115200 bauds.

    Switch the AP to Site Survey mode using this command, press y, and wait for it to reload:

    ap-type site-survey


    Note: Mode change to Site Survey mode erases the AP settings and resets Console port credentials to cisco/Cisco.

  2. After it reloads, ROW domain AP will only broadcast 2.4 GHz survey SSID. No 5 GHz. No 6 GHz. That’s because we haven’t configured any country code yet and it doesn’t know what regulatory to follow. Note the Country NONE value.


  3. If you are using ROW (Rest Of World) domain AP, configure country code using this command using Console connection and reload:

    configure ap country-code GB


  4. The AP will boot up and broadcast the survey SSID on all 3 bands.


  5. Connect to the survey SSID wirelessly. It is an open SSID, no passphrase needed.


  6. Access the access point’s web interface on https://10.0.23.1. Default credentials are admin/admin. Click OK, and change default credentials.

  7. Using the web UI, customise the RF settings to fit your survey needs. Default 6 GHz channel setting is set to Auto, which results in channel 1, which is not a Preferred Scanning Channel (PSC).

    Let’s change it to channel 5 or other PSC channel.


  8. That’s it. Take the AP with you to site and enjoy the survey. When you PoE power it, it will automatically start in the Site Survey mode with your customised settings.

    To scan 6 GHz spectrum, I use WiFi Explorer Pro with WLAN Pi M4 as a remote sensor. It has a built-in tri-band Wi-Fi adapter.
Custom 6 GHz channel and Tx power
Site survey SSID enabled on all 3 bands

New LED pattern in Site Survey mode

During boot, the LED flashes blue.

After the AP successfully starts Site Survey mode, the LED flashes red and green. This is a normal Site Survey mode pattern, and absolutely nothing to worry about.

LED flashes red and green in Site Survey mode

Warning: Read before you switch back to CAPWAP mode

Take a deep breath before you do this

If you switch the AP from Site Survey mode back to CAPWAP mode, you will no longer be able to log in via its Console port. The mode change wipes all CAPWAP settings of the AP including credentials. If you proceed with switch to CAPWAP mode, you will have to perform these steps to regain Console port access:

  1. Join the AP to a Catalyst 9800 controller
  2. Create Console port credentials and Enable password in AP Join Profile of the controller (Configuration > AP Join)
  3. Controller automatically pushes these newly created credentials to the AP
  4. You can now login to the Console port of the AP and switch back to Site Survey mode or run other commands

How long does a Site Survey AP take to boot?

From plugging the Ethernet cable in to seeing the SSIDs on the air, it takes about 3-4 minutes. DFS channels take 4 minutes or so, other bands come up faster.

Does the AP need wired connectivity or IP address on its Ethernet interface?

No, wired connectivity is not needed. The AP can just be powered by a power injector with no upstream Ethernet link. No IP address is needed on the wired port of the AP.

Does internet connectivity work?

Yes, it does. If you connect AP’s Ethernet port to infrastructure that provides internet, wireless clients connected to the AP in Site Survey mode get internet access too.

The Ethernet interface of the AP gets an IP address via DHCP from the existing infrastructure. The AP has its own DHCP scope 10.0.23.0/24 enabled on its survey SSID. It then NATs traffic coming from wireless clients to the wired network.

iPad Pro Wi-Fi 6E Preference of 5 GHz over 6 GHz

You may have read my 6 GHz discovery test of the new Wi-Fi 6E iPad Pro. This time we ask the “Hey Siri, what is iPad Pro’s favourite band?” question.

Since Apple hasn’t published any documentation that would cover this subject, I configured a tri-band SSID on Catalyst 9136 AP. The SSID name is the same for all 2.4 GHz, 5 GHz and 6 GHz bands. Now, what band does iPad prefer?

Setup

  • Wi-Fi 6E iPad Pro 11-inch (4th generation) running iPadOS 16.1
  • Catalyst 9136 Wi-Fi 6E AP
  • C9800-CL cloud controller running 17.9.2

Max transmit power and 80 MHz wide 5 GHz channel

All 3 bands are enabled with manual Power Level 1 (PL1), which forces the AP to use highest permitted Transmit Power.

In this case, the 6 GHz SSID had the strongest absolute signal strength (RSSI) of the 3 bands.

  • 2.4 GHz enabled, PL1
  • 5 GHz channel 36, 80 MHz wide, PL1
  • 6 GHz channel 5, 80 MHz wide, PL1

The iPad prefers the 5 GHz band and joins using this band.

Reduce transmit power on 5 GHz radio

Let’s use the exact same configuration as above and reduce 5 GHz radio’s transmit power to the lowest, Power Level 8 (PL8). Will that make it prefer 6 GHz?

  • 2.4 GHz enabled, PL1 (RSSI on the iPad -31 dBm)
  • 5 GHz channel 36, 80 MHz wide, PL8 (RSSI on the iPad -55 dBm)
  • 6 GHz channel 5, 80 MHz wide, PL1 – strongest absolute RSSI (RSSI on the iPad -30 dBm)

Yes! The iPad Pro prefers 6 GHz every single time. As you can see, the 6 GHz RSSI is 25 dB stronger than the 5 GHz one, which is why (as far as I can tell).

Narrower 5 GHz channel

We are using the the same configuration as in our very first scenario, but 40 MHz we will reduce 5 GHz channel width to 40 MHz.

  • 2.4 GHz enabled, PL1
  • 5 GHz channel 36, 40 MHz wide, PL1
  • 6 GHz channel 5, 80 MHz wide, PL1

Using narrower 5 GHz channel makes the iPad connect using 6 GHz instead.

Disable 5 GHz radio

This time we disable 5 GHz radio and see if 2.4 GHz or 6 GHz wins. I have high hopes for 6 GHz, you?

  • 2.4 GHz enabled, PL1
  • 5 GHz disabled
  • 6 GHz channel 5, 80 MHz wide, PL1 – strongest absolute RSSI

Indeed, the iPad prefers 6 GHz.

Now, let forcefully shut the 6 GHz radio on the AP. iPad moves to its only available option, the 2.4 GHz radio and happily lives there. We now reenable the 6 GHz radio. The iPad doesn’t automatically jump back to 6 GHz, although 6 GHz has stronger RSSI. When we disabled iPad’s Wi-Fi radio, and reenable, it connected on 6 GHz.

Make 2.4 GHz stronger than 6 GHz and disable 5 GHz

Can we make 2.4 GHz appealing enough to the iPad so that it would prefer it over 6 GHz? Let’s disable 5 GHz radio, keep max transmit power on 2.4 GHz, and reduce 6 GHz transmit power to the lowest Power Level 8 (PL8).

  • 2.4 GHz enabled, PL1
  • 5 GHz disabled
  • 6 GHz channel 5, 80 MHz wide, PL8

The 6 GHz RSSI (-45 dBm) is now weaker than the 2.4 GHz RSSI (-33 dBm) by 12 dB. Is it good enough reason for the iPad to prefer 2.4 GHz?

Not really. It connected on 6 GHz 2 times out of 3. Once it connected on 2.4 GHz.

Summary

When 80 MHz wide 5 GHz channel is used, the iPad prefers 5 GHz. If 5 GHz drops below a certain threshold, and is much weaker than 6 GHz, it then prefers 6 GHz.

It prefers 6 GHz over 40 MHz wide 5 GHz channel.

It doesn’t use 2.4 GHz unless it has no other option.

Please take these tests with a pinch of salt. Ideally I would repeat each of them 10 or so times. Time is of the essence and I only repeated each test 3 times.

Peloton bike Wi-Fi connection to a Cisco access point stopped working after a software update

Has your bike suddenly lost its Wi-Fi connection after a Peloton software update? Is it saying “Device not connected to internet”?

Here is why and how to fix it before it hopefully gets fixed in one of the upcoming Peloton software updates.

Peloton bikes use Android operating system, and they have recently upgraded to Android 10. Unfortunately, this version has compatibility issues with Cisco Wi-Fi access points and Adaptive Fast Transition feature, which is enabled by default.

To resolve the issue, simply set Fast Transition to Enabled.

Connect to your Wireless LAN Controller, go to Configuration > Tags & Profiles > WLANs > select the network > click Edit > Security > Layer2 > Fast Transition > Enabled > Update & Apply To Device. Now, test that your bike can connect, and test few other devices to make sure everything is working as expected. Then click the floppy disk icon to save this new configuration.

Apple iOS 14 Private Address feature, per SSID Wi-Fi MAC randomisation and how it actually works

Apple published a brief summary of the newly introduced “Private Address” Wi-Fi feature. Since it does not go into the detail, I tested the public iOS 14.0 release on an iPhone SE and iPad Mini in my lab. Here is how it actually works.

New Wi-Fi networks

For SSIDs you have not connected to before, iOS 14 devices generate a random MAC “Private Address” and they use this MAC address permanently for this SSID. This address does NOT change over time. This works as expected.

Previously used Wi-Fi networks

Known Wi-Fi networks you have already connected to at least once before the upgrading to iOS 14 get a different treatment though. And this is where things are not as straightforward as the documentation suggests.

After upgrading to iOS 14, I connect to a known network which I have already used before the upgrade. The MAC address that is used is actually the real hardware MAC address of the Wi-Fi adapter for 24 hours. Note that the “Private Address” feature is enabled. This could potentially be considered a UI bug.

24 hours after first connecting from an iOS 14 device to this known SSID, the “Private Address” feature kicks in and the MAC address for this SSID automatically switches from the real MAC address to a randomly generated MAC address. Personally, I assume that this 24-hour period has been developed to allow enterprises to disable Private Address feature on their managed iOS devices using MDM, but I may be wrong.

From this point onwards the same randomly generated Private Address is permanently used for this SSID and does NOT change over time.

Schedule WLAN availability on Catalyst 9800 Series Wireless LAN Controllers

Catalyst 9800 controllers come with built-in support for WLAN availability scheduling. When a WLAN becomes disabled, APs do not broadcast the SSID and channel utilisation decreases. Also, it can be implemented as a security enhancement to prevent client devices from connecting during specified hours.

At the time of writing IOS-XE 17.3.1 does not yet offer a GUI for this capability, but there is a couple of options how to schedule WLAN availability.

Before we start, please double-check time settings on the controller, enable NTP client and set a correct timezone.

Option 1: Built-in Calendar Profile

The configuration is self-explanatory, so let’s start with that. My example enables all WLANs mapped to the “default-policy-profile” from 9 am to 5 pm every week day. Outside of these times, the SSIDs will not be available for clients to join.

configure terminal
!
wireless profile policy default-policy-profile
shutdown
!
no wireless profile calendar-profile name WEEKDAYS-9-TO-5
!
wireless profile calendar-profile name WEEKDAYS-9-TO-5
day monday
day tuesday
day wednesday
day thursday
day friday
recurrence weekly
start 09:00:00 end 17:00:00
!
wireless profile policy default-policy-profile
calendar-profile name WEEKDAYS-9-TO-5
action wlan_enable
no shutdown
!

Verification

You can verify using a Wi-Fi client. If you do “show wlan summary”, the WLANs will still appear as “Enabled” and this is expected. To verify current status of WLANs controlled by the Calendar Profile, please use “show logging | include SCHEDULED_WLAN”.

Reference

Official documentation explaining Calendar Profiles.

Option 2: EEM Script

If you like flexibility, an EEM script running on the controller triggered by CRON might work even better for you. Special thanks to Federico Ziliotto for this.

event manager applet EEM_SCHEDULE_WLAN_UP
event timer cron cron-entry "0 9 * * 1-5" name 9_AM_MON_TO_FRI
action 1.0 cli command "enable"
action 2.0 cli command "conf t"
action 3.0 cli command "wlan MY_SSID"
action 4.0 cli command "no shut"
action 5.0 cli command "end"
action 6.0 syslog msg "Scheduled WLAN_SSID has been enabled"

event manager applet EEM_SCHEDULE_WLAN_DOWN
event timer cron cron-entry "0 17 * * 1-5" name 5_PM_MON_TO_FRI
action 1.0 cli command "enable"
action 2.0 cli command "conf t"
action 3.0 cli command "wlan MY_SSID"
action 4.0 cli command "shut"
action 5.0 cli command "end"
action 6.0 syslog msg "Scheduled WLAN_SSID has been disabled"

Reference

Here and here are some useful and practical EEM examples for your reference.

How to convert hundreds of Cisco Aironet or Catalyst APs from Mobility Express or Embedded Wireless Controller to Lightweight mode using Option 43

You may have used DHCP Option 43 to point an AP to its controller before. But only very few people know that Cisco APs can automatically convert themselves from the built-in controller mode (think Mobility Express or Embedded Wireless Controller) to Lightweight mode after they receive a special Option 43 from a DHCP server.

If you have a pallet of access points (or routers with built-in Wi-Fi in Mobility Express mode) next to your desk and need to convert all of them to Lightweight mode, simply configure DHCP Option 43 in the following format on your DHCP server and plug them into a PoE capable switch. After the APs boot up and receive the option from DHCP server, they automatically switch to the Lightweight mode and attempt to join the configured controller (192.168.130.2 in our case).

Option 43 format used for AP conversion

f2:05:c0:a8:82:02

“f2” tells the AP that we want it to switch to Lightweight mode

“05” means that only one controller IP address will follow

“c0:a8:82:02” is the controller IP address (192.168.130.2 in this case) in hexadecimal format, search for “IP to Hex Converter” if you do no want to do the math

Cisco IOS/IOS-XE DHCP server configuration

You can run DHCP server on a Catalyst switch. The DHCP scope configuration is straightforward.

ip dhcp pool <pool name>
network <ip network> <netmask>
default-router <default-router IP address>
dns-server <dns server IP address>
option 43 hex f205c0a88202

WLAN Pi, Raspberry Pi and any other Linux ISC DHCP server configuration

Special thanks to Nicolas Darchis, who helped me find the “vendor-encapsulated-options” option. It lets you enter Option 43 in the hex format and all it takes is a single line of DHCP server configuration.

# eth0 DHCP scope on ISC DHCP server
subnet 192.168.130.0 netmask 255.255.255.0 {
interface eth0;
range 192.168.130.100 192.168.130.200;
option routers 192.168.130.1;
option domain-name-servers 208.67.222.220, 208.67.222.220;
default-lease-time 86400;
max-lease-time 86400;
option vendor-encapsulated-options f2:05:c0:a8:82:02;
}

DHCP server on Cisco Meraki MX appliance

If your DHCP server runs on a Cisco Meraki MX appliance, you can easily configure Option 43 using Dashboard. Here are the instructions.

Packet capture or it did not happen

Here is the DHCP Offer packet with the special Option 43 value sent from DHCP server to the APs. They will start the conversion automatically after receiving it.

Option 43 which converts the AP from ME or EWC mode to lightweight

Verify successful AP conversion to Lightweight mode

Console to one of the APs and you will notice this message:

[*08/25/2020 23:24:39.5620] Last reload reason : 2: AP type changed from ME to CAPWAP

Or you can let the AP finish its job. And then verify successful conversion to Lightweight mode whenever you are ready using the “show version” command.

9120#show version
<output omitted>
9120 uptime is 0 days, 0 hours, 5 minutes
Last reload time : Tue Aug 25 23:24:39 UTC 2020
Last reload reason : AP type changed from ME to CAPWAP
<output omitted>

Cisco Aironet and Catalyst AP Option 43 configuration for ISC DHCP server on Linux

There is great document explaining how to configure Option 43 on ISC DHCP server on the Cisco website.

If all you need is a simple DHCP server which will assign Option 43 to all devices on the network, without selectively assigning it only to specific AP models using the class construct, you can simplify your ISC DHCP server configuration to this. It works great on a WLAN Pi.

Configuration

# Linux ISC DHCP server configuration in /etc/dhcp/dhcpd.conf
option space Cisco_LWAPP_AP;
option Cisco_LWAPP_AP.server-address code 241 = array of ip-address;

# eth0 DHCP scope
subnet 192.168.73.0 netmask 255.255.255.0 {
interface eth0;
range 192.168.73.100 192.168.73.200;
option routers 192.168.73.1;
option domain-name-servers 208.67.222.222, 208.67.220.220;
default-lease-time 86400;
max-lease-time 86400;
vendor-option-space Cisco_LWAPP_AP;
option Cisco_LWAPP_AP.server-address 10.10.10.10, 10.20.20.20;
}

Verification

The access point will get its IP configuration from the DHCP server including Option 43 and will try to join these controllers.