iPad Pro Wi-Fi 6E Preference of 5 GHz over 6 GHz

You may have read my 6 GHz discovery test of the new Wi-Fi 6E iPad Pro. This time we ask the “Hey Siri, what is iPad Pro’s favourite band?” question.

Since Apple hasn’t published any documentation that would cover this subject, I configured a tri-band SSID on Catalyst 9136 AP. The SSID name is the same for all 2.4 GHz, 5 GHz and 6 GHz bands. Now, what band does iPad prefer?

Setup

  • Wi-Fi 6E iPad Pro 11-inch (4th generation) running iPadOS 16.1
  • Catalyst 9136 Wi-Fi 6E AP
  • C9800-CL cloud controller running 17.9.2

Max transmit power and 80 MHz wide 5 GHz channel

All 3 bands are enabled with manual Power Level 1 (PL1), which forces the AP to use highest permitted Transmit Power.

In this case, the 6 GHz SSID had the strongest absolute signal strength (RSSI) of the 3 bands.

  • 2.4 GHz enabled, PL1
  • 5 GHz channel 36, 80 MHz wide, PL1
  • 6 GHz channel 5, 80 MHz wide, PL1

The iPad prefers the 5 GHz band and joins using this band.

Reduce transmit power on 5 GHz radio

Let’s use the exact same configuration as above and reduce 5 GHz radio’s transmit power to the lowest, Power Level 8 (PL8). Will that make it prefer 6 GHz?

  • 2.4 GHz enabled, PL1 (RSSI on the iPad -31 dBm)
  • 5 GHz channel 36, 80 MHz wide, PL8 (RSSI on the iPad -55 dBm)
  • 6 GHz channel 5, 80 MHz wide, PL1 – strongest absolute RSSI (RSSI on the iPad -30 dBm)

Yes! The iPad Pro prefers 6 GHz every single time. As you can see, the 6 GHz RSSI is 25 dB stronger than the 5 GHz one, which is why (as far as I can tell).

Narrower 5 GHz channel

We are using the the same configuration as in our very first scenario, but 40 MHz we will reduce 5 GHz channel width to 40 MHz.

  • 2.4 GHz enabled, PL1
  • 5 GHz channel 36, 40 MHz wide, PL1
  • 6 GHz channel 5, 80 MHz wide, PL1

Using narrower 5 GHz channel makes the iPad connect using 6 GHz instead.

Disable 5 GHz radio

This time we disable 5 GHz radio and see if 2.4 GHz or 6 GHz wins. I have high hopes for 6 GHz, you?

  • 2.4 GHz enabled, PL1
  • 5 GHz disabled
  • 6 GHz channel 5, 80 MHz wide, PL1 – strongest absolute RSSI

Indeed, the iPad prefers 6 GHz.

Now, let forcefully shut the 6 GHz radio on the AP. iPad moves to its only available option, the 2.4 GHz radio and happily lives there. We now reenable the 6 GHz radio. The iPad doesn’t automatically jump back to 6 GHz, although 6 GHz has stronger RSSI. When we disabled iPad’s Wi-Fi radio, and reenable, it connected on 6 GHz.

Make 2.4 GHz stronger than 6 GHz and disable 5 GHz

Can we make 2.4 GHz appealing enough to the iPad so that it would prefer it over 6 GHz? Let’s disable 5 GHz radio, keep max transmit power on 2.4 GHz, and reduce 6 GHz transmit power to the lowest Power Level 8 (PL8).

  • 2.4 GHz enabled, PL1
  • 5 GHz disabled
  • 6 GHz channel 5, 80 MHz wide, PL8

The 6 GHz RSSI (-45 dBm) is now weaker than the 2.4 GHz RSSI (-33 dBm) by 12 dB. Is it good enough reason for the iPad to prefer 2.4 GHz?

Not really. It connected on 6 GHz 2 times out of 3. Once it connected on 2.4 GHz.

Summary

When 80 MHz wide 5 GHz channel is used, the iPad prefers 5 GHz. If 5 GHz drops below a certain threshold, and is much weaker than 6 GHz, it then prefers 6 GHz.

It prefers 6 GHz over 40 MHz wide 5 GHz channel.

It doesn’t use 2.4 GHz unless it has no other option.

Please take these tests with a pinch of salt. Ideally I would repeat each of them 10 or so times. Time is of the essence and I only repeated each test 3 times.

iPad Pro Wi-Fi 6E Scanning and 6 GHz SSID Discovery

iPad Pro 11-inch (4th generation) is the first Apple device to feature Wi-Fi 6E. With the significant amount of new 6 GHz spectrum, active scanning for 6 GHz SSIDs is not practical. Other methods are being used instead. Let’s see how iPad Pro actually does it.

iPad Pro with Wi-Fi 6E

If you are an Android user, I’ve also tested Google Pixel 6 and its 6 GHz discovery here.

Setup

As of writing, iPadOS 16.1 is the latest version and that’s the one I am using for all tests here.

The access points in this test are Catalyst Wireless CW9162I-ROW APs running IOS-XE 17.9.2.

iPad Pro ignores FILS Discovery frames on 6 GHz

I am using 6 GHz only SSID (which doesn’t broadcast on 2.4 GHz and 5 GHz) and 80 MHz wide channels.

3 APs in lower 6 GHz in the UK

Of course, there are Beacon frames sent by the APs every 100 ms or so, and there are FILS Discovery frames sent by my APs every 20 ms. These FILS frames are automatically enabled on Catalyst Wireless APs in DNA persona only when the only SSID enabled on the AP is a 6 GHz one (and there is no 2.4 GHz or 5 GHz SSID). At this point, we need FILS, because at that point FILS is the only method for 6 GHz capable clients to discover 6 GHz networks.

6 GHz beacons every 100 ms and FILS frames every 20 ms

Think of FILS frames as of condensed beacons. They are nearly 4 times smaller than Beacons.

FILS frames are smaller than beacons

Unfortunately, the iPad completely ignores the FILS frames, and it has no in-band (6 GHz) method of discovering 6 GHz networks. That results in no visibility of the 6 GHz only SSIDs on the iPad, and we can’t connect.

The 6 GHz only “Cisco 6” SSID isn’t being discovered by the iPad

Airport Utility doesn’t show the 6 GHz only SSID either.

The 6 GHz only “Cisco 6” SSID isn’t being discovered by the iPad

iPad Pro only uses Reduced Neighbour Reports (RNR) for discovery

Let’s keep the 6 GHz only SSID Cisco 6 enabled, and also enable a 5 GHz only SSID called Cisco 5.

If we now do a packet capture on one of the active 5 GHz channels, we will see 5 GHz beacons. These beacons contain Reduced Neighbour Report Information Element, which announces to the client device “there is a 6 GHz AP on channel 5”.

RNR in 5 GHz beacons allows the iPad discover the 6 GHz SSID.

iPad sees both the 5 GHz “Cisco 5” and 6 GHz “Cisco 6” SSIDs

Airport Utility also reports both the 5 GHz only and 6 GHz only SSIDs.

iPad sees both the 5 GHz “Cisco 5” and 6 GHz “Cisco 6” SSIDs

By doing a packet capture on 6 GHz channel number 5, we verify that the AP only sends 6 GHz beacons every 100 ms or so. There are no signs of FILS, which is a good thing. By default, FILS is disabled. It only gets automatically enabled when 6 GHz is the only active band on the AP (with no 2.4 GHz and no 5 GHz SSIDs), because it is then the only method for a 6 GHz capable client to discover a 6 GHz AP.

6 GHz beacons without FILS, because we don’t need FILS, we use 5 GHz RNR

Apparently, the iPad only leverages Reduced Neighbour Reports for 6 GHz SSID discovery.

Does RNR included in 2.4 GHz beacons allow the iPad to discover the 6 GHz only SSID?

Andrew McHale made me to lab this up. Thank you, Andrew 😉 The short answer is yes.

This time we only enable 2.4 GHz only SSID and 6 GHz only SSID and verify that we can see them on the air using WLAN Pi in Remote Sensor mode to WiFi Explorer Pro macOS app.

Practically instantly after enabling these, the iPad discovers the 6 GHz one using 2.4 GHz RNR.

Here is the RNR Information Element included in 2.4 GHz beacons.

RNR IE in 2.4 GHz beacons tells the client to look for 6 GHz AP on 6 GHz channel 5
iPad sees both the 2.4 GHz “Cisco 2.4” and 6 GHz “Cisco 6” SSIDs

Summary

The new iPad Pro with Wi-Fi 6E only relies on Reduced Neighbour Reports (RNR) when it comes to discovery of 6 GHz Wi-Fi 6E networks. It will only discover a 6 GHz SSID, if you also enable the same or different SSID name on 5 GHz (and/or 2.4 GHz if needed).

It ignores FILS sent by the AP on its primary 6 GHz channel.

It also ignores unsolicited probe responses sent by the AP on its primary 6 GHz channel if we enable them explicitly.

It doesn’t actively scan 6 GHz to discover new SSIDs.

I recommend you enable a 5 GHz (or 2.4 GHz) SSID, which will allow the iPad to use RNR Information Element included in the 5 GHz (or 2.4 GHz) beacons. It will help other clients like Google Pixel 6, which I’ve tested here, too.

I am very happy with how well the 6 GHz discovery using 2.4 GHz or 5 GHz beacons works. It definitely is production ready. The test with only one 6 GHz only SSID on the AP is more of a corner case. Most customers I work with, if not all, will also deploy 5 GHz alongside 6 GHz, so there is absolutely nothing to worry about.

Packet capture or it didn’t happen 😉

Download 2.4 GHz an 5 GHz RNR, 6 GHz FILS, and 6 GHz unsolicited probe response packet captures from here.

Download WLAN Pi Profiler report and packet capture of 5 GHz association request, and also 6 GHz association request. We can see client’s capabilities in these frames.

Tern GSD self-adhesive silicon case for Apple AirTag

I enjoyed testing the under-seat and water bottle bike mounts for AirTags on our Tern GSD bike, and thought I should explore other mounting options.

This self-adhesive sleeve looks like a universal option, as it can be attached practically to any flat surface.

It has a silicone sleeve on one side and self-adhesive on the other.

Silicon sleeve with AirTag
Detail of the slot

The self-adhesive layer seems to be a good choice. It is not extremely sticky as some other products, it does not seem to leave marks, and I actually managed to remove the case from the Storm Box on our Tern GSD bike, move it to a more suitable spot and re-apply it.

Self-adhesive layer
That sounds of peeling off the protective plastic sheet

It fits nicely inside the sleeve and as far as I can tell, there is no chance of it slipping out. The silicone keeps it from moving. In fact, it takes some effort to insert and remove the AirTag, which is great.

Fully inserted AirTag

There are many accessories available for the GSD. Storm Box is a great candidate for an AirTag in this sleeve. Mine is still holding tight. It has a few internal pockets and you can easily attach a dozen of AirTags to it and still have some space left for more;-)

Tern GSD with Storm Box

Bottom of the front rack might also be a good place for an AirTag.

A word of caution

Wherever you mount it, please keep your own safety in mind. Don’t mount it near the motor or anywhere near the chain/belt. It might cause you some bumpy ride should the self-adhesive fail.

Where can I buy one?

I bought mine on eBay and it was very affordable. Here is a link if you are considering getting one or two.

Other bike mounts

If you are looking for inspiration, I tested an under-seat and water bottle bike mounts. Here are a couple of photos and you can find more of them in the respective blog posts.

Water bottle mount with more mounting options available on the GSD
Under-saddle mount

Apple AirTag from iPhone SE user’s perspective

Many people are talking about the Ultra Wide Band (UWB) precision finding supported by AirTags and the last two generations of iPhones. It is possible thanks to Apple’s U1 chip. This feature on its own might quite likely be a good enough reason for many users to upgrade to the latest iPhone.

Since I don’t own iPhone 11 or 12, I was curious what the experience was from iPhone SE or XR user’s perspective. Due to the lack of the U1 chip, these phones don’t support UWB and “Precision Finding”. Instead, they use Bluetooth and “Proximity Finding”.

“With You” Bluetooth accuracy and audible alarm

When the tag is “With You”, that means that your iPhone or macOS device can hear the Bluetooth signal beaconed by the AirTag. In this mode, location accuracy seems to be around 10 meters (depending on where it is and if indoors or outdoors). The lack of the UWB support means that the SE or XR can’t detect the direction you or the AirTag is moving in.

Since the AirTags is “With You” (shown in the screenshot above) and is reachable via Bluetooth, you can activate the audible alarm and find its exact location this way.

Active Bluetooth connection to the tag is required to activate Play Sound

Detached mode accuracy and refresh rate

When the AirTag becomes detached from your iPhone or macOS device (tag’s Bluetooth signal is lost), the tag then relies on other people’s iPhones and macOS devices. As soon as their device hears the Bluetooth signal of your lost AirTag, it relays (or reports if you will) the tag location to iCloud. Thanks to the crown-sourced relayed location, you will be able to see your tag’s current location in the Find My app although you are not anywhere the tag. The AirTag does not even have to be in the Lost Mode. Location finding works in its standard mode.

Location in the Find My does not update instantly. Based on my tests, it refreshes every 5 to 15 minutes.

When it comes to location accuracy relayed by other people’s iPhones and macOS devices, it ranges from approximately 10 meters to 110 meters.

Relayed location – accuracy around 10 meters
Relayed location – accuracy around 110 meters

Can Wi-Fi-only iPads relay location?

No, they can’t. I tested a couple of iPads connected to Wi-Fi with Bluetooth enabled and placed them in close proximity of the AirTag. They did not relay location. As far as I can tell, only iPhones and macOS devices can relay location of a tag.

Can cellular iPads relay location?

I don’t know. Please test it if you have one and tell me;-)

Lost mode

In the unfortunate event of losing your item, you can switch the tag to the “Lost mode” and receive a push notification whenever the AirTags gets automatically reported by someone’s iPhone or macOS device.

Activate Lost Mode and push notification

When that happens location, you receive a notification. Currently, there seems to be a cosmetic bug as the text of the notification does not show the latest location of the tag, but its previous location. When you open “Find My” app, you will see the correct and latest location though.

Item found notification received on Apple Watch

My test setup

  • iPhone SE 2nd generation running iOS 14.5
  • MacBook Pro running Big Sur 11.3.1
  • iPad Mini 5th generation running iOS 14.5
  • iPad Air 2nd generation running iOS 14.5

What is your experience with AirTags?

I am curious what your experience was. Have you tested any other scenarios? Have I missed anything. Please do let me know in the comments and I will update the post.

Apple iOS 14 Private Address feature, per SSID Wi-Fi MAC randomisation and how it actually works

Apple published a brief summary of the newly introduced “Private Address” Wi-Fi feature. Since it does not go into the detail, I tested the public iOS 14.0 release on an iPhone SE and iPad Mini in my lab. Here is how it actually works.

New Wi-Fi networks

For SSIDs you have not connected to before, iOS 14 devices generate a random MAC “Private Address” and they use this MAC address permanently for this SSID. This address does NOT change over time. This works as expected.

Previously used Wi-Fi networks

Known Wi-Fi networks you have already connected to at least once before the upgrading to iOS 14 get a different treatment though. And this is where things are not as straightforward as the documentation suggests.

After upgrading to iOS 14, I connect to a known network which I have already used before the upgrade. The MAC address that is used is actually the real hardware MAC address of the Wi-Fi adapter for 24 hours. Note that the “Private Address” feature is enabled. This could potentially be considered a UI bug.

24 hours after first connecting from an iOS 14 device to this known SSID, the “Private Address” feature kicks in and the MAC address for this SSID automatically switches from the real MAC address to a randomly generated MAC address. Personally, I assume that this 24-hour period has been developed to allow enterprises to disable Private Address feature on their managed iOS devices using MDM, but I may be wrong.

From this point onwards the same randomly generated Private Address is permanently used for this SSID and does NOT change over time.

Pozor na kopie nabíječky a USB kabelu pro iPhone

V domnění, že kupuji originální nabíječku a USB kabel pro iPhone jsem si z jednoho českého obchodu objednal toto přislušenství. Příště už to neudělám a nedoporučuji to ani vám.

Proč se vyhnout kopii?

  • kopie nabíječky se nepříjemně přehřívá!
  • při zaklepání na neoriginální nabíječku uvnitř cosi drnčí, některý z dílů je tam špatně uchycen
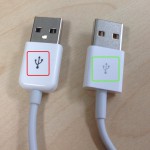
  • USB kabel má větší rozměry plastové základny okolo 30ti pinového konektoru
  • máte-li telefon v bumperu, musíte ho nejprv z obalu vyndat, až potom se vám povede USB kabel do přístroje zastrčit

Jak poznat originál?

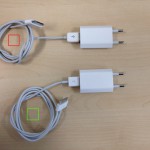
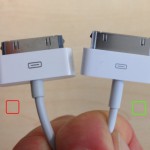
V galerii si prohlédněte, jak od sebe odlišíte originál od Applu a jeho levnější kopii z Číny. Vodítkem pro zakoupení originálu může být cena, která je zpravidla o dost vyšší než u kopie. Ale nebral bych to jako svaté pravidlo, viděl jsem i zadraho prodávané neoriginální příslušenství.

Znaky originálního příslušenství:

  • plastová základna obklopující 30ti pinový konektor USB kabelu je menší než u “baculatější” kopie
  • piktogramy na USB kabelu jsou šedivé nikoliv černé
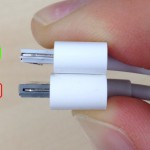
  • bužírka je na obou koncích USB kabelu delší
  • kabel je tužší
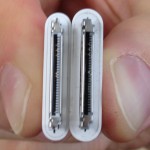
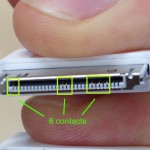
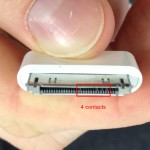
  • má v 30ti pinovém konektoru zapojených 6 kontaktů narozdíl od 4 u kopie
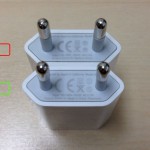
  • při pohledu do USB portu nabíječky uvidíte její alfanumerické označení (že by sériové číslo?)
  • znak CE na spodní straně nabíječky má na kopii chybné proporce, písmena CE jsou blíže k sobě, než je předepsáno, takže spíše než o evropskou shodu půjde o neslavný “China Export”
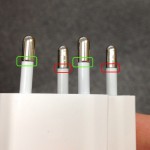
  • kovový díl vidlice nabíječky je na konci viditelně zkosený – v místě kde končí pokovená část vidlice a přechází v plast
  • nabíječku dostanete zabalenou v originální krabičce od Applu, kopie vám obvykle dorazí pouze v obálce

Originál od Applu najdete pod zelenou barvou, kopii jsem zvýraznil červeně.

Popisek v ČR nehraje roli

Ani sebedůvěryhodnější popisek zboží negarantuje, že se při výběru nespálíte. V případě této přehřívající se nabíječky to berte doslova:) Na českých aukčních portálech i e-shopech prodejci podobného zboží běžně udávají jako výrobce “Apple”, což má daleko k pravdě.
Týden s Apple iPad 16 GB WiFi

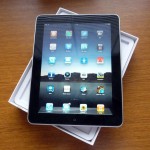
Poštěstilo se mi a na týden jsem si půjčil 16 GB WiFi iPad. Po první zkušenosti, kdy jsem před několika měsíci testoval iPad v Německu, bylo vše teď o poznání veselejší. Začínají se objevovat weby optimalizované pro zobrazování a přehrávání videa na iPadu, rozhraní iPadu je brilantně svižné a pozitiv je celá řada.

Důvodem, proč bych si já osobně iPad pořídil, je především čtení elektronických knížek.  Po přizoomování se čte velmi pěkně a i na přímém slunci je navzdory lesklému displeji text čitelný. Pokud by měl displej o něco málo vyšší rozlišení, asi bych o koupi neváhal. Uvidíme s čím se blýskne případná druhá generace.  Více se už ale dozvíte ve videu.

Závěrem ještě několik informací, které se nevešly do videa. Jistě vás bude zajímat kolik iPad vydrží na jedno nabití. Moje praktická zkušenost hovoří přibližně o 4 dnech intenzivního hraní a používání se zapnutou WiFi. Patrně by vydržel ještě o něco déle, ale mou předpokládanou hranici dvou dní hravě zbořil, čímž mě velmi mile překvapil. Spotřeba 3G verze se patrně na výdrži podepíše výrazněji, uvidíme.

Chcete o iPadu vědět víc? Ptejte se, rád se podělím o zkušenosti.

Synergy – ovládněte více PC jednou klavesnicí a myší

SynergyTato geniální freewarová utilitka se mi natolik zalíbila, že o ní prostě nemůžu nenapsat. Poprvé jsem zmínku o tomto malém pomocníkovi zaslechl v nějakém MS videu z Redmontu. Vstřebával jsem, co je nového ve Windows Serveru a náhle se prezentující človíček otočil se svou bezdrátovou myší k jinému počítači na druhém konci stolu a zvesela s ní pracoval i na něm. To už mi nedalo a pídil jsem se, v čem je fígl. A odpověď? Synergy.

Funguje to tak, že máte dejme tomu stolní PC1 s 20″ LCD panelem a hned vedle něj PC2 (nebo klidně iMac, notebook,…) s 19″. Na prvním produkčním PC pracujete a na druhém jen vyřizujete poštu, komunikujete se světem a posloucháte své oblíbené rádio. Vše vám “pěkně” sedí na jednom pracovním stole. Počítejte se mnou: 2x PC, 2x LCD, 2x klávesnice, 2x myš. Budete-li chtít sofistikovanější řešení pravděpodobně si koupíte KVM přepínač pro dva počítače a pak vám bude stačit jen jedna klávesnice a jedna myš. Stále se ale musíte ručně přepínat mezi PC1 a PC2 na KVM přepínači – podle toho na kterém zrovna chcete myš a klávesnici používat. No dobrá. Nějaký čas to vydržíte, ale pak vám začne vrtat hlavou. Proč si nepořídit něco, co automaticky rozpozná, že chci používat klávesnici a myš na PC1 nebo PC2 a zařídí to všechno za mě? A jsme tu zase odpověď je stejná jako v prvním odstavci. Synergy to zařídí.

Tak a teď přímo k věci. Synergy je malá síťová TCP/IP utilitka, kterou nainstalujete na PC1 i PC2. K PC1 připojíte klávesnici a myš a nastavíte ho jako server. PC2 naopak nastavíte jako klienta, s tím, aby se připojoval k PC1 a používal jeho vstupní zařízení. Nastavíte, že PC1 je na stole umístěn vlevo od PC2. Přepínání mezi aktivním počítačem řídíte jednoduše myší. Dopíši text ve Wordu na PC1 a posunu kurzor myši doprava, až mi přeskočí na monitor PC2. V tom okamžiku se aktivuje i klávesnice a vstupy z klávesnice a pohyb myši se přenáší do PC2! Jednoduše, rychle a hlavně instuitivně.

Požadavky:

– počítače musejí být oba ve stejné síti
– operační systém Mac OS X, Windows 95-XP, Unix
– takto propojené počítače mohou být třeba tři (levý LCD displej,
  prostřední a pravý – kurzorem myši se mezi nimi zleva doprava pohybujete)

Download:

http://synergy2.sourceforge.net/