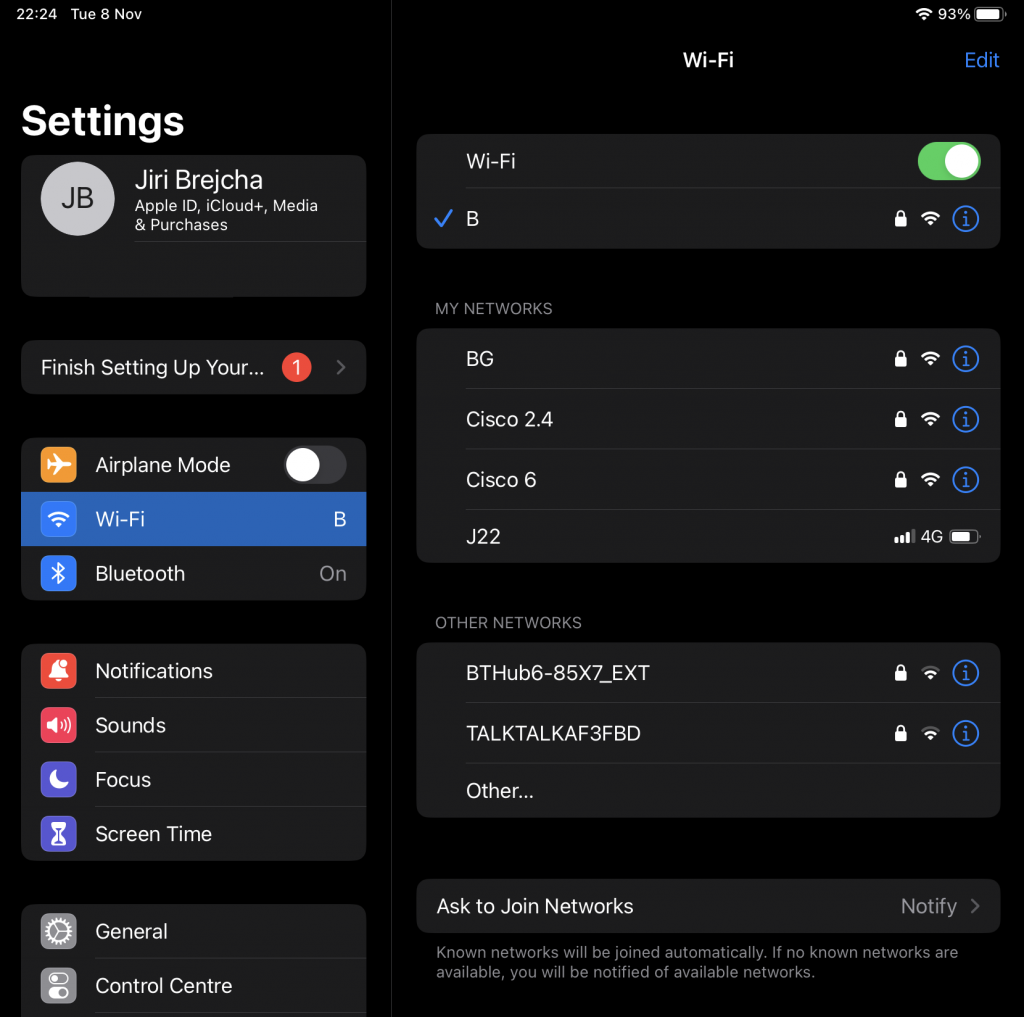
Apple developed a diagnostics profile that allows you to monitor and troubleshoot Wi-Fi connectivity. Unfortunately, it is only available for 7 days after installation. After that, it get automatically removed. If you are a Wi-Fi professional, that means that you need to reinstall it every few days. Yes, it always disables when you are on site and need it the most :)
Manual installation of the profile – the hard way
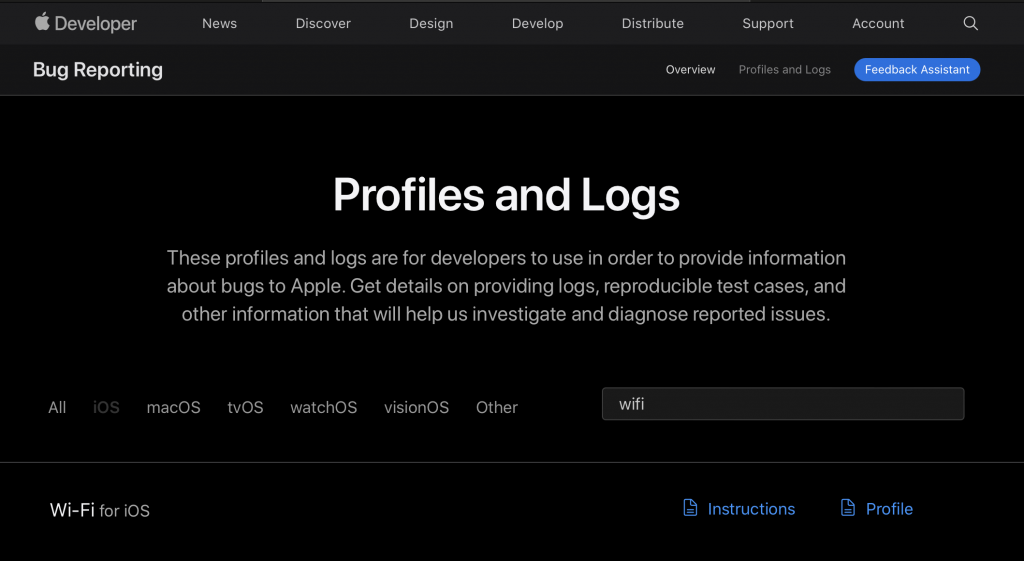
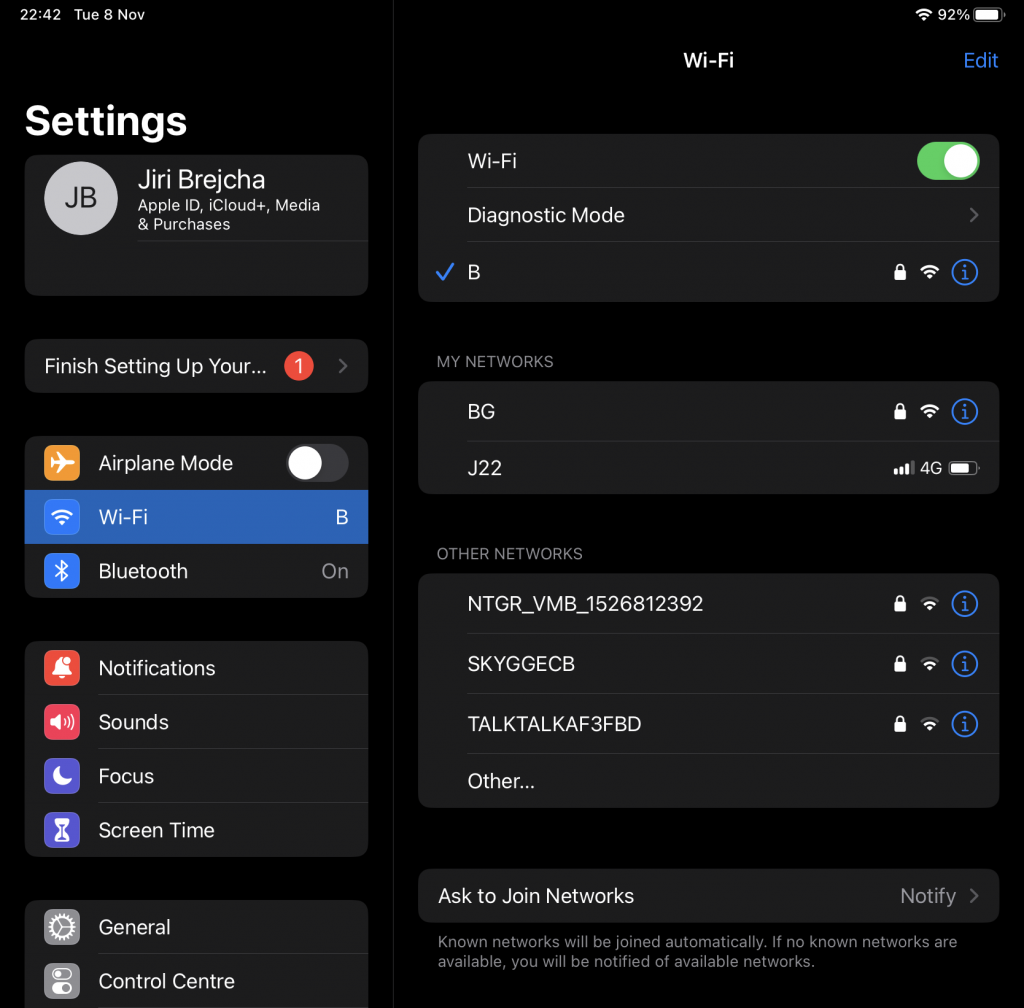
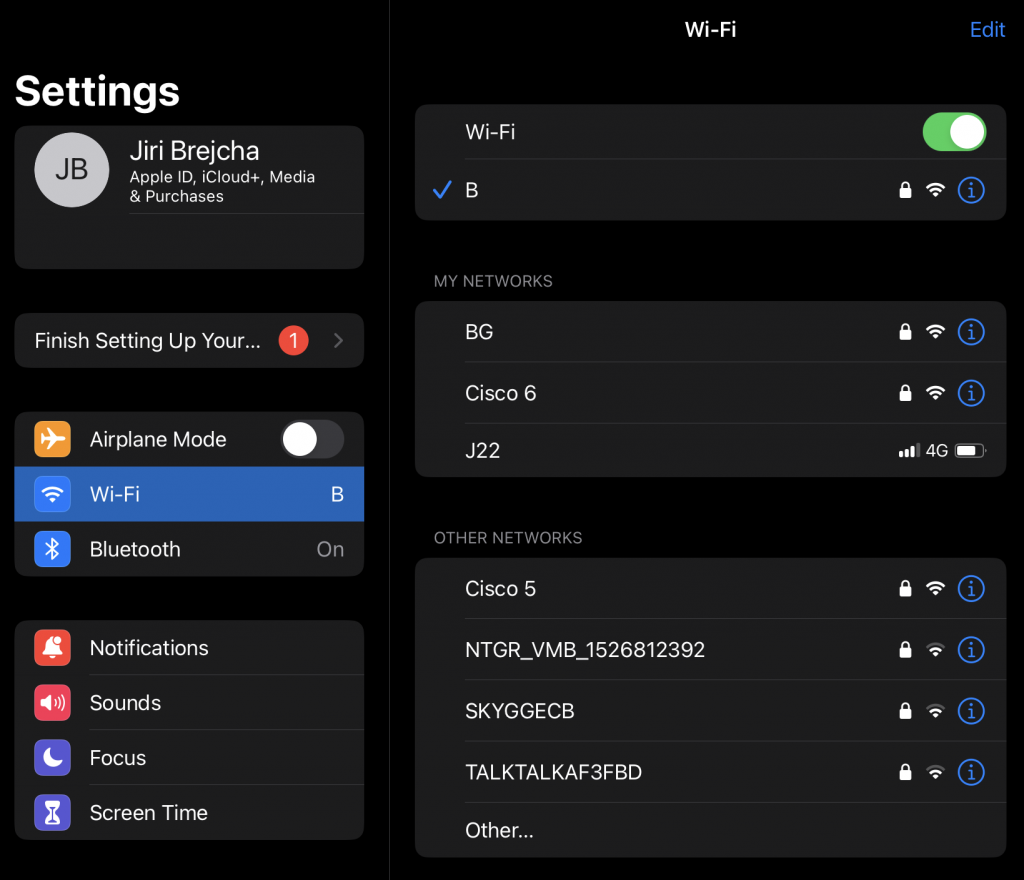
Normally, I would google something along the lines of “Apple Wi-Fi diagnostics profile”, eventually I find the right link, log in, search for the iOS Wi-Fi profile on the Apple Developer website, download the profile, go to Settings > General > Profiles section, and I install it from there.
Wi-Fi diagnostics profile for iOS devices
What if there was a little tool that did most of the above for you?
The easy way
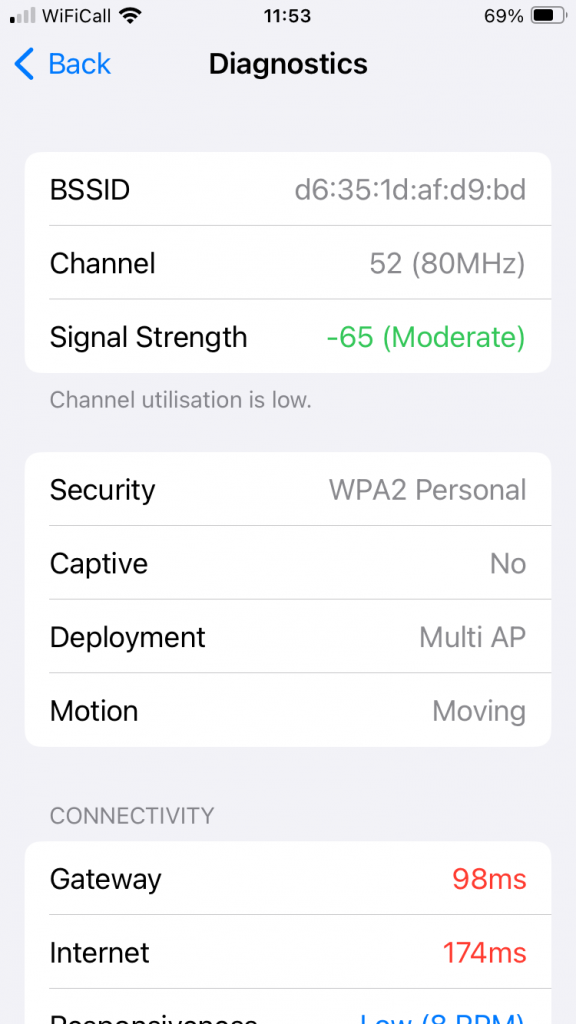
I put together a quick “Wi-Fi Profile” Apple Shortcut that removes some of these steps. Install the shortcut on your phone and it will guide you through the diagnostics profile installation every time you need it. It downloads the profile to your iPhone, lets you approve the installation and voilà, you open Wi-Fi settings and get RSSI measurements, channel details, BSSID and other useful info.
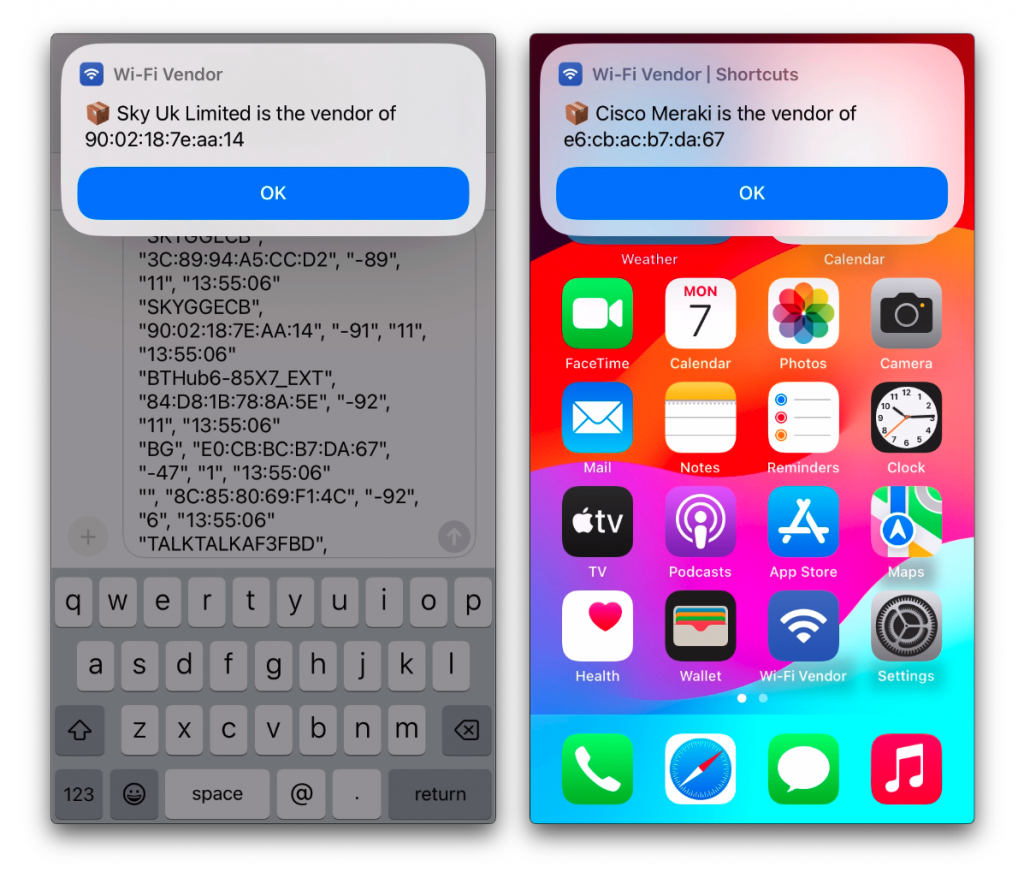
I wrote few other Shortcuts. Perhaps you are connected to a someone’s guest network, and would like to see who their access point vendor is? Your iPhone can tell you.
Let me give you one more reason why you should explore the Shortcuts framework on your iOS or macOS device.
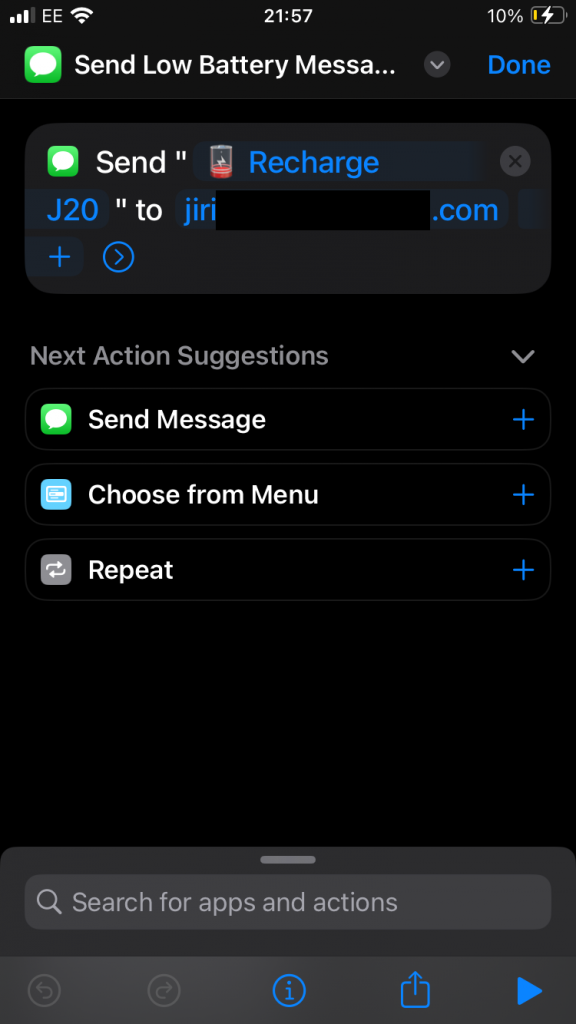
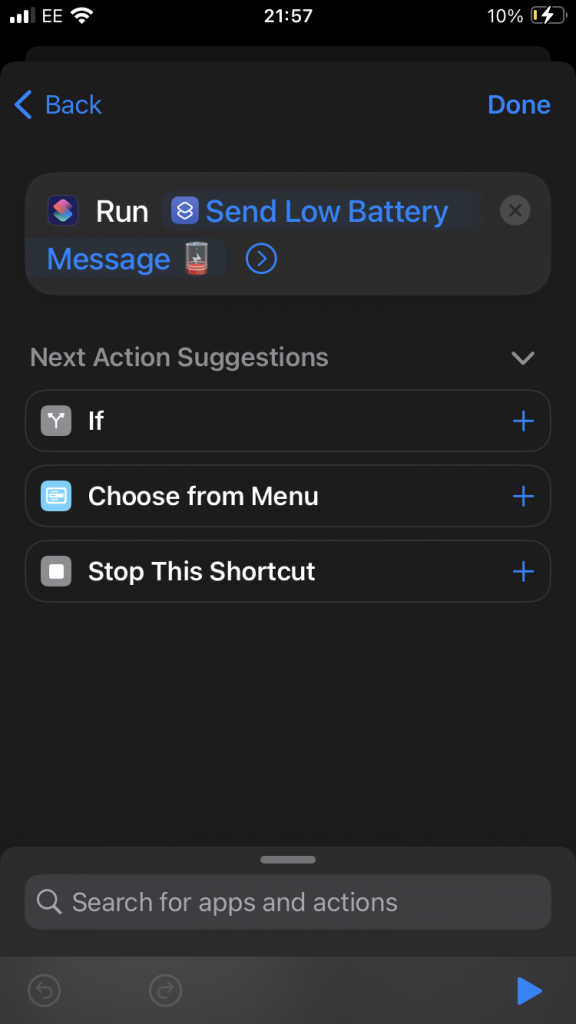
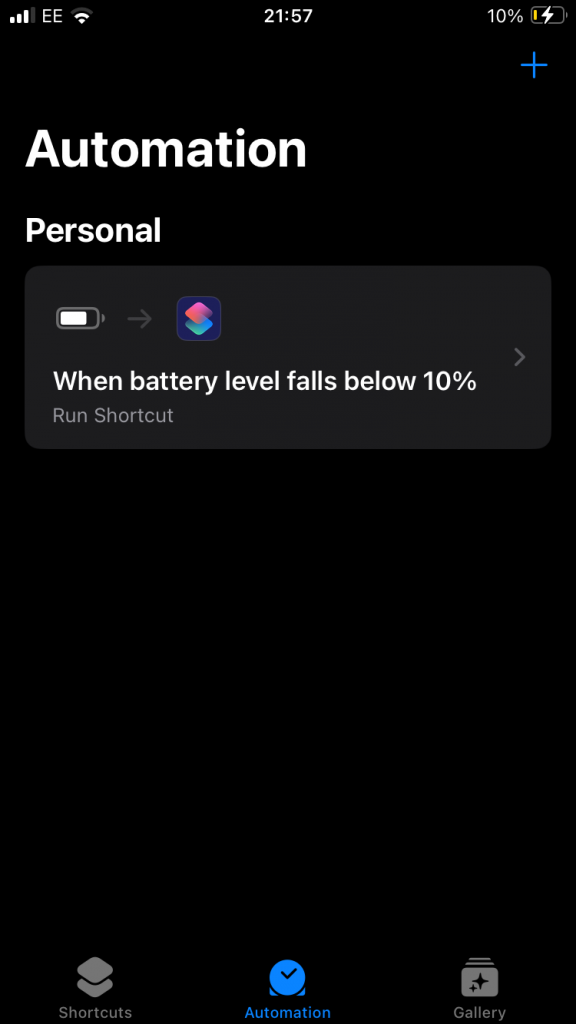
Remind me to charge my test phone
I mainly use my primary iPhone, but for testing I use an older iPhone running iOS Beta. Up until now, I struggled to keep the test phone charged. Typically I would pull it out of the bag and … you know the rest of this story, right?
I put together this quick but very useful shortcut. Whenever charge level drops below 10 %, the secondary phone will automatically send me an iMessage with a reminder. That’s it. Simple. Useful.
Recharge reminder automatically sent to me via iMessage from the secondary device
How does it work
Simply create a new Shortcut on the secondary iOS device, using the Shortcuts app. Select Send Message action and enter your iMessage details.
Now, in the Automation section, configure the trigger that executes this action. Set it to run whenever battery level drops below 10 %.
Many of us walk into buildings and we immediately start looking for access points 🙃 Often times, the access points are not visibly installed. But how can you tell what vendor is your favourite coffee shop using, or what APs did your customer deploy?
Now, would it be cool if you could use your iPhone or iPad to find out what vendor is your customer, public venue, favourite football club, or train provider using?
Wi-Fi Vendor iOS Shortcut
I created a Shortcut for iOS, which does exactly that.
Simply connect to a Wi-Fi network and open the shortcut. We will automatically populate the input field with the BSSID of the AP you are currently connected to:
Simply connect to a Wi-Fi network and tap on the Wi-Fi Vendor icon
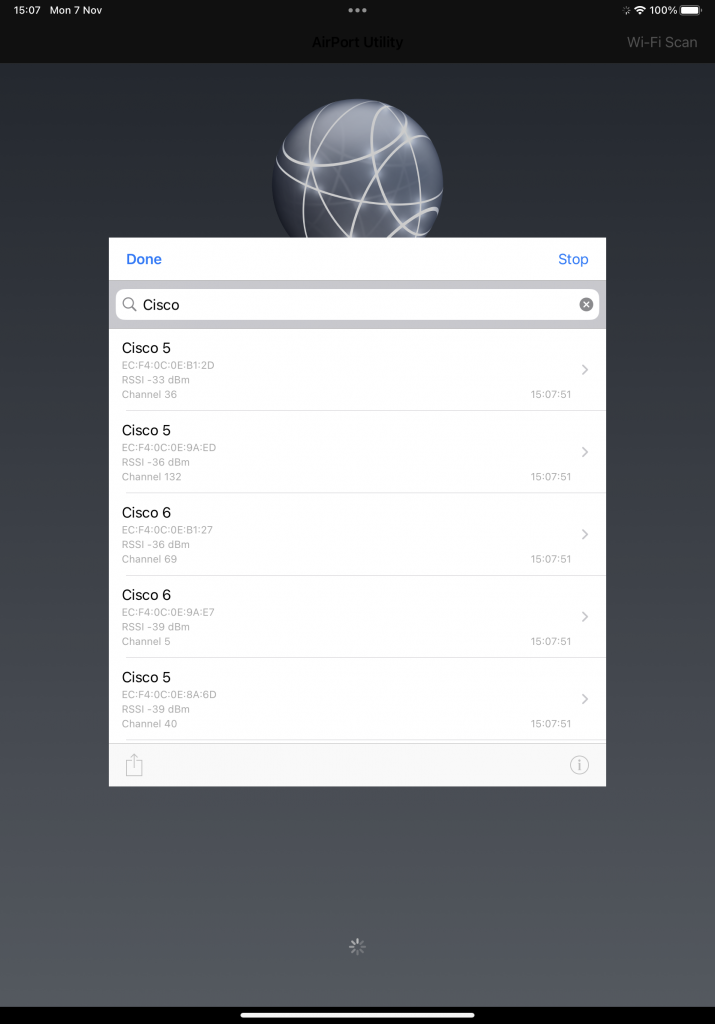
If you don’t want to connect to an AP, use Airport Utility to get the BSSID (aka the “wireless MAC address” of the AP) of the access points around you, and let Wi-Fi Vendor shortcut do its magic:
Scan for BSSIDs around you and detect vendor
Or you can even use the good old Copy & Paste method. Let’s say you saved the OUI to your Notes app. Copy it to clipboard and paste into Wi-Fi Vendor:
Benefits of this solution
iPhone or iPad is all you need. No need to open your laptop or other professional Wi-Fi tool.
All data stays on your iPhone and iPad. No data, not even the BSSID, is sent to a cloud service.
Our OUI <-> Vendor database is Wi-Fi centric, open to additions of the new records by Wi-Fi professionals, it has extra entries from vendor documentation, and BSSIDs captured in the field
It is community-driven and customisable. Contribute new OUIs, or fork our repository and create your own tool.
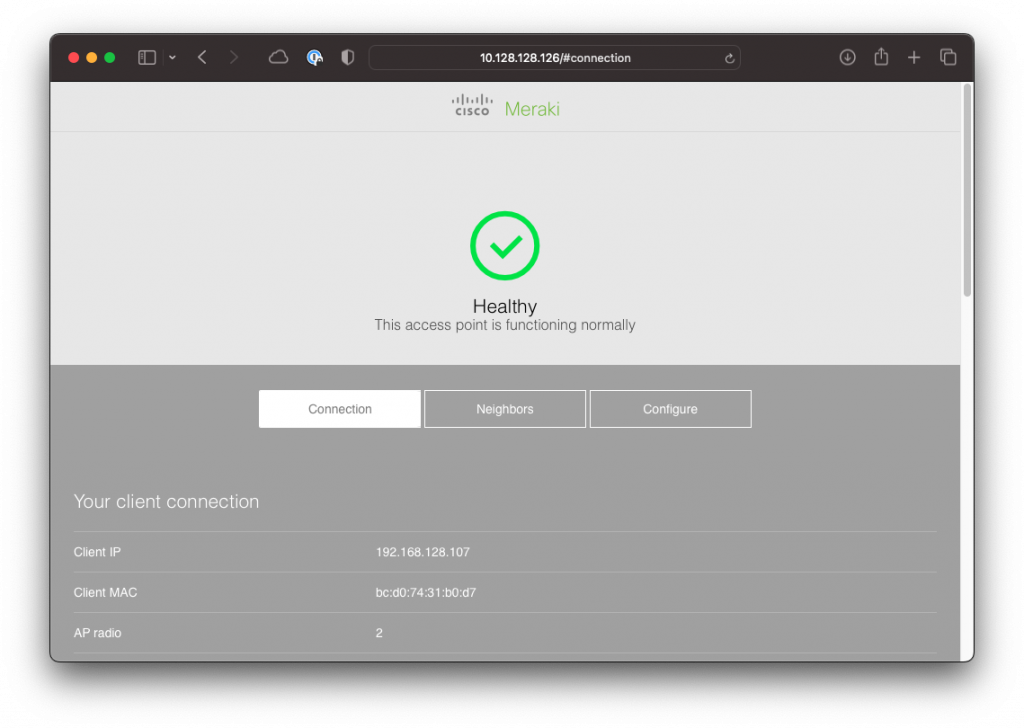
For Cisco Meraki APs, I use an active detection method – more about this below
Cisco Meraki active vendor detection method
When there is no match based on the access point’s OUI, Wi-Fi Vendor shortcut performs an active check. Make sure you are connected to the AP, then open Wi-Fi Vendor. It will attempt to browse to the Local Status Page of the AP and if it find Cisco Meraki logo in the source code, that’s a match.
Supported iOS releases
I’ve tested Wi-Fi Vendor on these devices. Use iOS 17 or newer for the best results and all features.
iPad Air 2, iOS 15.7.7 – no Cisco Meraki active check, doesn’t detect BSSID you are currently connected to
iPhone SE 2nd gen, iOS 16.6 – no Cisco Meraki active check, doesn’t detect BSSID you are currently connected to
iPhone SE 2nd generation, iOS 17.0 – all features are supported
iPhone SE 3rd generation, iOS 17.0 – all features are supported
This tool is provided as is. If you spot anything that needs to be fixed, let us know, or even better submit a Pull Request including the fix. Blame Jiri for anything that needs to be fixed, not Cisco 😉
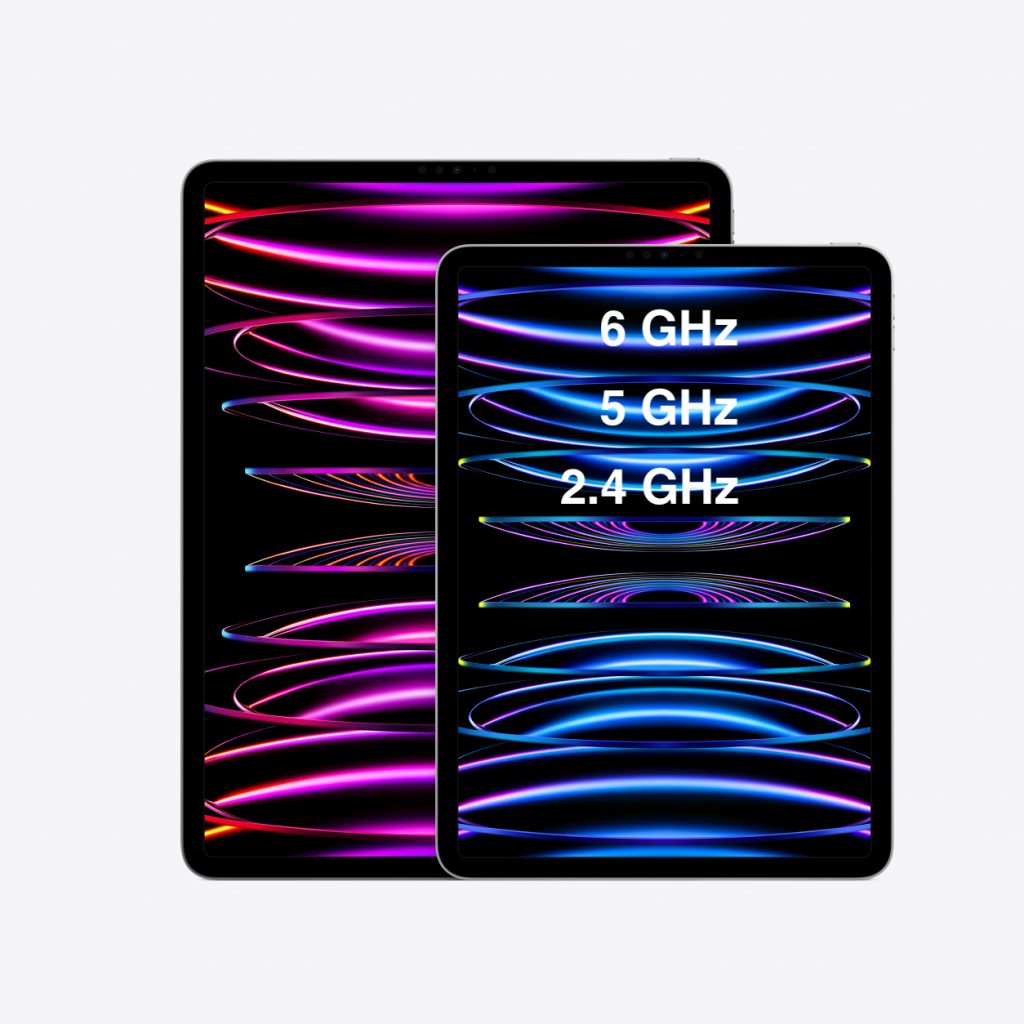
Since Apple hasn’t published any documentation that would cover this subject, I configured a tri-band SSID on Catalyst 9136 AP. The SSID name is the same for all 2.4 GHz, 5 GHz and 6 GHz bands. Now, what band does iPad prefer?
Setup
Wi-Fi 6E iPad Pro 11-inch (4th generation) running iPadOS 16.1
Catalyst 9136 Wi-Fi 6E AP
C9800-CL cloud controller running 17.9.2
Max transmit power and 80 MHz wide 5 GHz channel
All 3 bands are enabled with manual Power Level 1 (PL1), which forces the AP to use highest permitted Transmit Power.
In this case, the 6 GHz SSID had the strongest absolute signal strength (RSSI) of the 3 bands.
2.4 GHz enabled, PL1
5 GHz channel 36, 80 MHz wide, PL1
6 GHz channel 5, 80 MHz wide, PL1
The iPad prefers the 5 GHz band and joins using this band.
Reduce transmit power on 5 GHz radio
Let’s use the exact same configuration as above and reduce 5 GHz radio’s transmit power to the lowest, Power Level 8 (PL8). Will that make it prefer 6 GHz?
2.4 GHz enabled, PL1 (RSSI on the iPad -31 dBm)
5 GHz channel 36, 80 MHz wide, PL8 (RSSI on the iPad -55 dBm)
6 GHz channel 5, 80 MHz wide, PL1 – strongest absolute RSSI (RSSI on the iPad -30 dBm)
Yes! The iPad Pro prefers 6 GHz every single time. As you can see, the 6 GHz RSSI is 25 dB stronger than the 5 GHz one, which is why (as far as I can tell).
Narrower 5 GHz channel
We are using the the same configuration as in our very first scenario, but 40 MHz we will reduce 5 GHz channel width to 40 MHz.
2.4 GHz enabled, PL1
5 GHz channel 36, 40 MHz wide, PL1
6 GHz channel 5, 80 MHz wide, PL1
Using narrower 5 GHz channel makes the iPad connect using 6 GHz instead.
Disable 5 GHz radio
This time we disable 5 GHz radio and see if 2.4 GHz or 6 GHz wins. I have high hopes for 6 GHz, you?
Now, let forcefully shut the 6 GHz radio on the AP. iPad moves to its only available option, the 2.4 GHz radio and happily lives there. We now reenable the 6 GHz radio. The iPad doesn’t automatically jump back to 6 GHz, although 6 GHz has stronger RSSI. When we disabled iPad’s Wi-Fi radio, and reenable, it connected on 6 GHz.
Make 2.4 GHz stronger than 6 GHz and disable 5 GHz
Can we make 2.4 GHz appealing enough to the iPad so that it would prefer it over 6 GHz? Let’s disable 5 GHz radio, keep max transmit power on 2.4 GHz, and reduce 6 GHz transmit power to the lowest Power Level 8 (PL8).
2.4 GHz enabled, PL1
5 GHz disabled
6 GHz channel 5, 80 MHz wide, PL8
The 6 GHz RSSI (-45 dBm) is now weaker than the 2.4 GHz RSSI (-33 dBm) by 12 dB. Is it good enough reason for the iPad to prefer 2.4 GHz?
Not really. It connected on 6 GHz 2 times out of 3. Once it connected on 2.4 GHz.
Summary
When 80 MHz wide 5 GHz channel is used, the iPad prefers 5 GHz. If 5 GHz drops below a certain threshold, and is much weaker than 6 GHz, it then prefers 6 GHz.
It prefers 6 GHz over 40 MHz wide 5 GHz channel.
It doesn’t use 2.4 GHz unless it has no other option.
Please take these tests with a pinch of salt. Ideally I would repeat each of them 10 or so times. Time is of the essence and I only repeated each test 3 times.
iPad Pro 11-inch (4th generation) is the first Apple device to feature Wi-Fi 6E. With the significant amount of new 6 GHz spectrum, active scanning for 6 GHz SSIDs is not practical. Other methods are being used instead. Let’s see how iPad Pro actually does it.
As of writing, iPadOS 16.1 is the latest version and that’s the one I am using for all tests here.
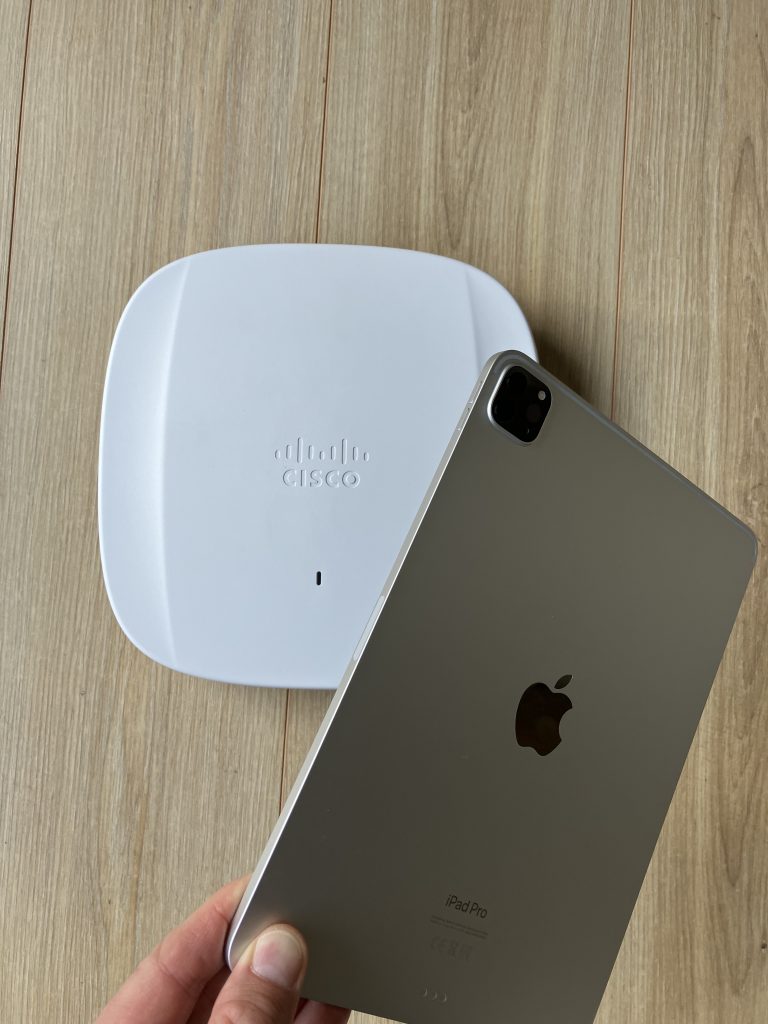
The access points in this test are Catalyst Wireless CW9162I-ROW APs running IOS-XE 17.9.2.
iPad Pro ignores FILS Discovery frames on 6 GHz
I am using 6 GHz only SSID (which doesn’t broadcast on 2.4 GHz and 5 GHz) and 80 MHz wide channels.
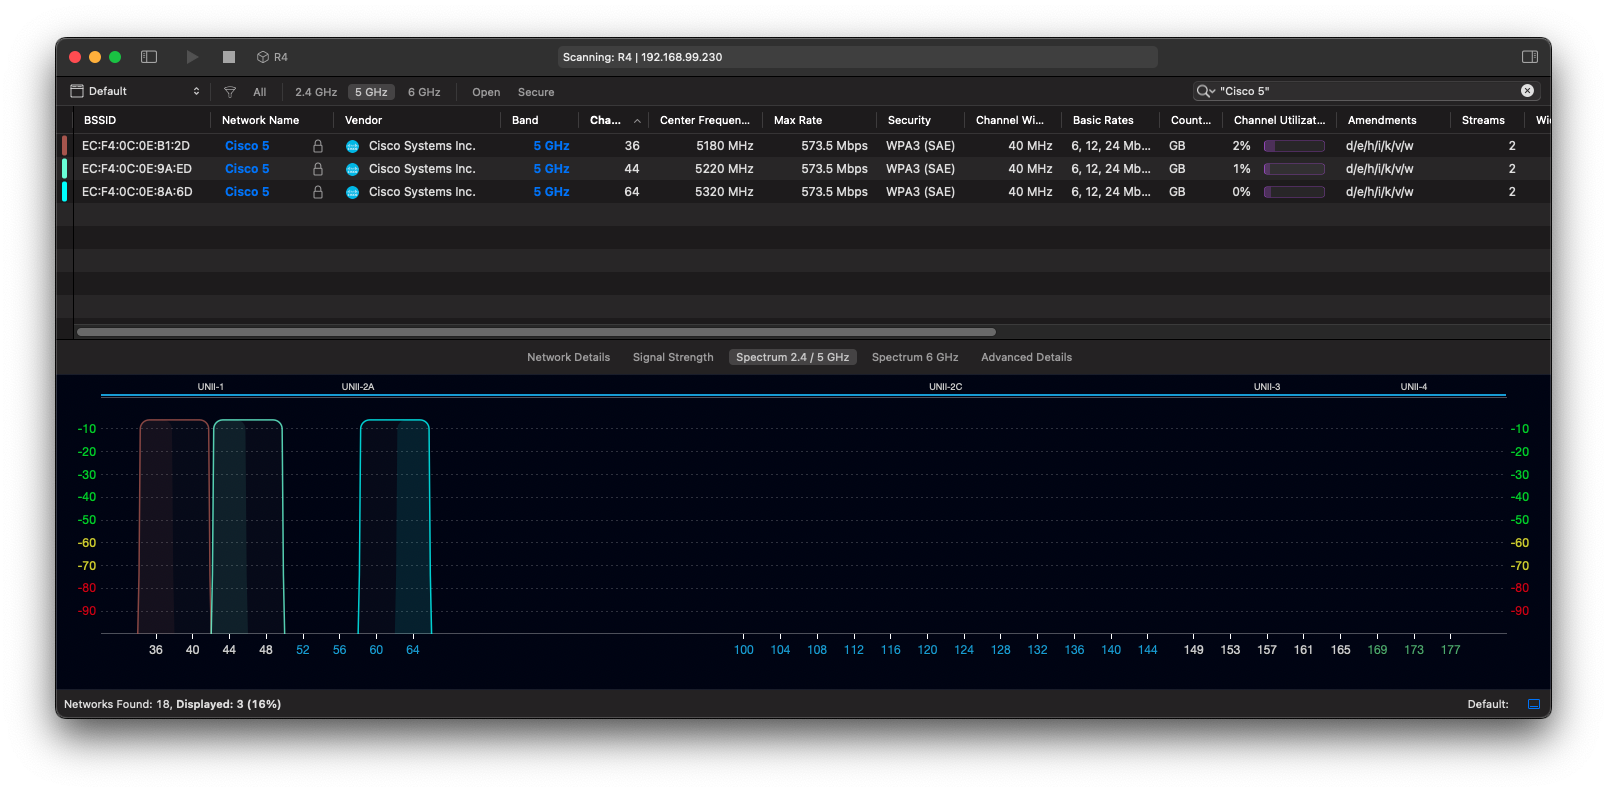
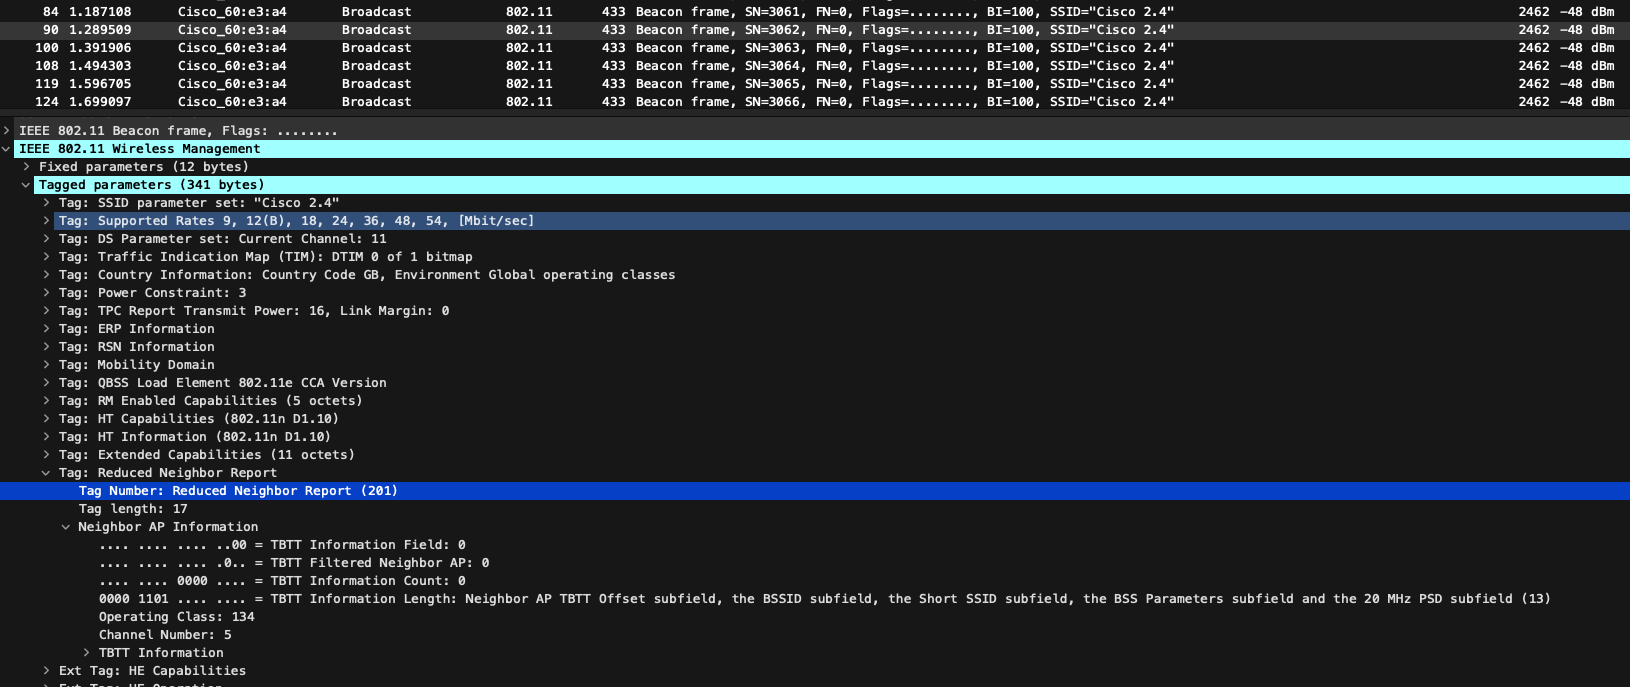
3 APs in lower 6 GHz in the UK
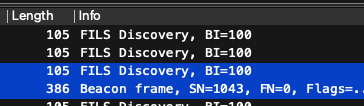
Of course, there are Beacon frames sent by the APs every 100 ms or so, and there are FILS Discovery frames sent by my APs every 20 ms. These FILS frames are automatically enabled on Catalyst Wireless APs in DNA persona only when the only SSID enabled on the AP is a 6 GHz one (and there is no 2.4 GHz or 5 GHz SSID). At this point, we need FILS, because at that point FILS is the only method for 6 GHz capable clients to discover 6 GHz networks.
6 GHz beacons every 100 ms and FILS frames every 20 ms
Think of FILS frames as of condensed beacons. They are nearly 4 times smaller than Beacons.
FILS frames are smaller than beacons
Unfortunately, the iPad completely ignores the FILS frames, and it has no in-band (6 GHz) method of discovering 6 GHz networks. That results in no visibility of the 6 GHz only SSIDs on the iPad, and we can’t connect.
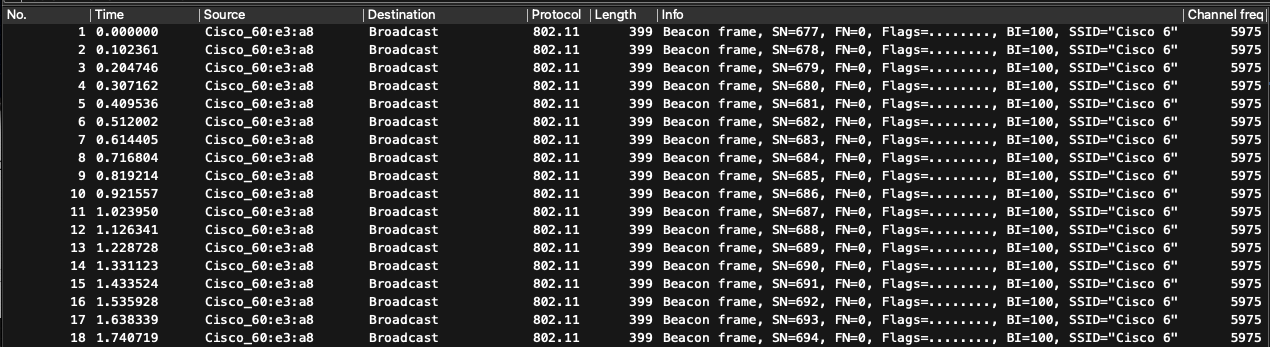
The 6 GHz only “Cisco 6” SSID isn’t being discovered by the iPad
Airport Utility doesn’t show the 6 GHz only SSID either.
The 6 GHz only “Cisco 6” SSID isn’t being discovered by the iPad
iPad Pro only uses Reduced Neighbour Reports (RNR) for discovery
Let’s keep the 6 GHz only SSID Cisco 6 enabled, and also enable a 5 GHz only SSID called Cisco 5.
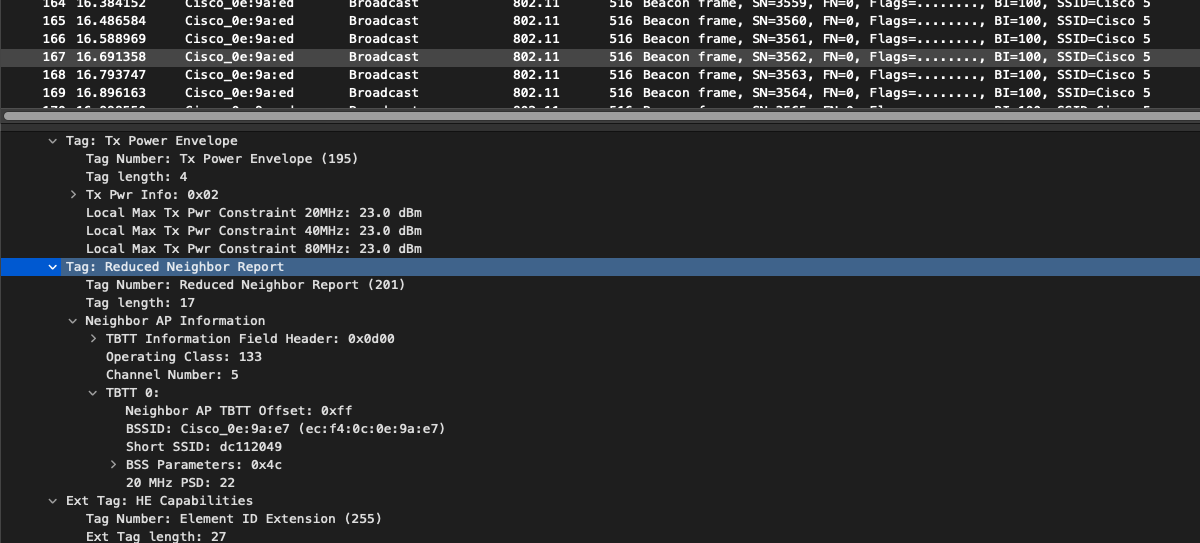
If we now do a packet capture on one of the active 5 GHz channels, we will see 5 GHz beacons. These beacons contain Reduced Neighbour Report Information Element, which announces to the client device “there is a 6 GHz AP on channel 5”.
RNR in 5 GHz beacons allows the iPad discover the 6 GHz SSID.
iPad sees both the 5 GHz “Cisco 5” and 6 GHz “Cisco 6” SSIDs
Airport Utility also reports both the 5 GHz only and 6 GHz only SSIDs.
iPad sees both the 5 GHz “Cisco 5” and 6 GHz “Cisco 6” SSIDs
By doing a packet capture on 6 GHz channel number 5, we verify that the AP only sends 6 GHz beacons every 100 ms or so. There are no signs of FILS, which is a good thing. By default, FILS is disabled. It only gets automatically enabled when 6 GHz is the only active band on the AP (with no 2.4 GHz and no 5 GHz SSIDs), because it is then the only method for a 6 GHz capable client to discover a 6 GHz AP.
6 GHz beacons without FILS, because we don’t need FILS, we use 5 GHz RNR
Apparently, the iPad only leverages Reduced Neighbour Reports for 6 GHz SSID discovery.
Does RNR included in 2.4 GHz beacons allow the iPad to discover the 6 GHz only SSID?
Andrew McHale made me to lab this up. Thank you, Andrew 😉 The short answer is yes.
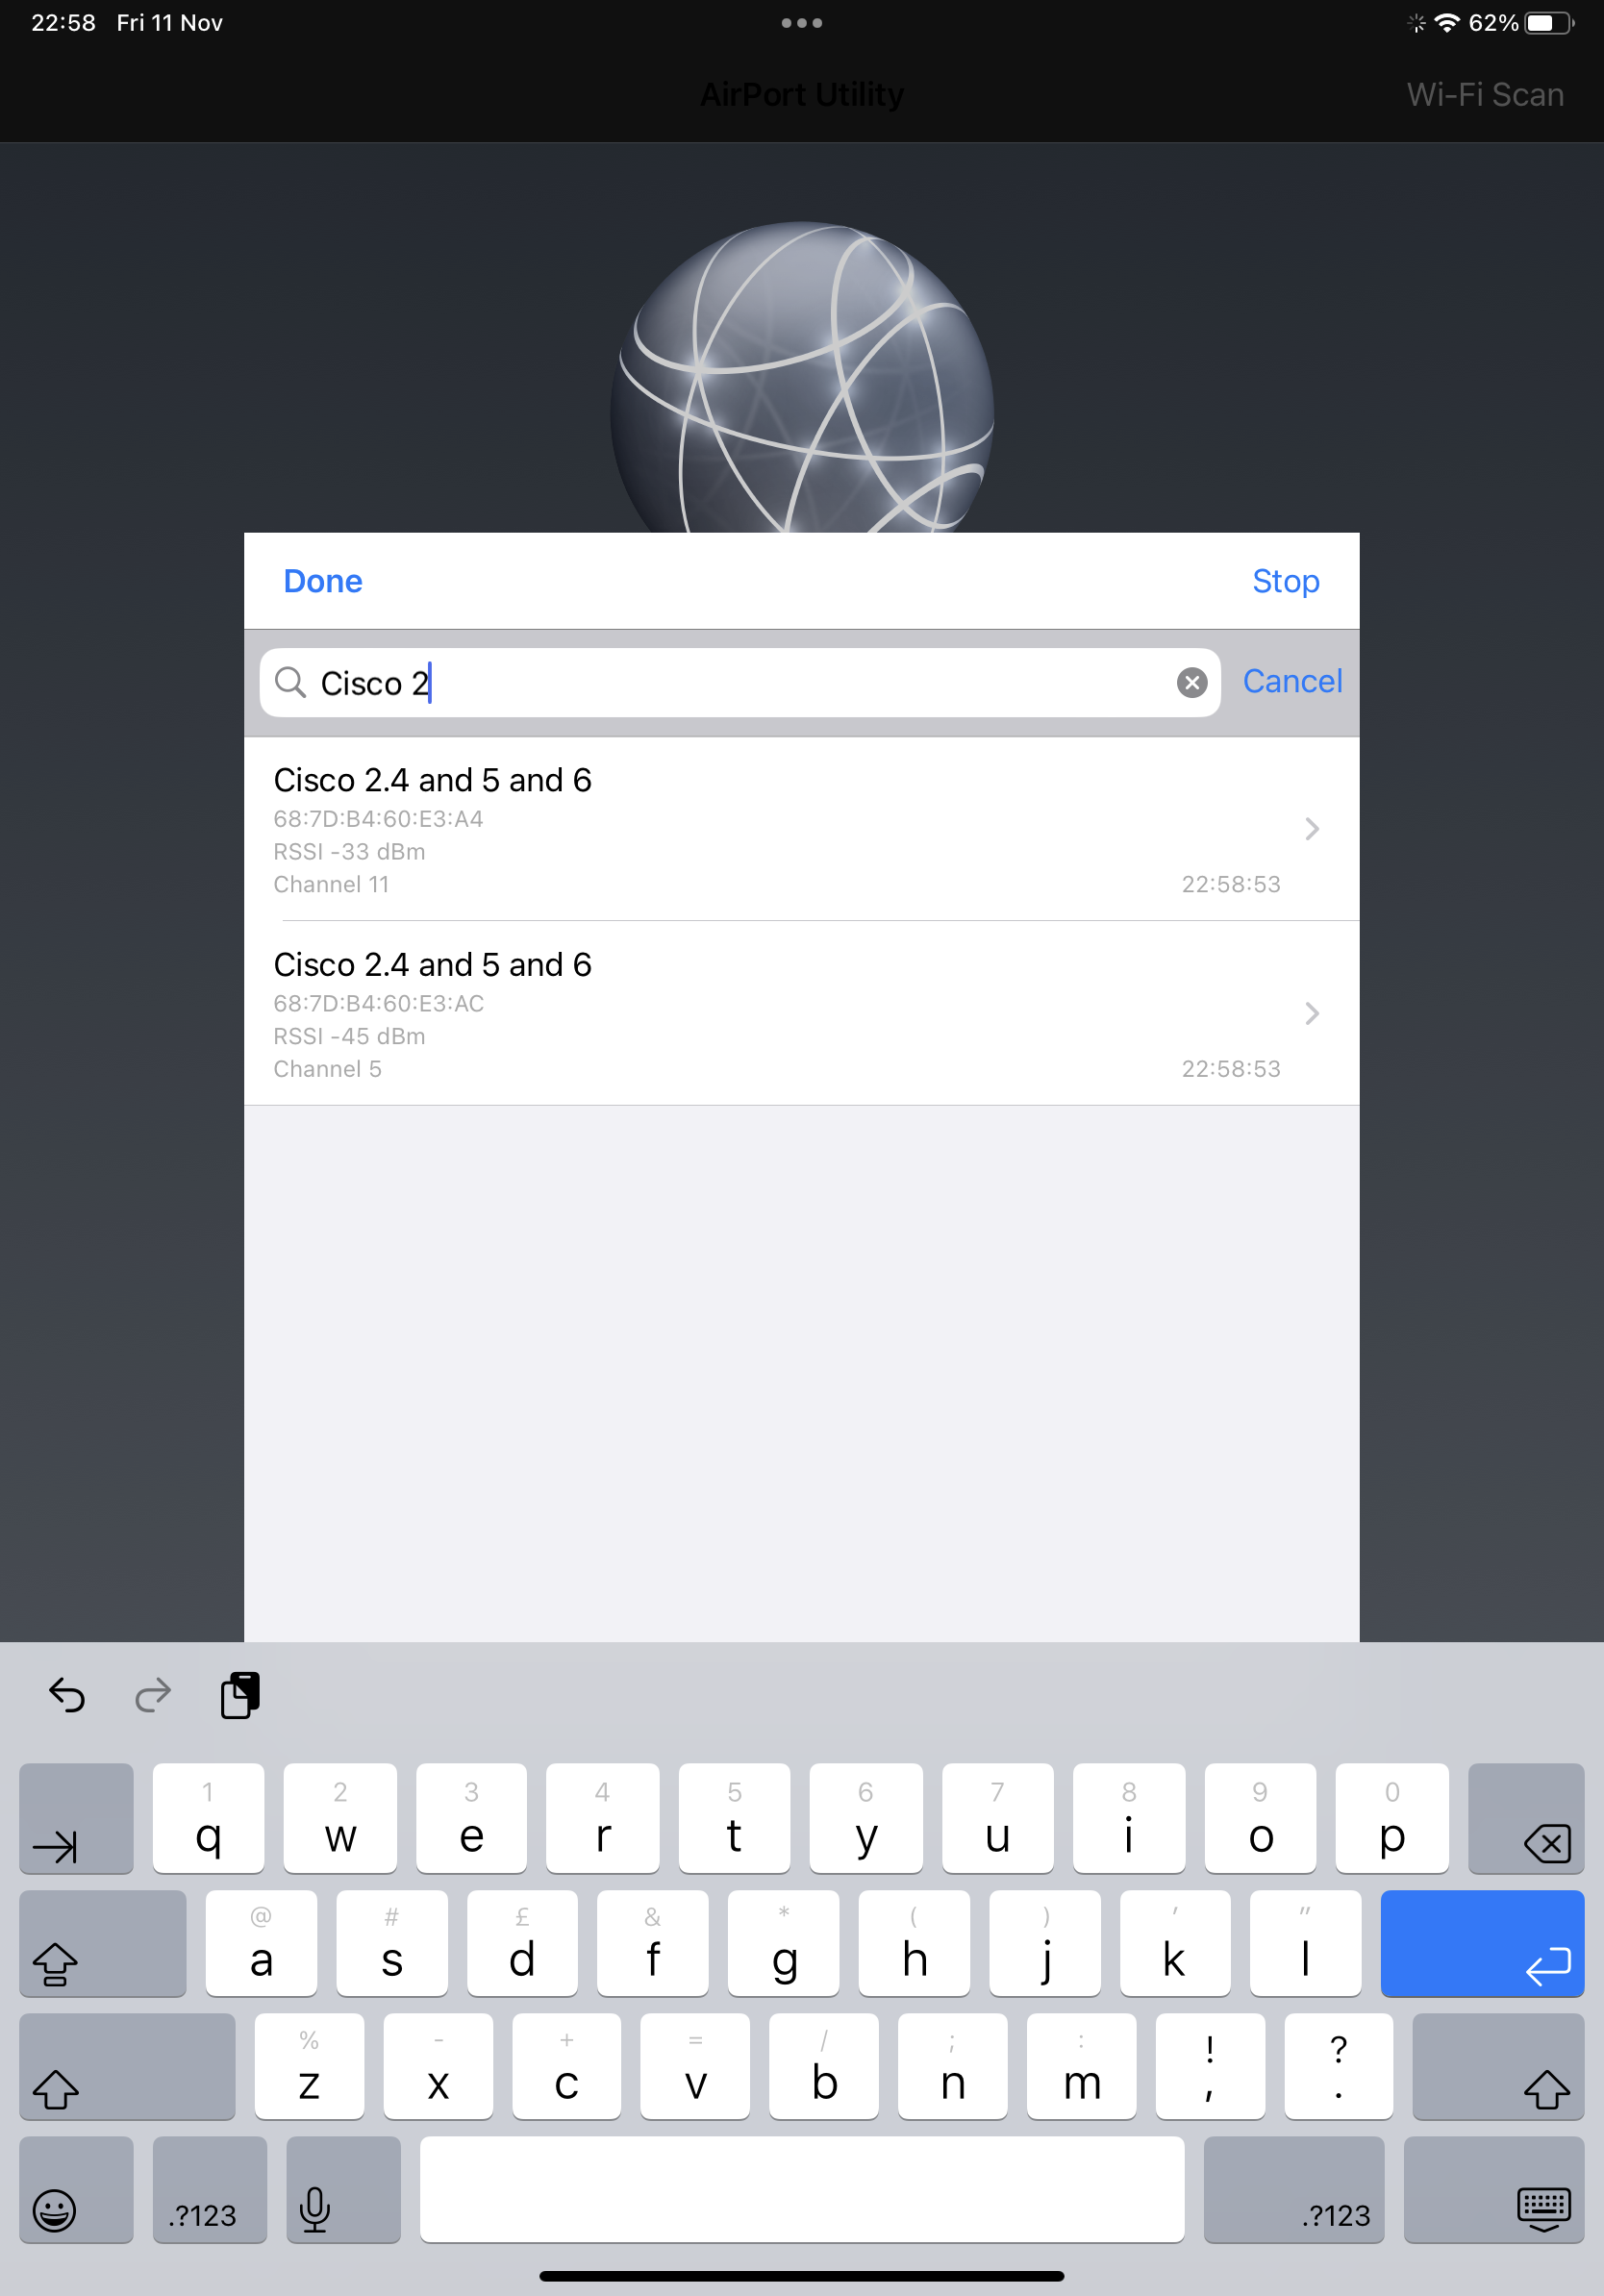
This time we only enable 2.4 GHz only SSID and 6 GHz only SSID and verify that we can see them on the air using WLAN Pi in Remote Sensor mode to WiFi Explorer Pro macOS app.
Practically instantly after enabling these, the iPad discovers the 6 GHz one using 2.4 GHz RNR.
Here is the RNR Information Element included in 2.4 GHz beacons.
RNR IE in 2.4 GHz beacons tells the client to look for 6 GHz AP on 6 GHz channel 5iPad sees both the 2.4 GHz “Cisco 2.4” and 6 GHz “Cisco 6” SSIDs
Summary
The new iPad Pro with Wi-Fi 6E only relies on Reduced Neighbour Reports (RNR) when it comes to discovery of 6 GHz Wi-Fi 6E networks. It will only discover a 6 GHz SSID, if you also enable the same or different SSID name on 5 GHz (and/or 2.4 GHz if needed).
It ignores FILS sent by the AP on its primary 6 GHz channel.
It also ignores unsolicited probe responses sent by the AP on its primary 6 GHz channel if we enable them explicitly.
It doesn’t actively scan 6 GHz to discover new SSIDs.
I recommend you enable a 5 GHz (or 2.4 GHz) SSID, which will allow the iPad to use RNR Information Element included in the 5 GHz (or 2.4 GHz) beacons. It will help other clients like Google Pixel 6, which I’ve tested here, too.
I am very happy with how well the 6 GHz discovery using 2.4 GHz or 5 GHz beacons works. It definitely is production ready. The test with only one 6 GHz only SSID on the AP is more of a corner case. Most customers I work with, if not all, will also deploy 5 GHz alongside 6 GHz, so there is absolutely nothing to worry about.
Packet capture or it didn’t happen 😉
Download 2.4 GHz an 5 GHz RNR, 6 GHz FILS, and 6 GHz unsolicited probe response packet captures from here.
Download WLAN Pi Profiler report and packet capture of 5 GHz association request, and also 6 GHz association request. We can see client’s capabilities in these frames.
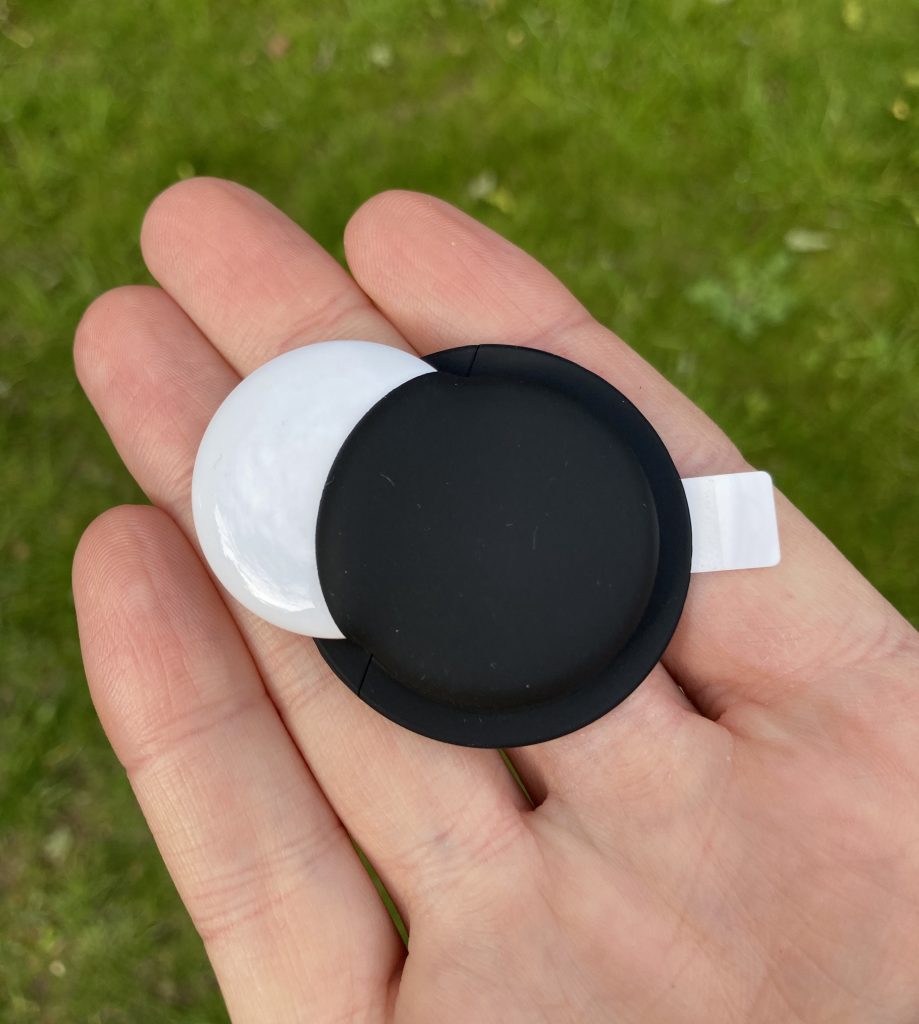
I enjoyed testing the under-seat and water bottle bike mounts for AirTags on our Tern GSD bike, and thought I should explore other mounting options.
This self-adhesive sleeve looks like a universal option, as it can be attached practically to any flat surface.
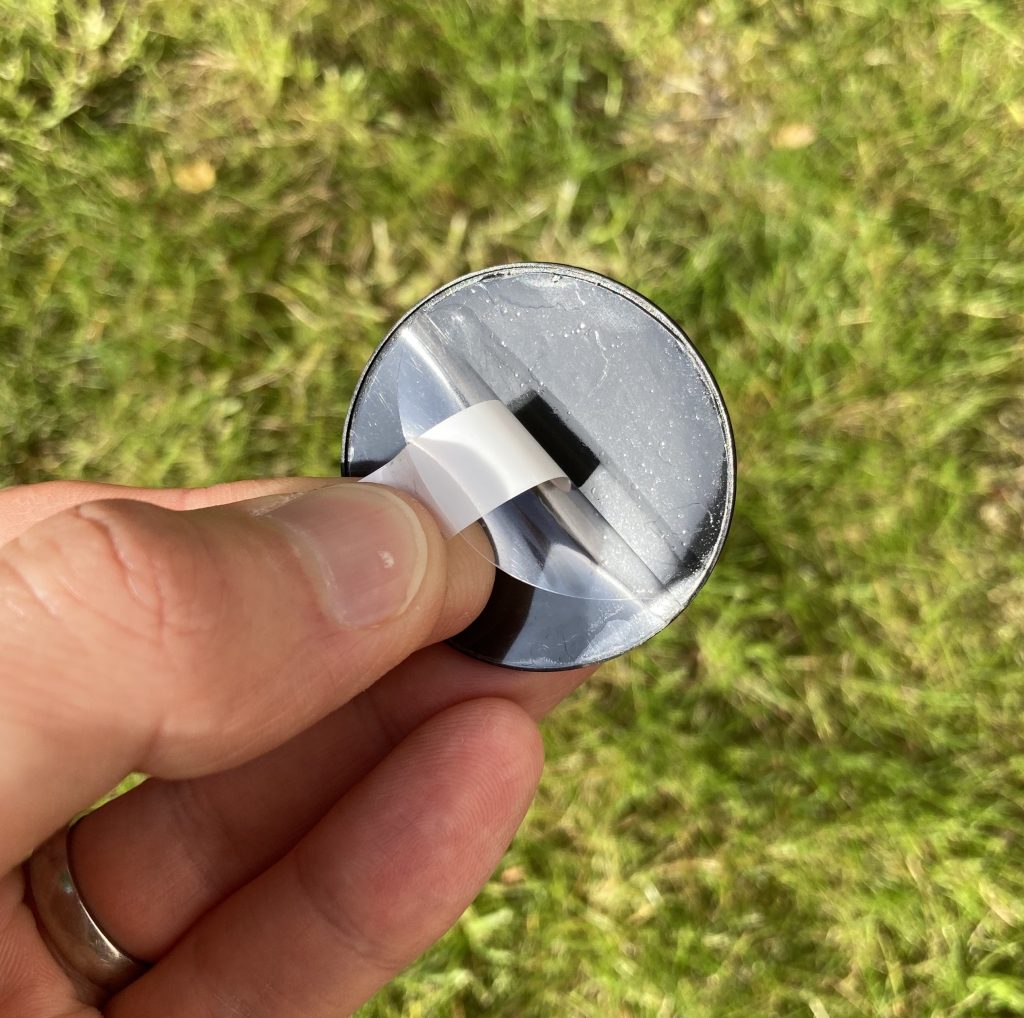
It has a silicone sleeve on one side and self-adhesive on the other.
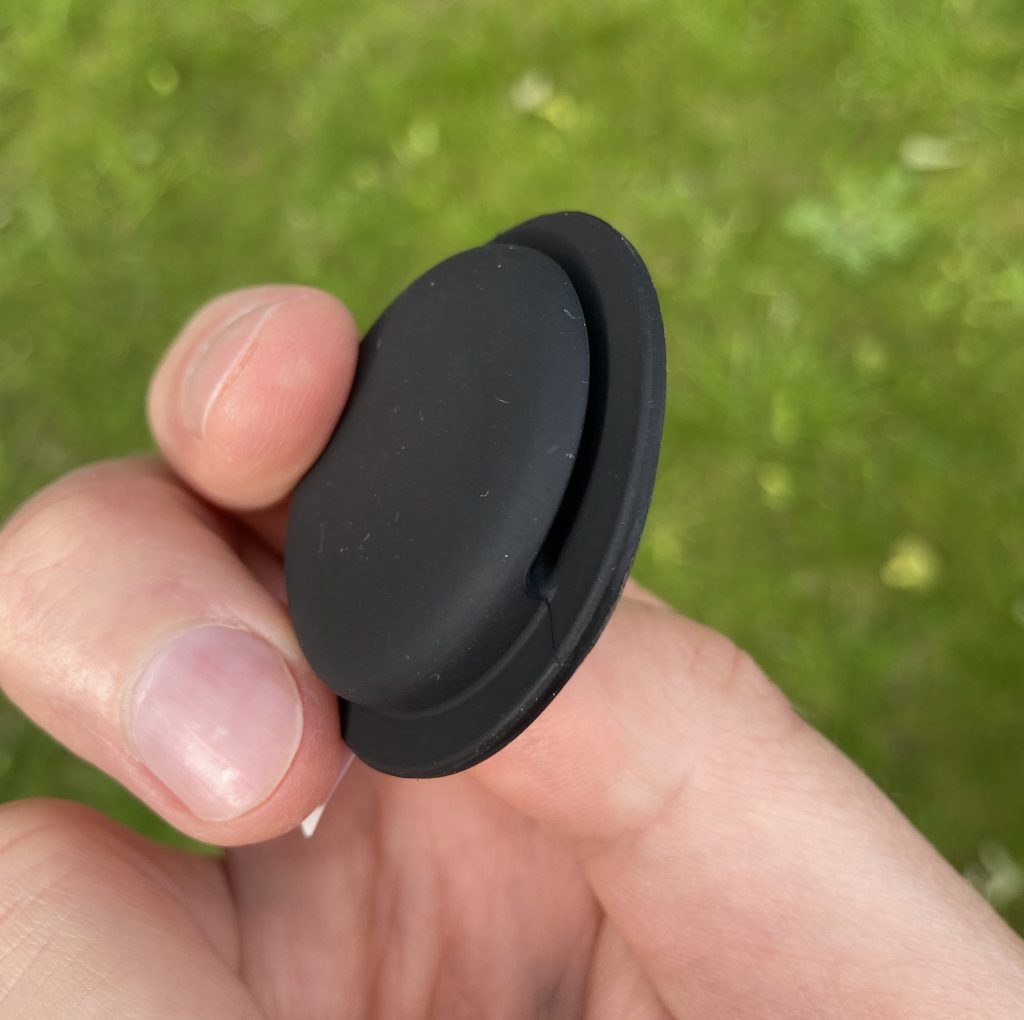
Silicon sleeve with AirTagDetail of the slot
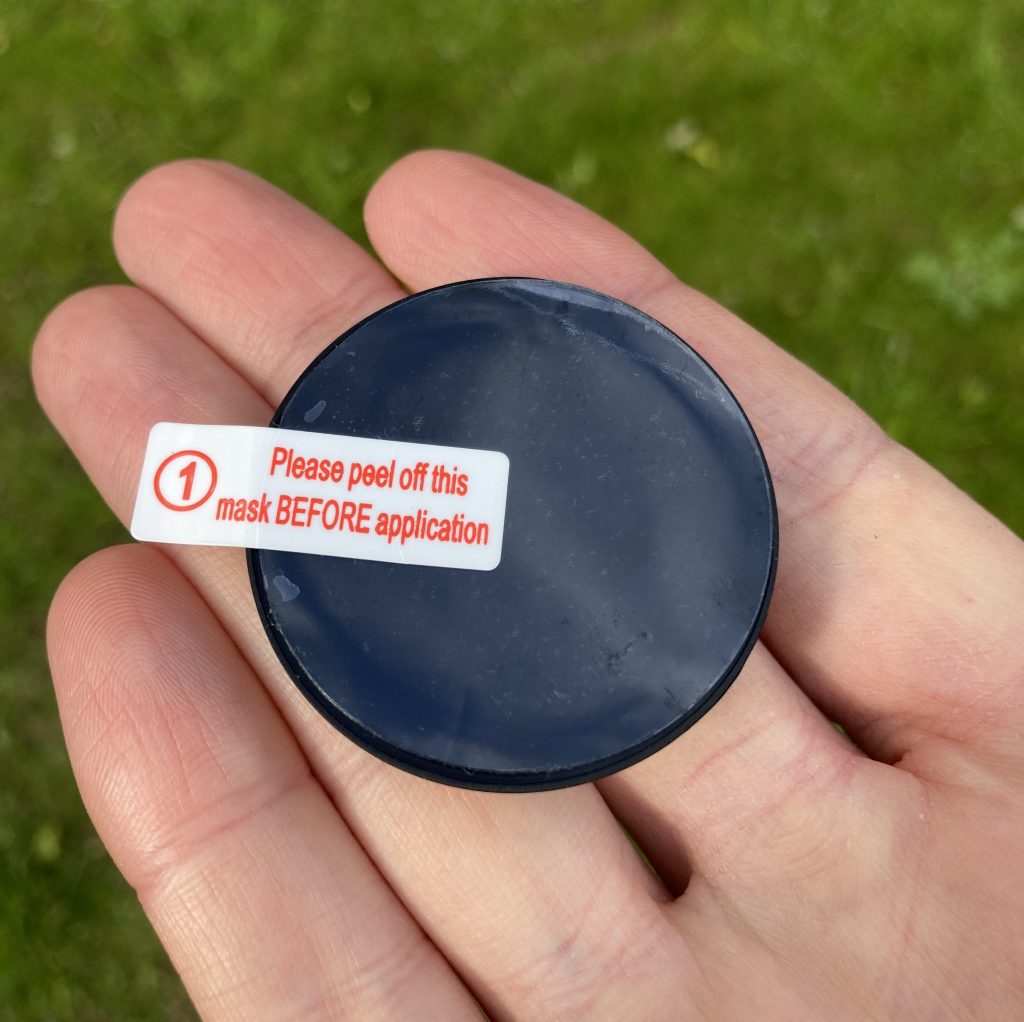
The self-adhesive layer seems to be a good choice. It is not extremely sticky as some other products, it does not seem to leave marks, and I actually managed to remove the case from the Storm Box on our Tern GSD bike, move it to a more suitable spot and re-apply it.
Self-adhesive layerThat sounds of peeling off the protective plastic sheet
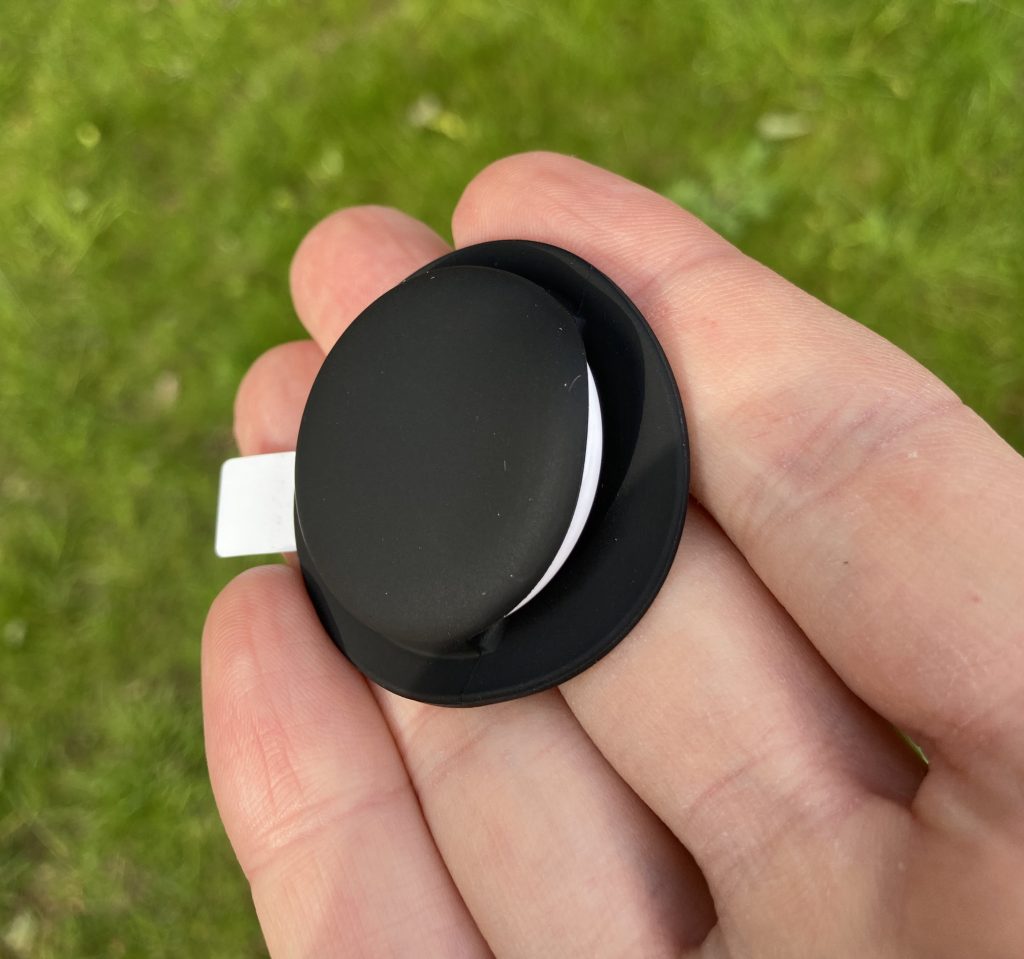
It fits nicely inside the sleeve and as far as I can tell, there is no chance of it slipping out. The silicone keeps it from moving. In fact, it takes some effort to insert and remove the AirTag, which is great.
Fully inserted AirTag
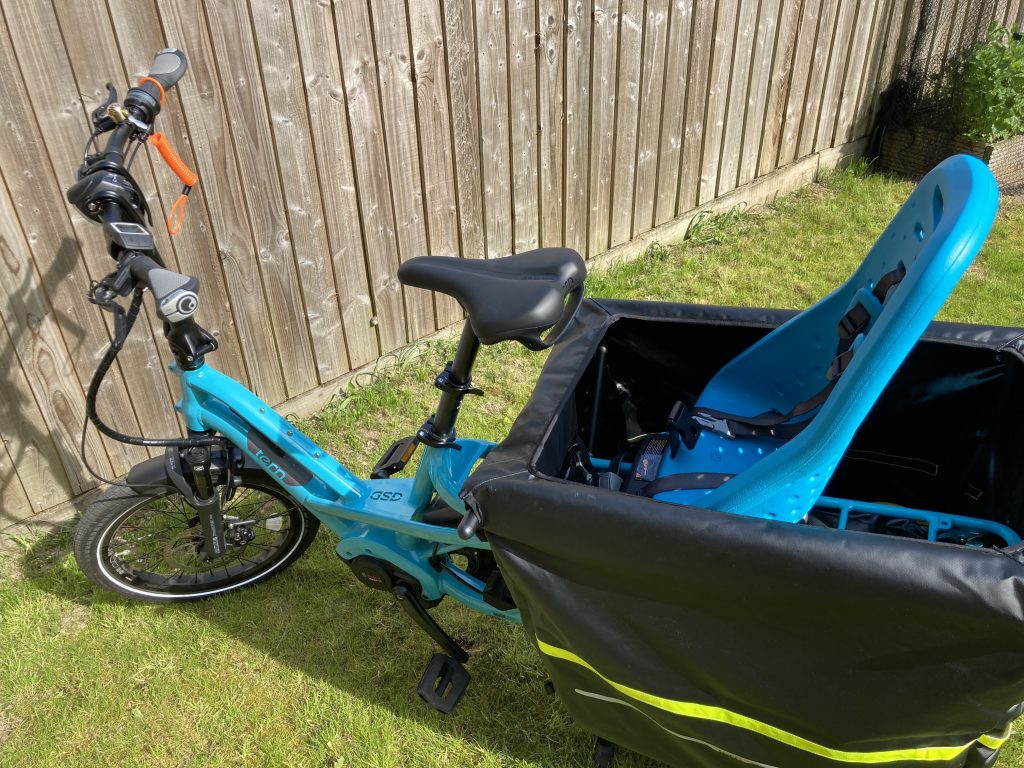
There are many accessories available for the GSD. Storm Box is a great candidate for an AirTag in this sleeve. Mine is still holding tight. It has a few internal pockets and you can easily attach a dozen of AirTags to it and still have some space left for more;-)
Tern GSD with Storm Box
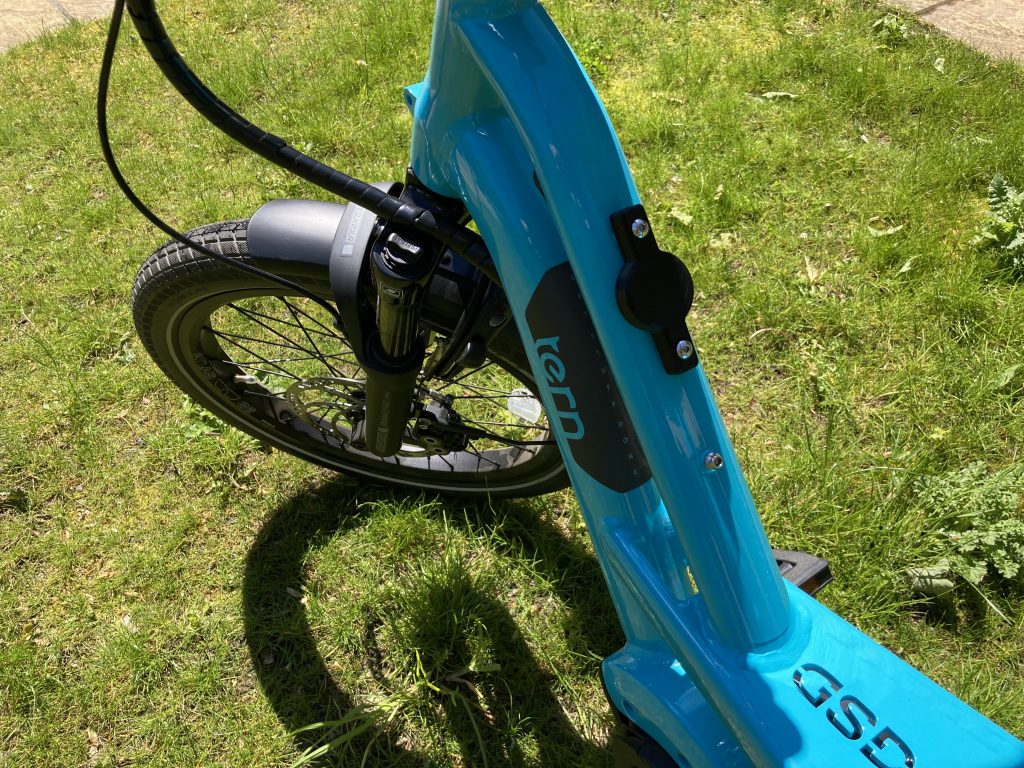
Bottom of the front rack might also be a good place for an AirTag.
A word of caution
Wherever you mount it, please keep your own safety in mind. Don’t mount it near the motor or anywhere near the chain/belt. It might cause you some bumpy ride should the self-adhesive fail.
Where can I buy one?
I bought mine on eBay and it was very affordable. Here is a link if you are considering getting one or two.
Other bike mounts
If you are looking for inspiration, I tested an under-seat and water bottle bike mounts. Here are a couple of photos and you can find more of them in the respective blog posts.
Water bottle mount with more mounting options available on the GSDUnder-saddle mount
Many people are talking about the Ultra Wide Band (UWB) precision finding supported by AirTags and the last two generations of iPhones. It is possible thanks to Apple’s U1 chip. This feature on its own might quite likely be a good enough reason for many users to upgrade to the latest iPhone.
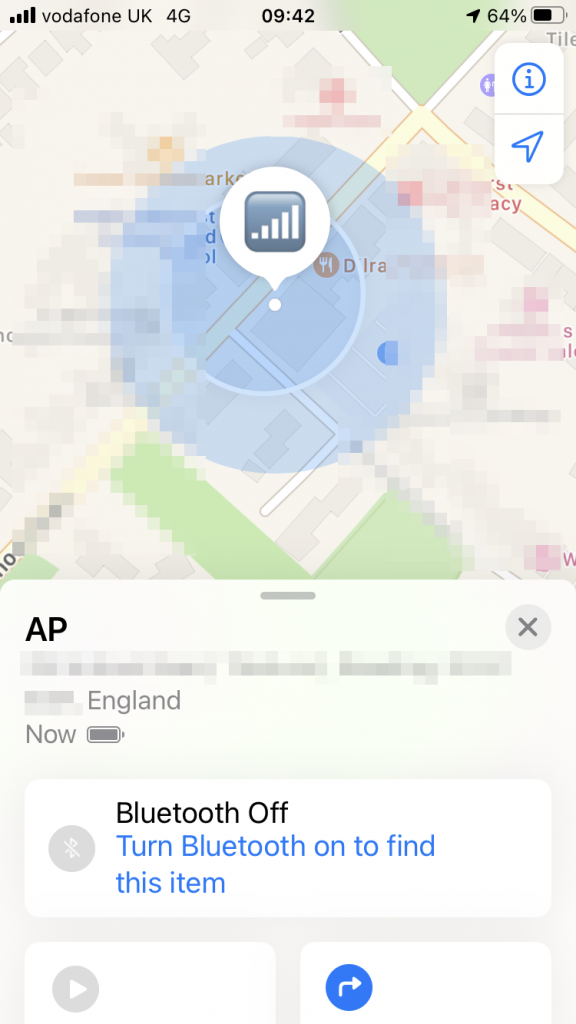
Since I don’t own iPhone 11 or 12, I was curious what the experience was from iPhone SE or XR user’s perspective. Due to the lack of the U1 chip, these phones don’t support UWB and “Precision Finding”. Instead, they use Bluetooth and “Proximity Finding”.
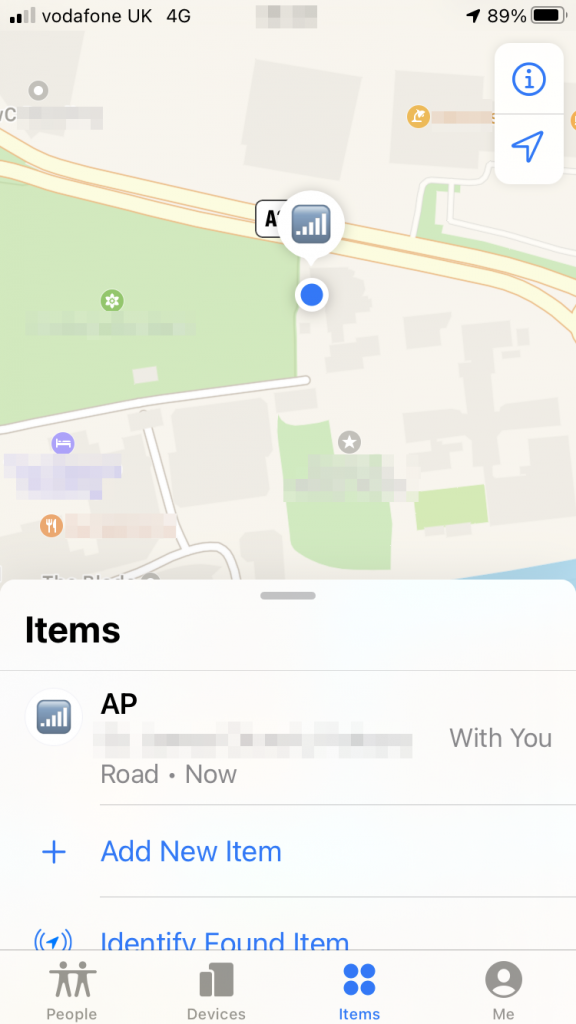
“With You” Bluetooth accuracy and audible alarm
When the tag is “With You”, that means that your iPhone or macOS device can hear the Bluetooth signal beaconed by the AirTag. In this mode, location accuracy seems to be around 10 meters (depending on where it is and if indoors or outdoors). The lack of the UWB support means that the SE or XR can’t detect the direction you or the AirTag is moving in.
Since the AirTags is “With You” (shown in the screenshot above) and is reachable via Bluetooth, you can activate the audible alarm and find its exact location this way.
Active Bluetooth connection to the tag is required to activate Play Sound
Detached mode accuracy and refresh rate
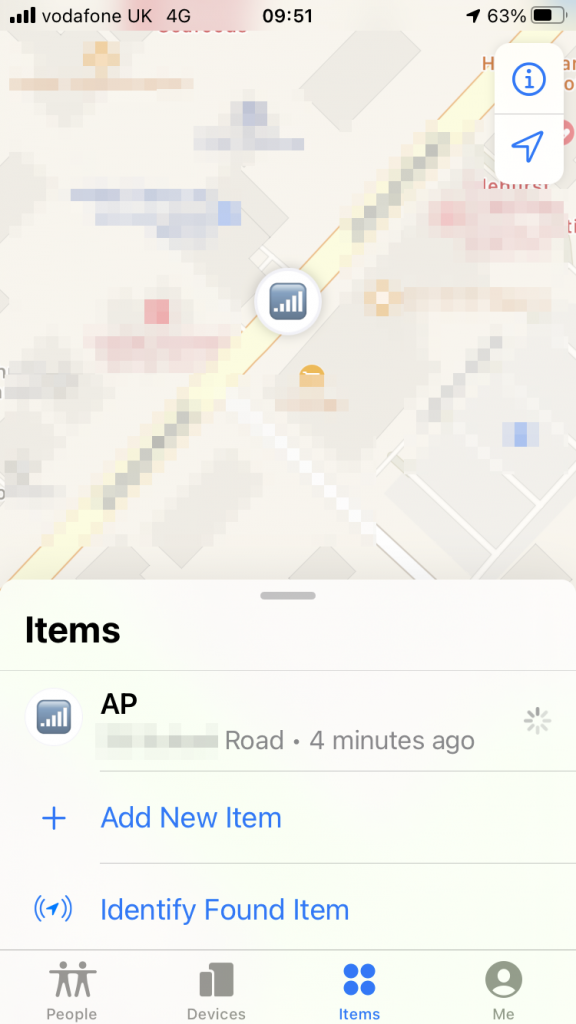
When the AirTag becomes detached from your iPhone or macOS device (tag’s Bluetooth signal is lost), the tag then relies on other people’s iPhones and macOS devices. As soon as their device hears the Bluetooth signal of your lost AirTag, it relays (or reports if you will) the tag location to iCloud. Thanks to the crown-sourced relayed location, you will be able to see your tag’s current location in the Find My app although you are not anywhere the tag. The AirTag does not even have to be in the Lost Mode. Location finding works in its standard mode.
Location in the Find My does not update instantly. Based on my tests, it refreshes every 5 to 15 minutes.
When it comes to location accuracy relayed by other people’s iPhones and macOS devices, it ranges from approximately 10 meters to 110 meters.
Relayed location – accuracy around 10 metersRelayed location – accuracy around 110 meters
Can Wi-Fi-only iPads relay location?
No, they can’t. I tested a couple of iPads connected to Wi-Fi with Bluetooth enabled and placed them in close proximity of the AirTag. They did not relay location. As far as I can tell, only iPhones and macOS devices can relay location of a tag.
Can cellular iPads relay location?
I don’t know. Please test it if you have one and tell me;-)
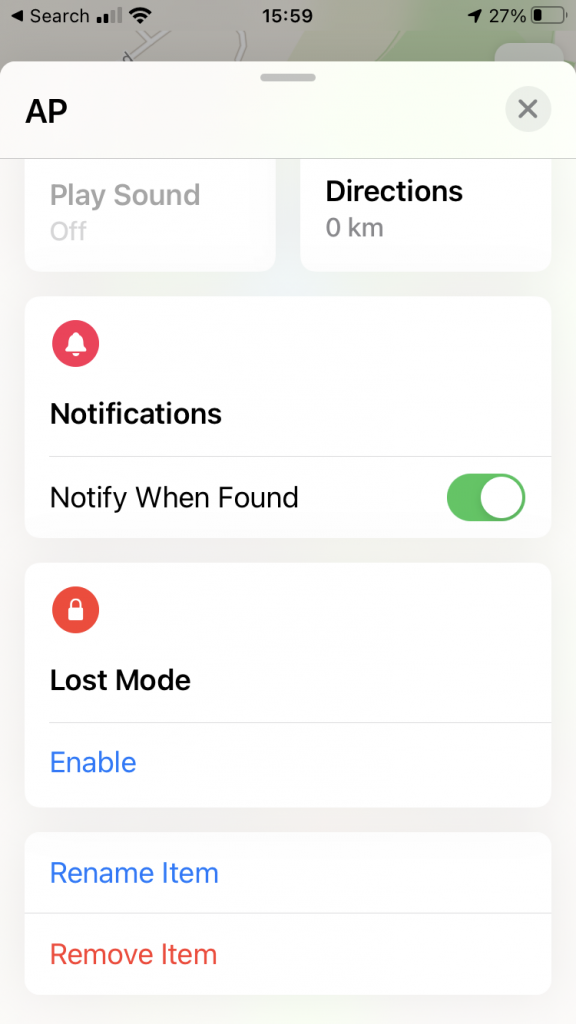
Lost mode
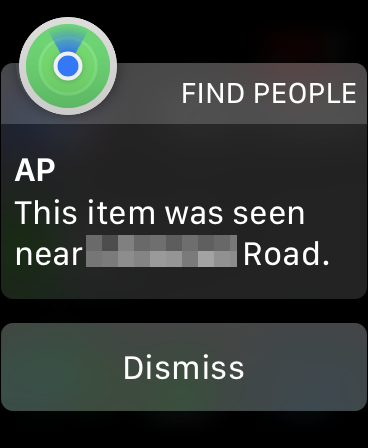
In the unfortunate event of losing your item, you can switch the tag to the “Lost mode” and receive a push notification whenever the AirTags gets automatically reported by someone’s iPhone or macOS device.
Activate Lost Mode and push notification
When that happens location, you receive a notification. Currently, there seems to be a cosmetic bug as the text of the notification does not show the latest location of the tag, but its previous location. When you open “Find My” app, you will see the correct and latest location though.
Item found notification received on Apple Watch
My test setup
iPhone SE 2nd generation running iOS 14.5
MacBook Pro running Big Sur 11.3.1
iPad Mini 5th generation running iOS 14.5
iPad Air 2nd generation running iOS 14.5
What is your experience with AirTags?
I am curious what your experience was. Have you tested any other scenarios? Have I missed anything. Please do let me know in the comments and I will update the post.
Apple published a brief summary of the newly introduced “Private Address” Wi-Fi feature. Since it does not go into the detail, I tested the public iOS 14.0 release on an iPhone SE and iPad Mini in my lab. Here is how it actually works.
New Wi-Fi networks
For SSIDs you have not connected to before, iOS 14 devices generate a random MAC “Private Address” and they use this MAC address permanently for this SSID. This address does NOT change over time. This works as expected.
Previously used Wi-Fi networks
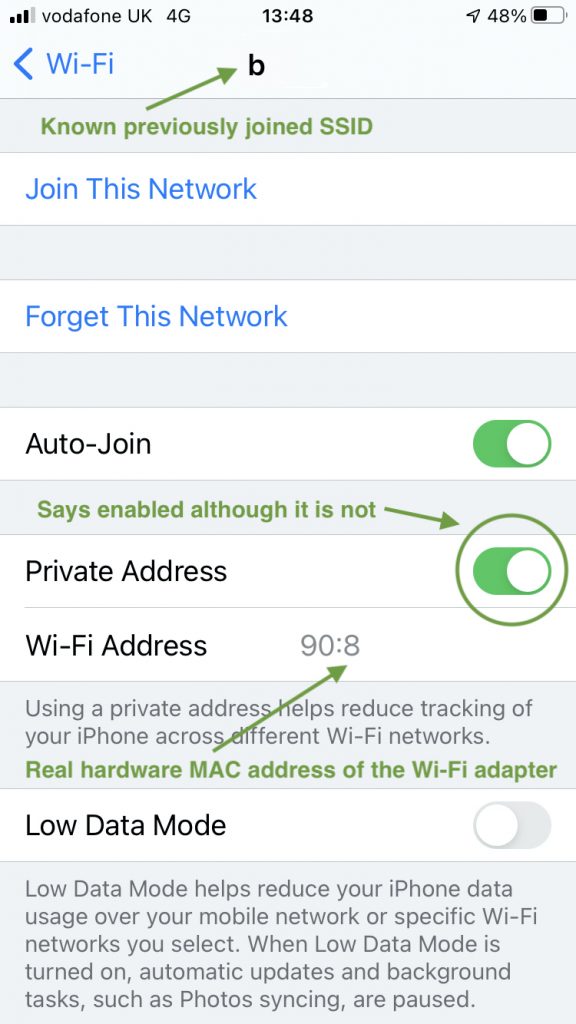
Known Wi-Fi networks you have already connected to at least once before the upgrading to iOS 14 get a different treatment though. And this is where things are not as straightforward as the documentation suggests.
After upgrading to iOS 14, I connect to a known network which I have already used before the upgrade. The MAC address that is used is actually the real hardware MAC address of the Wi-Fi adapter for 24 hours. Note that the “Private Address” feature is enabled. This could potentially be considered a UI bug.
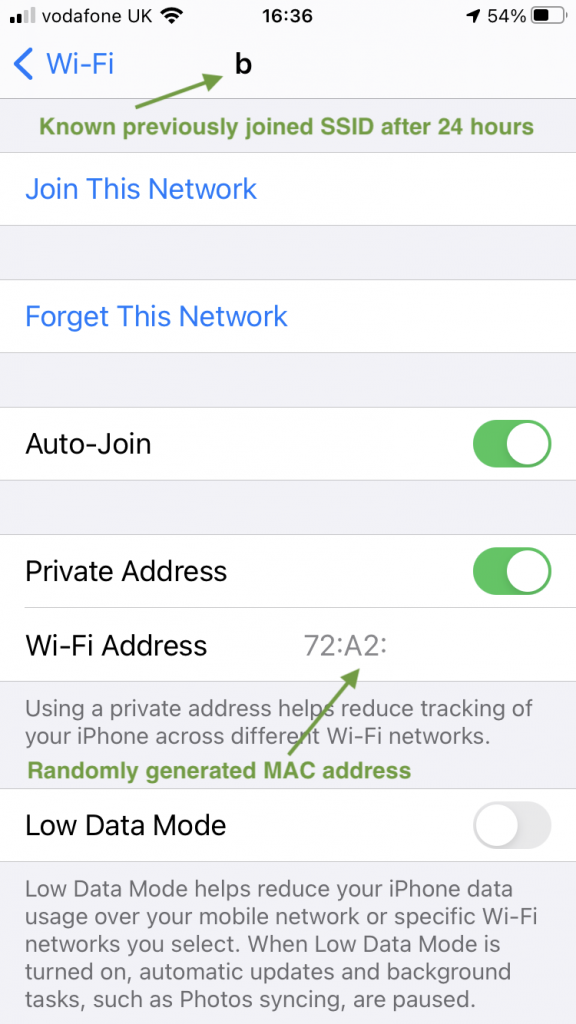
24 hours after first connecting from an iOS 14 device to this known SSID, the “Private Address” feature kicks in and the MAC address for this SSID automatically switches from the real MAC address to a randomly generated MAC address. Personally, I assume that this 24-hour period has been developed to allow enterprises to disable Private Address feature on their managed iOS devices using MDM, but I may be wrong.
From this point onwards the same randomly generated Private Address is permanently used for this SSID and does NOT change over time.