No, it will not, unless you make some bad choices. But, faster card will make your life easier and significantly speed up the image flashing process.
Tests performed
Flash and verify WLAN Pi 3.1.4 software image to the micro SD card using built-in card reader of MacBook Pro M2 and Balena Etcher app
Software image flashing process
Boot WLAN Pi M4 from the micro SD card. Measure how long it takes to boot from plugging the Ethernet cable in (and PoE power provided) to WLAN Pi home screen shown on the display
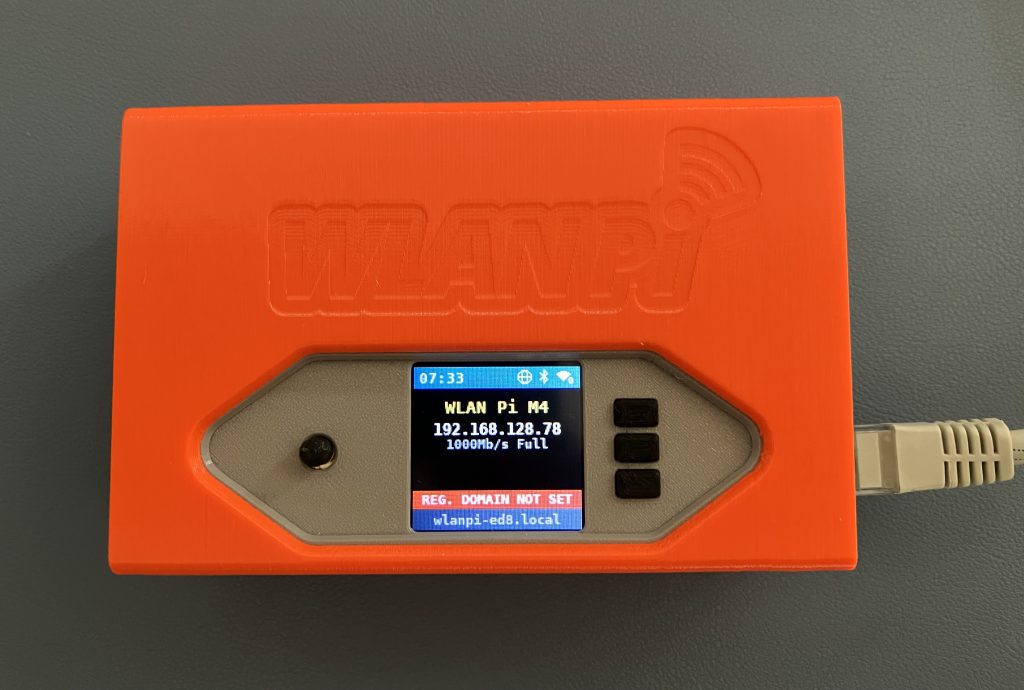
WLAN Pi M4 powered via PoE
Results
Sandisk High Endurance 32 GB U3 card is the default provided with WLAN Pi M4 by default. The U3 standard reall y makes a huge difference when it comes to writing to the card and that’s why it is our go to option.
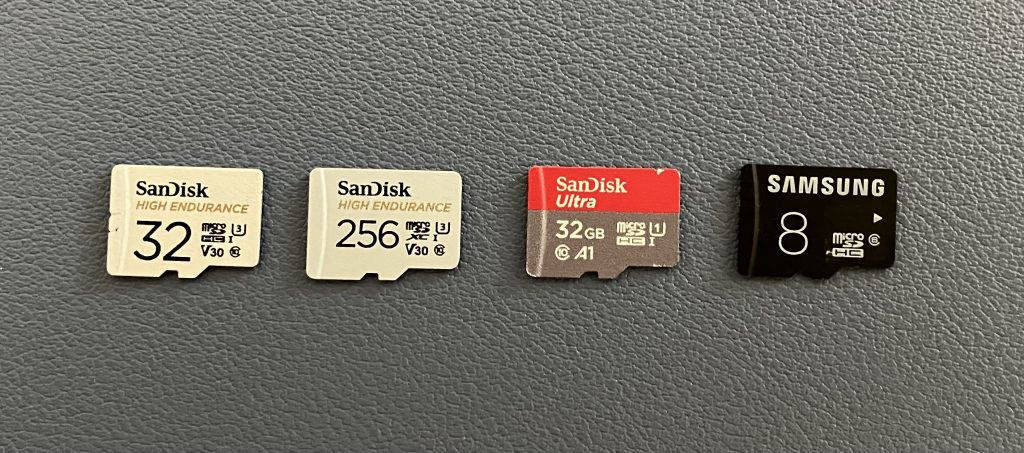
Micro SD cards tested
From practical perspective, different size or even slightly slower card won’t really make your Pi boot any faster. If you make some bad choices and reuse an older class 6 card, you will spend extra 11 seconds of your life waiting for the WLAN Pi to boot every single time.
Flash WLAN Pi image
Effective speed
Boot WLAN Pi M4
Sandisk HE 32 GB U3
1 min 59 seconds
64 MB/s
28 seconds
Sandisk HE 256 GB U3
1 min 53 seconds
68 MB/s
28 seconds
Sandisk Ultra 32 GB U1
3 mins 54 seconds
24 MB/s
28 seconds
Samsung 8 GB Class 6
11 mins 29 seconds
8 MB/s
39 seconds
Compute Module 4 with built-in eMMC storage
Didn’t test
Didn’t test
27 seconds
Recommendation
Invest in a U3 or better card and benefit from fast write speeds. There is very little premium to pay. In future, you can reuse a fast card in other device like a dash cam, Raspberry Pi 5 workstation, or video camera.
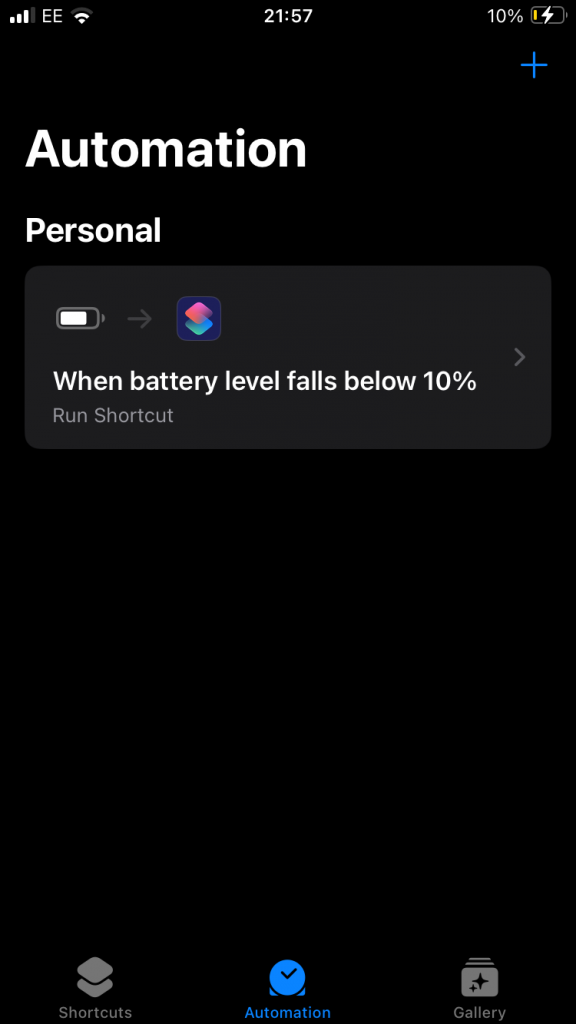
Let me give you one more reason why you should explore the Shortcuts framework on your iOS or macOS device.
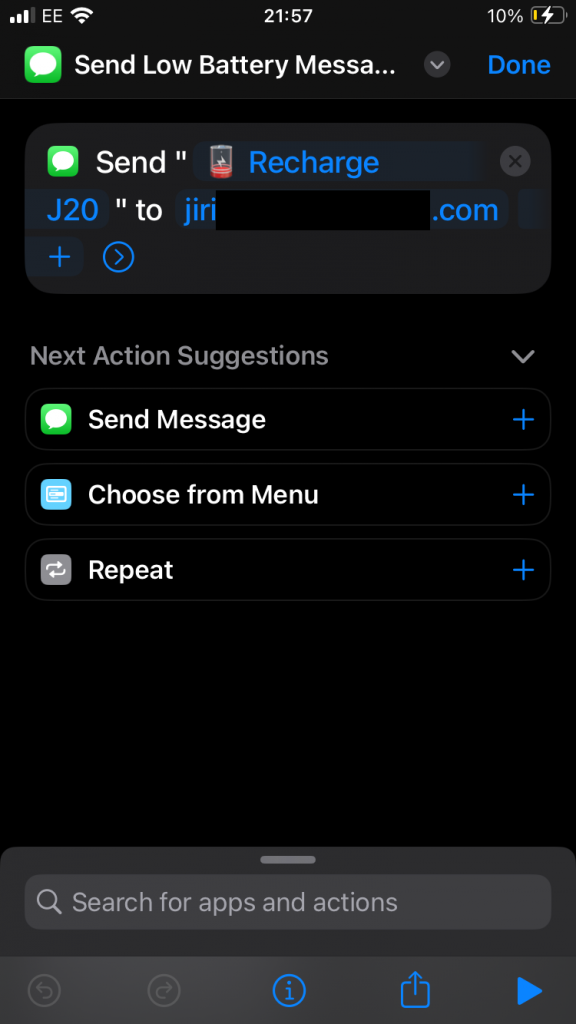
Remind me to charge my test phone
I mainly use my primary iPhone, but for testing I use an older iPhone running iOS Beta. Up until now, I struggled to keep the test phone charged. Typically I would pull it out of the bag and … you know the rest of this story, right?
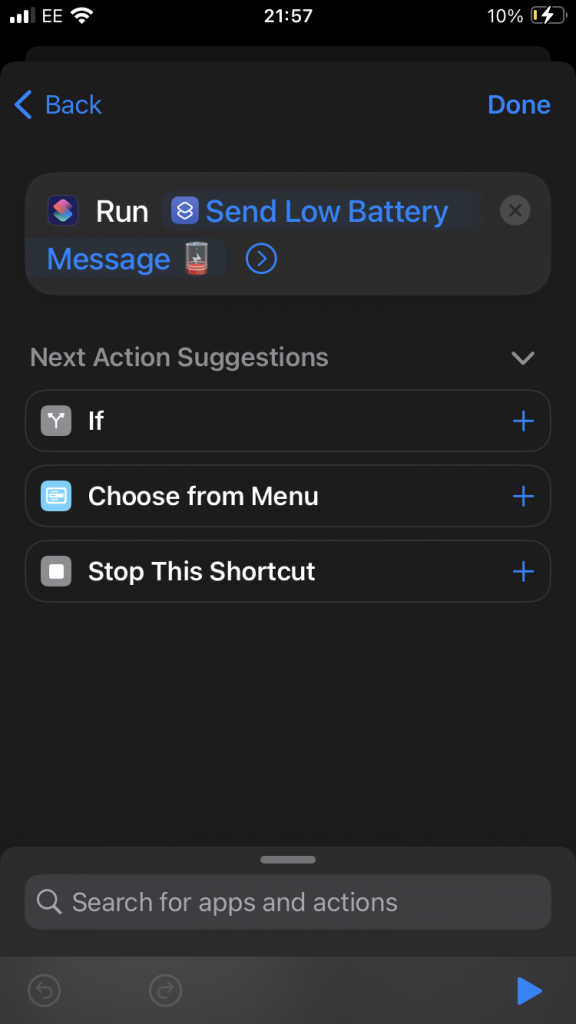
I put together this quick but very useful shortcut. Whenever charge level drops below 10 %, the secondary phone will automatically send me an iMessage with a reminder. That’s it. Simple. Useful.
Recharge reminder automatically sent to me via iMessage from the secondary device
How does it work
Simply create a new Shortcut on the secondary iOS device, using the Shortcuts app. Select Send Message action and enter your iMessage details.
Now, in the Automation section, configure the trigger that executes this action. Set it to run whenever battery level drops below 10 %.
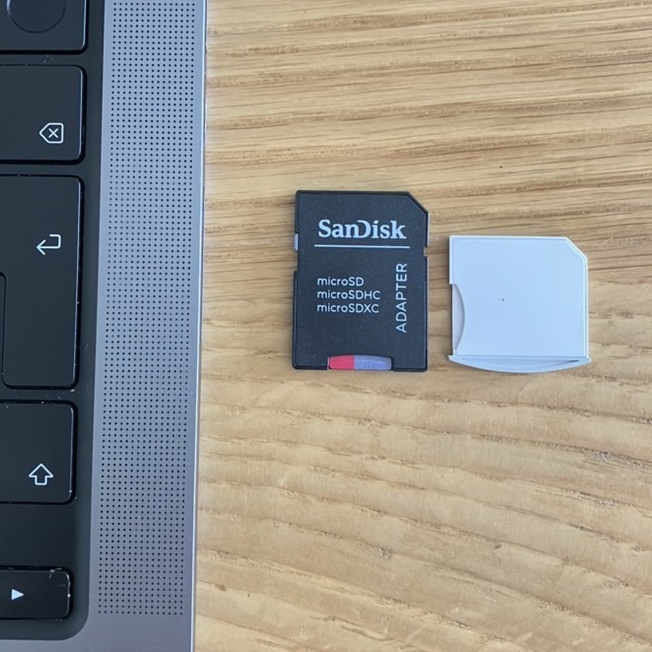
I flash Micro SD cards few times a day (hello WLAN Pi team 😉), and I thought it might be a good idea to always have an SD card to Micro SD card adapter on me. The easiest way to do that is to insert one in your MacBook built-in SD card reader slot. But which one do you buy?
Supplied adapter
There is nothing wrong with this SanDisk adapter. But it sticks out of your laptop. You can’t leave it inserted in the Mac while travelling. And also, the Micro SD card might slip out of the adapter.
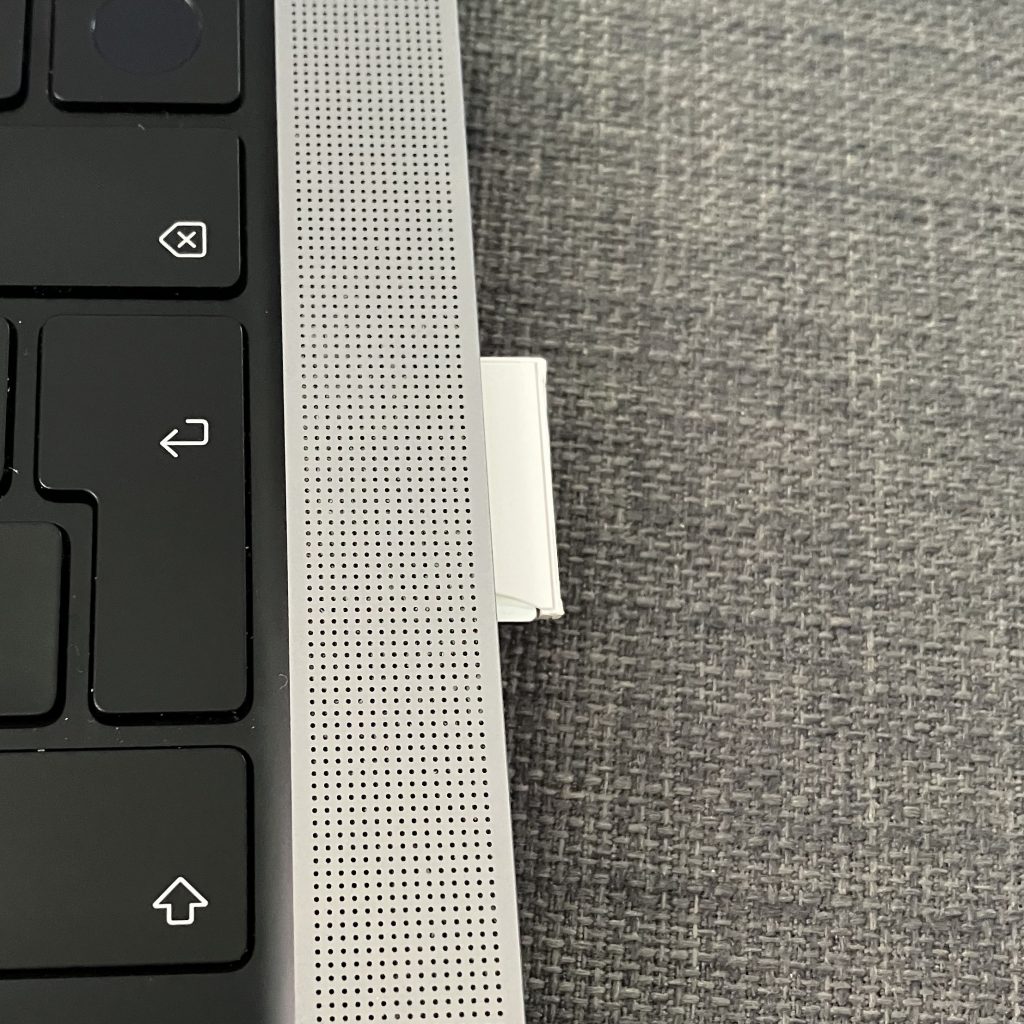
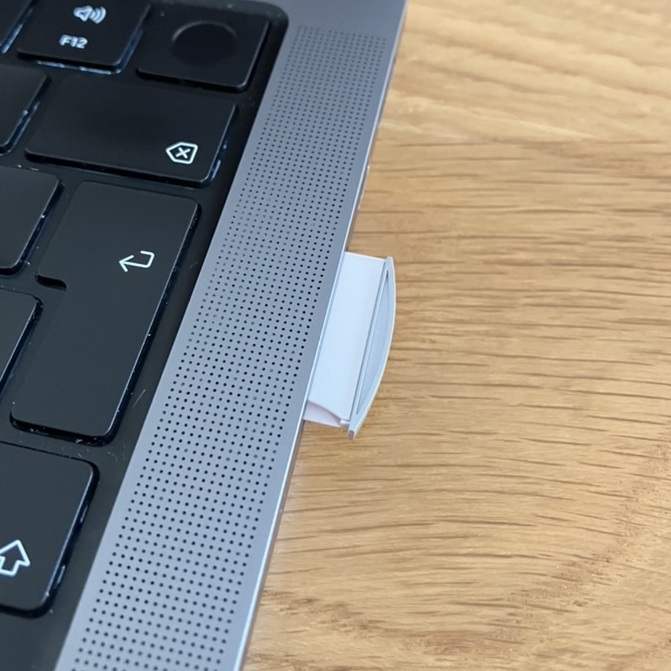
White OEM Micro SD to SD card adapter
To my surprise, this £2.60 adapter worked great… for a couple of weeks 😅 Until it disintegrated. It was designed for previous generations of MacBooks and it is not flush with the body of M1 MacBook, but it is still smaller than the full-size adapter.
You can shave off the grey plastic part, and make it even smaller. The white part allows you to easily remove and reinsert the adapter. No nails required.
The Micro SD card goes in the adapter from the side, so it won’t eject in your backpack or laptop bag.
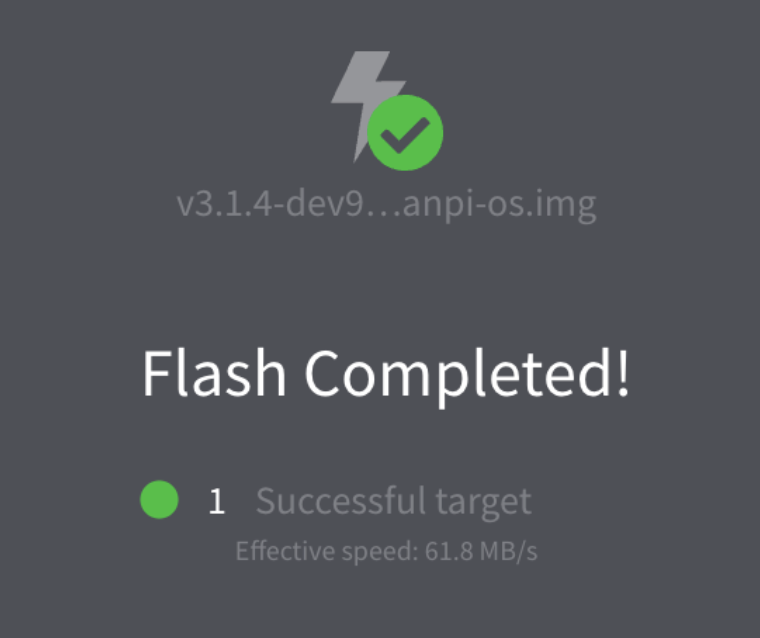
It flashes cards at the exact same speed 61.8 MB/s as the premium £30 BaseQi. And it is easy to remove from the MacBook card reader slot.
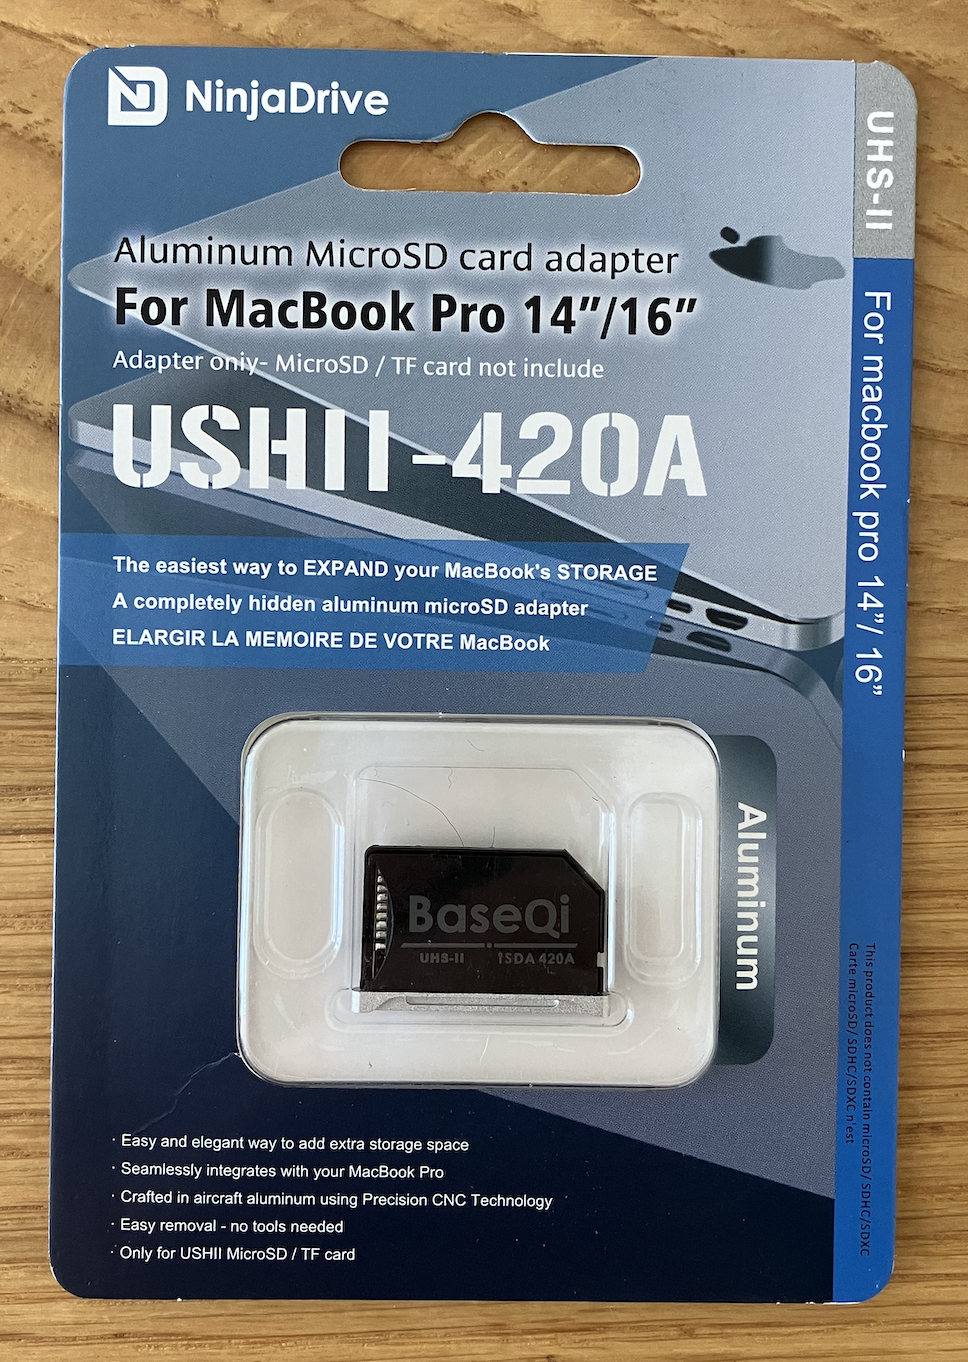
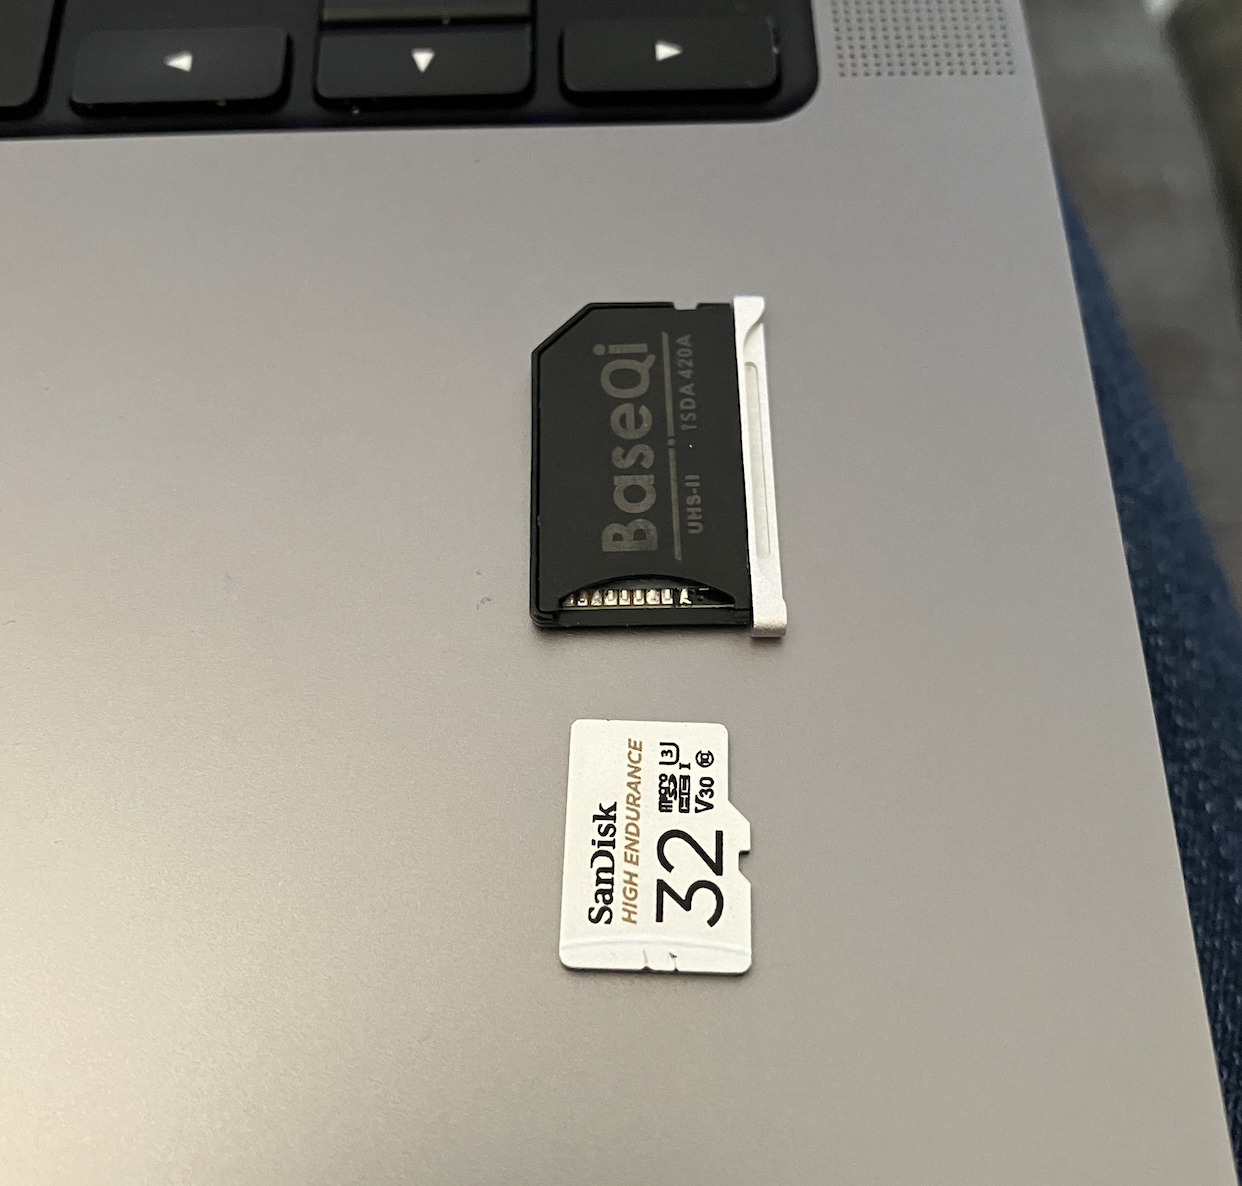
BaseQi 420A
This adapter is primarily designed for those who want to expand storage capacity of their MacBook. And it does that really well. It fits perfectly inside SD card reader slot of 14″ M1 2021 MacBook. The problem is that it works ‘too well’. Once you insert the Micro SD card to it, it is very hard to remove the Micro SD card. Now, when you insert it into MacBook SD card reader, it is designed to stay there and again it does that ‘really well’.
Removal of BaseQi from the MacBook card reader takes 2 fingers and 2 nails. Yes, it takes significant effort.
Would I recommend it to someone who wants to use it to flash Micro SD card few times a day? No. It takes a huge effort.
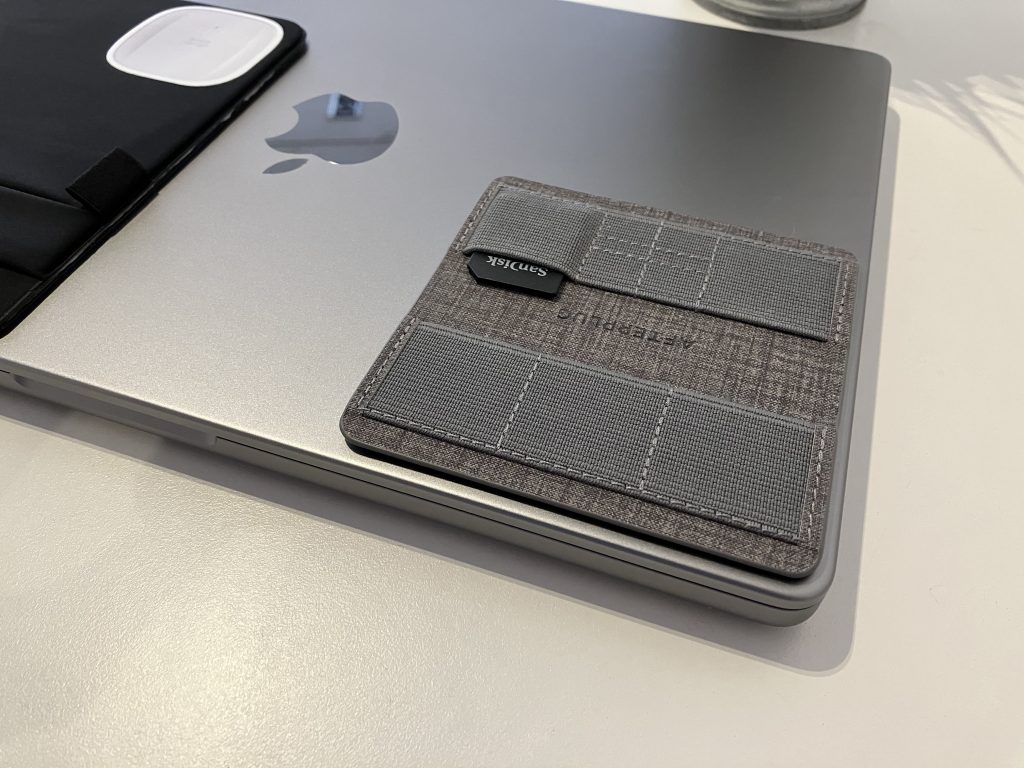
Afterplug Ultra Slim Stick On SD and MicroSD Card Holder with Reusable Adhesive
Problem solved! This stick on card holder did the trick. I can reuse all my SanDisk SD card to micro SD card adapters. And I can carry a handful of them, label them and store the micro SD cards inside the adapters.
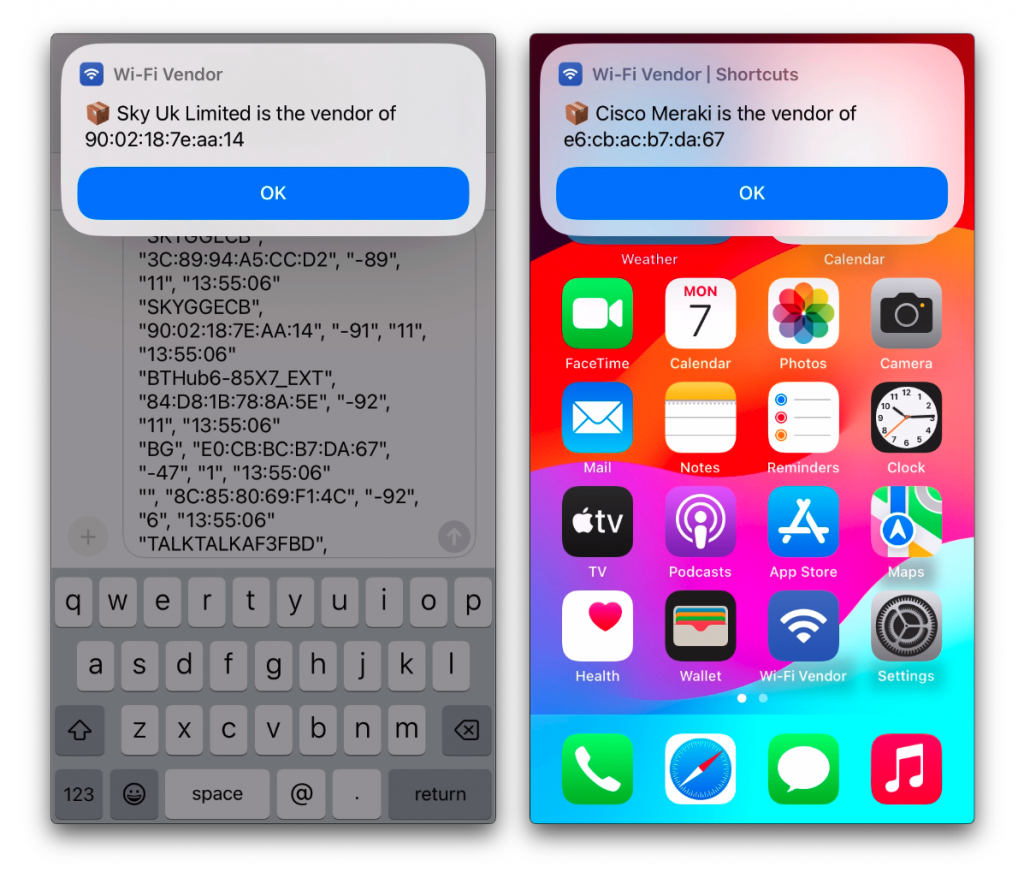
Many of us walk into buildings and we immediately start looking for access points 🙃 Often times, the access points are not visibly installed. But how can you tell what vendor is your favourite coffee shop using, or what APs did your customer deploy?
Now, would it be cool if you could use your iPhone or iPad to find out what vendor is your customer, public venue, favourite football club, or train provider using?
Wi-Fi Vendor iOS Shortcut
I created a Shortcut for iOS, which does exactly that.
Simply connect to a Wi-Fi network and open the shortcut. We will automatically populate the input field with the BSSID of the AP you are currently connected to:
Simply connect to a Wi-Fi network and tap on the Wi-Fi Vendor icon
If you don’t want to connect to an AP, use Airport Utility to get the BSSID (aka the “wireless MAC address” of the AP) of the access points around you, and let Wi-Fi Vendor shortcut do its magic:
Scan for BSSIDs around you and detect vendor
Or you can even use the good old Copy & Paste method. Let’s say you saved the OUI to your Notes app. Copy it to clipboard and paste into Wi-Fi Vendor:
Benefits of this solution
iPhone or iPad is all you need. No need to open your laptop or other professional Wi-Fi tool.
All data stays on your iPhone and iPad. No data, not even the BSSID, is sent to a cloud service.
Our OUI <-> Vendor database is Wi-Fi centric, open to additions of the new records by Wi-Fi professionals, it has extra entries from vendor documentation, and BSSIDs captured in the field
It is community-driven and customisable. Contribute new OUIs, or fork our repository and create your own tool.
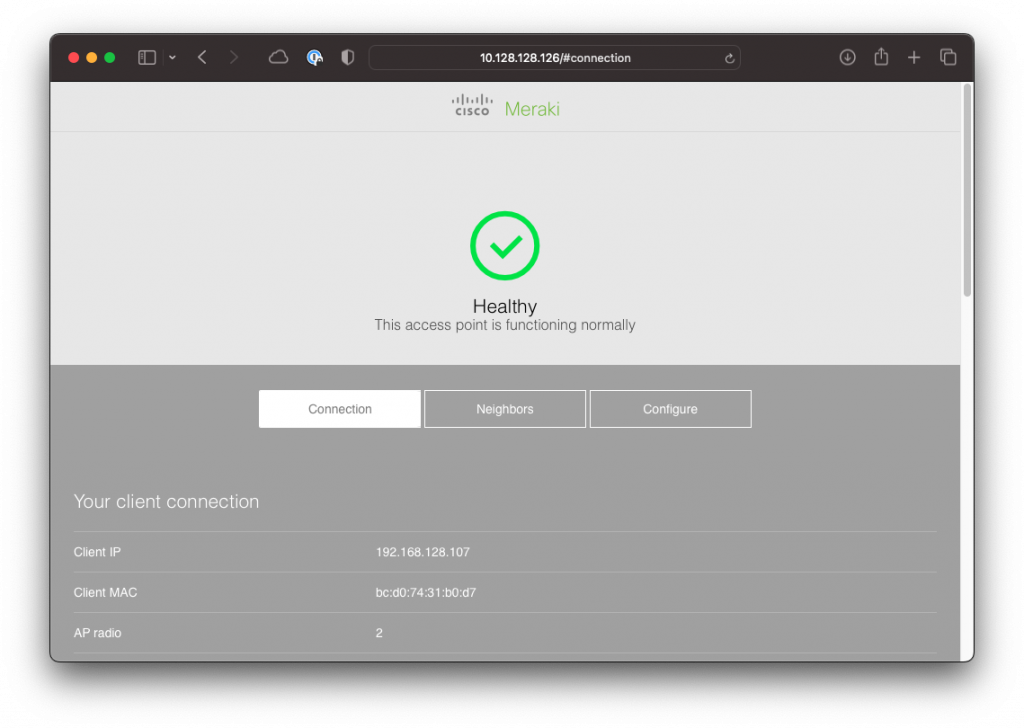
For Cisco Meraki APs, I use an active detection method – more about this below
Cisco Meraki active vendor detection method
When there is no match based on the access point’s OUI, Wi-Fi Vendor shortcut performs an active check. Make sure you are connected to the AP, then open Wi-Fi Vendor. It will attempt to browse to the Local Status Page of the AP and if it find Cisco Meraki logo in the source code, that’s a match.
Supported iOS releases
I’ve tested Wi-Fi Vendor on these devices. Use iOS 17 or newer for the best results and all features.
iPad Air 2, iOS 15.7.7 – no Cisco Meraki active check, doesn’t detect BSSID you are currently connected to
iPhone SE 2nd gen, iOS 16.6 – no Cisco Meraki active check, doesn’t detect BSSID you are currently connected to
iPhone SE 2nd generation, iOS 17.0 – all features are supported
iPhone SE 3rd generation, iOS 17.0 – all features are supported
This tool is provided as is. If you spot anything that needs to be fixed, let us know, or even better submit a Pull Request including the fix. Blame Jiri for anything that needs to be fixed, not Cisco 😉
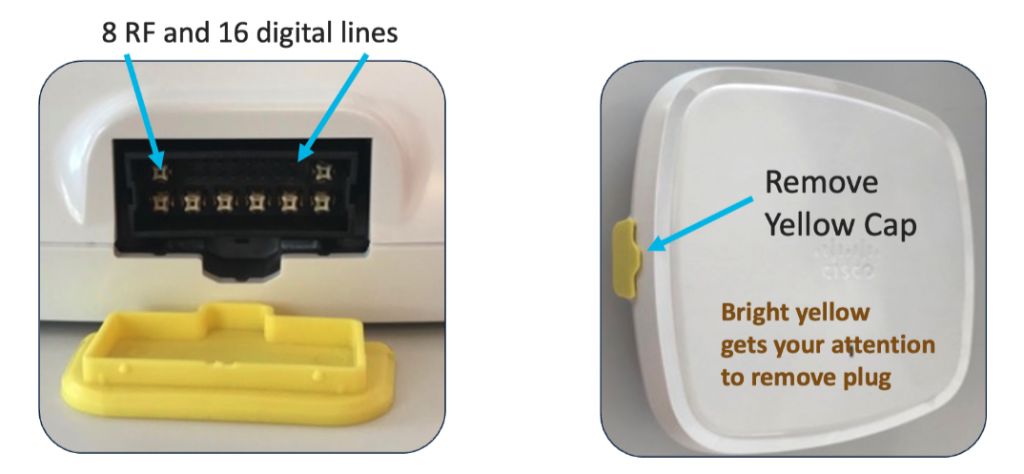
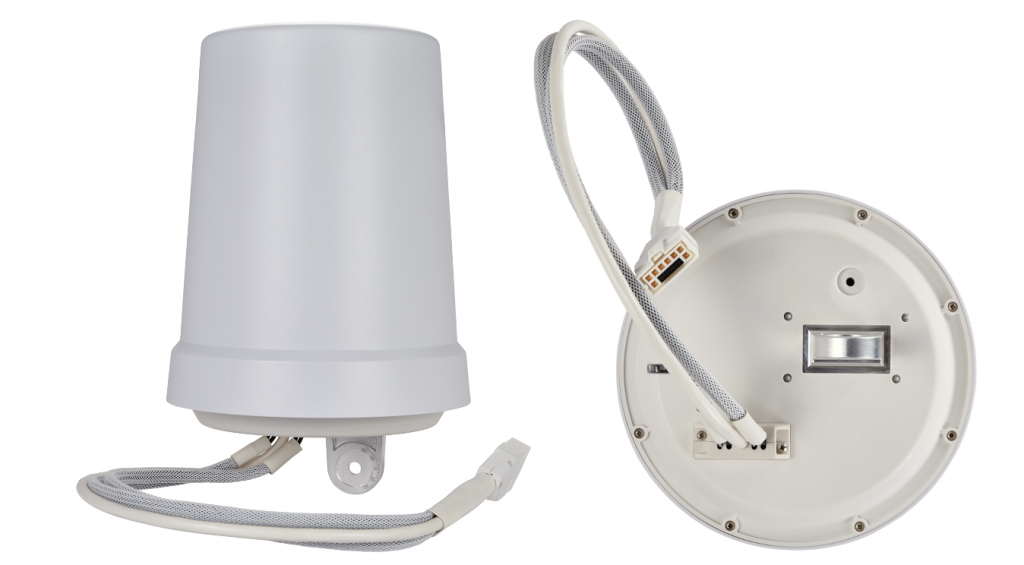
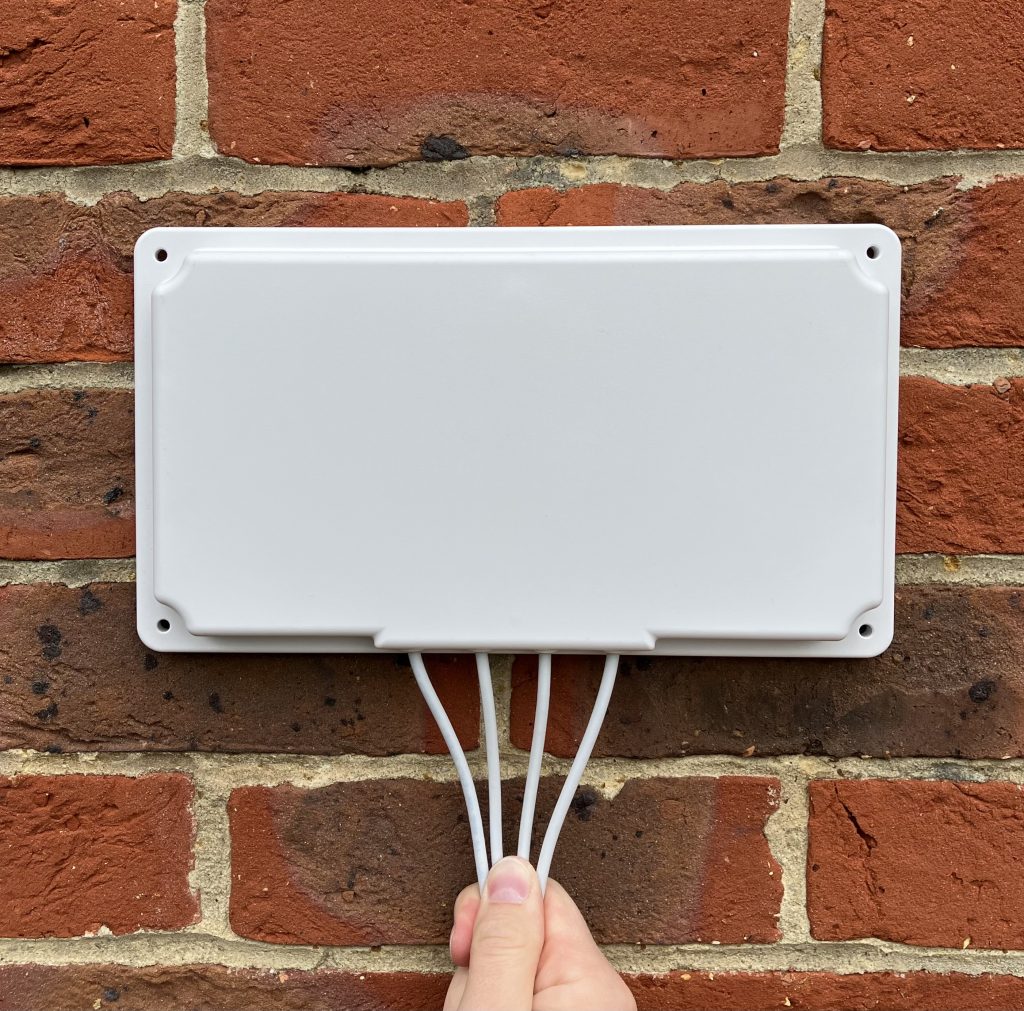
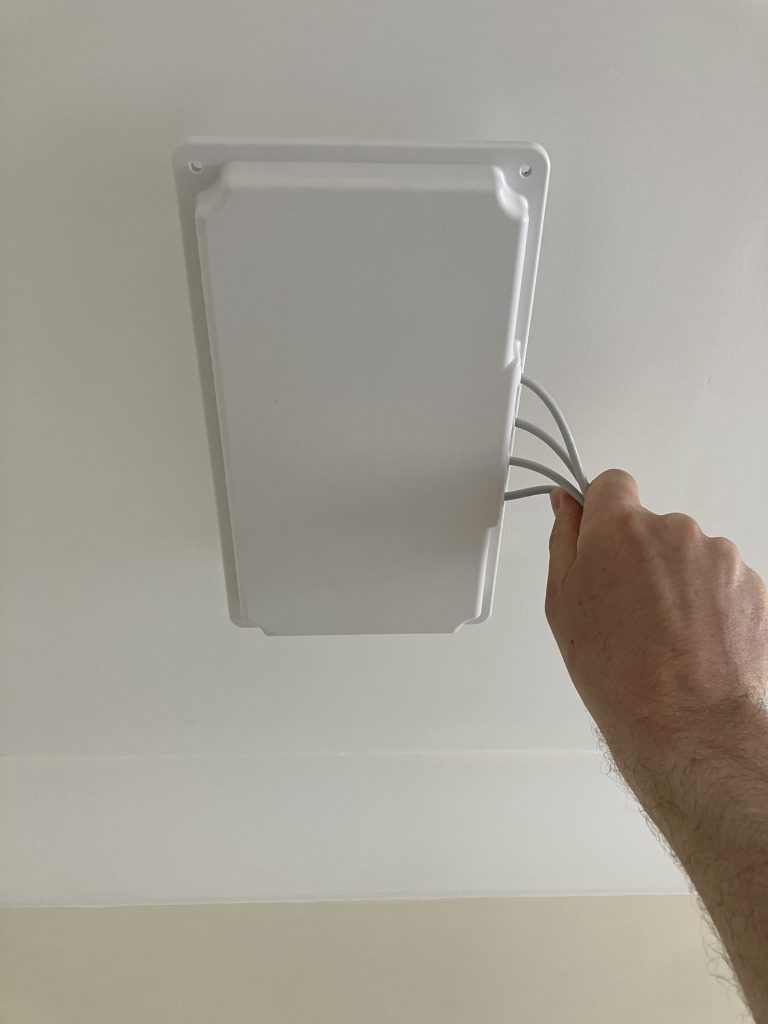
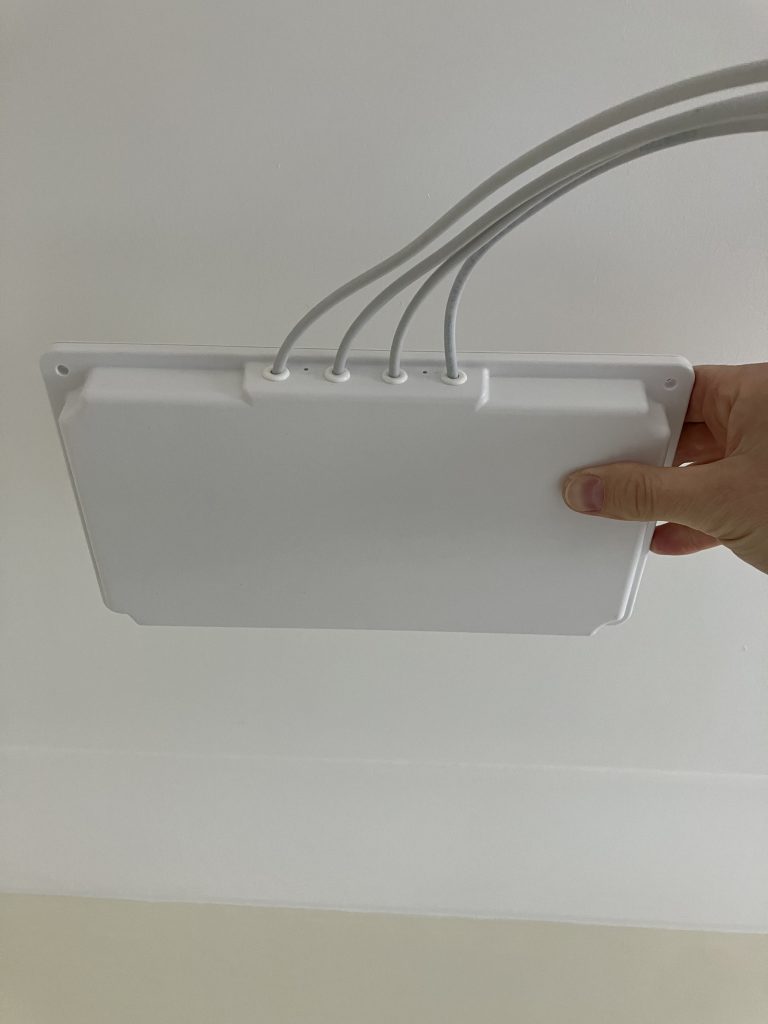
Cisco’s Catalyst 9130AXE access point (the external antenna model) doesn’t have any antennas built-in by design. It uses a DART connector with 8 RF lines and 16 digital lines. They carry the RF signals and allow communication between the AP and antenna.
All new C-ANT9101, C-ANT9102 and C-ANT9103 antennas connect natively using their directly-attached DART connector to the Catalyst 9130AXE access point. It significantly simplifies the deployment process, allows the AP to automatically detect the antenna model, type and gain, and it doesn’t allow any room for installation errors like loose RP-TNC connectors or swapped antenna RF ports.
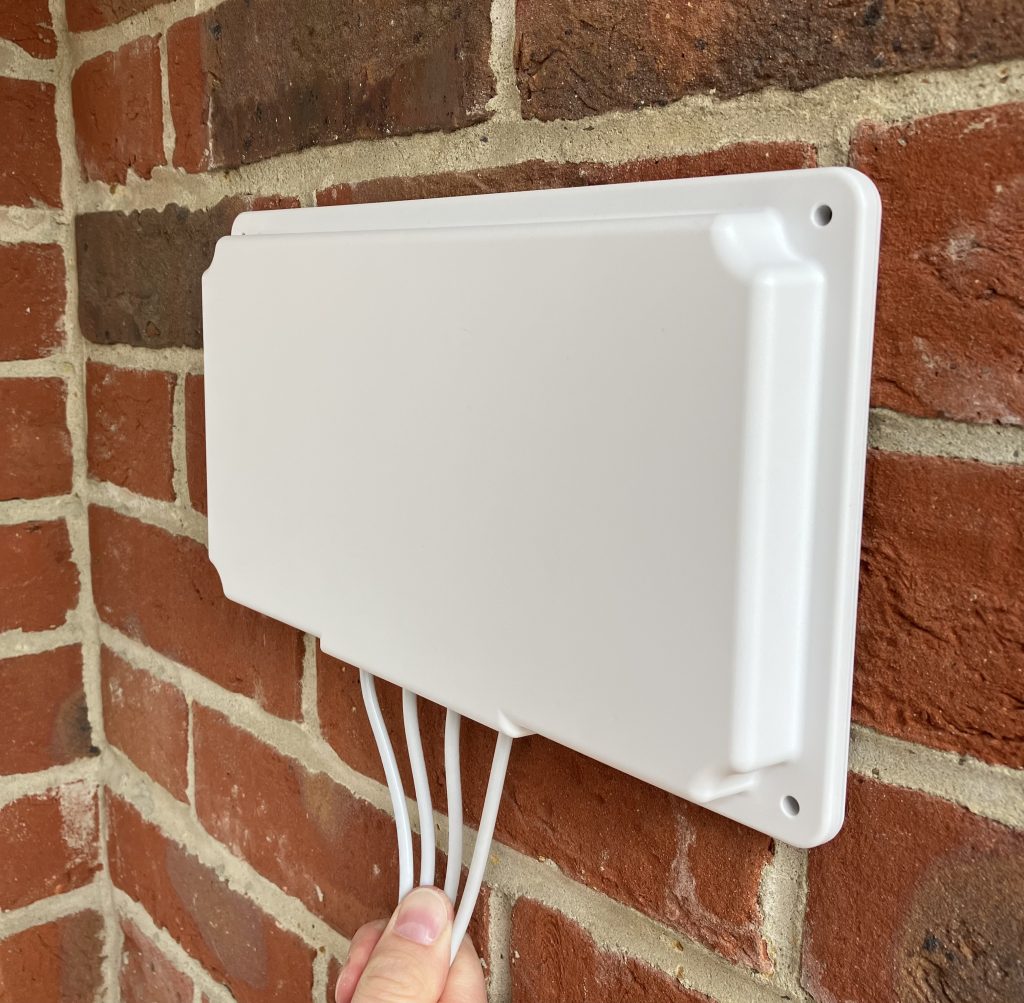
Here is an example of the new bell antenna C-ANT9102 with directly-attached DART connector.
And here is one connected to the C9130AXE-E access point.
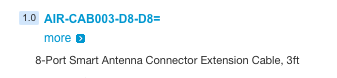
Now, if your scenario requires the antenna to be installed further away from the access point (inside of a freezer for example) there is a 3-feet DART extension cable for that sold by Cisco.
The part number is AIR-CAB003-D8-D8=.
It has 90-degree 8-port plug on one side and straight 8-port jack on the other.
Orientation of Wi-Fi access point with external antenna(s) on Cisco DNA Center maps is represented by 2 key attributes.
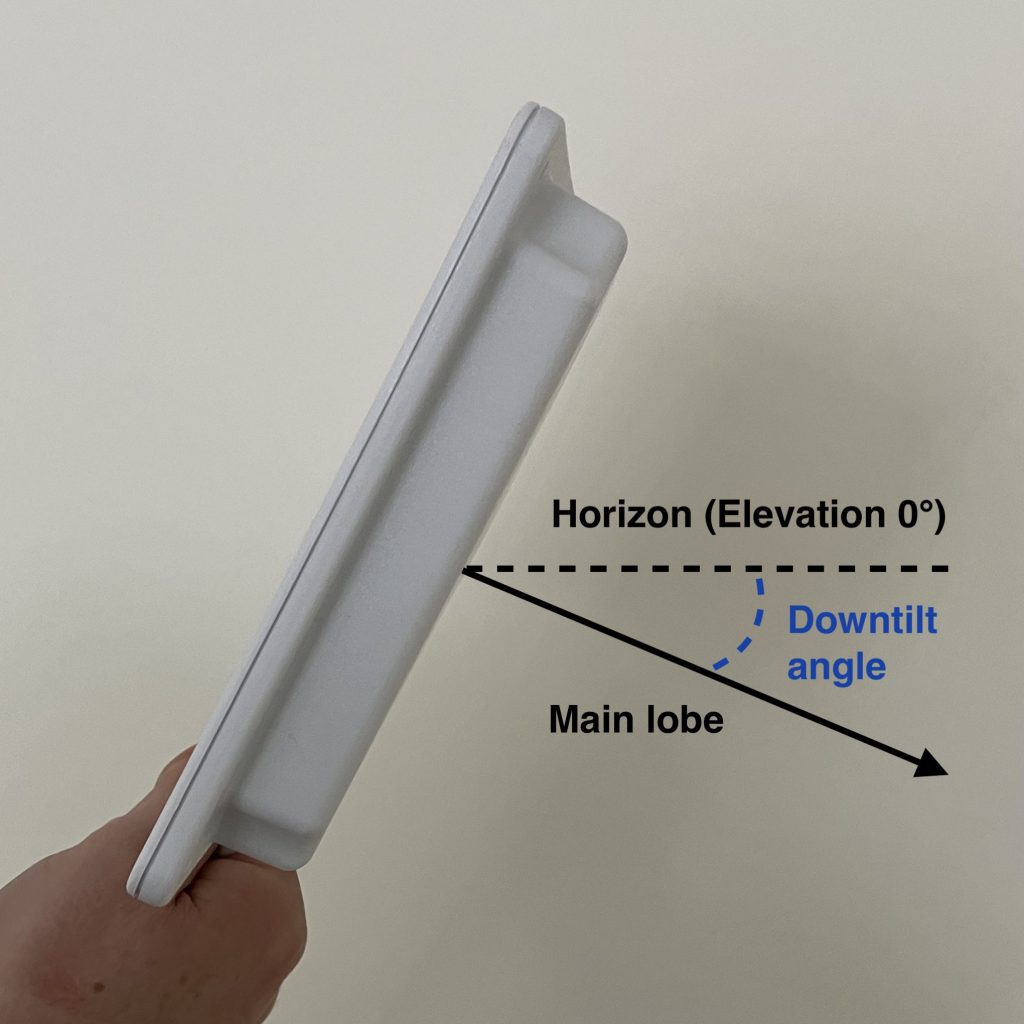
Azimuth tells us how many degrees we rotated the antenna around its vertical axis. It ranges from 0 to 360.
Elevation represents downtilt of the main lobe relative to horizon. It ranges from -90 to 90. Horizon equals to Elevation 0. If the antenna’s downtilt is 30° down, Elevation is -30. The minus sign tells us that the antenna is pointed downwards.
Downtilt of 30° equals to Elevation -30
Antenna shooting above the horizon, which is not very common, would have positive (larger than 0) Elevation value.
We are going to focus exclusively on access points with external antennas in this post. If you are deploying internal antenna AP or AP with dipole antennas, here are the correct settings for you.
Everything in this post applies to all Cisco’s directional antennas. To name a few, C-ANT9103, C-ANT9104, AIR-ANT2566D4M-R, AIR-ANT2566P4W-R, AIR-ANT2513P4M-N.
Enough theory. Pictures are worth a thousand of words.
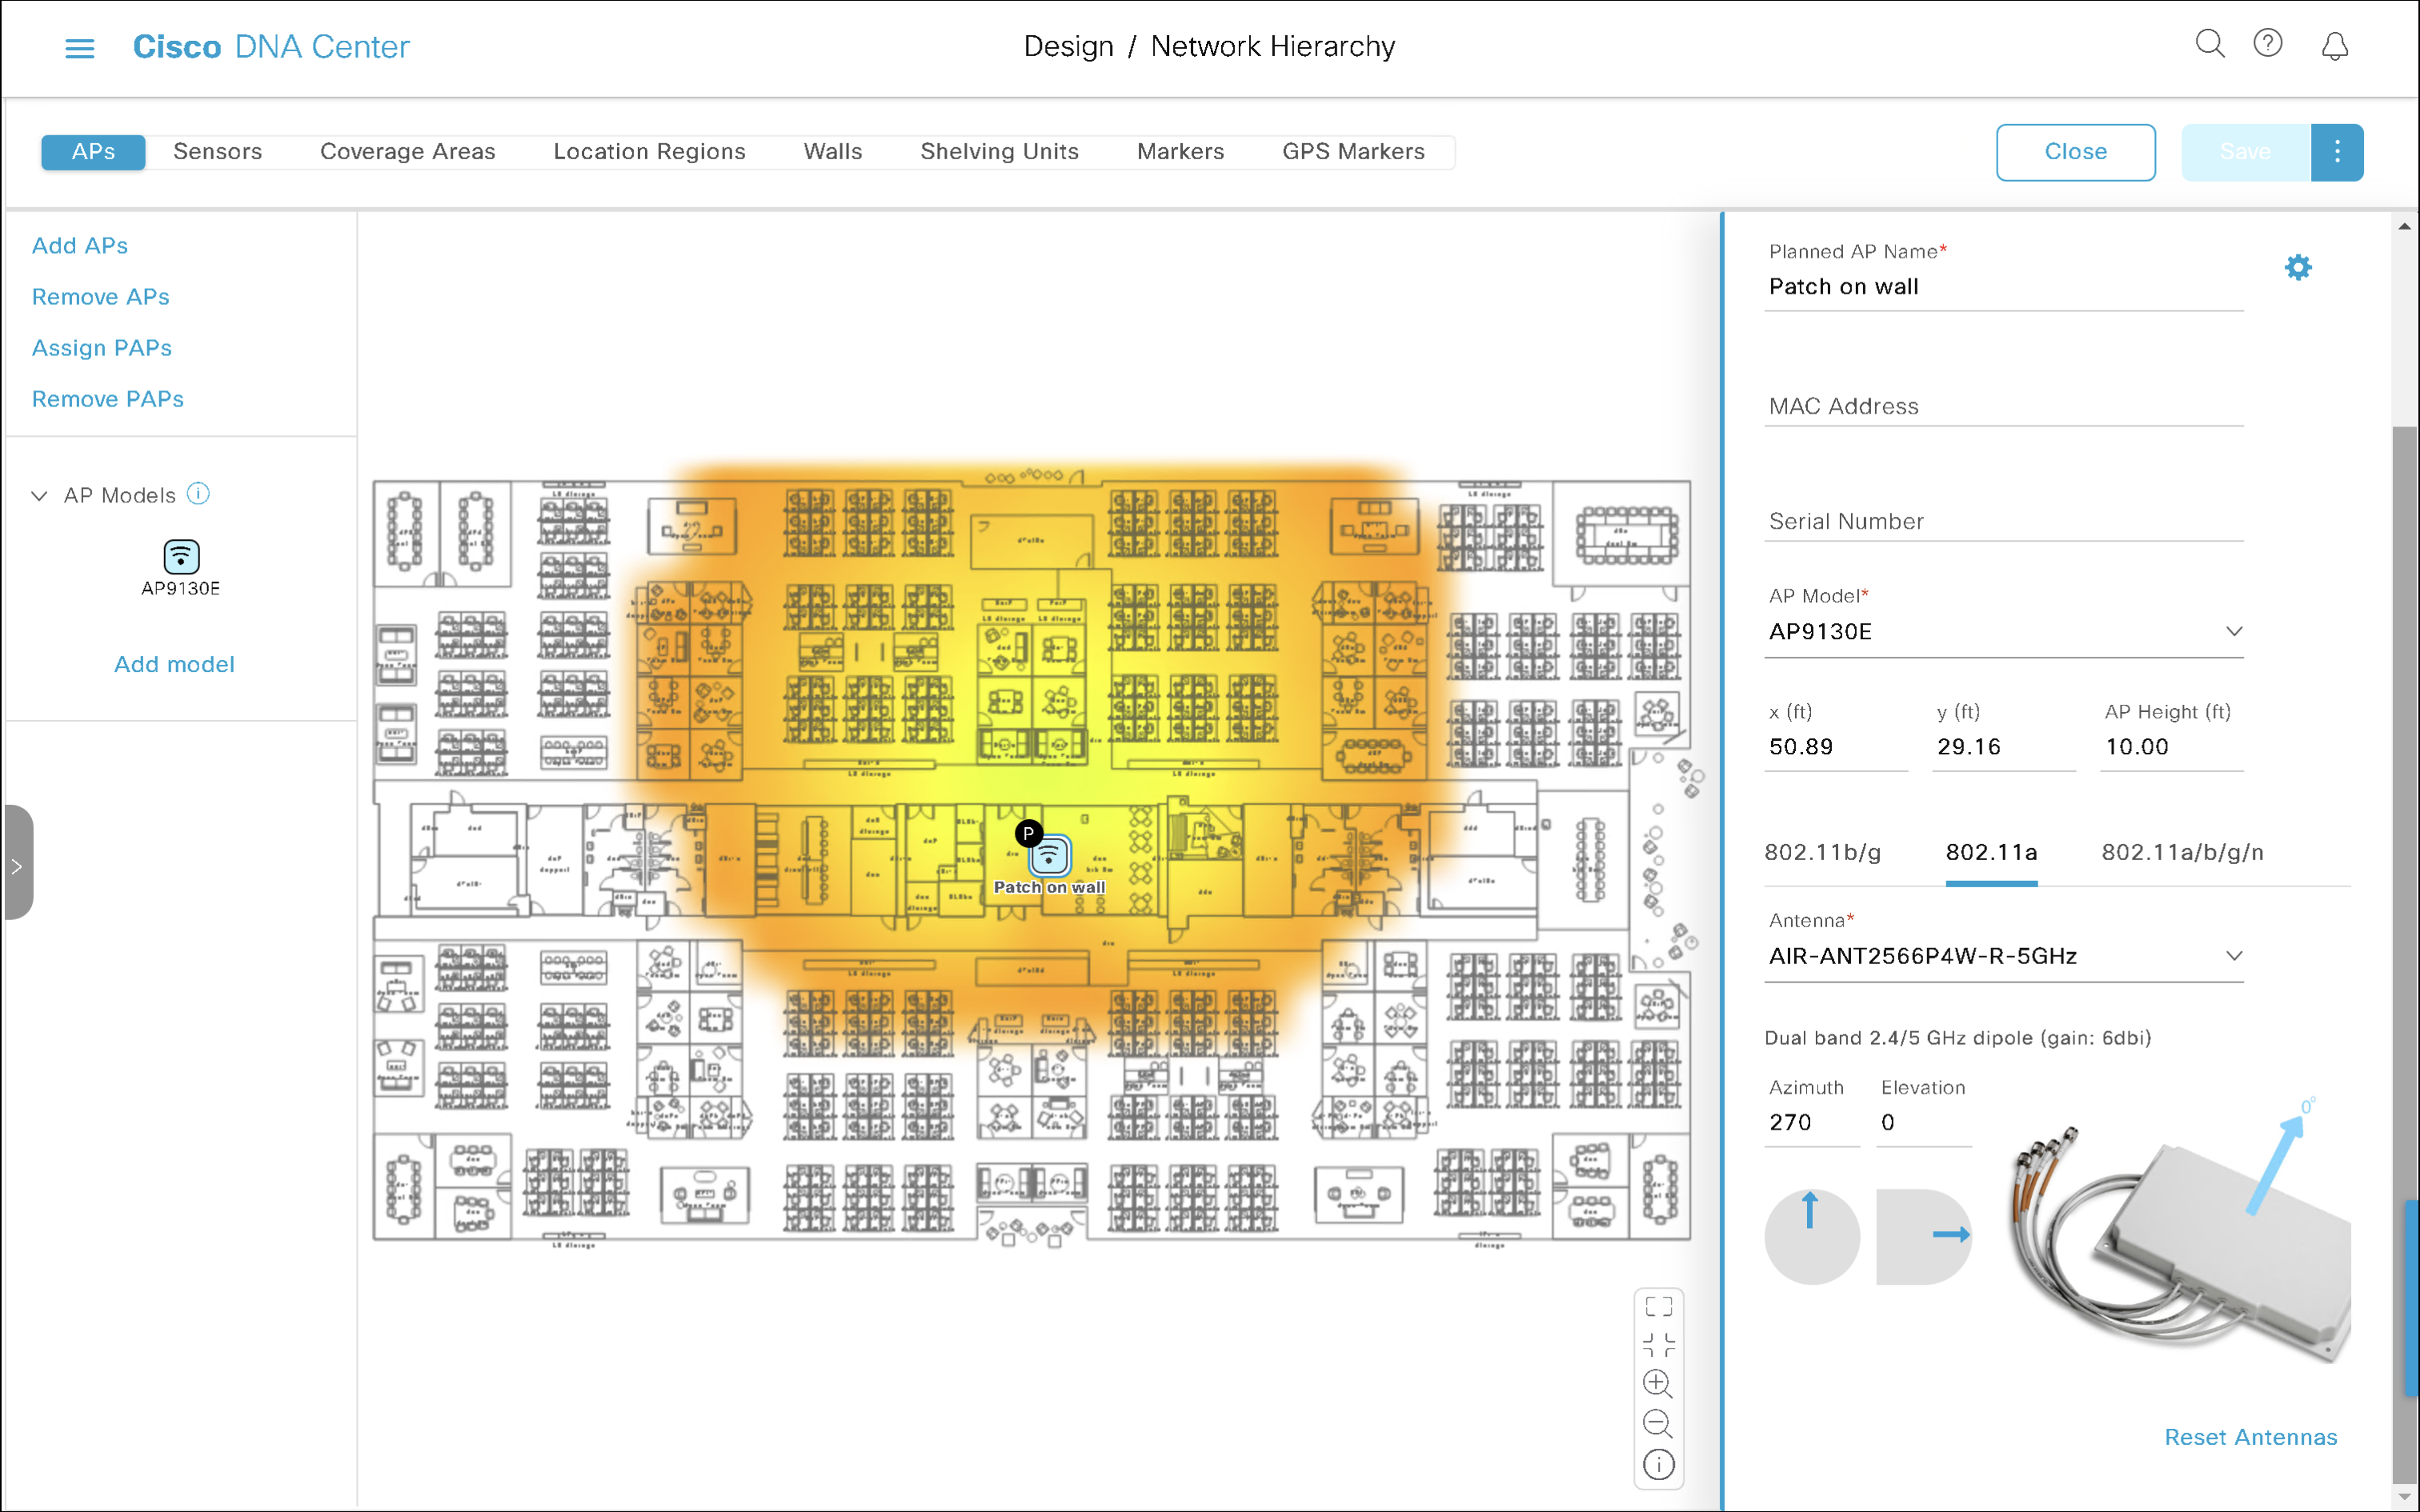
We are going to use use Cisco’s AIR-ANT2566P4W-R, which has a nicely squished pattern and changes to its orientation are very visual.
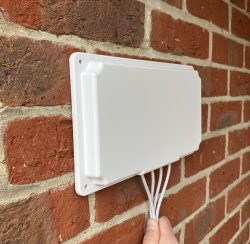
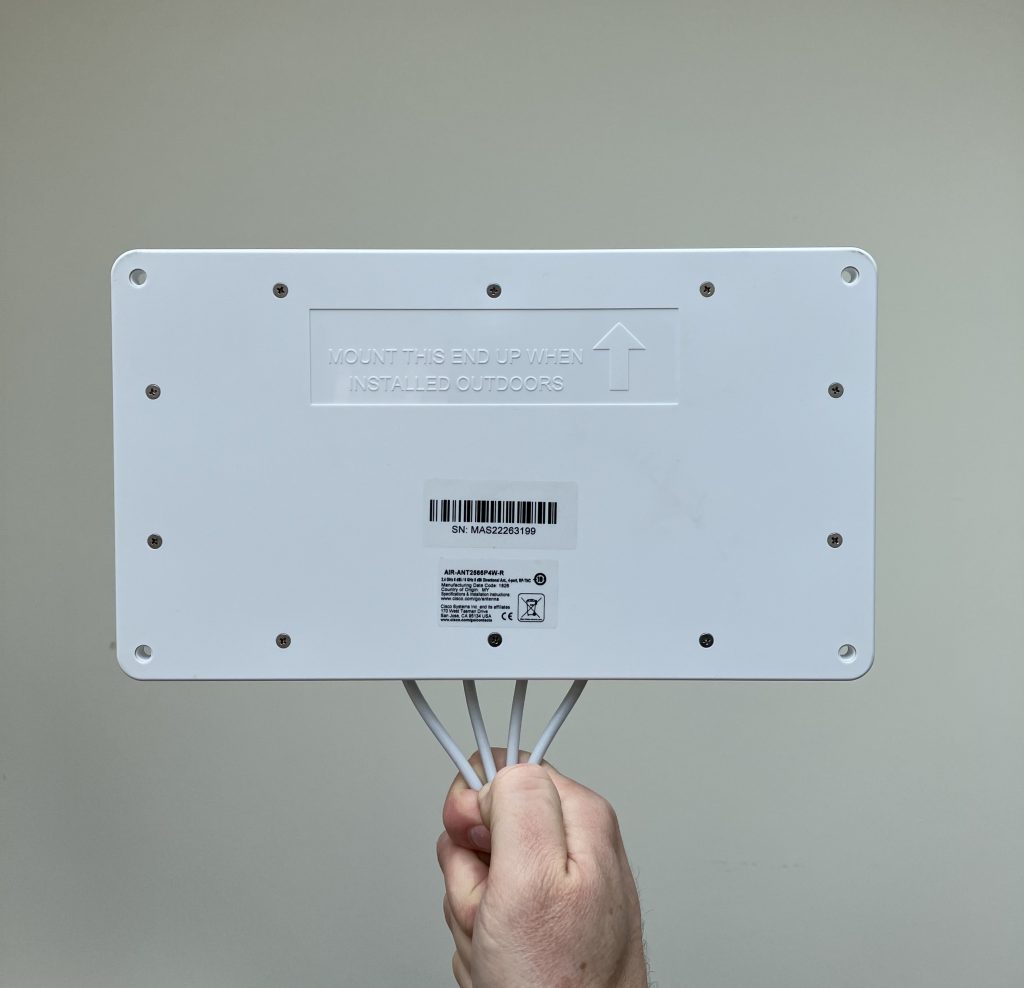
Wall-mounted external antenna
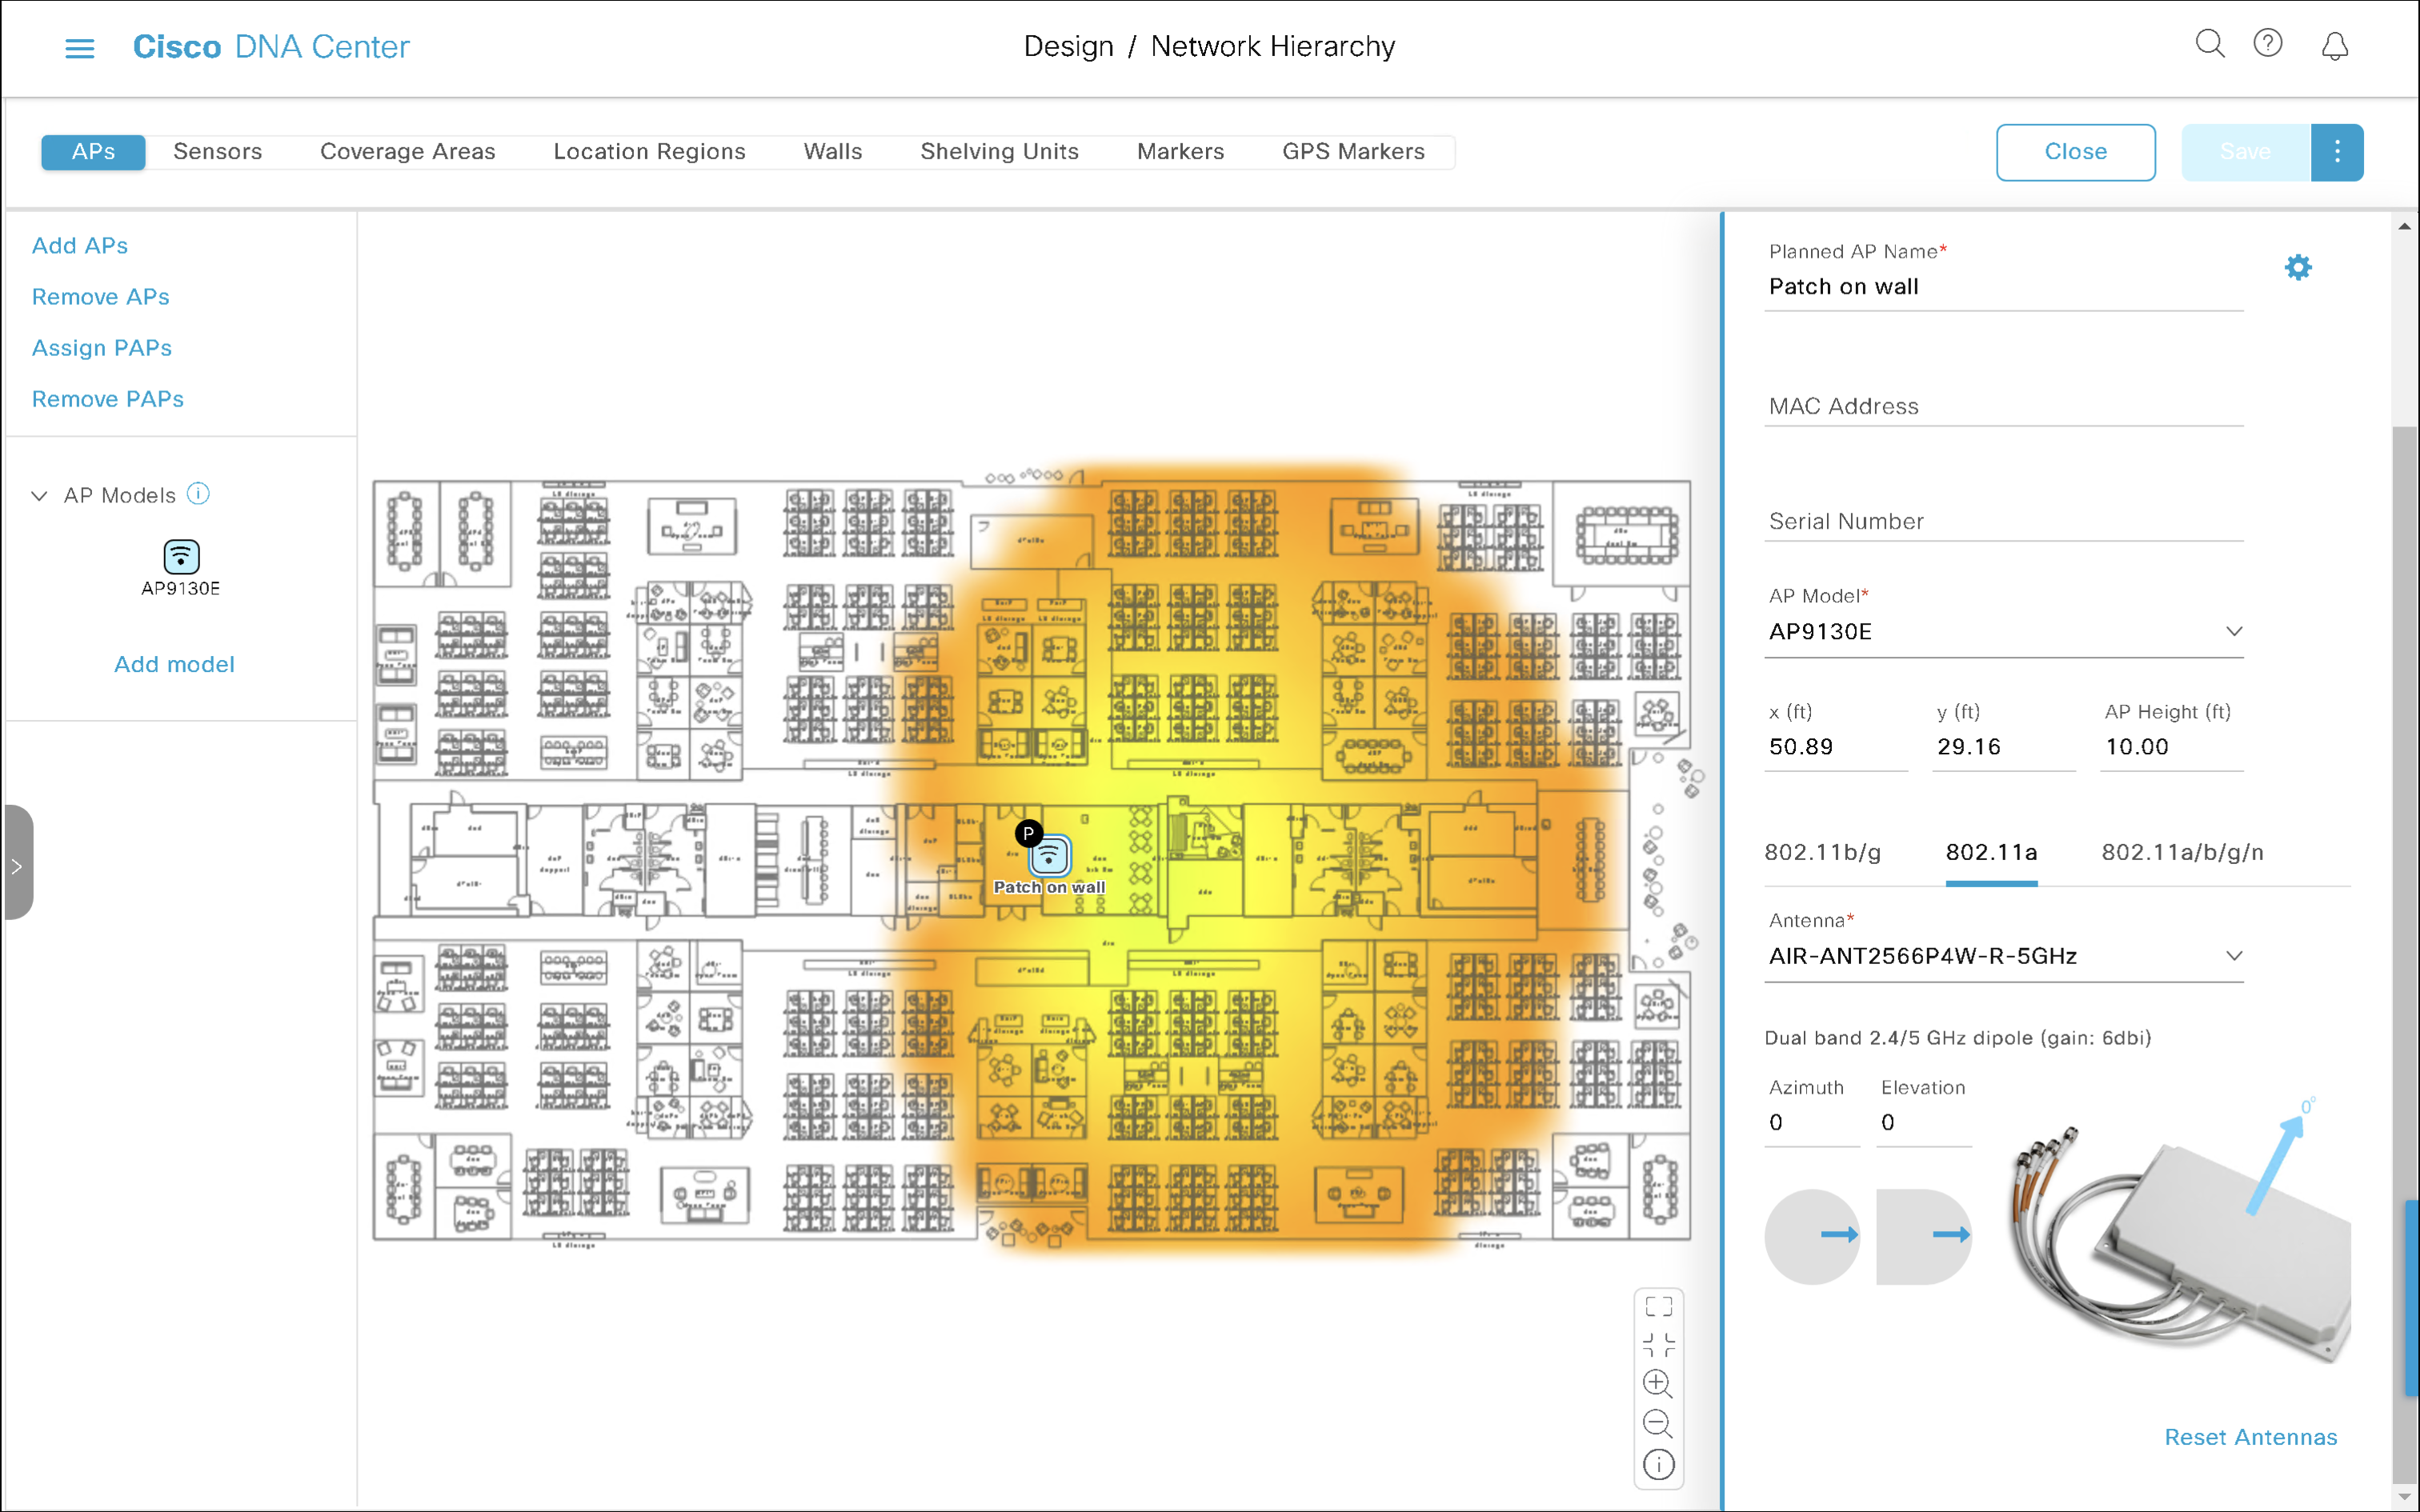
By default DNA Center sets APs with external antennas to Azimuth 0 and Elevation 0. Elevation 0 means that the antenna is wall-mounted (downtilt 0°) and its main lobe shoots parallel to horizon.
Let’s assume perfectly wall-mounted antennas with no downtilt at all in the examples below. That way we don’t need to touch the Elevation setting at all. All we need to do is to adjust the Azimuth angle depending on which wall the antenna is mounted on.
Wall-mounted antenna shooting towards the right
Azimuth 0 and Elevation 0 is the default setting for external antennas. It represents a perfectly wall-mounted antenna (that’s what Elevation 0 means) shooting in the right hand direction (that’s what Azimuth 0 does). The main lobe travels parallel to the floor.
Azimuth 0 and Elevation 0
On the floor plan, it is mounted on the ‘left wall’ of the room, shooting towards the right.
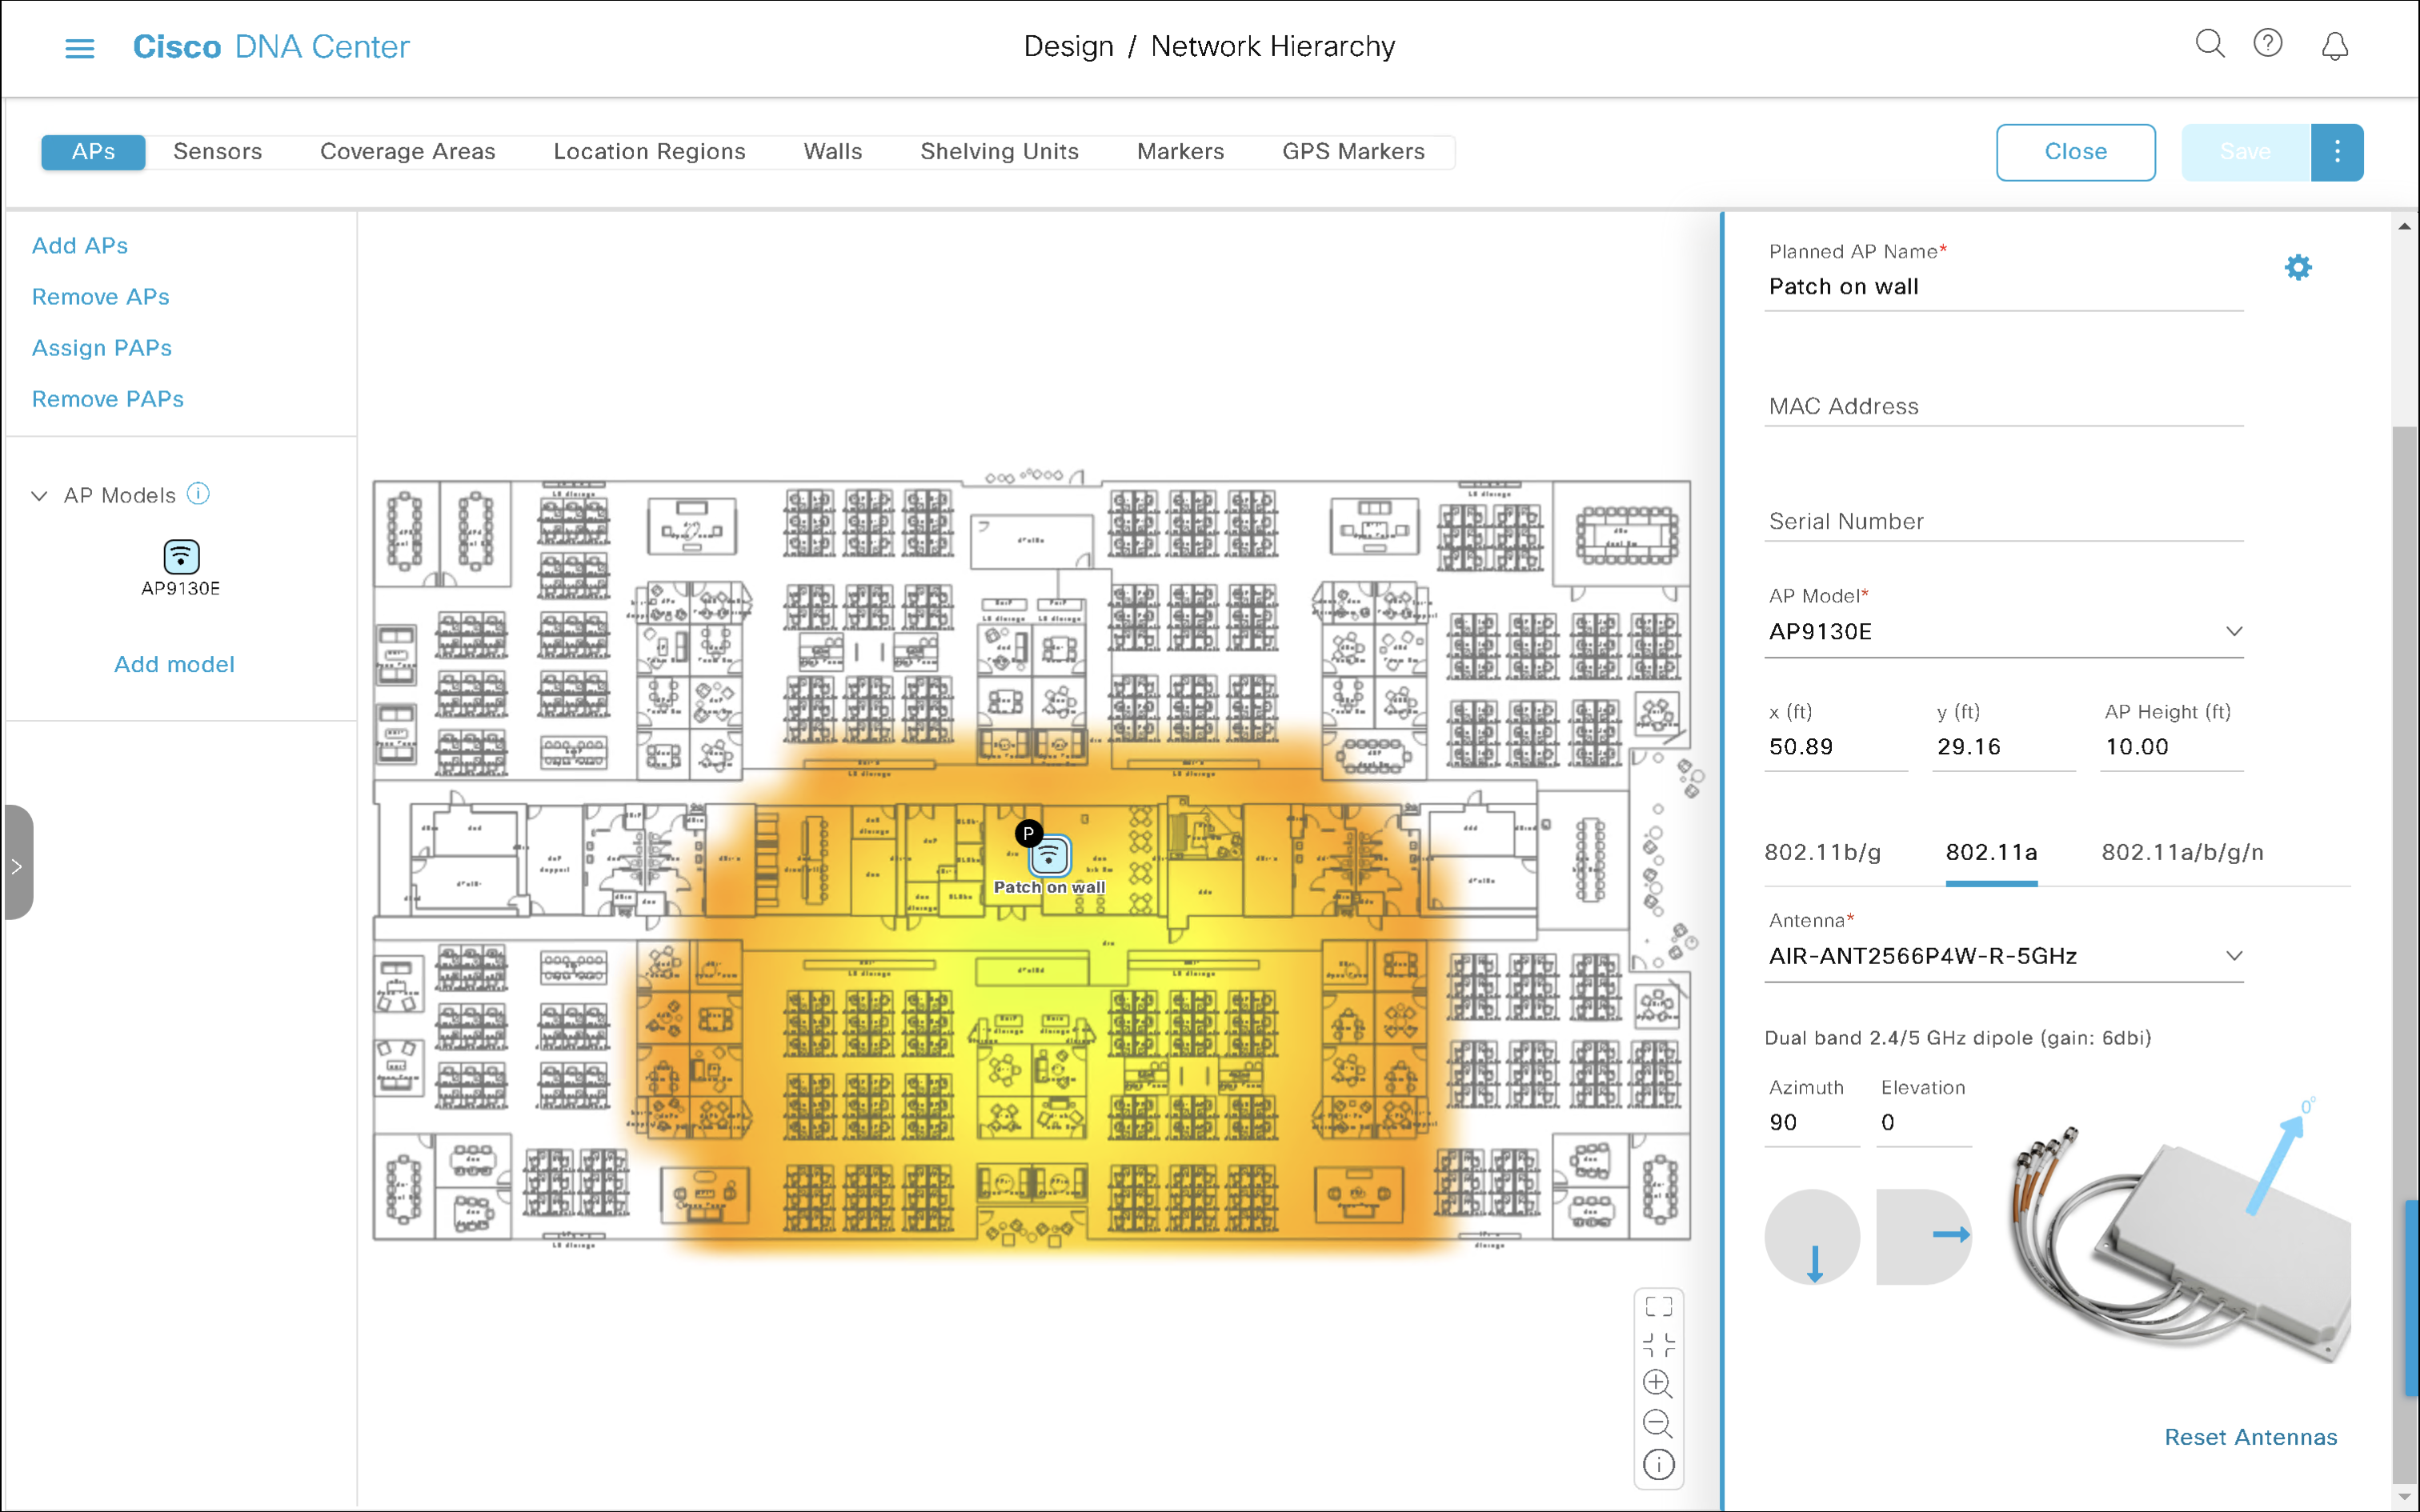
Wall-mounted antenna shooting towards the bottom of the map
Now, what if you installed the antenna on a wall, but it points towards the bottom of the map (I avoid the south as it is not true south) this time?
Azimuth 90 and Elevation 0
We rotated the antenna clockwise around it vertical axis by 90 degrees. There is Azimuth for that, so we will increase Azimuth by 90. The final setting is Azimuth 90 and Elevation 0.
The antenna appears as mounted on the ‘top wall’ of the room shooting towards the bottom of our floor plan.
Wall-mounted antenna shooting towards the left
We have now rotated the antenna by another 90 degrees clockwise. That results in Azimuth 180 and Elevation 0.
Azimuth 180 and Elevation 0
It is installed on the right wall pointed towards the left of our floor plan.
Wall-mounted antenna shooting towards the top of the map
Finally, if the antenna is mounted on the ‘bottom wall’ and it points towards the top of our floor plan, that is another 90-degree increment, and results in Azimuth 270 and Elevation 0.
Azimuth 270, Elevation 0
Hopefully, there are no surprises there?
If your antenna uses a different orientation, simply drag the blue Azimuth arrow and point it wherever the antenna’s main lobe is shooting towards.
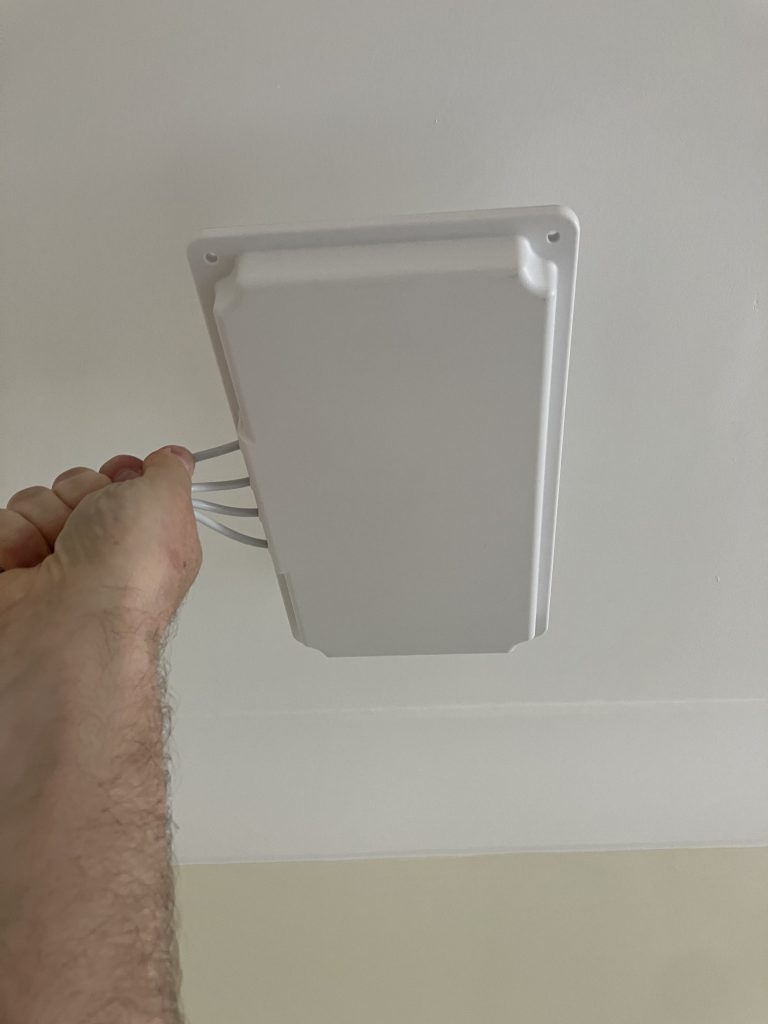
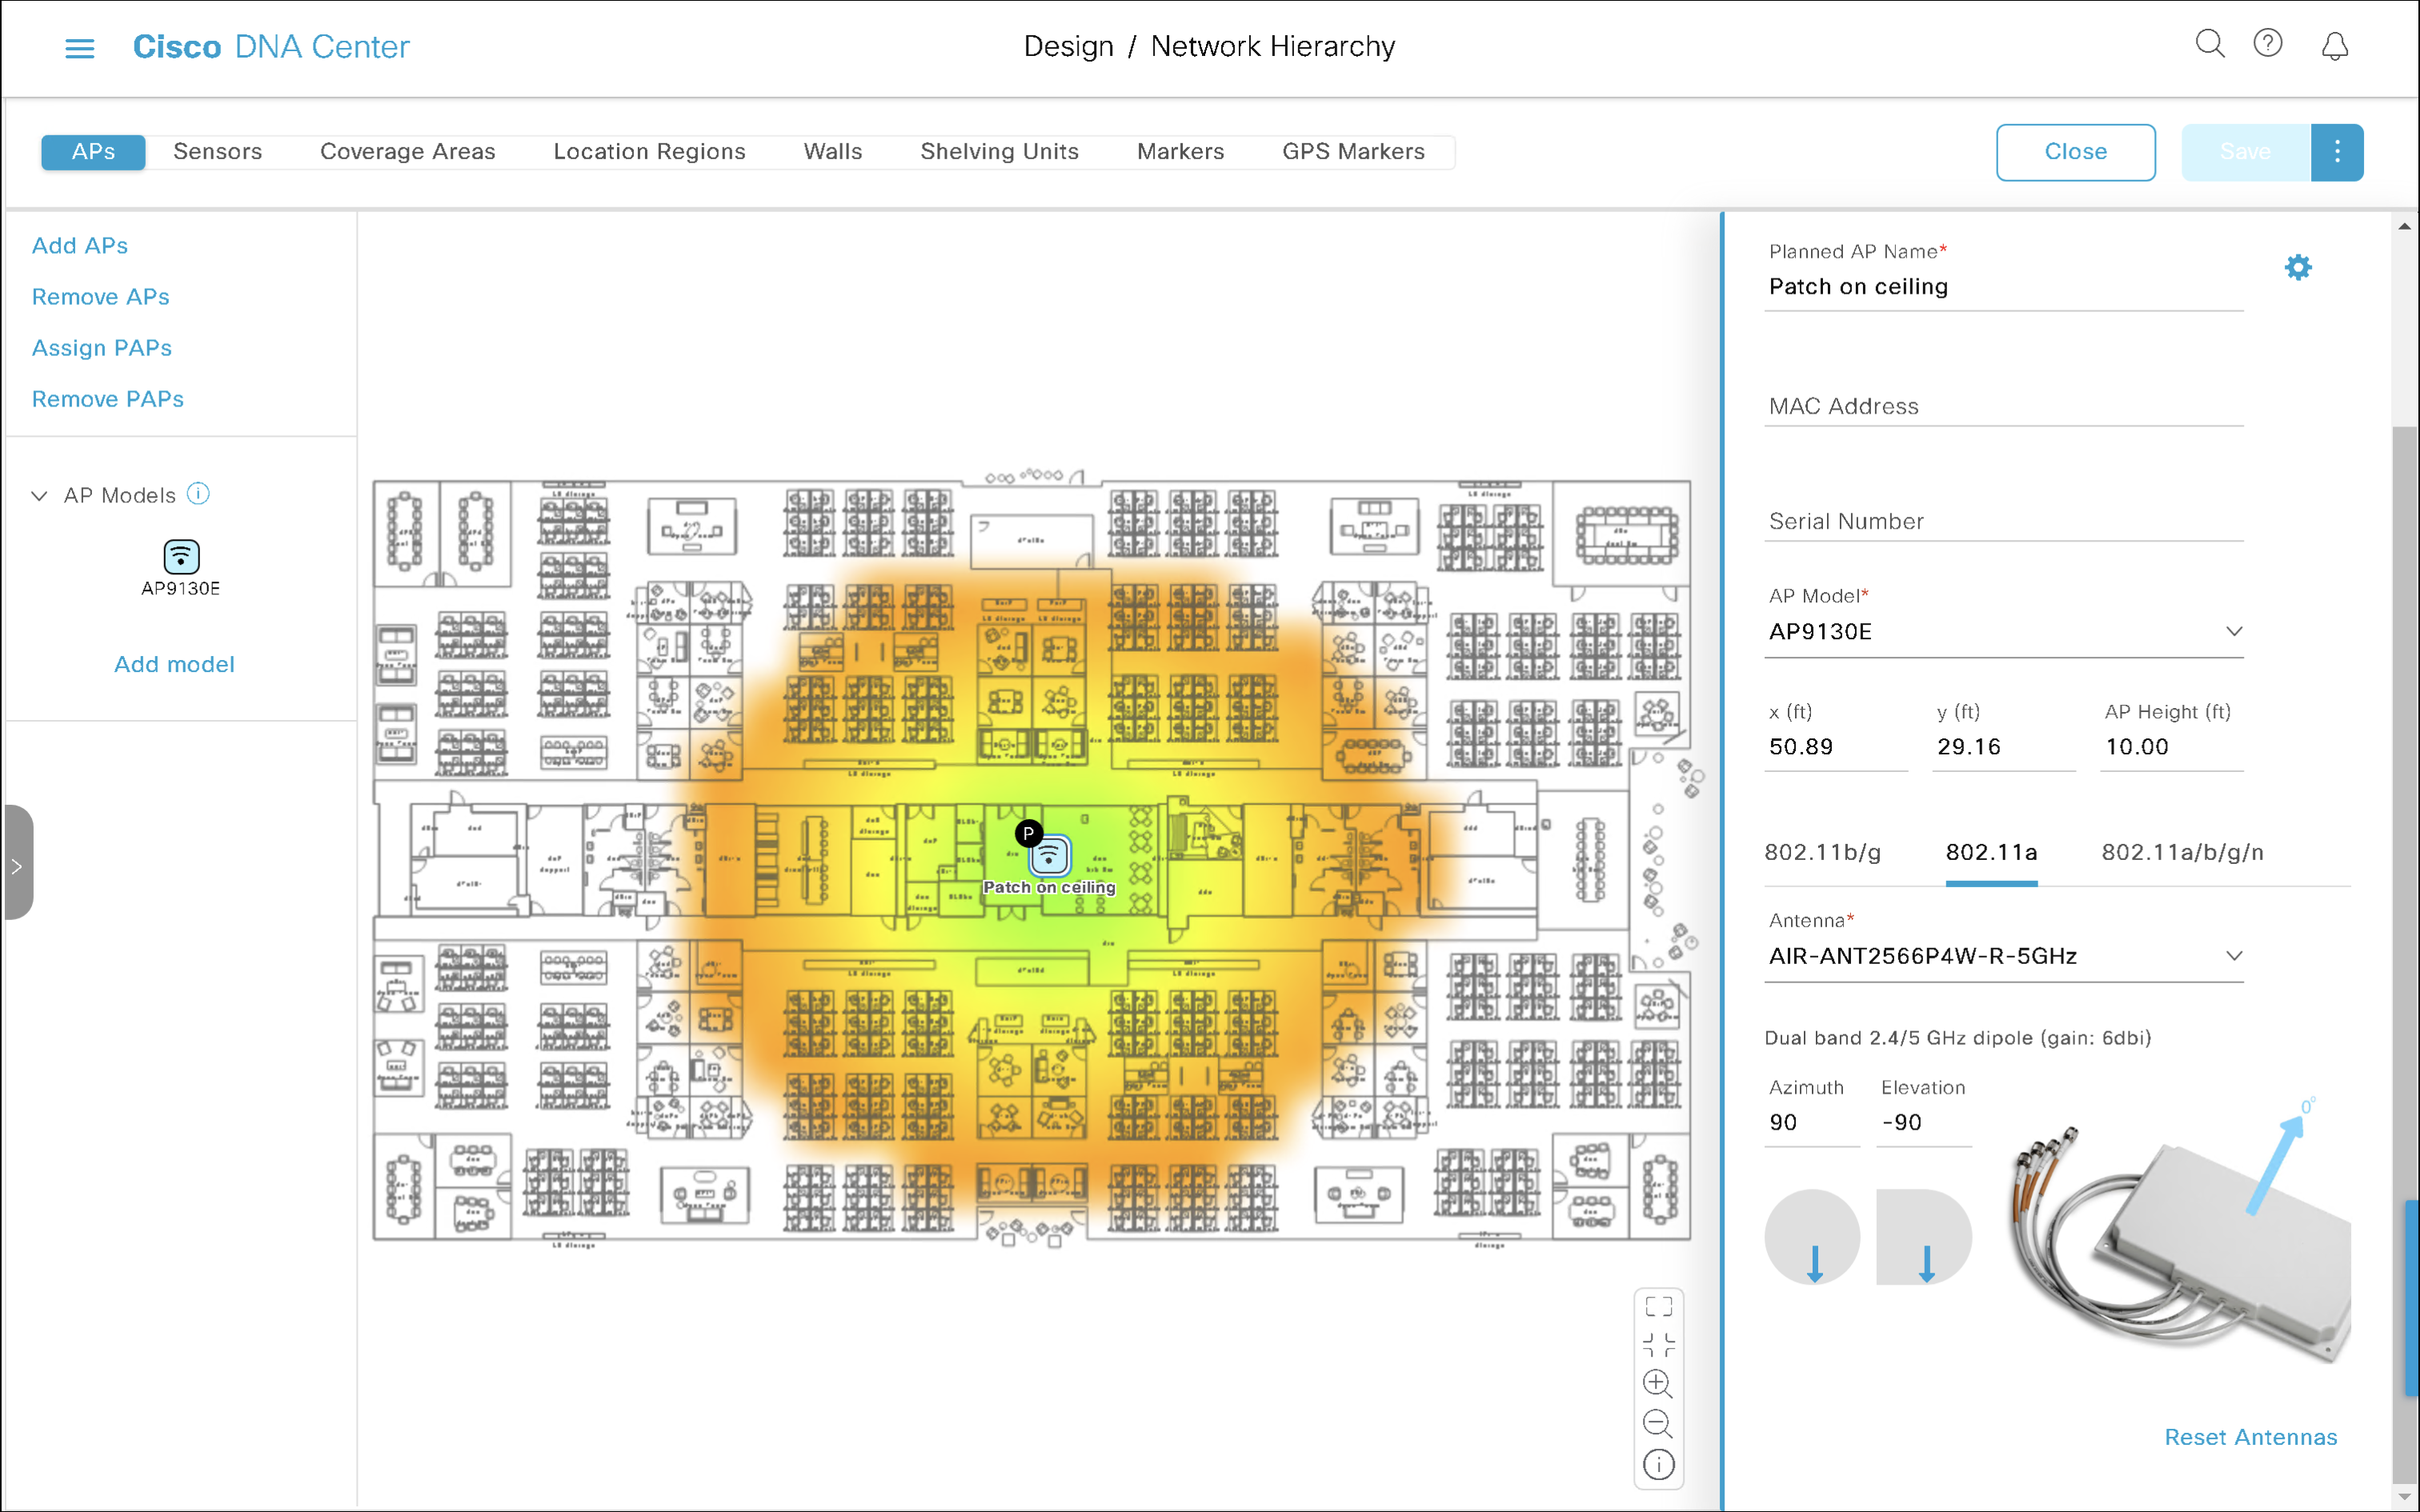
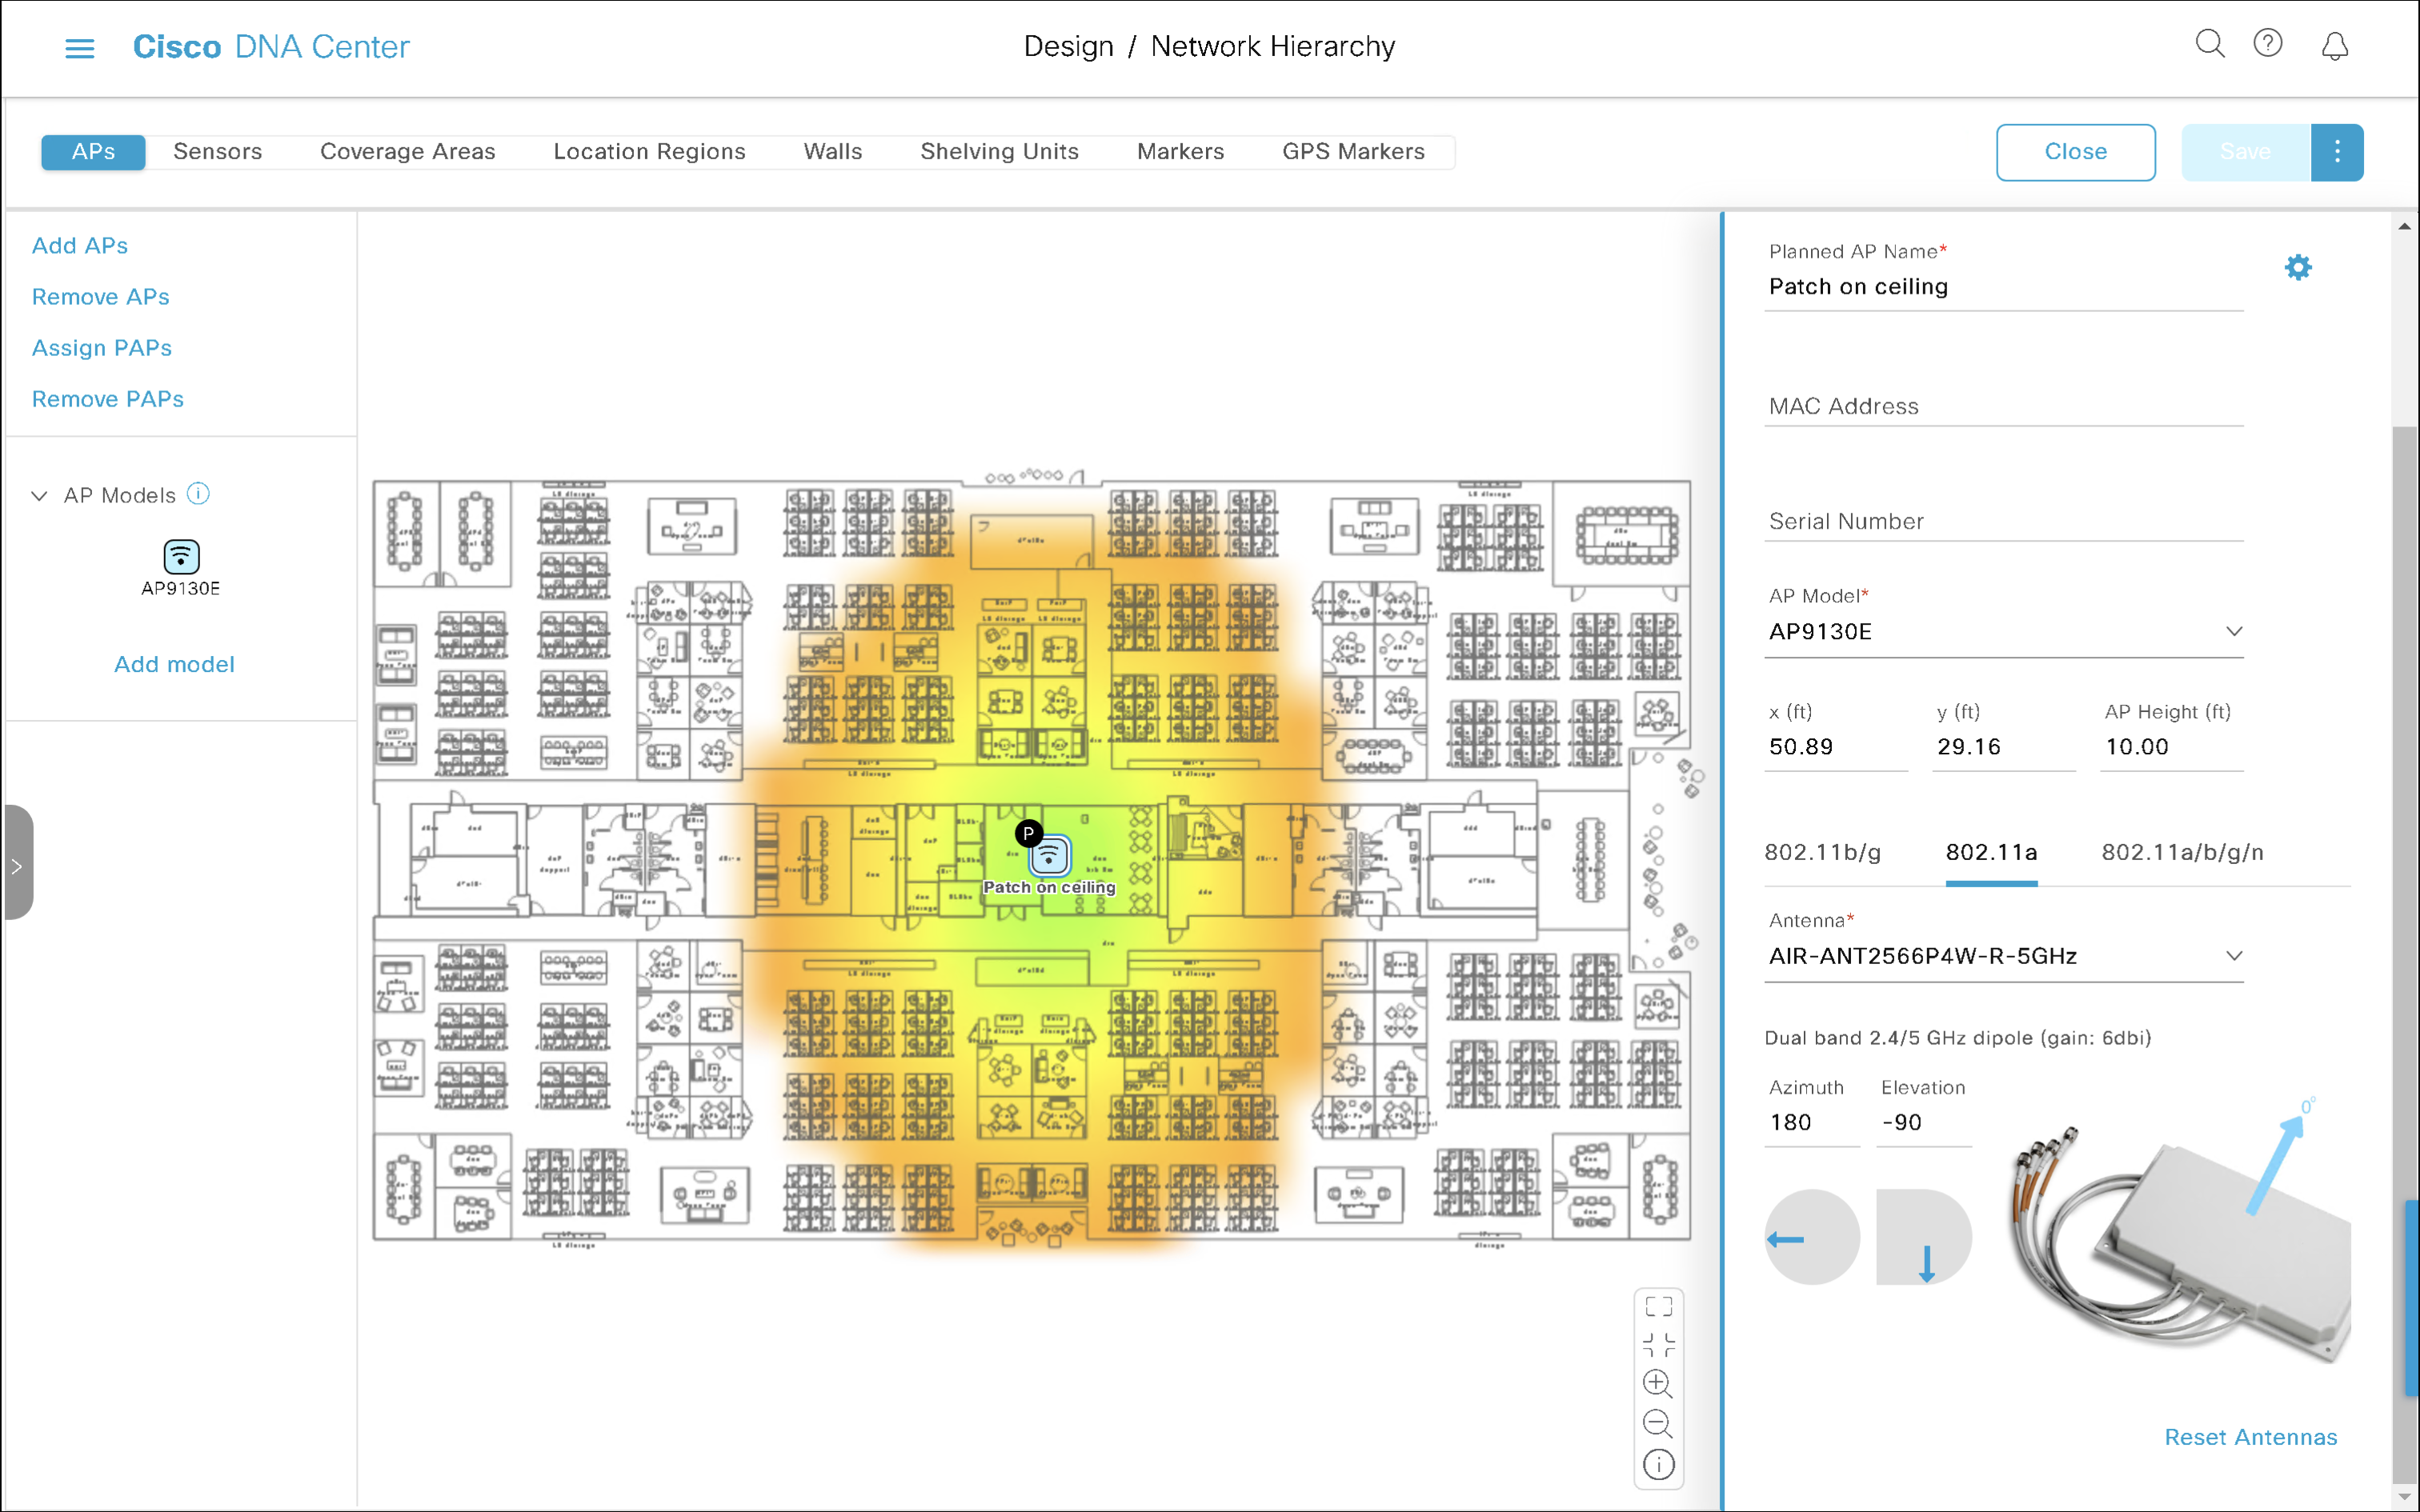
Ceiling-mounted antenna
Ceiling-mounted antenna shooting towards the floor
Antenna mounted to the ceiling shooting towards the floor has downtilt of 90°. We simply set Elevation to -90. Don’t miss the minus sign.
This is how Azimuth 0 (antenna cables on the left, top side of the antenna on the right) and Elevation -90 looks like.
Azimuth 0, Elevation -90
The irregular ‘oval-ish’ pattern of this patch antenna is very obvious on the map. It kisses the top and the bottom of the floor plan.
My antenna is ceiling-mounted but it is rotated?!
To rotate the antenna on the ceiling by 90° clockwise, we just need to increment Azimuth.
Azimuth 90, Elevation -90
Azimuth 90, Elevation -90
This time the coverage area stretches from left to right, because we rotated the antenna by 90 degrees.
Azimuth 180, Elevation -90
Azimuth 180, Elevation -90
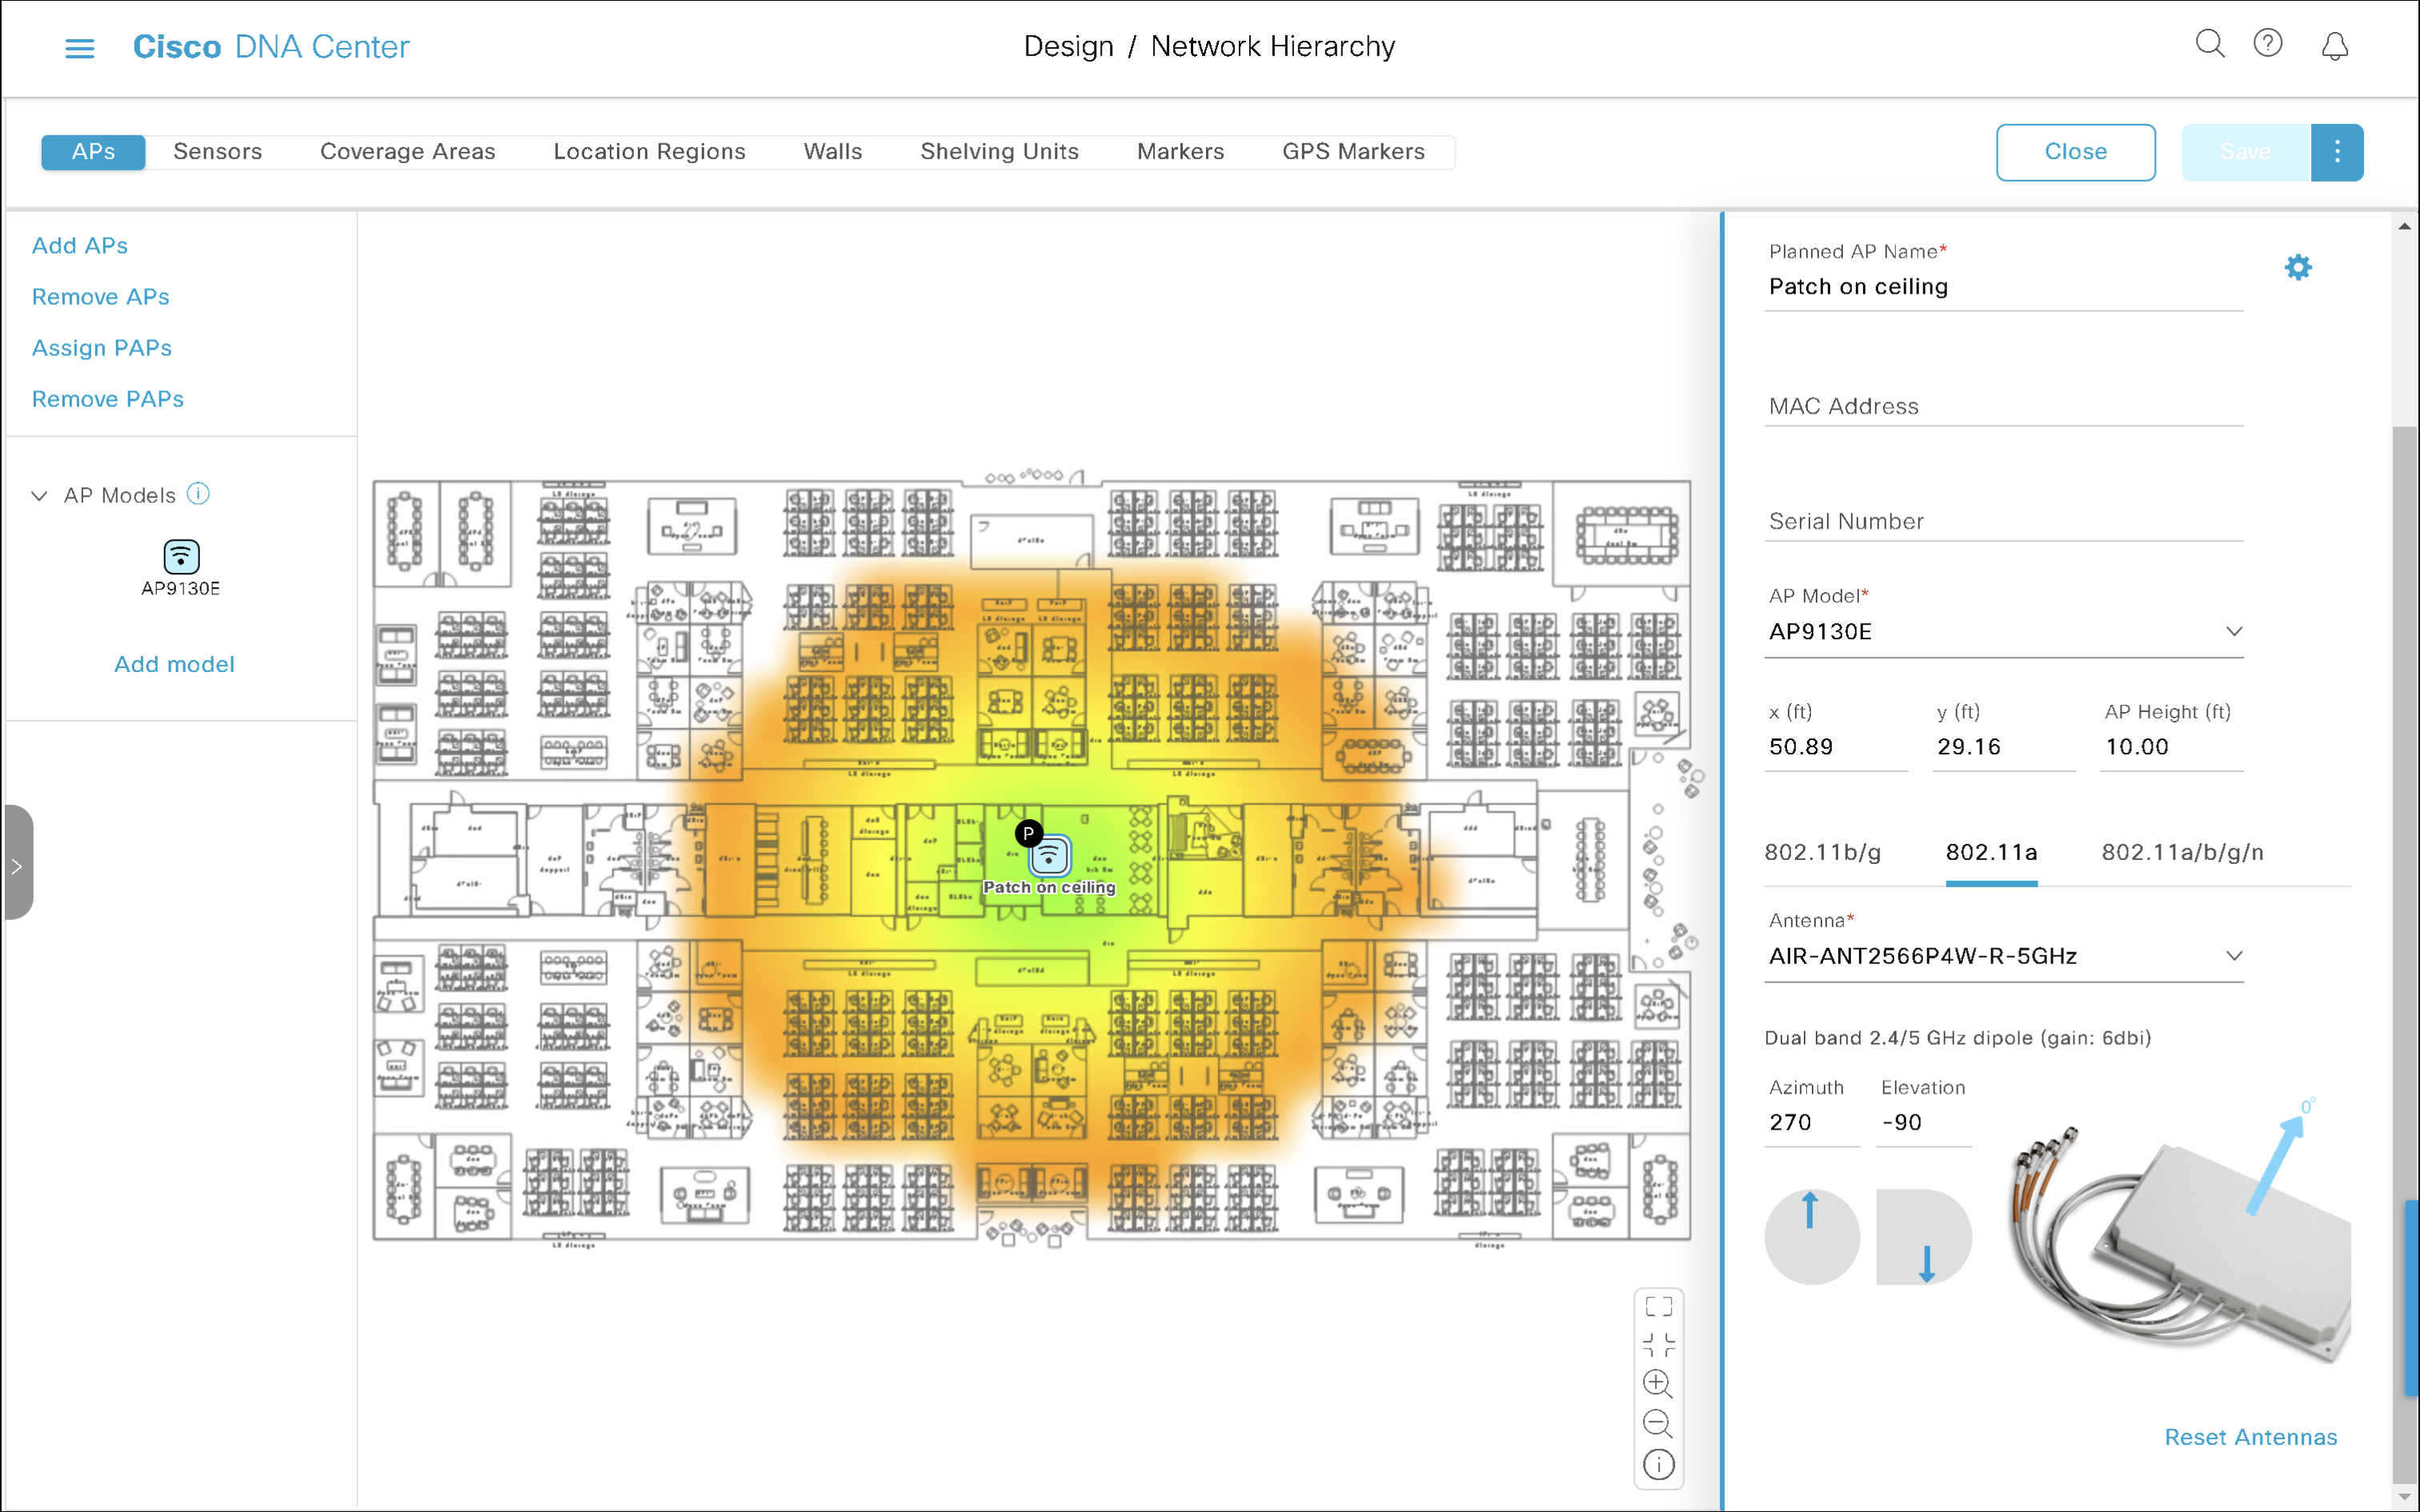
Azimuth 270, Elevation -90
Antenna cables point towards the bottom of the map, which is yet another 90-degree increment. It is still perfectly ceiling-mounted (that’s Elevation -90).
Azimuth 270, Elevation -90
Let’s practise
Now, let’s apply the theory.
What Azimuth and Elevation would you configure on C-ANT9103 antenna connected to Catalyst 9130 AP mounted using AP-BRACKET-9 bracket on the ‘top wall’ (don’t let the perspective of the photo confuse you) of the floor plan with 30-degree downtilt?
Azimuth 90, Elevation -30
The antenna is mounted on the top wall shooting to the bottom of the map. That translates to Azimuth 90. It is wall-mounted, which normally means Elevation 0, but it is tilted 30° down. So, we subtract 30 from Elevation. And here we go, that’s Elevation -30.
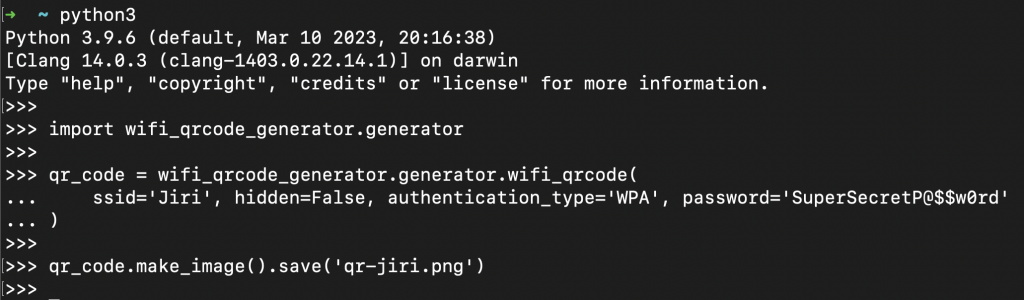
There are many online services that allow you to create a Wi-Fi QR code for free. The problem is that you are giving your SSID and your password (passphrase) in plain text to a random company on the internet. What happens if they sell or leak these?
There is a better way
You can easily create a QR code from your Terminal. The tool will guide you through the process.
wifi_qrcode_generator in action
What do we need?
I am using a Mac (it should work the same way on Windows) and we will install wifi_qrcode_generator, which is a Python package. No Python skills needed.
Install the tool
Open macOS Terminal and execute:
pip install wifi-qrcode-generator
Add Python to your PATH variable
You now might be able to start the tool by typing wifi-qrcode-generator in Terminal. If it fails, you might need to add Python to your PATH variable.
Edit this zsh file: nano ~/.zshrc
Add a new line and modify the Python version part if needed: export PATH="$HOME/Library/Python/3.9/bin:$PATH"
Save the file using Control+o and exit using Control+x.
Generate a Wi-Fi QR code the easy way
Execute wifi-qrcode-generator in Terminal and follow the instructions.
wifi_qrcode_generator tool in action
If you decide to save it as PNG, the file will save to your home folder.
Generated QR code sample
Scan the QR code with the Camera app on your phone and it will save this new Wi-fi profile and it will attempt to join.
Or use 4 lines of Python to generate the QR code
Alternatively, you can use few lines of Python to generate the code.
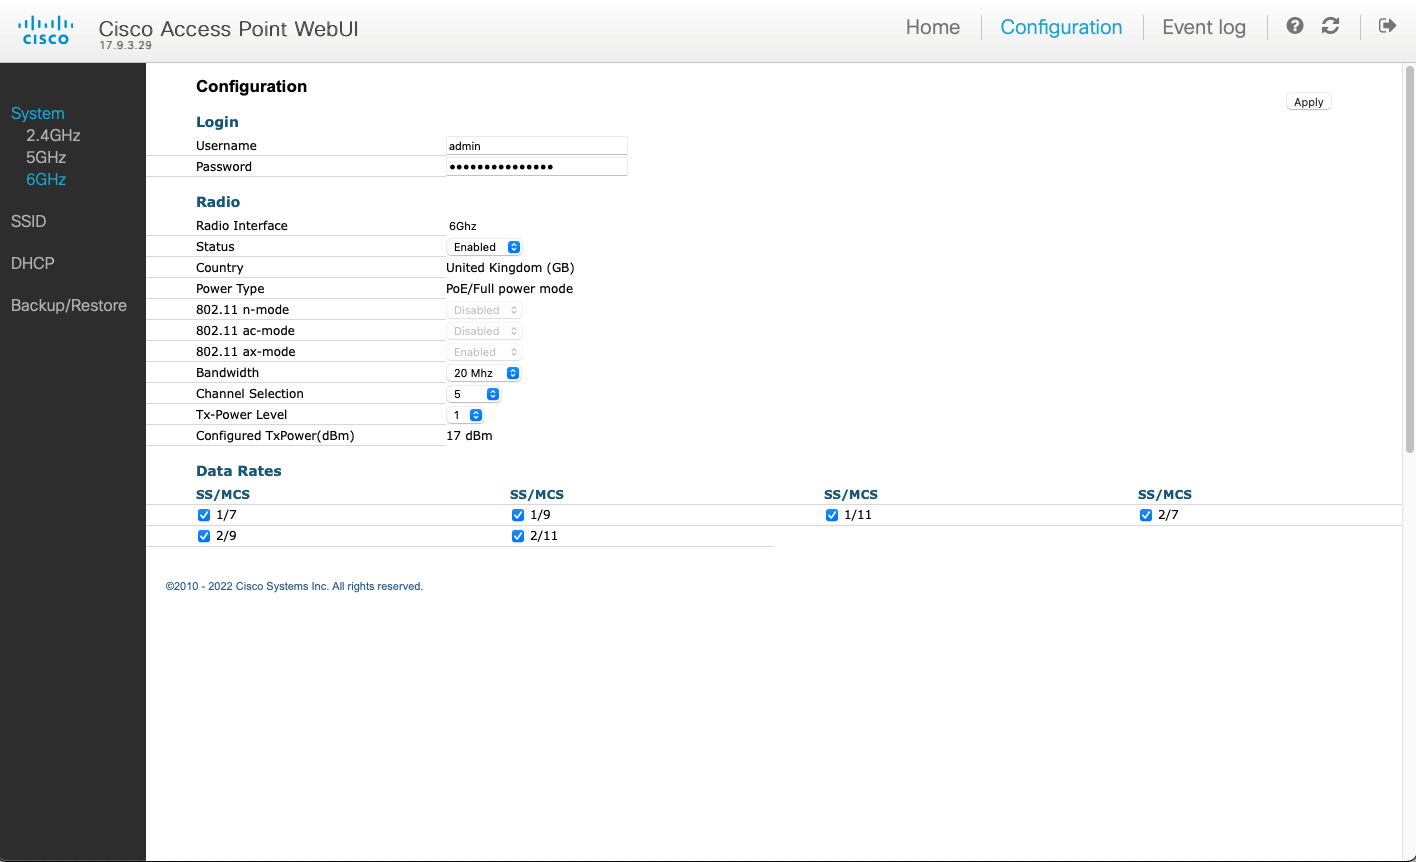
Cisco Catalyst Wi-Fi 6E access points in DNA persona support a new Site Survey mode. It allows you to perform AP-on-a-stick survey, it comes with a fresh web interface, and it supports 6 GHz. This new mode is included in the Lightweight access point software image.
Unlike the Embedded Wireless Controller (EWC) mode, which was available on previous generation of APs, this new Site Survey mode doesn’t require any extra software image download or reflash of the AP.
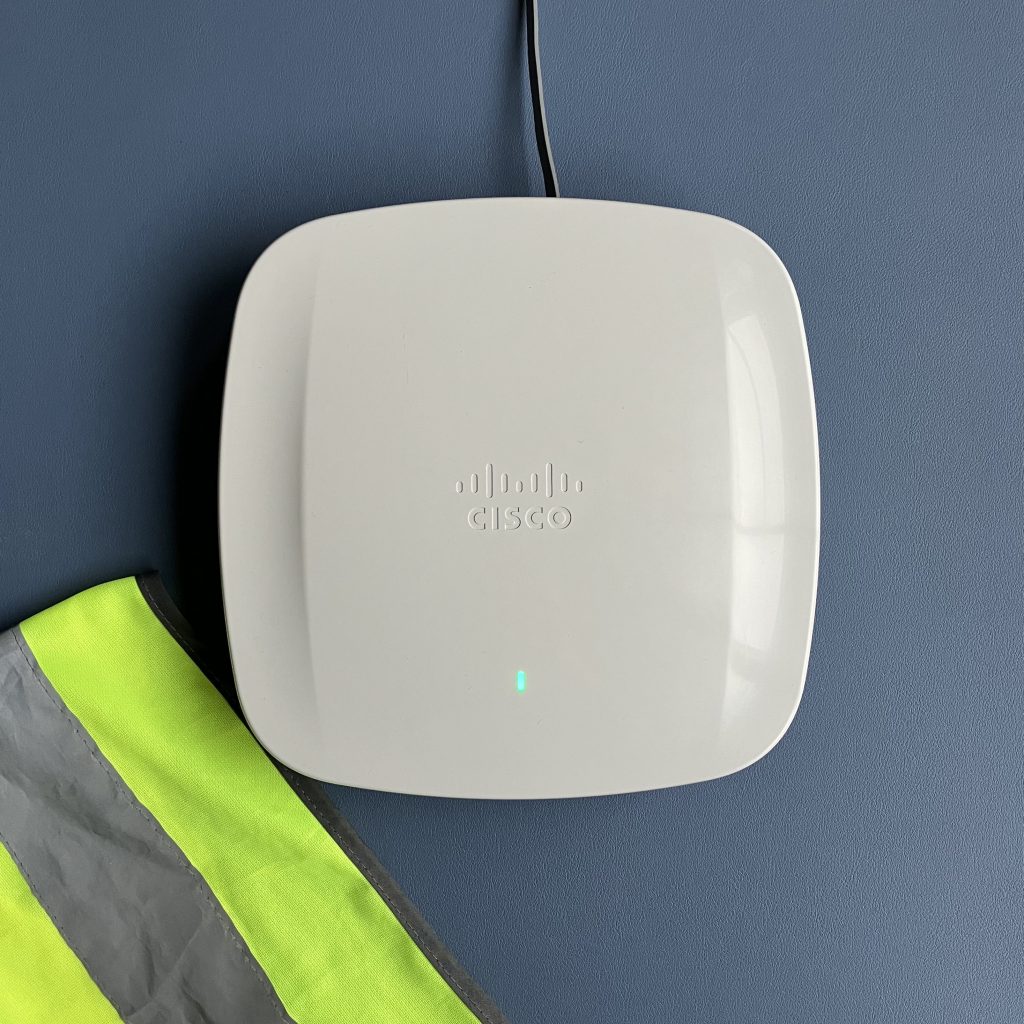
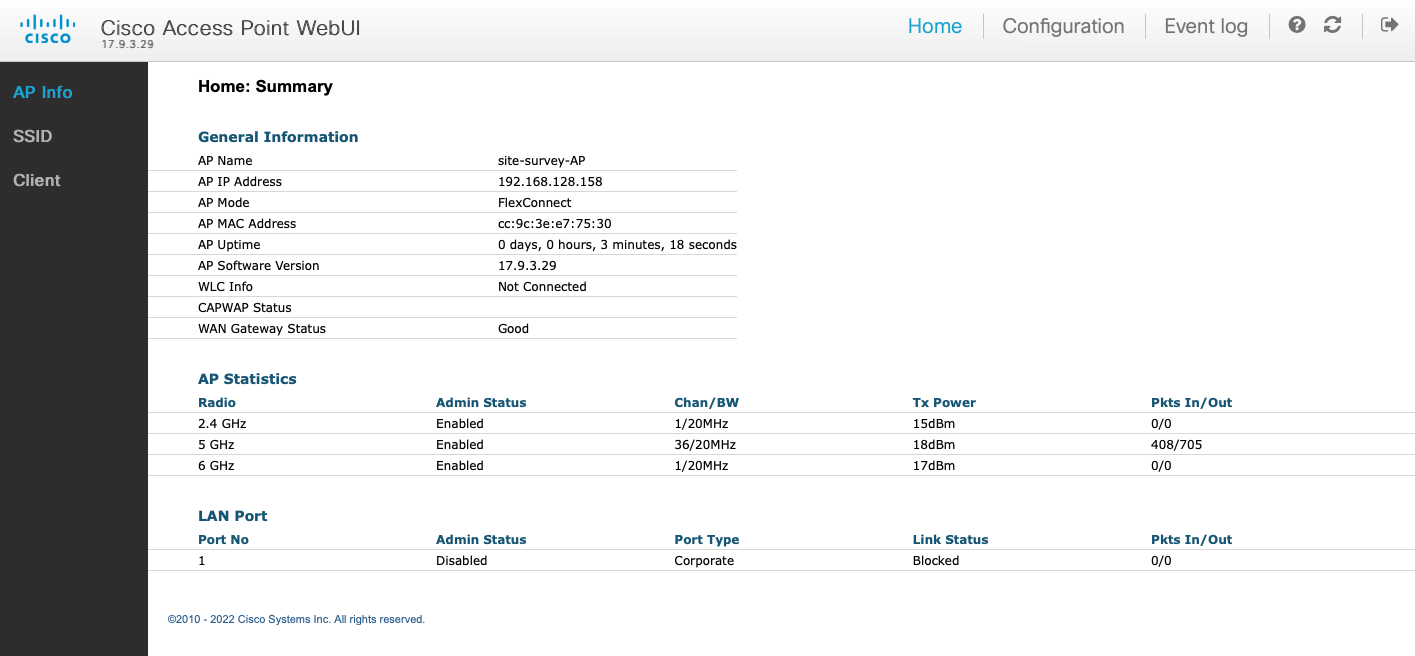
CW9162 access point in Site Survey mode
What do we need
Either of C9136I, CW9166I, CW9164I and CW9162I APs in DNA persona (controller-managed AP running Lightweight software image) works. We are going to use CW9162I-ROW DNA persona AP running 17.9.3 or newer release.
Console cable connected to the USB port of your laptop and the RJ45 Console port of the AP
PoE injector, PoE-capable battery pack, or switch with PoE support. To power CW916x APs, PoE+ (802.3af) is sufficient. You will need UPOE (802.3bt) to leverage full radio capability of C9136I.
Why the 17.9.3 or newer release
Why am I insisting on 17.9.3 or newer release? There was an issue, which prevented Site Survey mode from working on ROW regulatory domain APs used in the UK. The AP simply won’t accept the GB country code, and it won’t enable 5 GHz and 6 GHz radios. This is fixed in 17.9.3.
How to upgrade the AP to 17.9.3
Simply join the AP to an existing Catalyst 9800 controller running 17.9.3 release. During the join process, the AP will automatically upgrade its software to 17.9.3 to match your controller’s release.
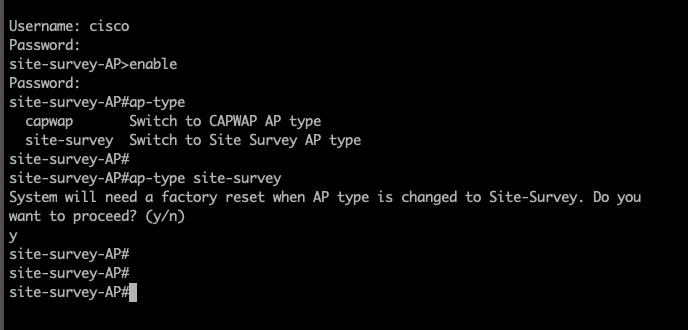
Console into the Lightweight AP. Please note Catalyst APs used 9600 baud rate by default, which has recently in 17.12.1 release changed to 115200 bauds.
Switch the AP to Site Survey mode using this command, press y, and wait for it to reload:
ap-type site-survey
Note: Mode change to Site Survey mode erases the AP settings and resets Console port credentials to cisco/Cisco.
After it reloads, ROW domain AP will only broadcast 2.4 GHz survey SSID. No 5 GHz. No 6 GHz. That’s because we haven’t configured any country code yet and it doesn’t know what regulatory to follow. Note the Country NONE value.
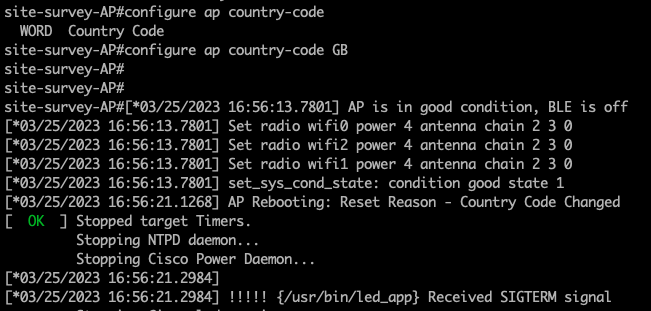
If you are using ROW (Rest Of World) domain AP, configure country code using this command using Console connection and reload:
configure ap country-code GB
The AP will boot up and broadcast the survey SSID on all 3 bands.
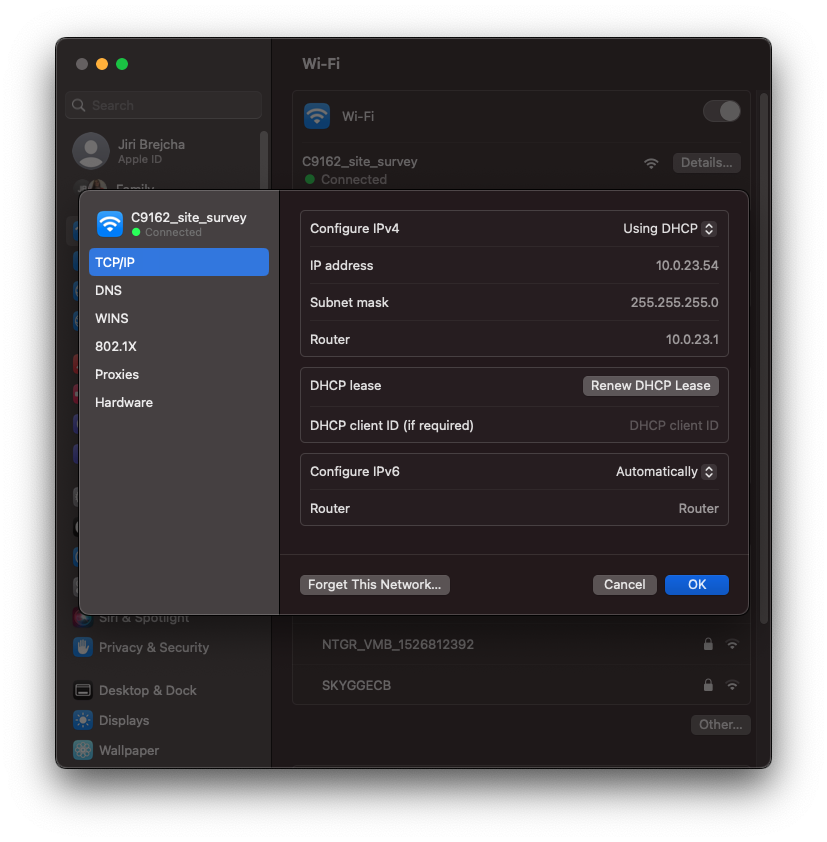
Connect to the survey SSID wirelessly. It is an open SSID, no passphrase needed.
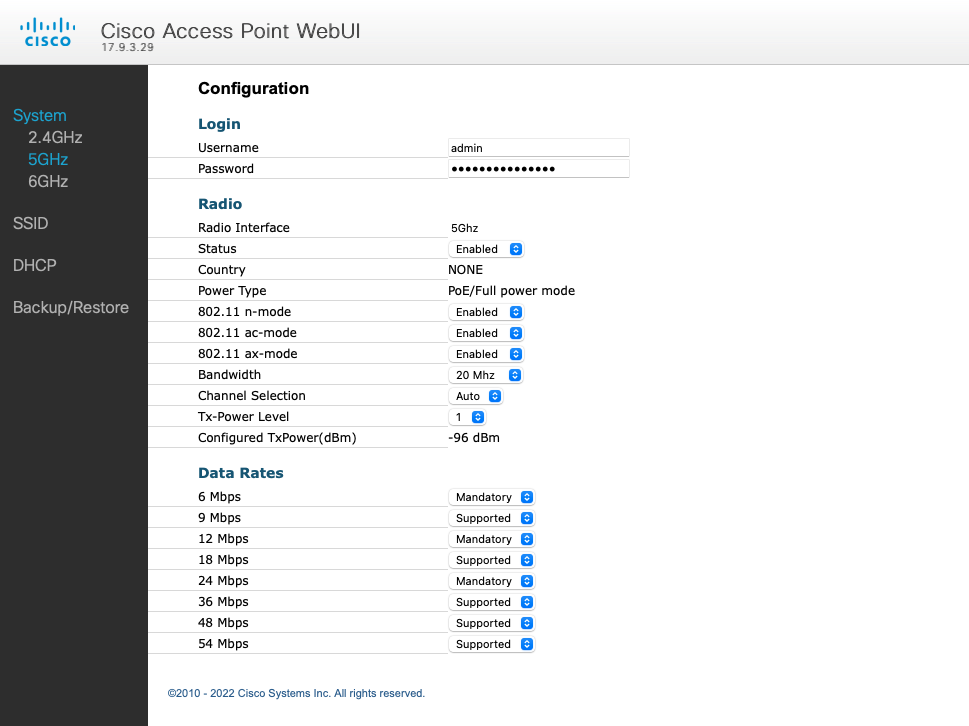
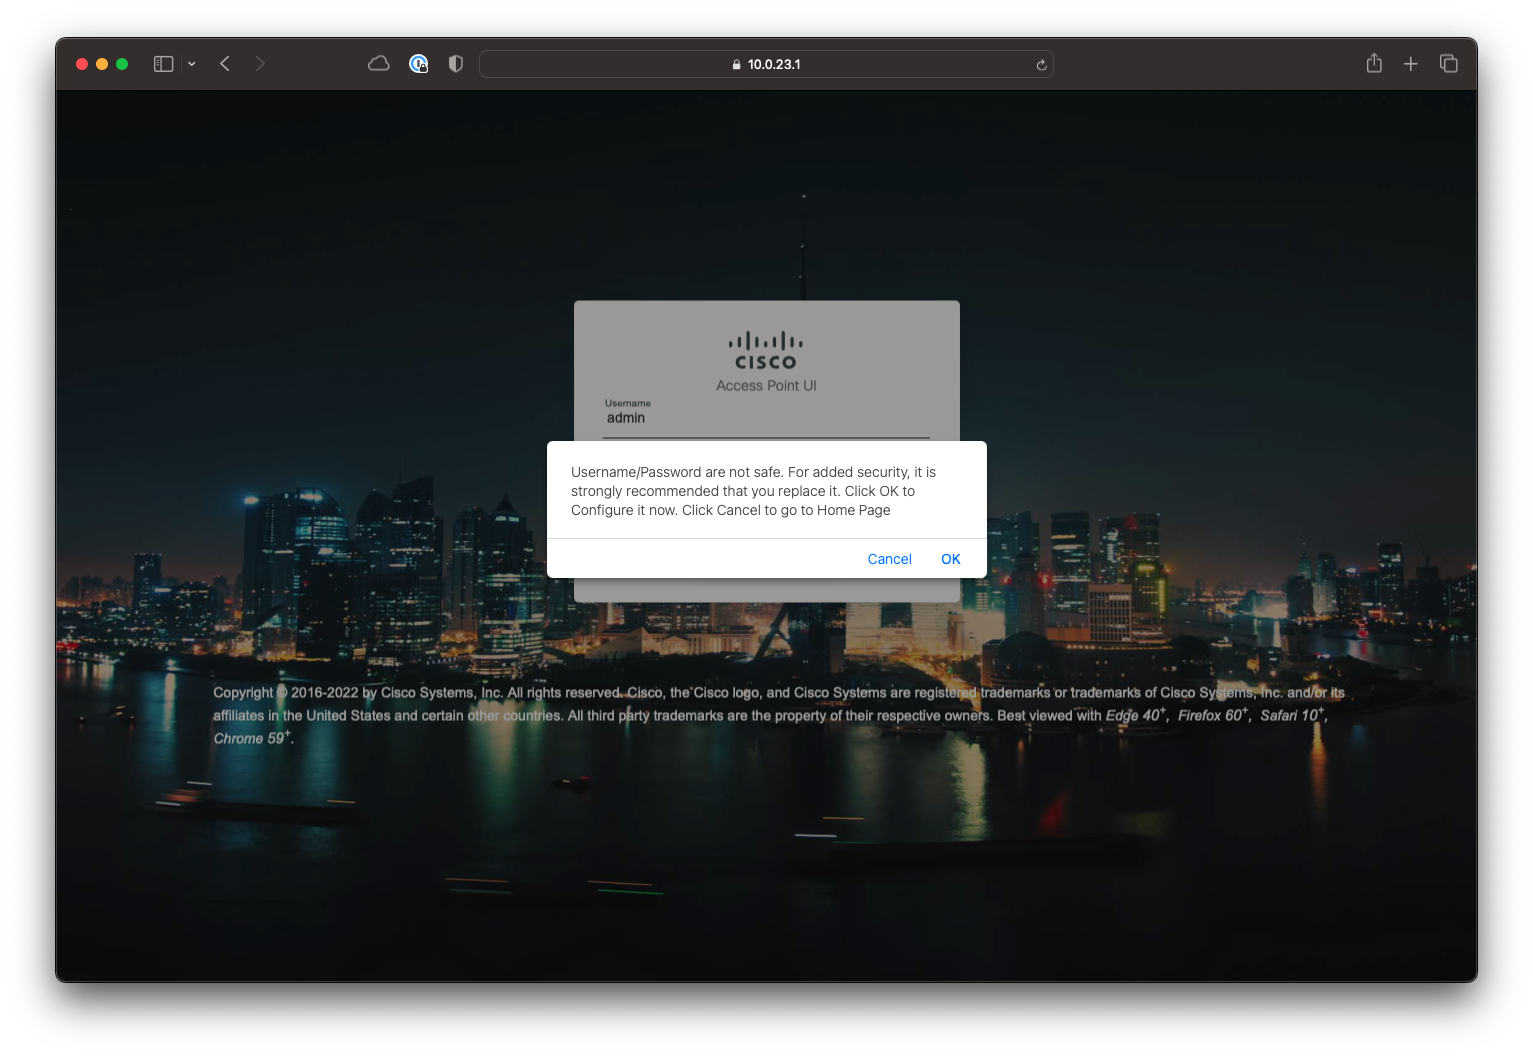
Access the access point’s web interface on https://10.0.23.1. Default credentials are admin/admin. Click OK, and change default credentials.
Using the web UI, customise the RF settings to fit your survey needs. Default 6 GHz channel setting is set to Auto, which results in channel 1, which is not a Preferred Scanning Channel (PSC).
Let’s change it to channel 5 or other PSC channel.
That’s it. Take the AP with you to site and enjoy the survey. When you PoE power it, it will automatically start in the Site Survey mode with your customised settings.
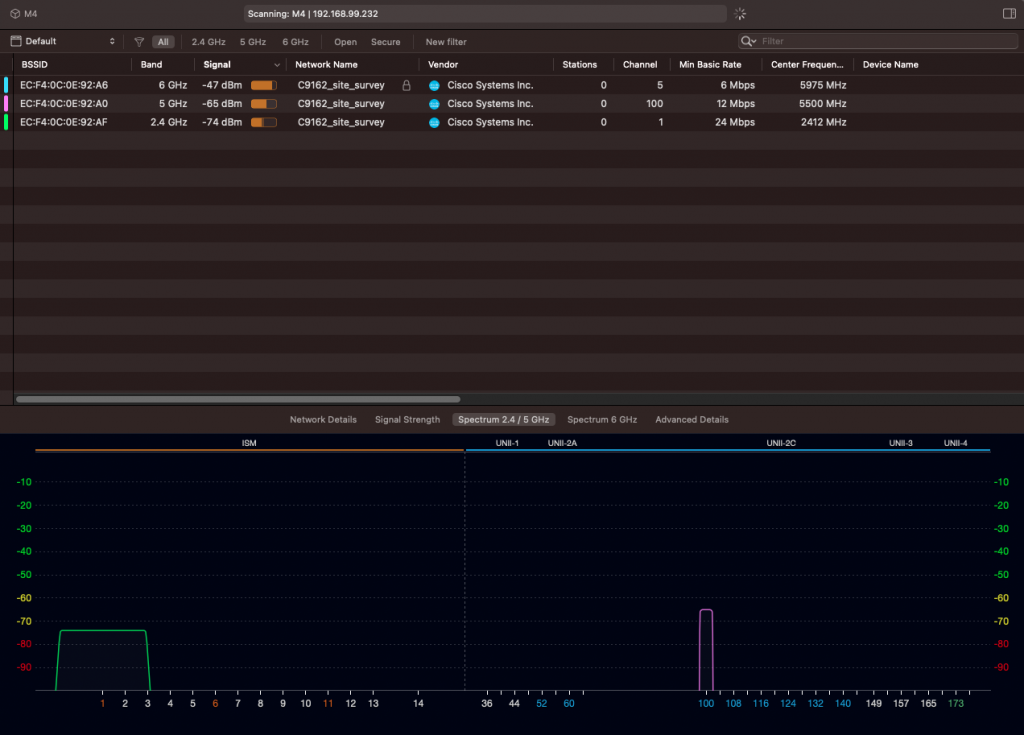
To scan 6 GHz spectrum, I use WiFi Explorer Pro with WLAN Pi M4 as a remote sensor. It has a built-in tri-band Wi-Fi adapter.
Custom 6 GHz channel and Tx powerSite survey SSID enabled on all 3 bands
New LED pattern in Site Survey mode
During boot, the LED flashes blue.
After the AP successfully starts Site Survey mode, the LED flashes red and green. This is a normal Site Survey mode pattern, and absolutely nothing to worry about.
LED flashes red and green in Site Survey mode
Warning: Read before you switch back to CAPWAP mode
Take a deep breath before you do this
If you switch the AP from Site Survey mode back to CAPWAP mode, you will no longer be able to log in via its Console port. The mode change wipes all CAPWAP settings of the AP including credentials. If you proceed with switch to CAPWAP mode, you will have to perform these steps to regain Console port access:
Join the AP to a Catalyst 9800 controller
Create Console port credentials and Enable password in AP Join Profile of the controller (Configuration > AP Join)
Controller automatically pushes these newly created credentials to the AP
You can now login to the Console port of the AP and switch back to Site Survey mode or run other commands
How long does a Site Survey AP take to boot?
From plugging the Ethernet cable in to seeing the SSIDs on the air, it takes about 3-4 minutes. DFS channels take 4 minutes or so, other bands come up faster.
Does the AP need wired connectivity or IP address on its Ethernet interface?
No, wired connectivity is not needed. The AP can just be powered by a power injector with no upstream Ethernet link. No IP address is needed on the wired port of the AP.
Does internet connectivity work?
Yes, it does. If you connect AP’s Ethernet port to infrastructure that provides internet, wireless clients connected to the AP in Site Survey mode get internet access too.
The Ethernet interface of the AP gets an IP address via DHCP from the existing infrastructure. The AP has its own DHCP scope 10.0.23.0/24 enabled on its survey SSID. It then NATs traffic coming from wireless clients to the wired network.