If you have not used WiFi Explorer before, get yourself a copy of the Pro version here. It is absolutely worth it and extremely useful tool if you have anything to do with Wi-Fi.
The Pro version (the Lite doesn’t) supports Filters. They allow you to filter scan results and get exactly the scan results you are interested in.
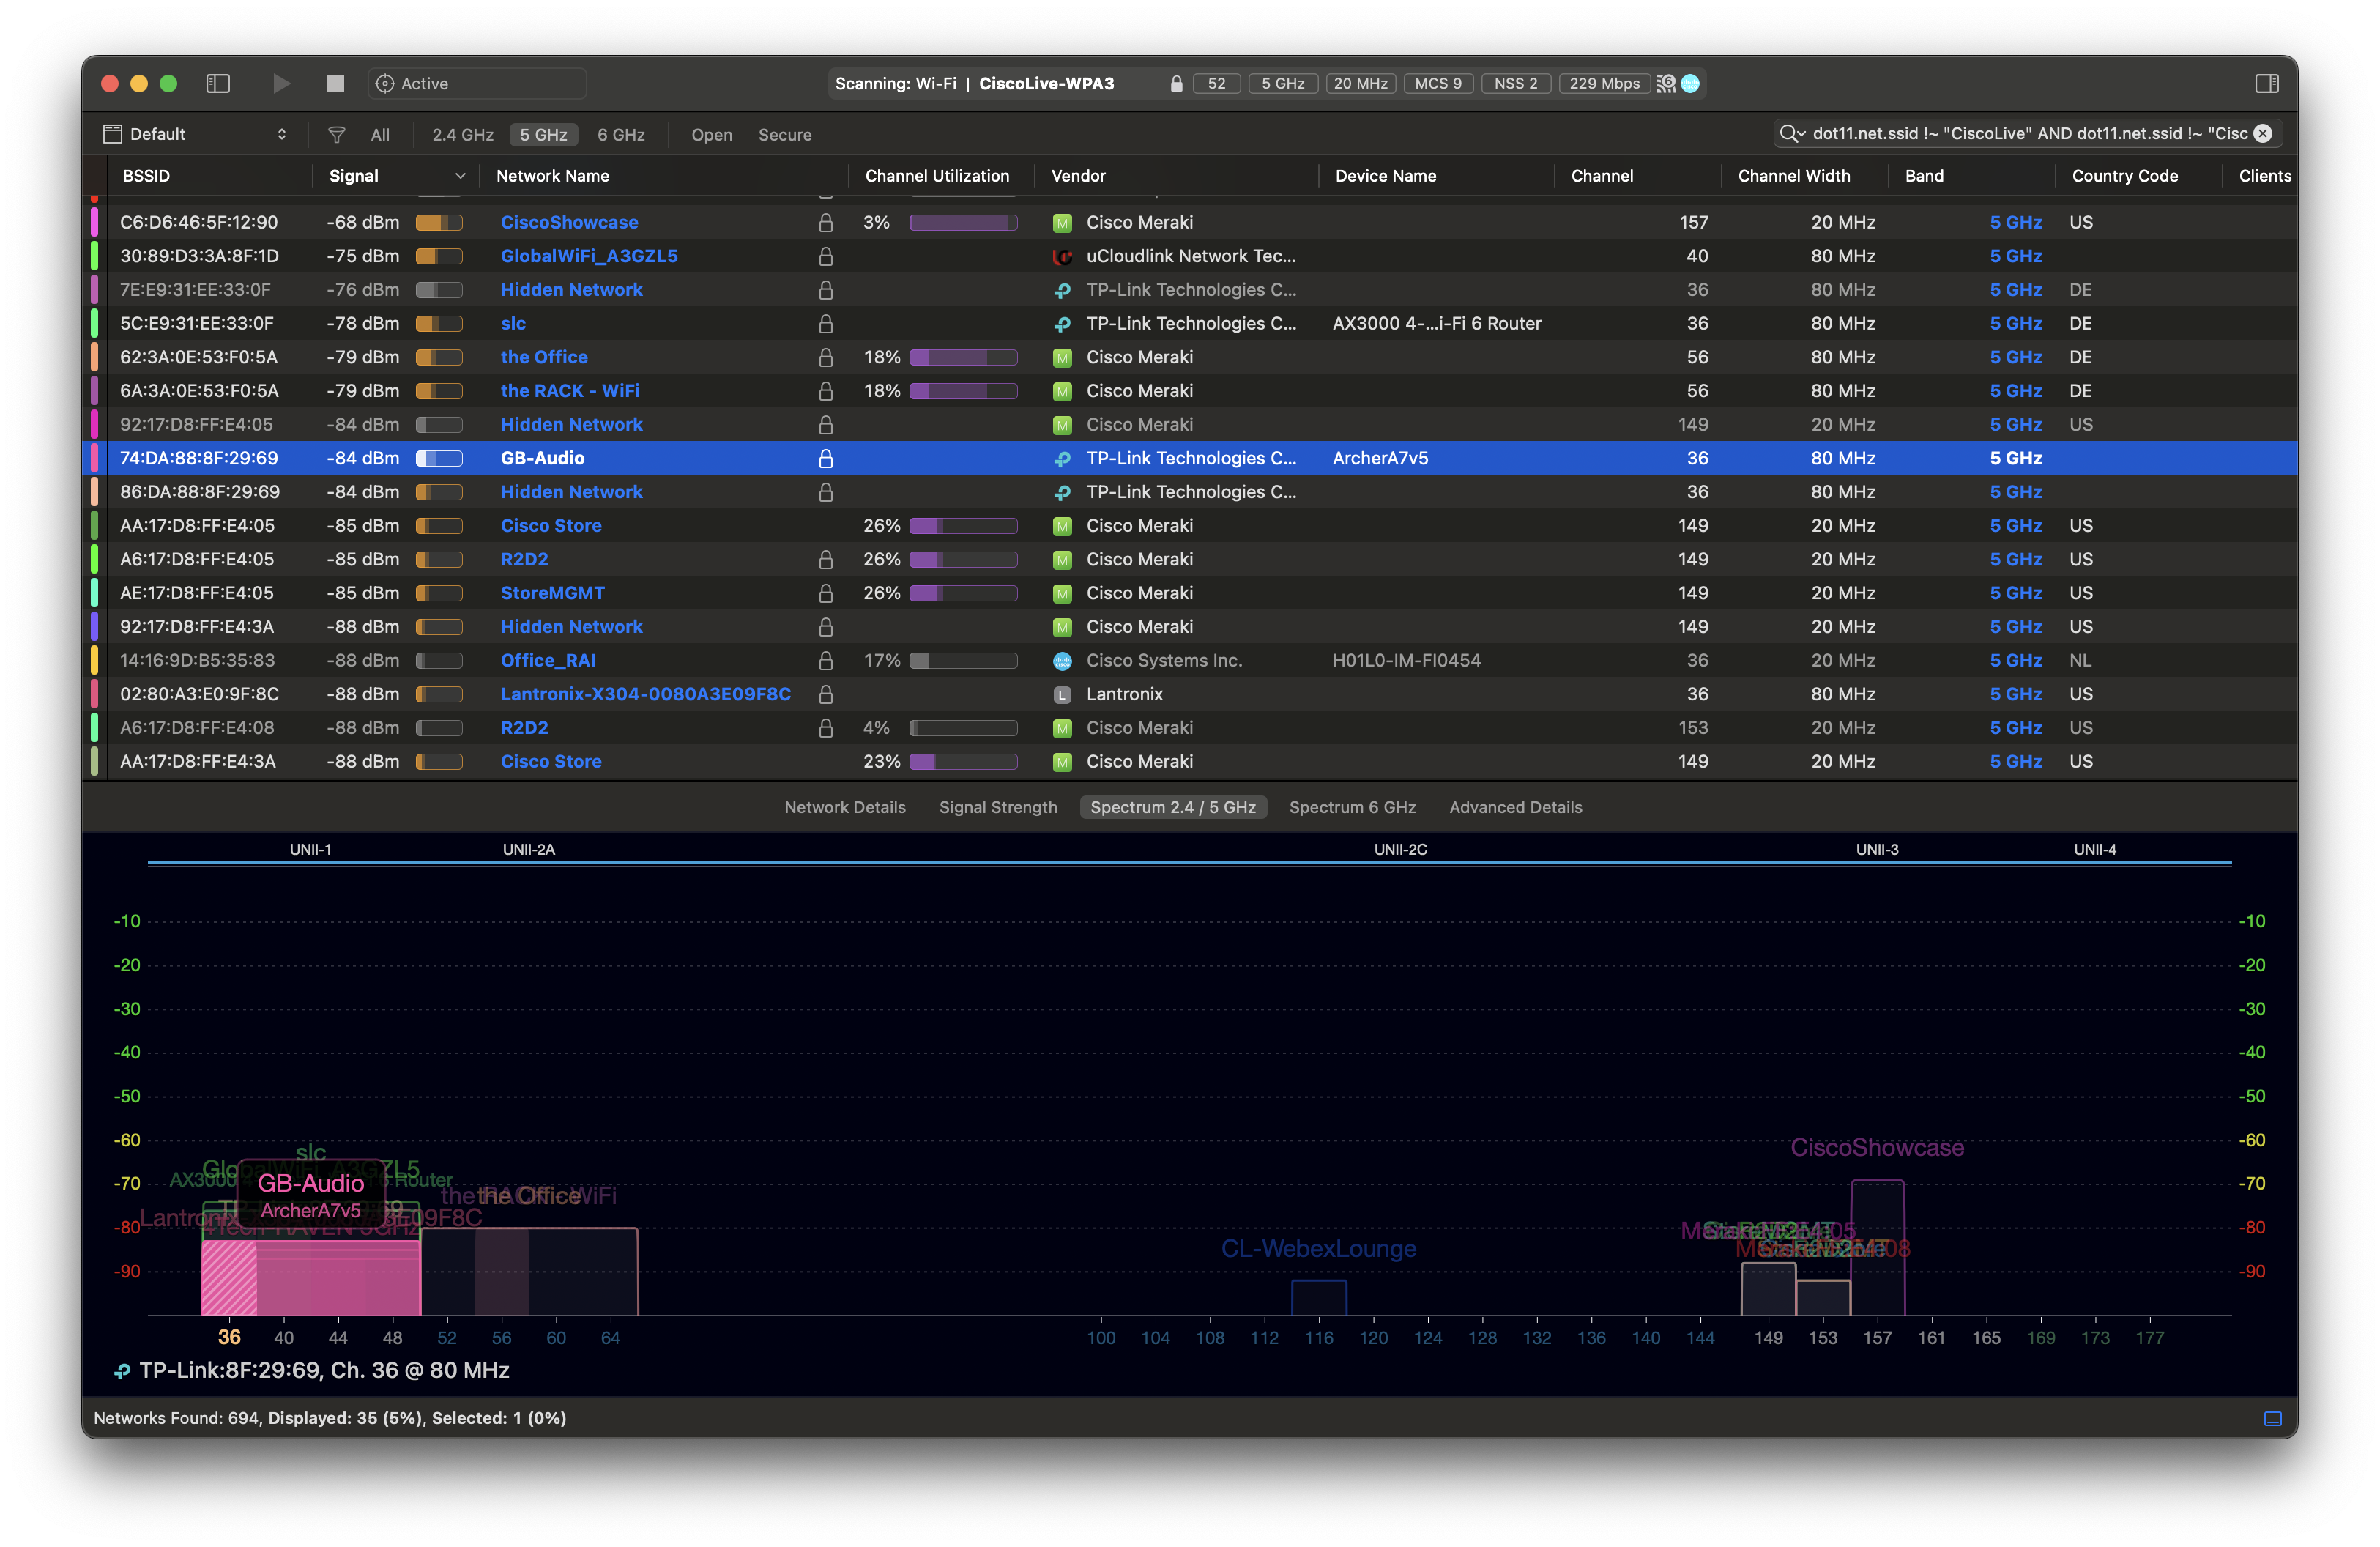
Find rogue access points
Let’s say you want to find APs that use other SSIDs than yours. This filter does just that. It shows all SSIDs other than CiscoLive or CiscoLive-WPA3. Simply paste this string into the Filters text field in the top right-hand corner.
dot11.net.ssid !~ "CiscoLive" AND dot11.net.ssid !~ "CiscoLive-WPA3"
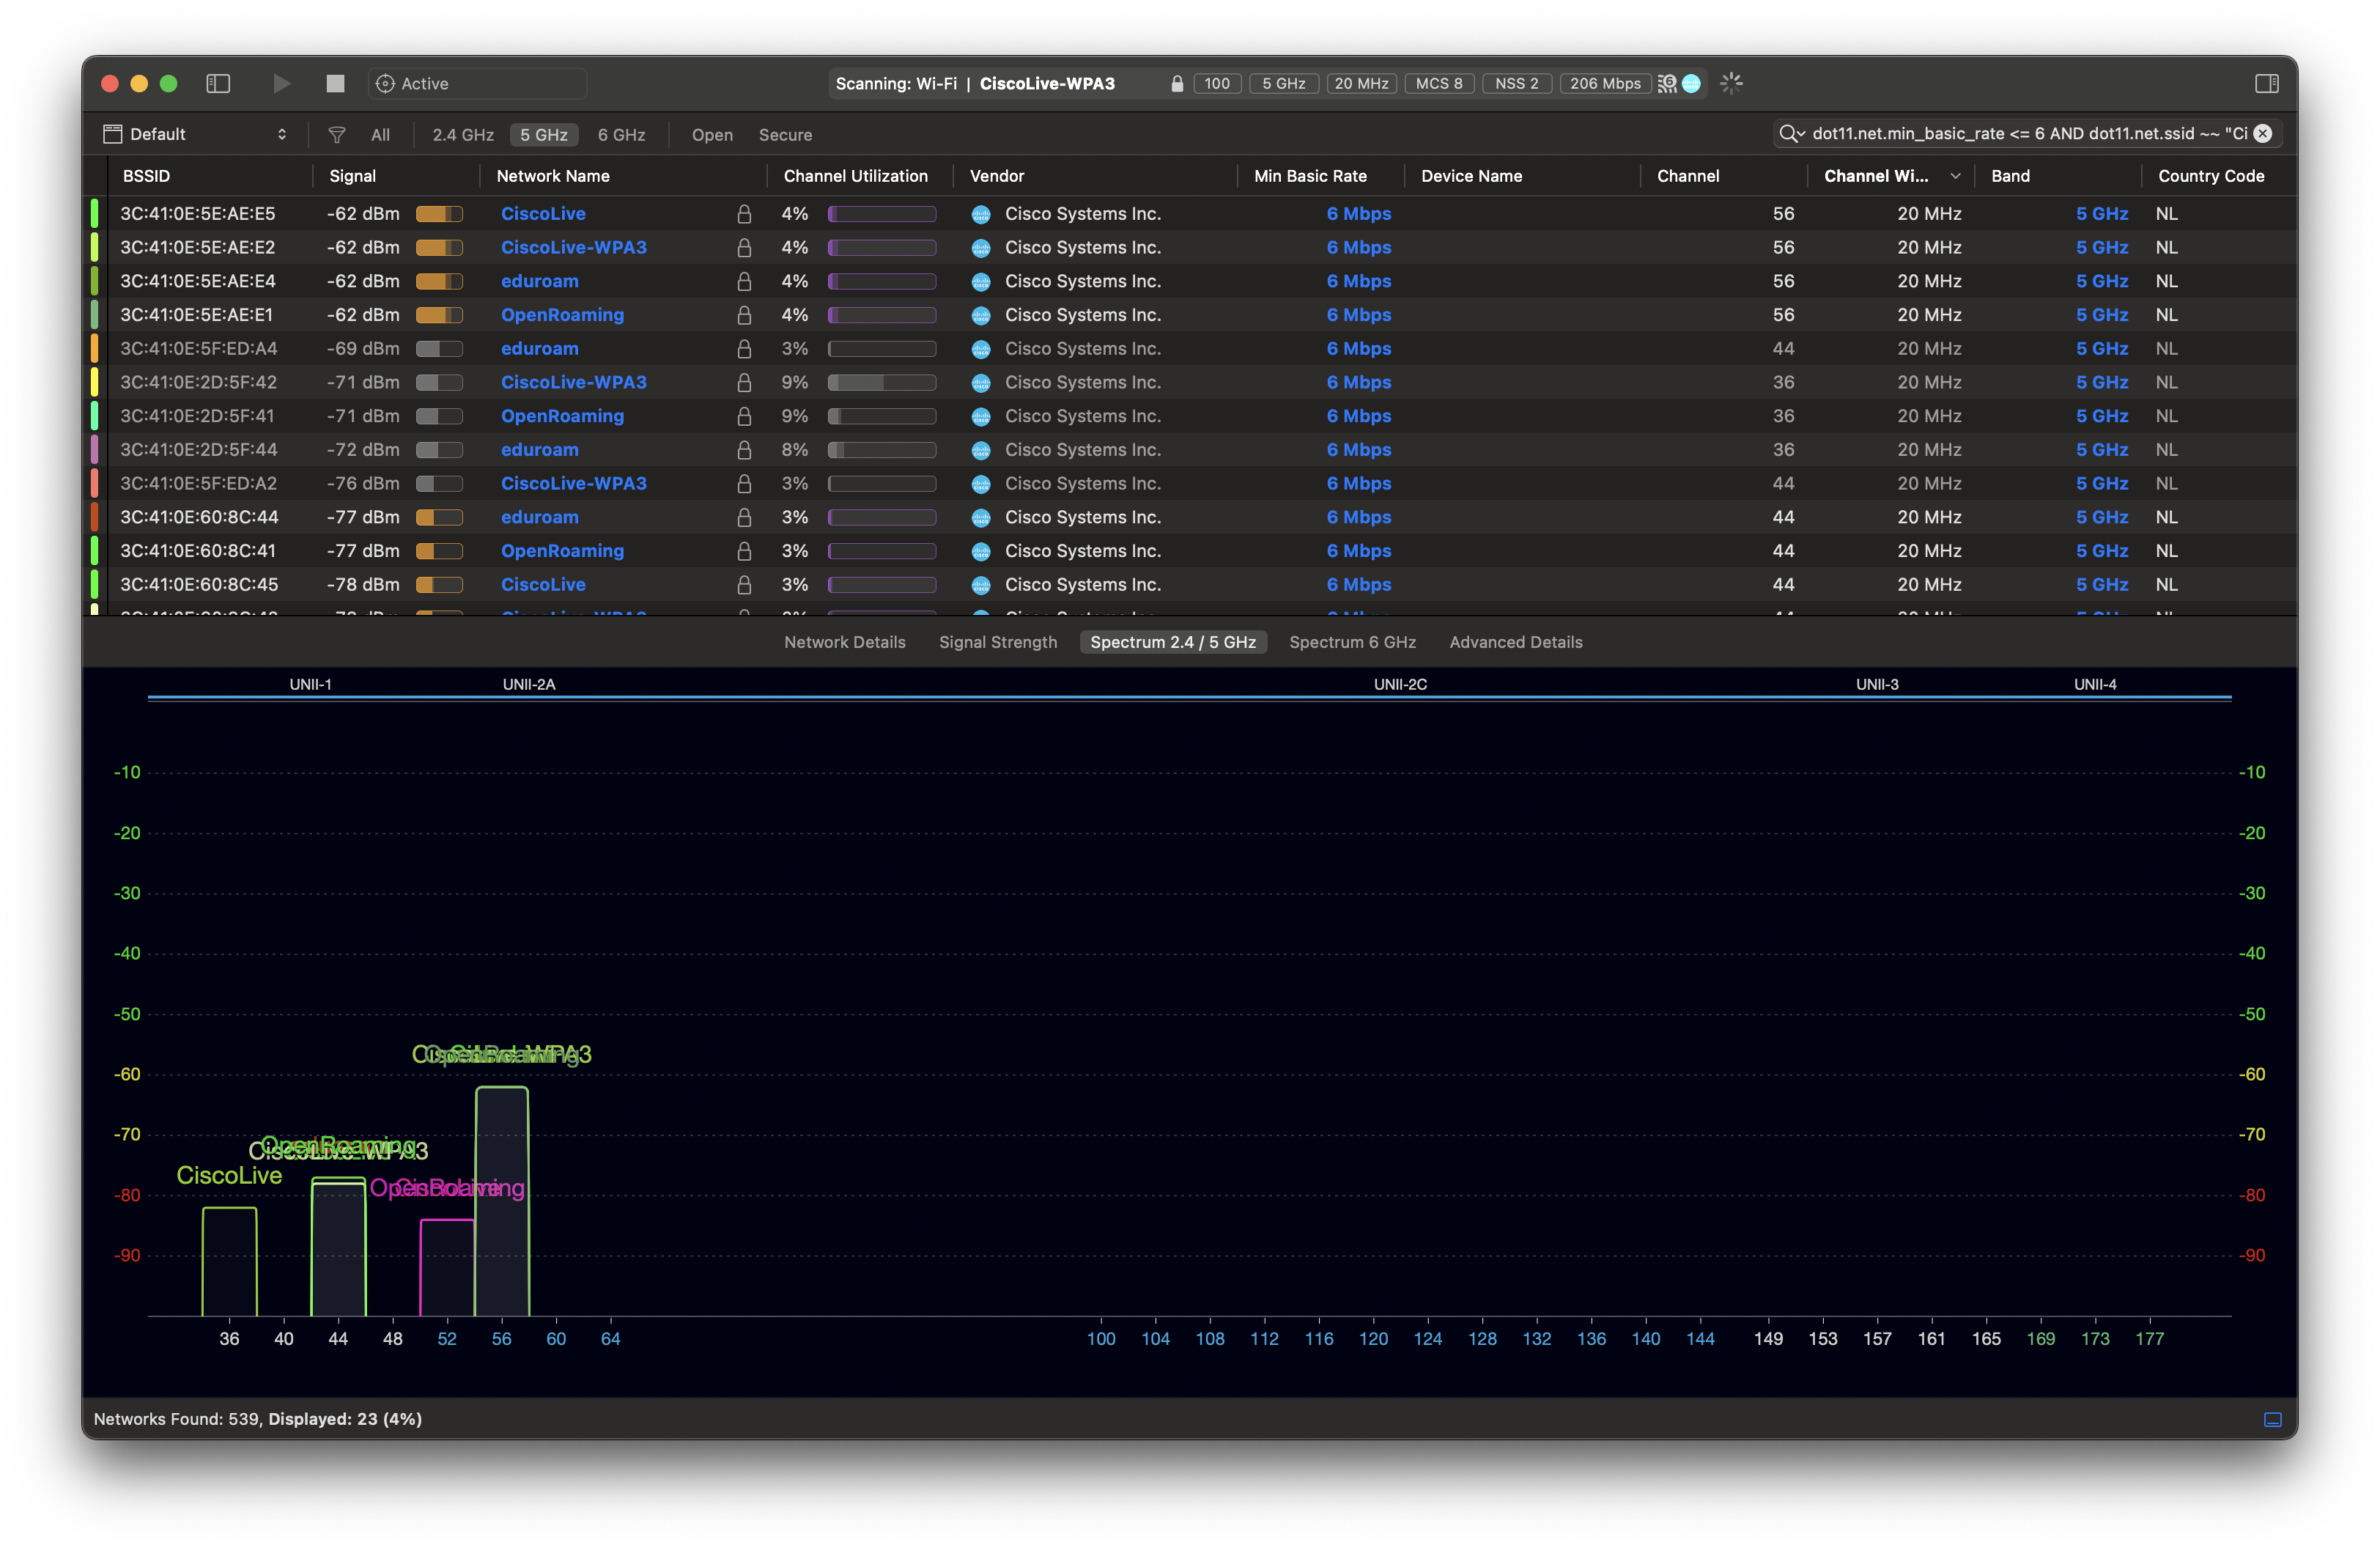
Find APs using low minimum mandatory data rate
Other times you might want to look for access points that have minimum mandatory data rate configured to low – by mistake or by choice. In this example, I am interested in APs broadcasting these 2 SSIDs and using minimum mandatory rate of 6 or lower.
dot11.net.min_basic_rate <= 6 AND dot11.net.ssid ~~ "CiscoLive" OR dot11.net.ssid ~~ "CiscoLive-WPA3"
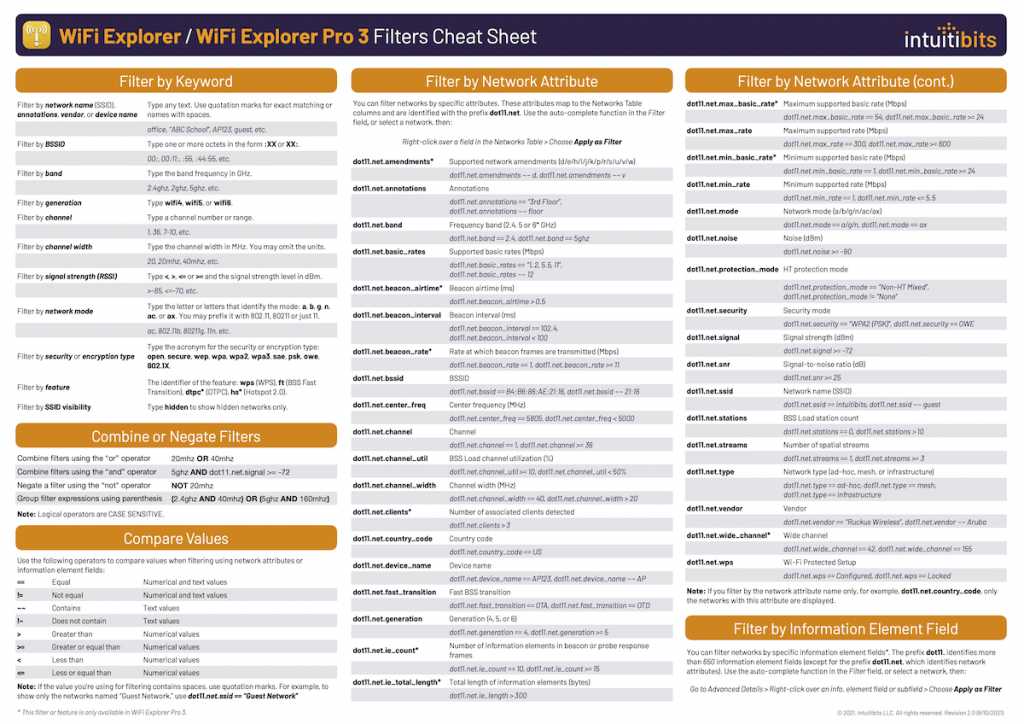
Download the cheat sheet
We have only scratched the surface. You can do so much more with filters.
Intuitibits, the makers of WiFi Explorer, published a great one-pager documenting the syntax. Get yourself a copy.
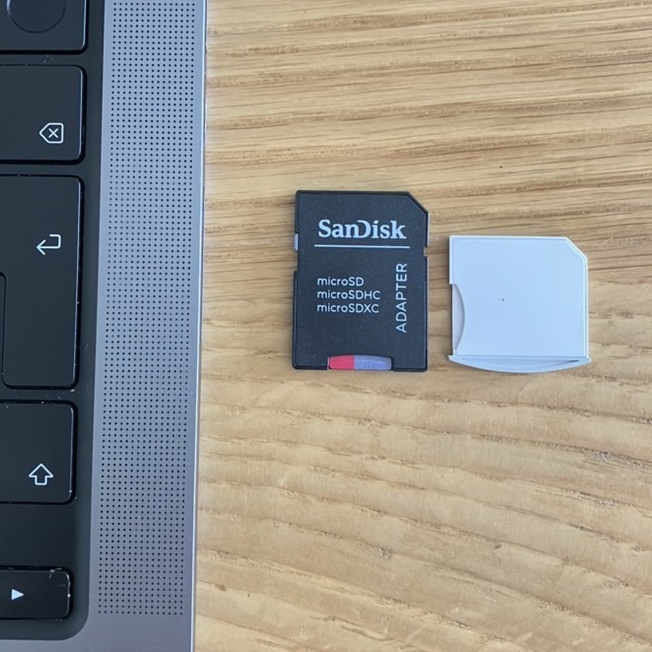
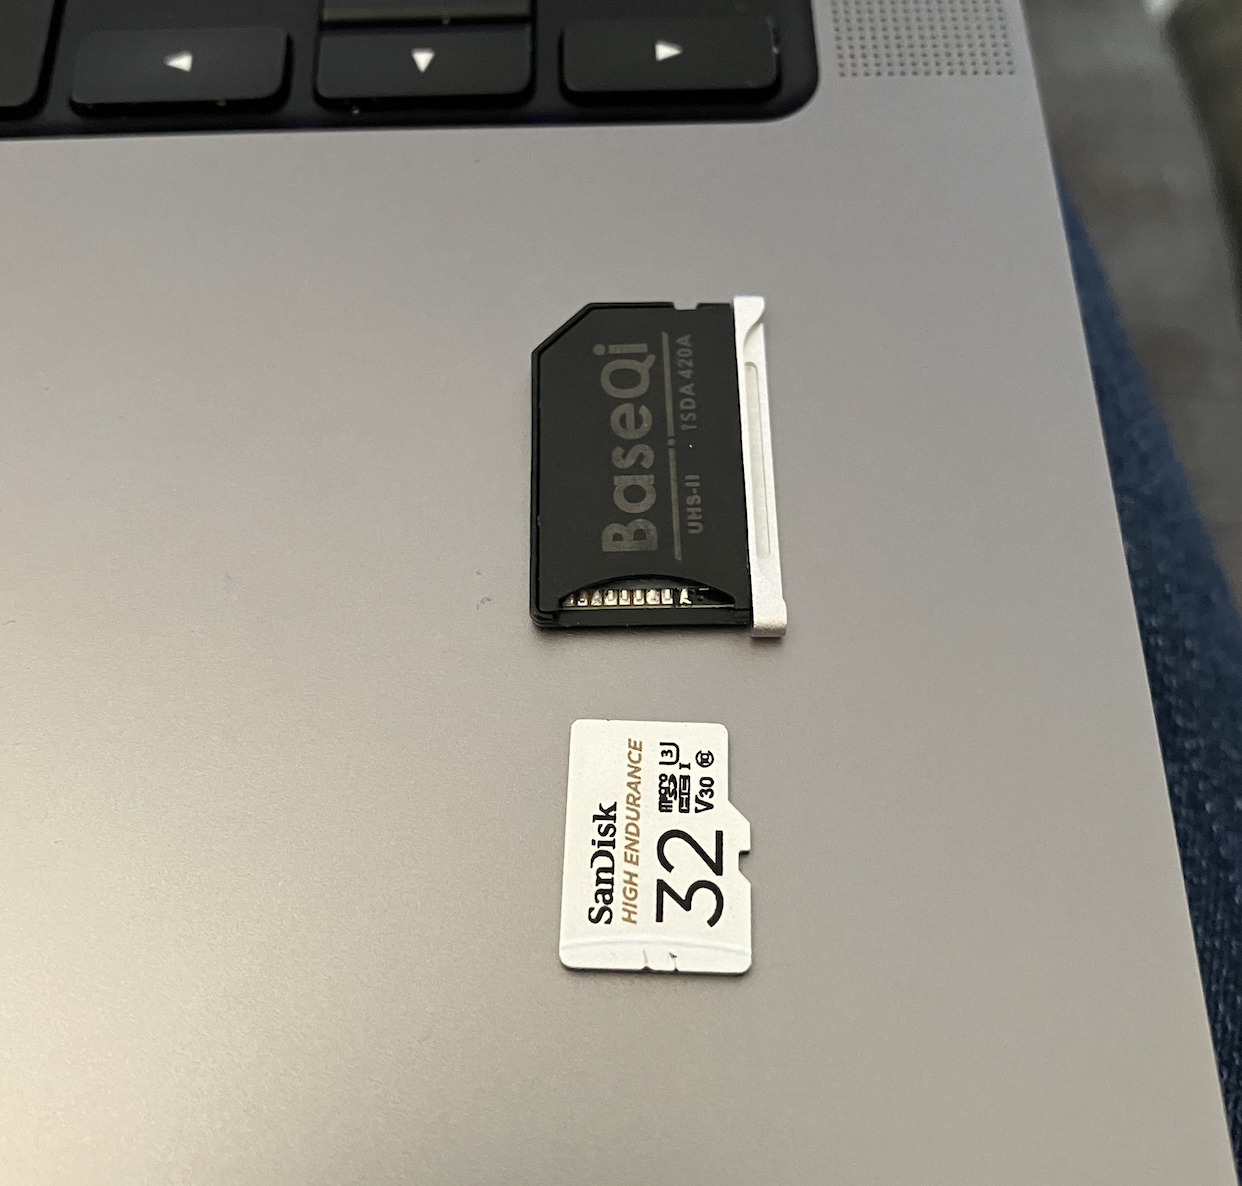
I flash Micro SD cards few times a day (hello WLAN Pi team 😉), and I thought it might be a good idea to always have an SD card to Micro SD card adapter on me. The easiest way to do that is to insert one in your MacBook built-in SD card reader slot. But which one do you buy?
Supplied adapter
There is nothing wrong with this SanDisk adapter. But it sticks out of your laptop. You can’t leave it inserted in the Mac while travelling. And also, the Micro SD card might slip out of the adapter.
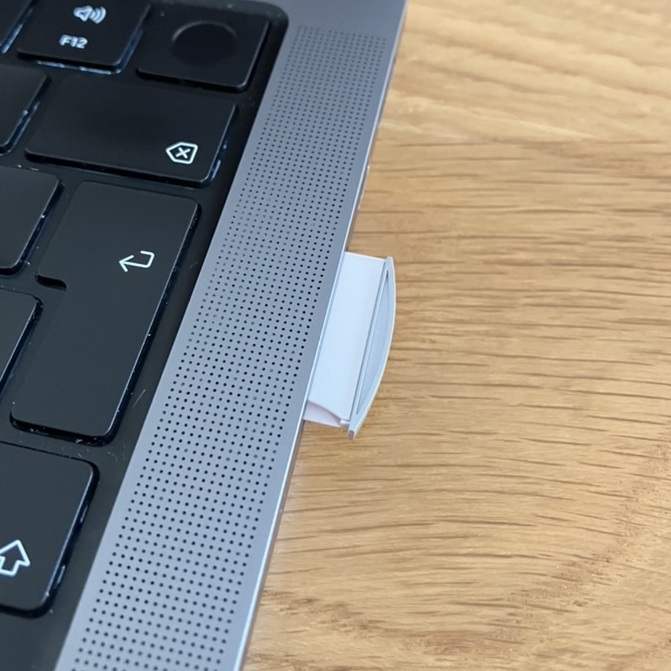
White OEM Micro SD to SD card adapter
To my surprise, this £2.60 adapter worked great… for a couple of weeks 😅 Until it disintegrated. It was designed for previous generations of MacBooks and it is not flush with the body of M1 MacBook, but it is still smaller than the full-size adapter.
You can shave off the grey plastic part, and make it even smaller. The white part allows you to easily remove and reinsert the adapter. No nails required.
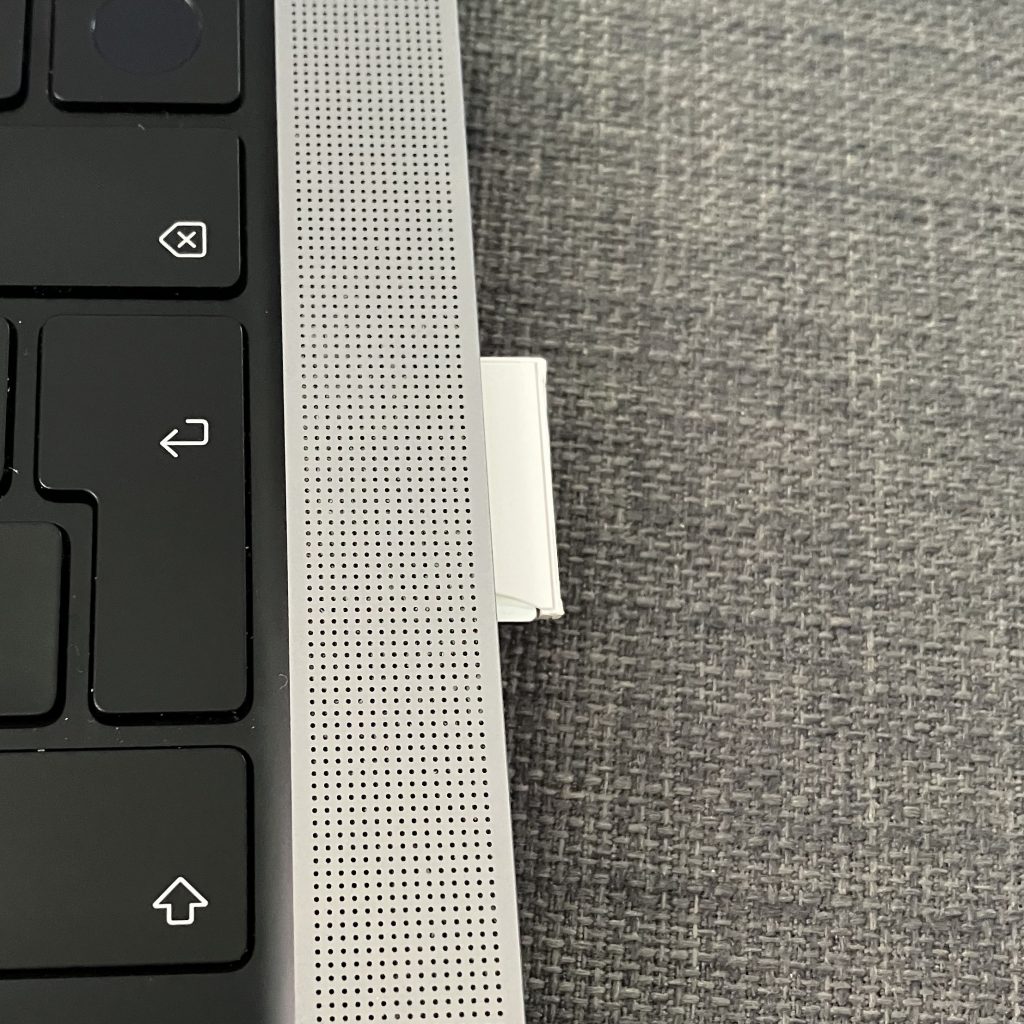
The Micro SD card goes in the adapter from the side, so it won’t eject in your backpack or laptop bag.
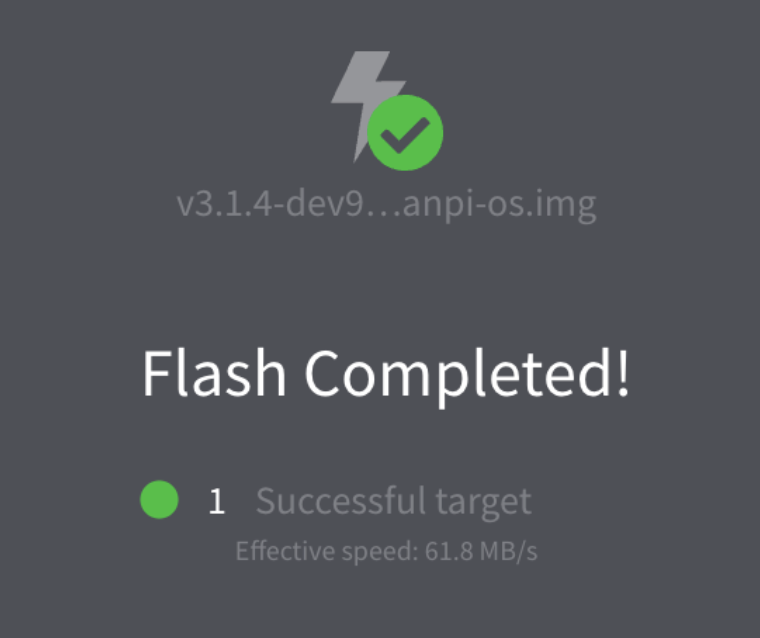
It flashes cards at the exact same speed 61.8 MB/s as the premium £30 BaseQi. And it is easy to remove from the MacBook card reader slot.
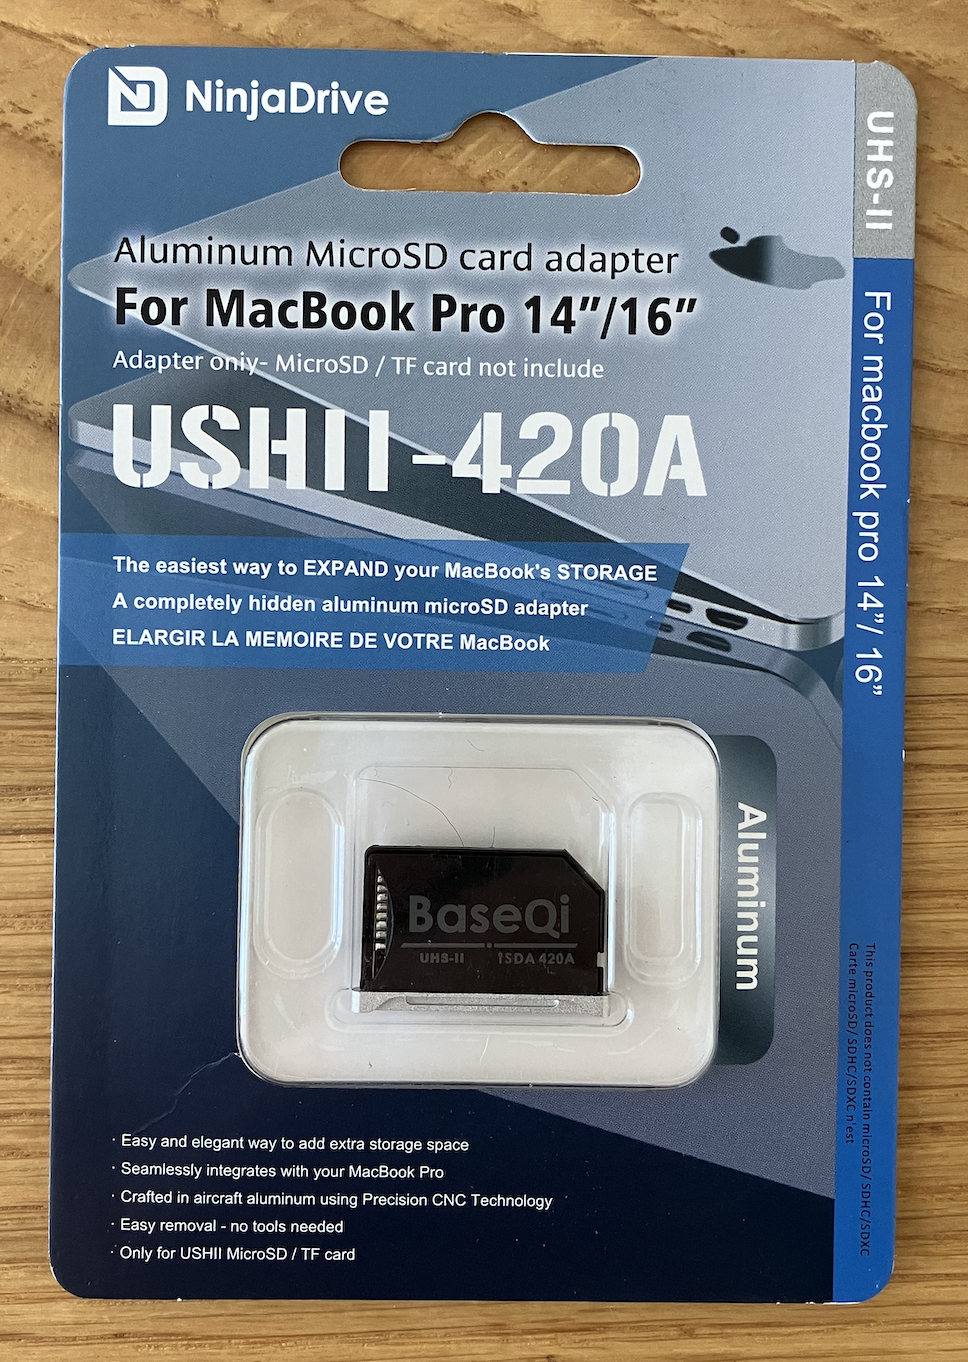
BaseQi 420A
This adapter is primarily designed for those who want to expand storage capacity of their MacBook. And it does that really well. It fits perfectly inside SD card reader slot of 14″ M1 2021 MacBook. The problem is that it works ‘too well’. Once you insert the Micro SD card to it, it is very hard to remove the Micro SD card. Now, when you insert it into MacBook SD card reader, it is designed to stay there and again it does that ‘really well’.
Removal of BaseQi from the MacBook card reader takes 2 fingers and 2 nails. Yes, it takes significant effort.
Would I recommend it to someone who wants to use it to flash Micro SD card few times a day? No. It takes a huge effort.
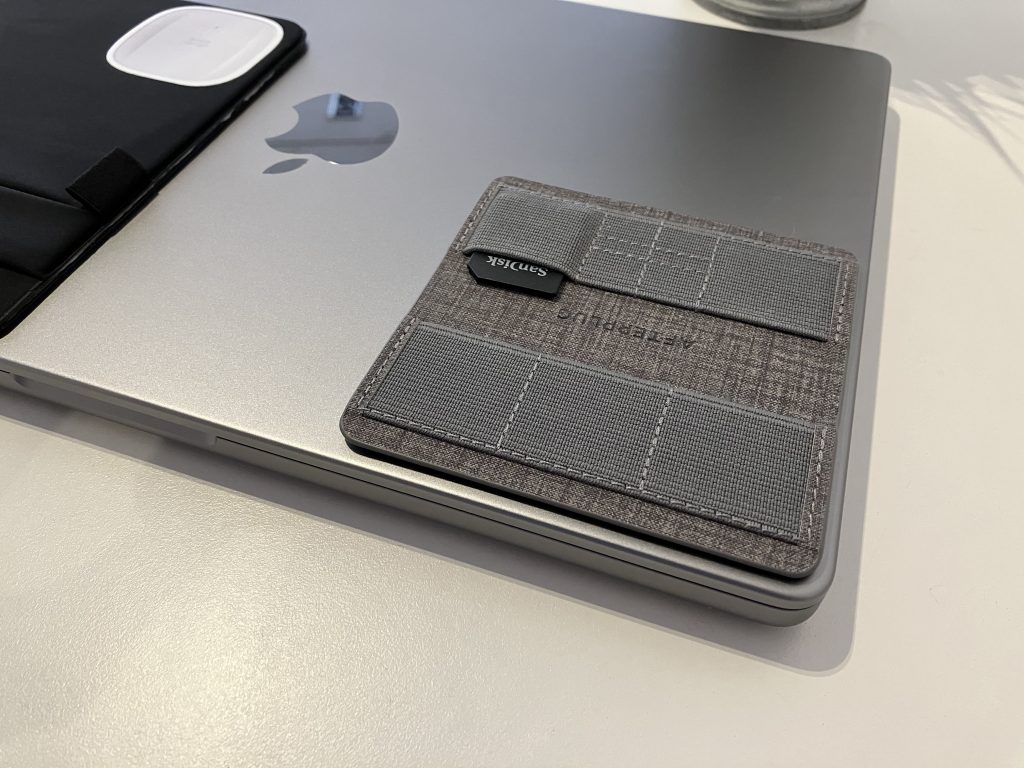
Afterplug Ultra Slim Stick On SD and MicroSD Card Holder with Reusable Adhesive
Problem solved! This stick on card holder did the trick. I can reuse all my SanDisk SD card to micro SD card adapters. And I can carry a handful of them, label them and store the micro SD cards inside the adapters.
Or you can consider an add-on 10 Gigabit Ethernet Thunderbolt 3 adapter for your current Mac.
We will focus on the latter today.
Thunderbolt 3, not USB
While the USB-C connector might temp you to connect these adapters to a standard USB port, these adapters don’t support USB protocol. They use Thunderbolt 3 and they happen to use the same USB-C connector as USB. That’s the only thing USB and Thunderbolt have in common. Before you order one of these adapters, double-check that your computer supports Thunderbolt 3. That should be most new MacBooks, Mac Minis, Intel NUCs and similar platforms.
Which 10 GbE adapter shall I buy?
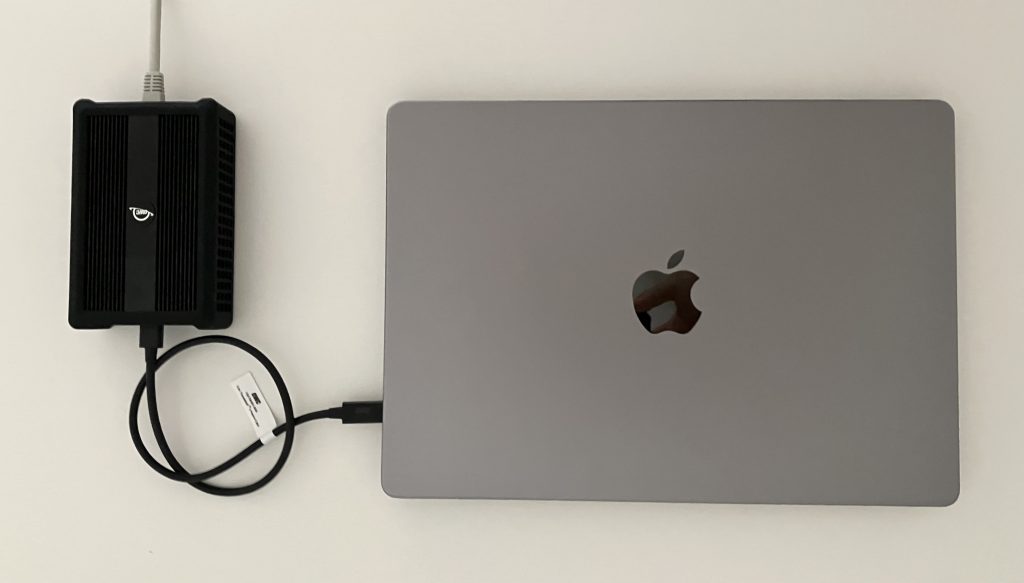
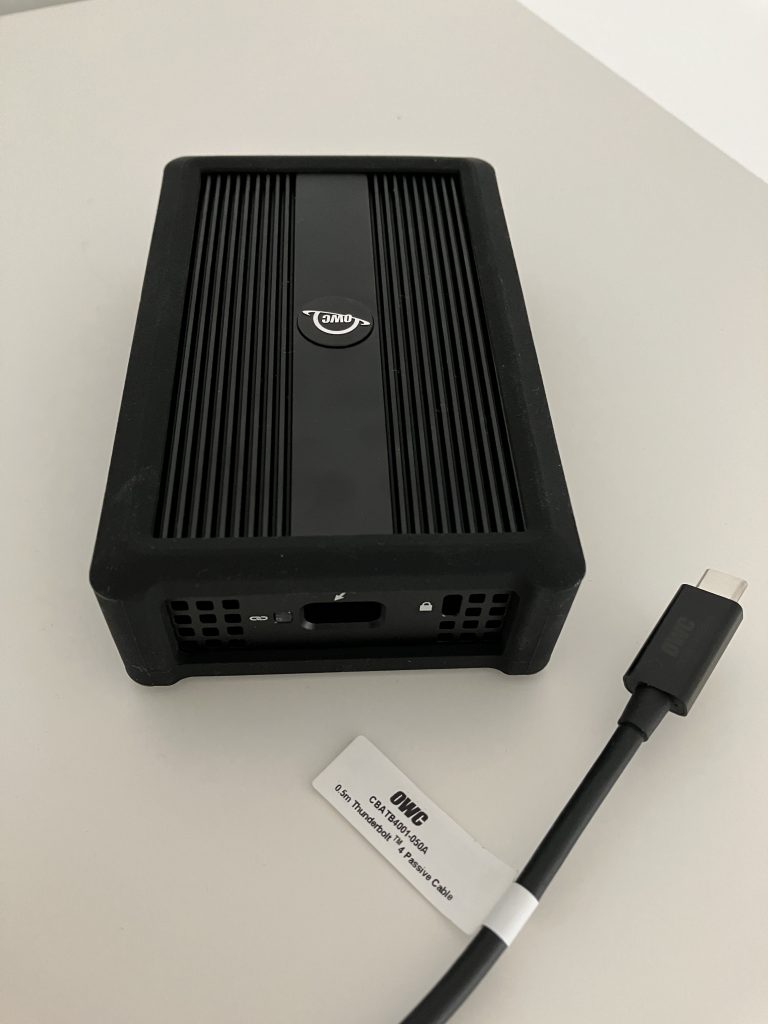
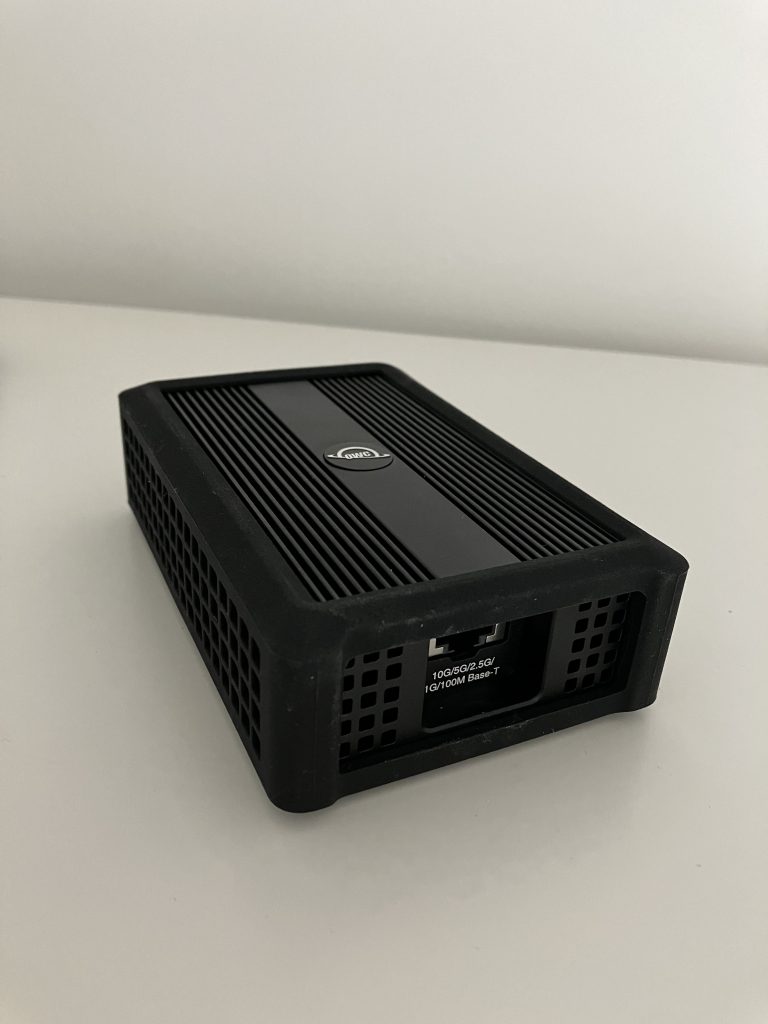
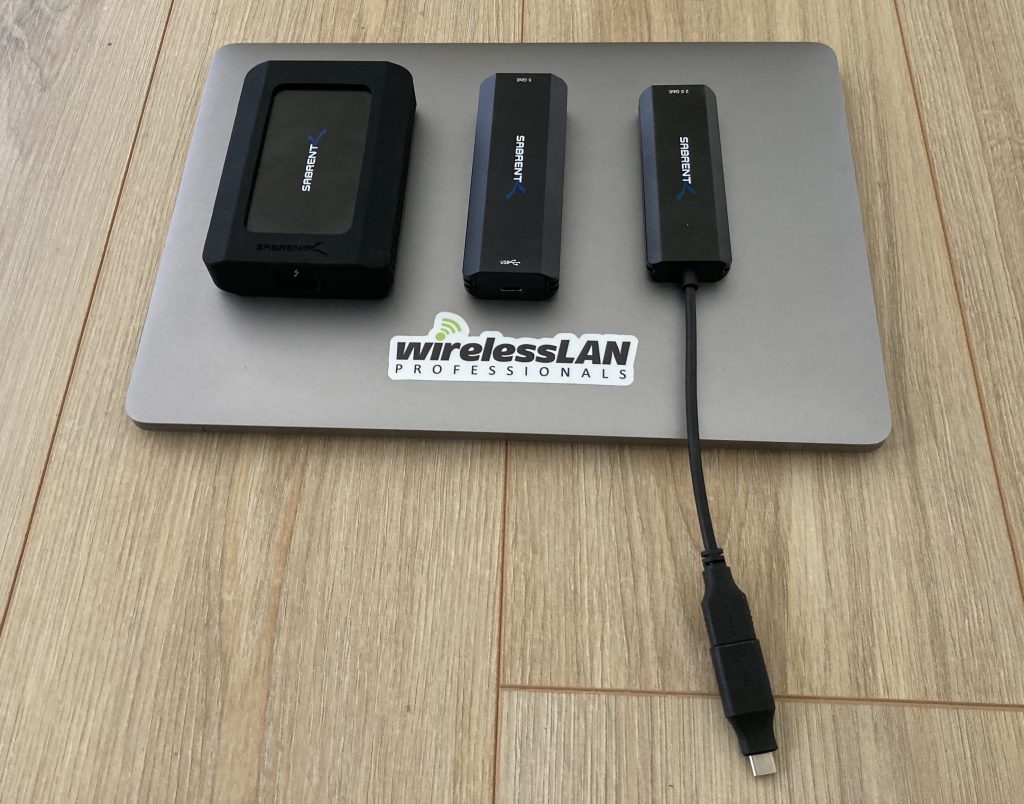
I tested two of these Thunderbolt 10 GbE adapters. One made by Sabrent, and the other by OWC. They both look alike, both perform very well, both get quite warm, and bothwork out of the box on macOS. Yes, no driver installation required on your part on macOS! 🎉
Mainly because of the loose Sabrent cable issue explained below, I recommend the OWCadapter. It comes with great documentation, and even the Thunderbolt cable itself is thicker, feels premium, and most likely delivers better shielding.
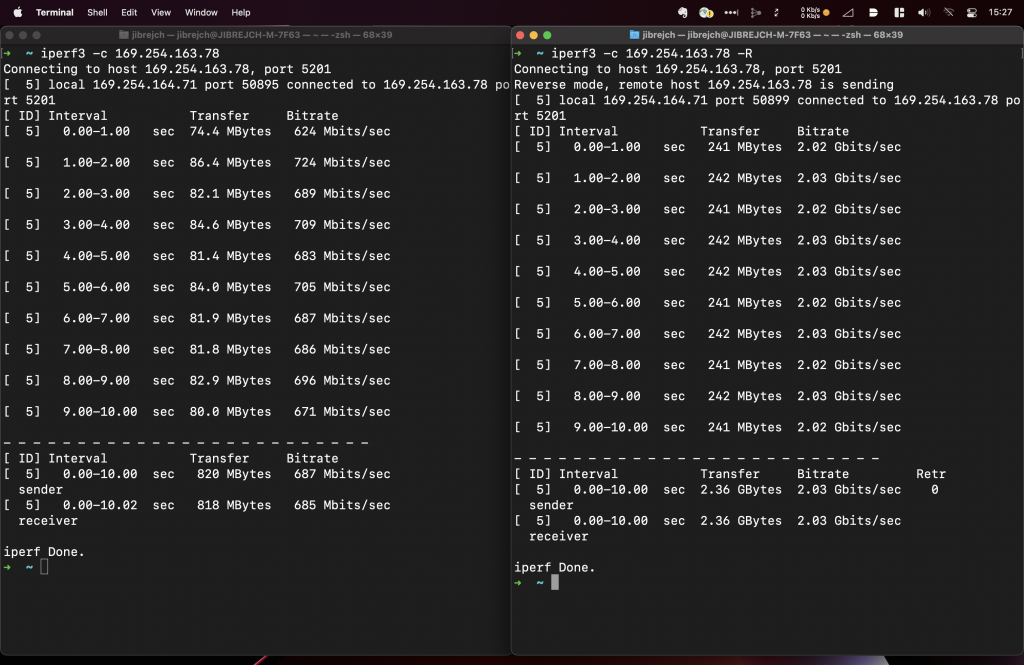
From throughput perspective, I personally tested it up to 3 Gbps down and 3.3 Gbps up using iperf3 with default settings. The limitation is on my part, I just don’t have another 10 GbE computer I could test against.
I’ve seen reports of:
between 7 Gbps and 8.74 Gbps uplink speeds with default iperf3 settings
9.5 Gbps uplink iperf3 speeds with Jumbo frames enabled
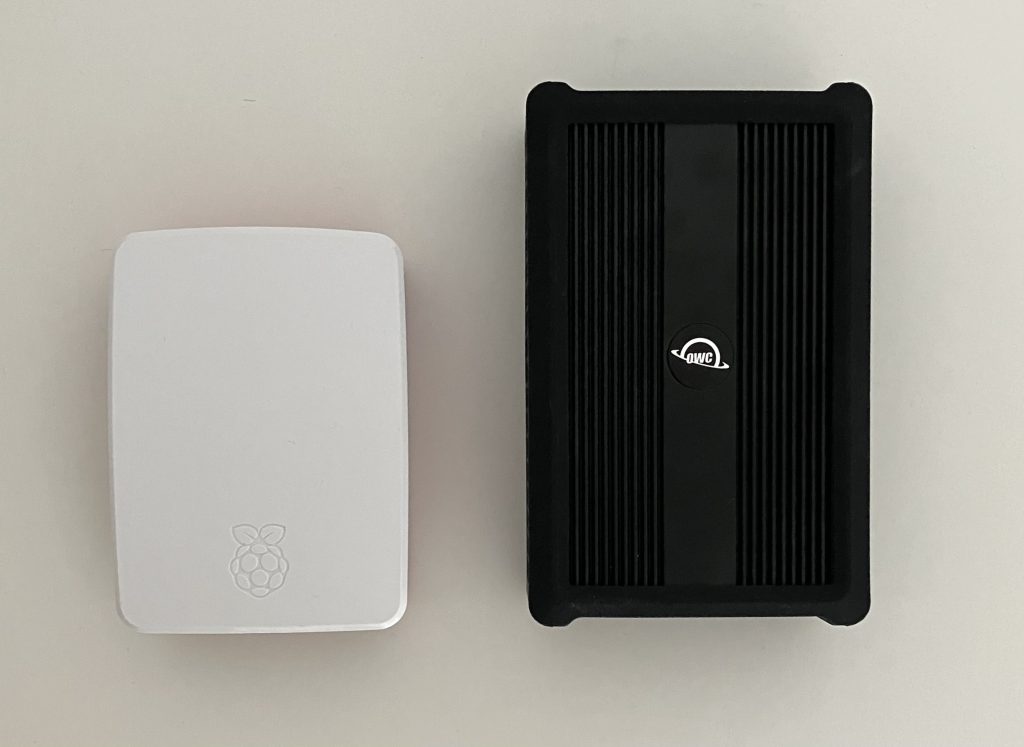
When I reviewed 2.5 GbE and 5 GbE adapters, this setup has become my reference I ran all iperf3 tests against.
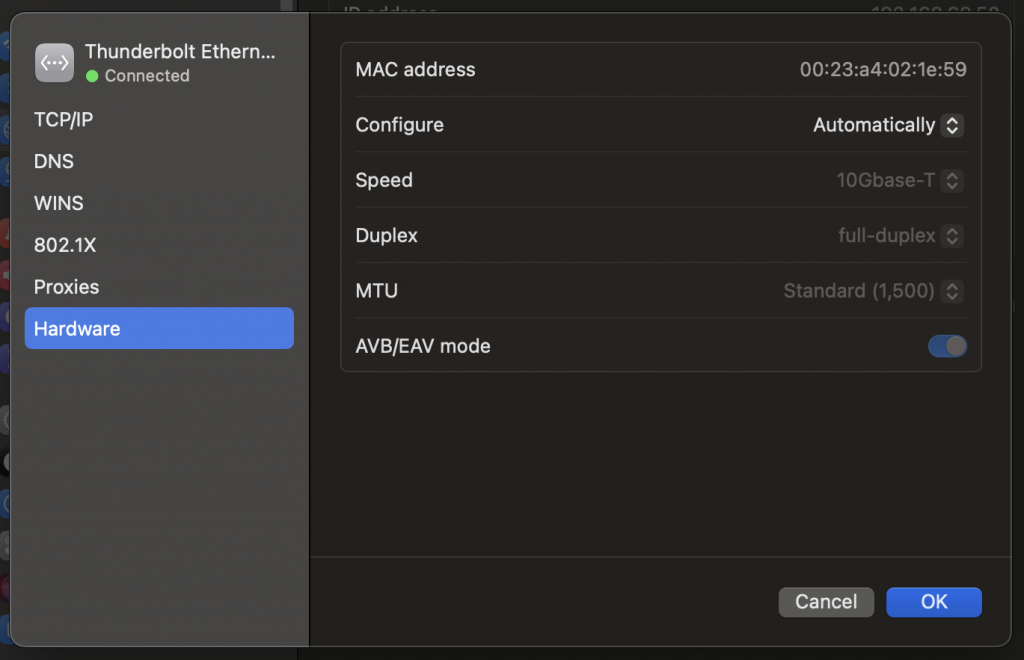
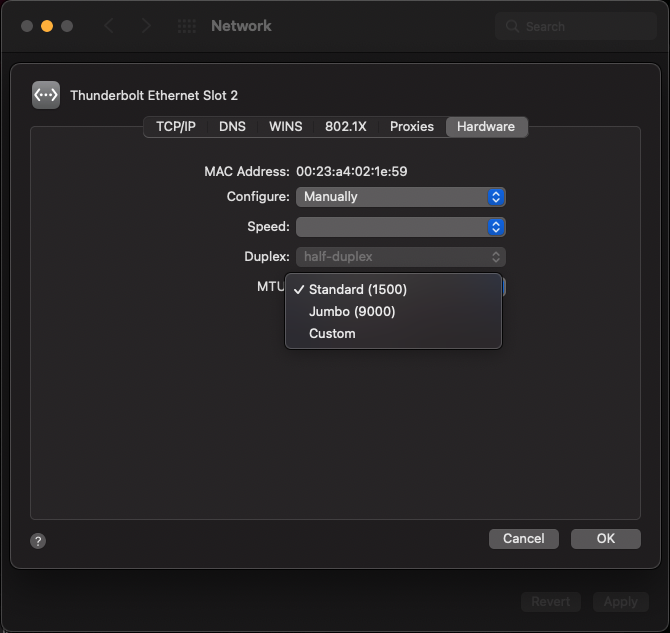
OWC connected to an M1 MacBook ProThunderbolt sideEthernet sideRaspberry Pi 4 for scale10 Gbps Full DuplexIt supports Jumbo frames including a custom MTU setting
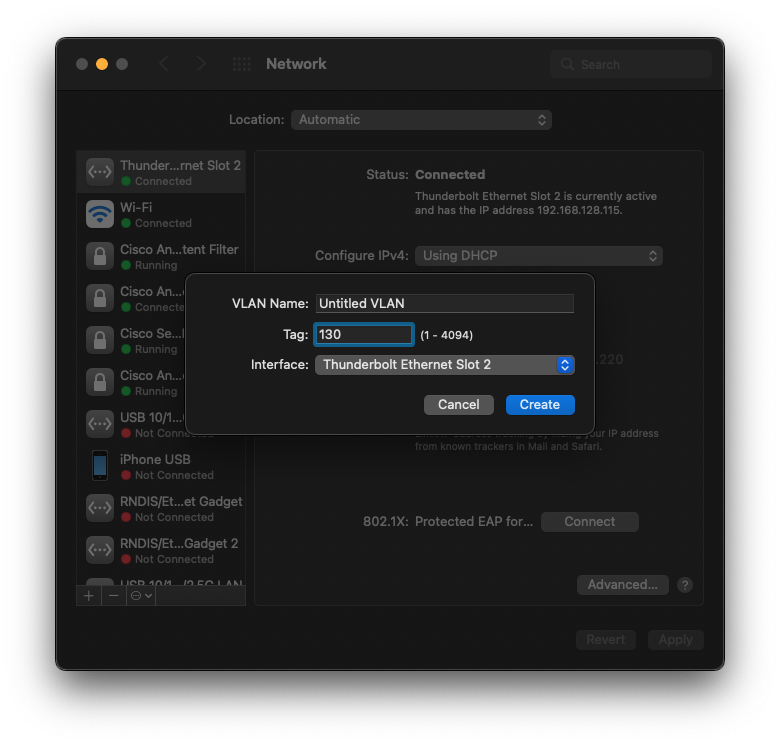
VLAN tagging
The OWC adapter also supports VLAN tagging. Here is my Trunk port with Native VLAN 129:
Trunk port configured on the access switch
Let’s tag all traffic with VLAN 130:
Create VLAN interface on macOS
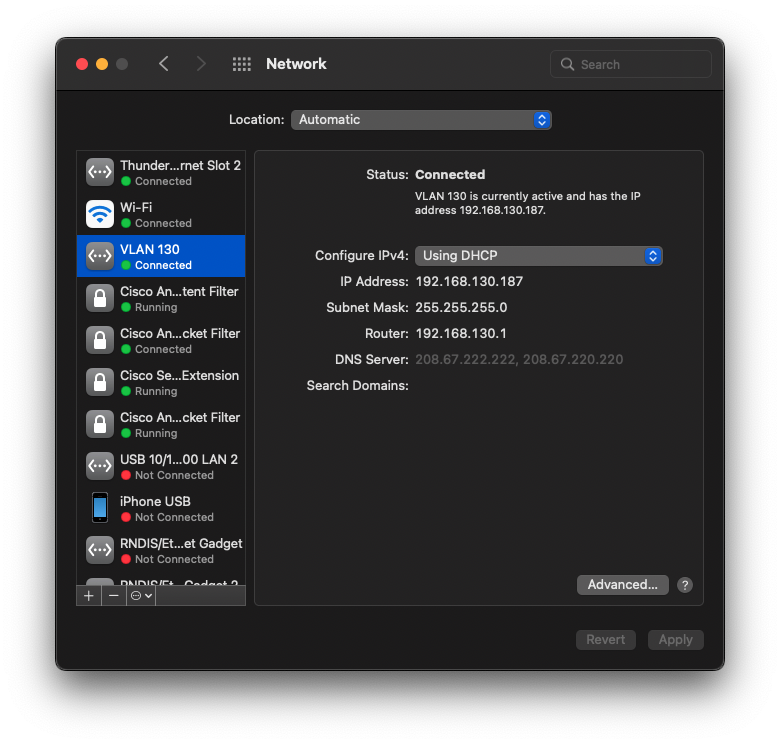
Verify that we are indeed in VLAN 130:
VLAN 130 is being used instead of the Native VLAN 129
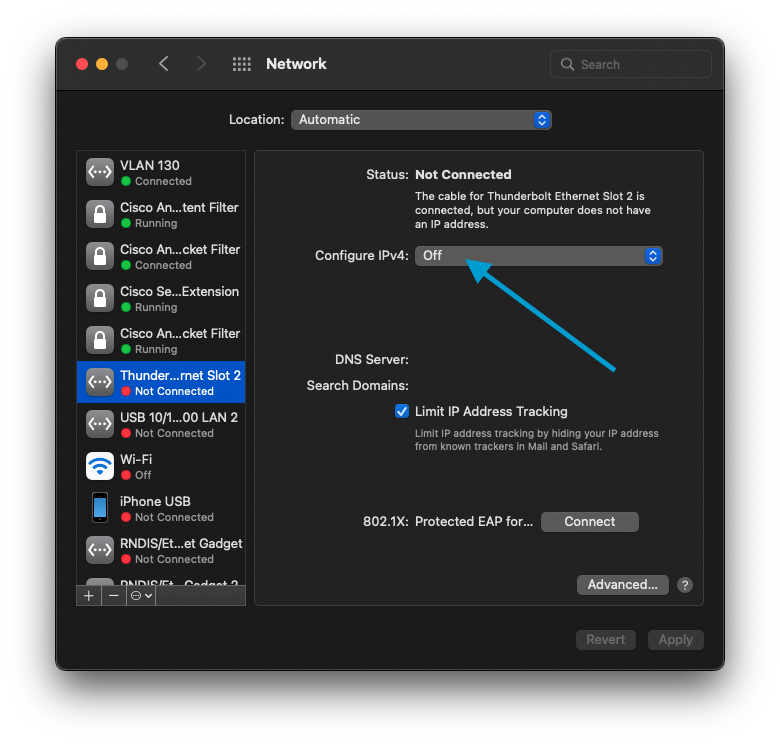
If you only want to use VLAN 130 (without touching the Native VLAN 129), you can disable the adapter itself. VLAN 130 virtual interface will stay up and forward traffic.
Disable the Native VLAN 129 and only use VLAN 130 for all traffic
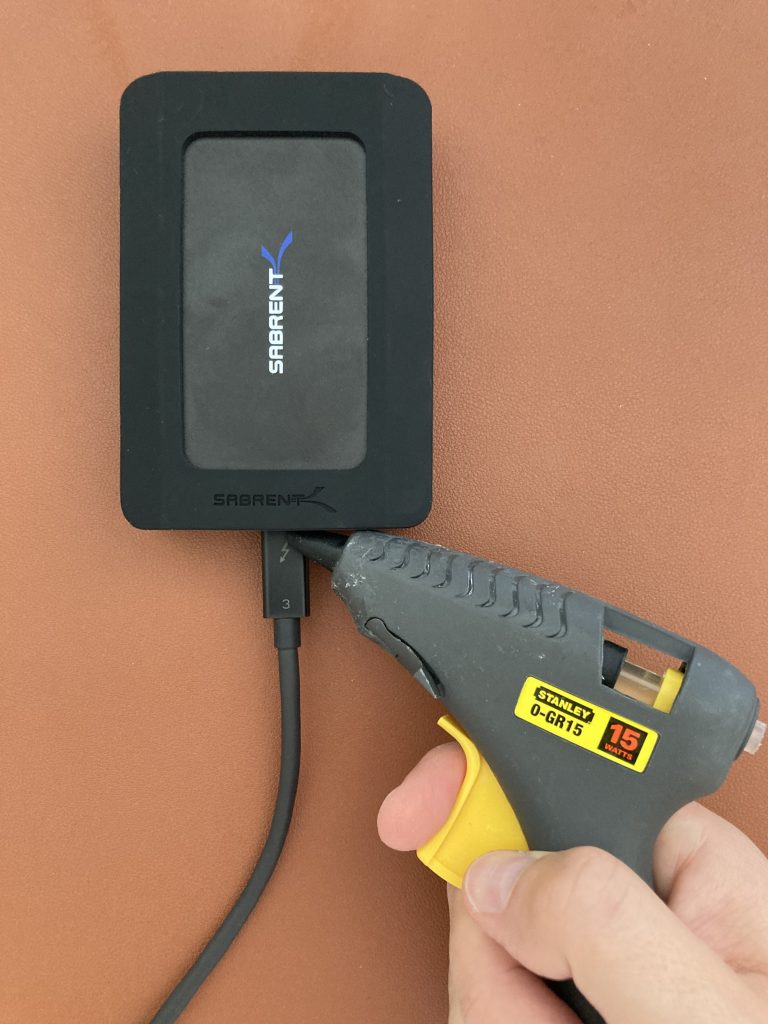
Sabrent Thunderbolt 3 to 10 Gbps Ethernet Adapter TH-S3EA
I won’t go into the detail, but my main challenge with the Sabrent adapter was its loose Thunderbolt cable. The connection between the USB-C socket on the adapter and the USB-C connector on the Thunderbolt cable is very loose and practically pulls out just by the tension of the cable itself. It might have been just my unit, but I can’t recommend it.
Sabrent Thunderbolt 3 to 10Gbps Ethernet Adapter on the leftIt almost felt like it needed some hot glue to keep the Thunderbolt cable connected
What about Windows and Linux support?
I tested the Sabrent adapter on Windows 10. It required a Sabrent driver installation and then it worked just fine. I would assume the same for the OWC.
I don’t have a Linux computer with a Thunderbolt port, so I can’t share anything on that front.
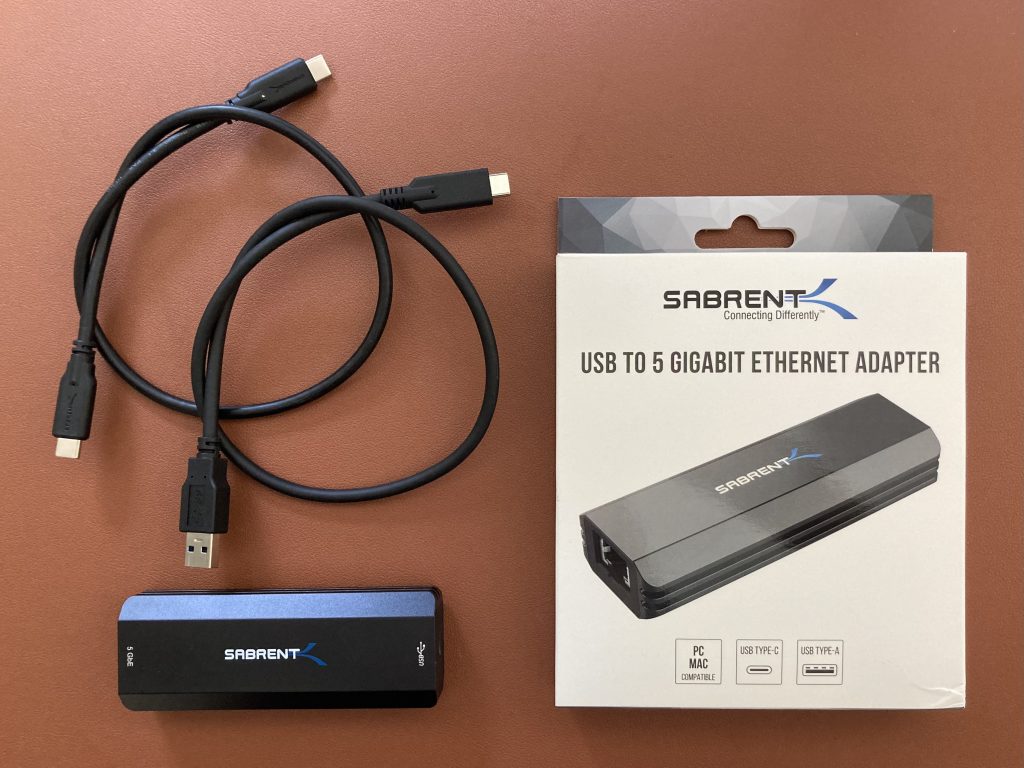
Sabrent NT-SS5G is a 5 GbE USB adapter, which allows you to achieve higher throughput than 2.5 GbE adapters, and break the 2.35 Gbps barrier. It works great on Windows. If you are a macOS or Linux user, I recommend you consider other options like this instead.
The adapter itself is larger than 2.5 GbE adapters, it uses AQC111U chip, and ships with short 2 detachable USB-A and USB-C cables. USB-C port on its back connects the adapter to your computer. A metal shell protects it, serves as a heatsink, and also adds to its weight.
Windows 11
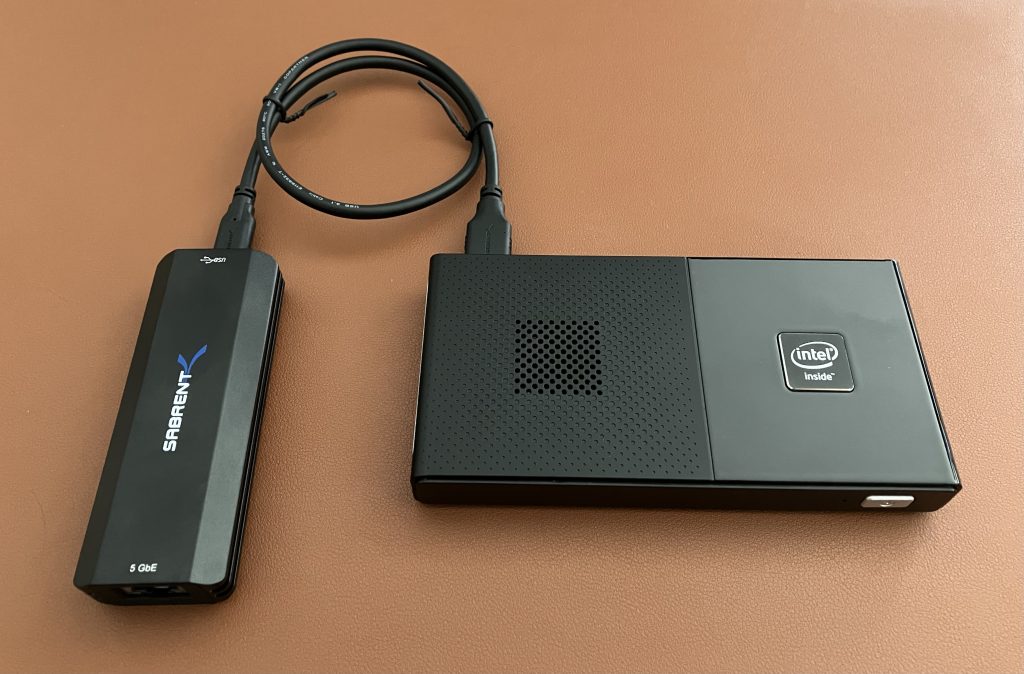
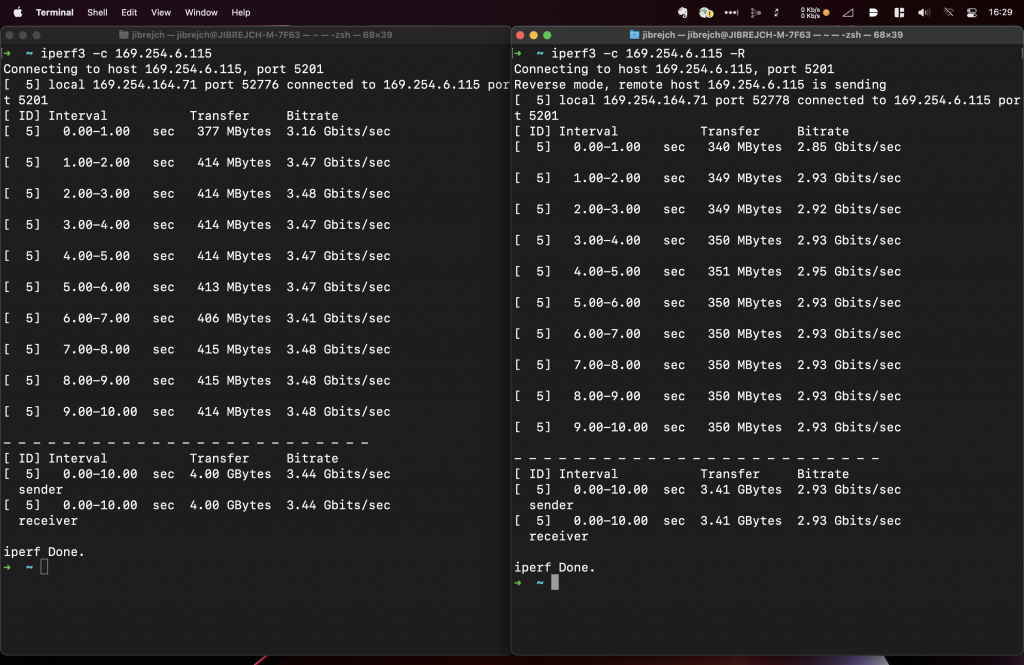
Install the driver from Sabrent’s website and you are good to go. In my tests with this Topton M6 Mini PC, I measured 2.93 Gbps down and 3.44 Gbps up with default iperf3 settings.
2.93 Gbps down and 3.44 Gbps up with default iperf3 settings
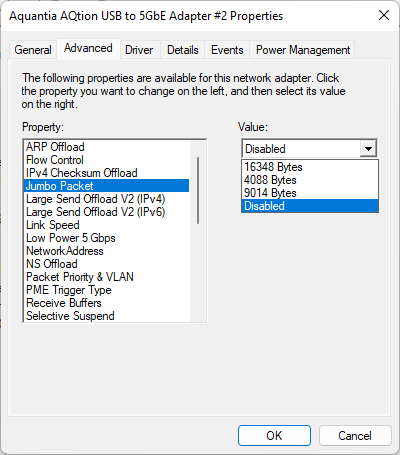
In adapter options, you can actually configure quite a few things including Jumbo frame support. Note that these are fixed values.
macOS
I can’t recommend this adapter for macOS users. It forces you to disable macOS System Integrity Protection (csrutil), otherwise it won’t work. It might be okay for a proof of concept or lab setup, but I would hesitate from using it in production.
This is how to install the driver if you were interested:
Install the driver using the pkg file provided by Sabrent. It installs a Kernel Extension (kext), which drives this adapter.
Enable the extension by going to System Preferences > Security & Privacy > enable the extension > Reboot.
After reboot, unplug the adapter and plug it back in.
It should work as long as you leave the System Integrity Protection disabled.
From throughput perspective, it saw download speeds of 3.30 Gbps, and upload of 3.45 Gbps. This was with default iperf3 settings, standard 1500-byte MTU and one stream. Great results considering that this adapter’s USB interface maximum theoretical throughput is 5 Gbps.
In my view, you might be better off buying a 2.5 GbE adapter, which can push 2.35 Gbps up and down consistently and with no driver installation needed. I tested one here. Alternatively, a 10GbE Thunderbolt Ethernet adapter is even faster choice, but more costly, and larger form factor. Or, if your other half approves, treat yourself to an M1 Mac Mini with built-in 10 GbE 😉
Linux
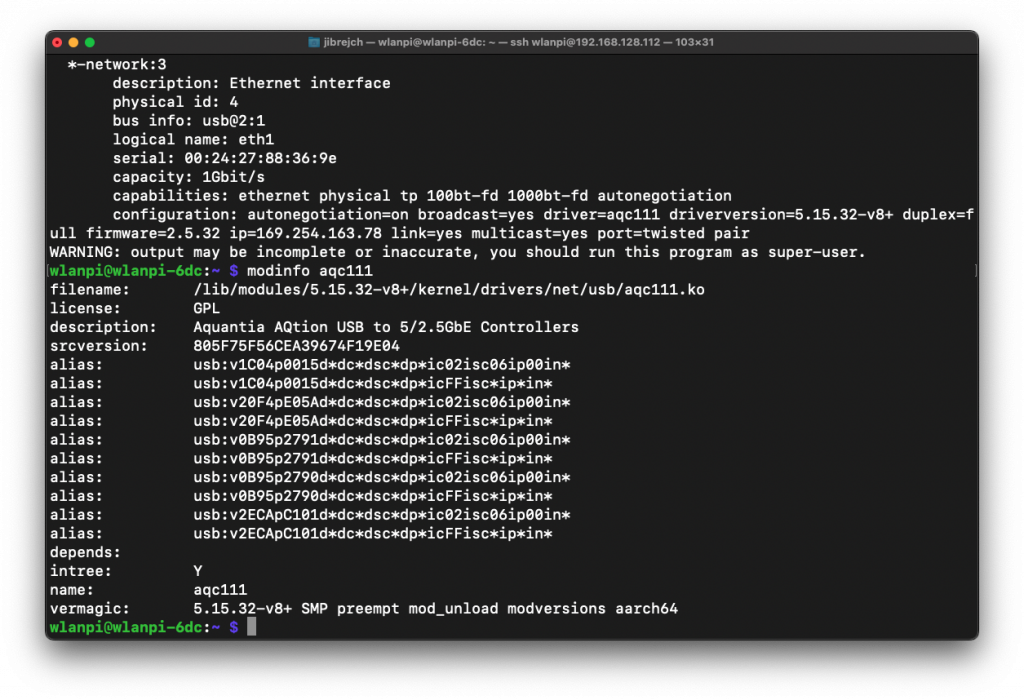
I tested this adapter on 64-bit Raspberry Pi OS running on Raspberry Pi 4. Although the default driver distributed in Linux Kernel 5.15 works, it doesn’t even deliver symmetric 1 Gbps.
Sabrent connected to Raspberry Pi 4Upload speeds well below 1 GbpsDefault aqc111 driver details
Let’s download the latest driver from Sabrent’s website. Unfortunately that doesn’t seem to be able to compile for 64-bit OS. I tried compiling on 32-bit Raspberry OS, to no avail. If you have any ideas, please do let me know.
So, on Linux, a Realtek RTL8156B based 2.5 GbE adapter might be a better choice for you. Here is the one I tested.
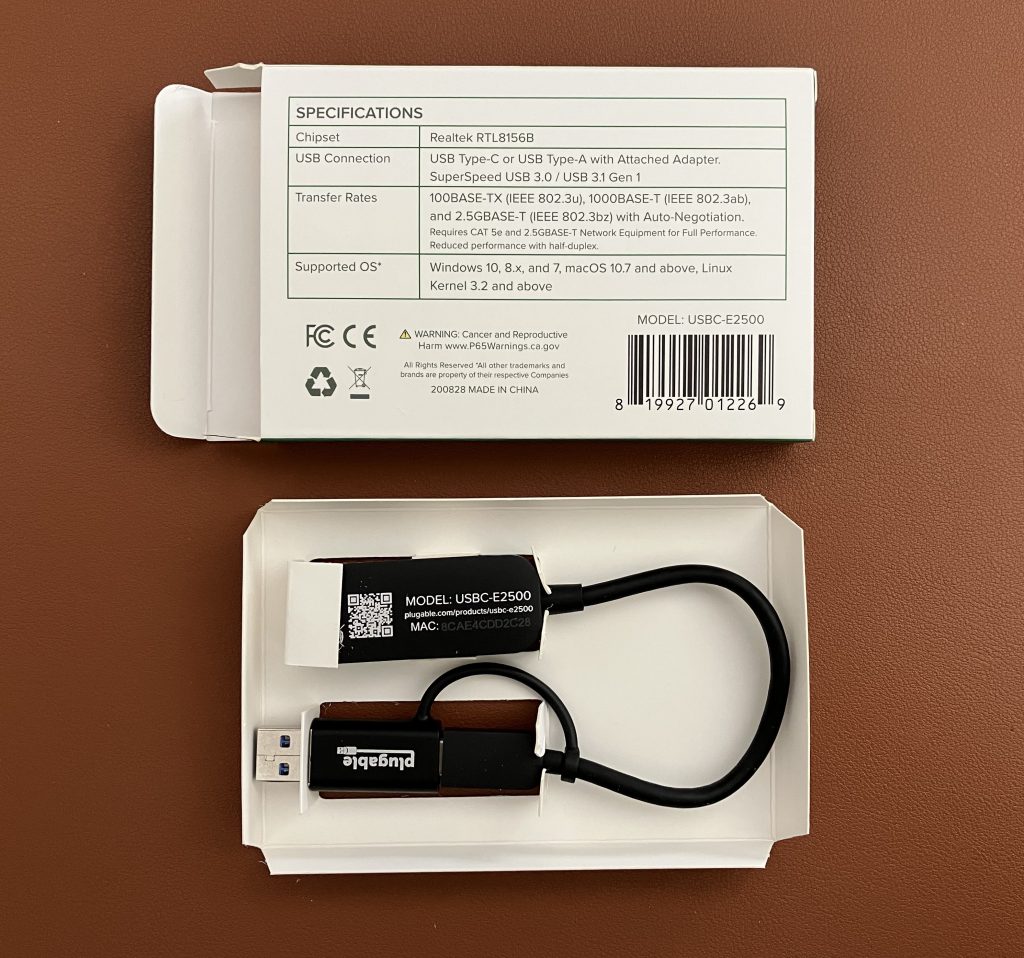
Plugable makes this inexpensive 2.5 Gigabit Ethernet USBC-E2500 adapter. It is based on Realtek RTL8156B chip. On Windows and macOS it works out of the box. If you want to use it on a Linux machine like WLAN Pi Pro or Raspberry Pi 4, expect some troubles along the way, but good performance when you get there.
The USB-C to USB-A adapter is allows you to use it with a MacBook (USB-C) or Raspberry Pi 4 (USB-A)The adapter itself has a plastic shell and is very lightweight
Windows 11
When they say “update the driver using Windows Update first”, they mean it. Windows 11 will recognise the adapter and you can start using it, but the default driver distributed with Windows 11 significantly reduces this adapter’s performance.
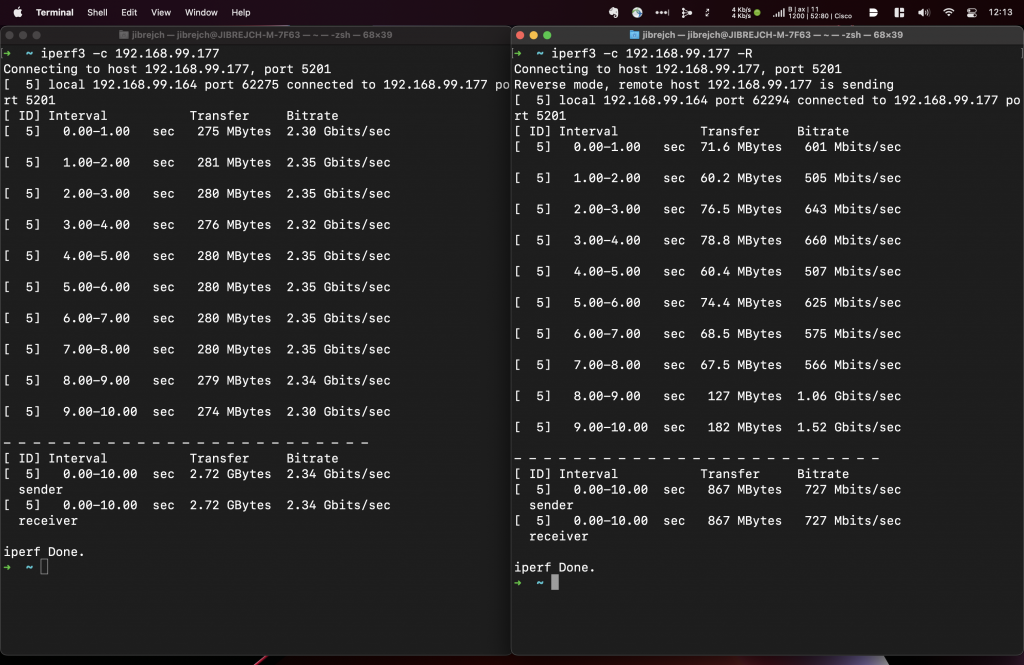
727 Mbps down and 2.34 Gbps up with default driver
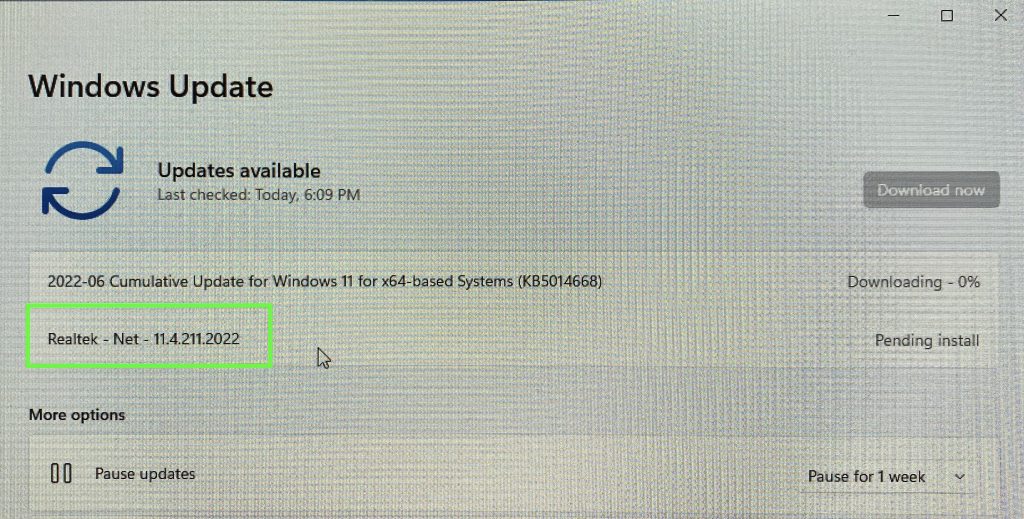
Now, let’s use Windows Update to download the latest driver.
Don’t forget to update the driver using Windows Update
As you can see, download throughput (from iperf3 server to iperf3 client) has dramatically improved.
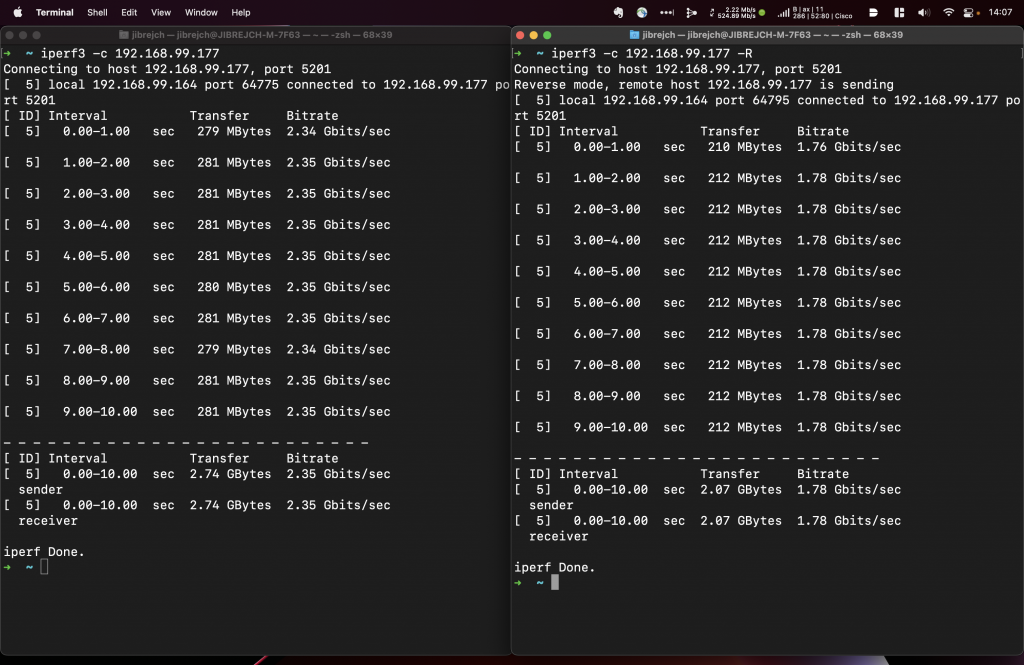
1.78 Gbps down and 2.35 Gbps up with updated driver
Although the box suggests Jumbo frame support, Windows driver settings don’t give me any option to edit the MTU size. So, I assume Jumbo frames are not supported.
MacOS Monterey
On macOS, this adapter works out of the box with no additional driver installation required. That’s a very nice surprise. And performance is great.
Symmetric 2.35 Gbps throughput on macOS
Auto-negotiation worked just fine. If you want to configure speed or MTU manually, you can, but Jumbo frames are not supported on macOS either.
Jumbo frames are not supported
Linux
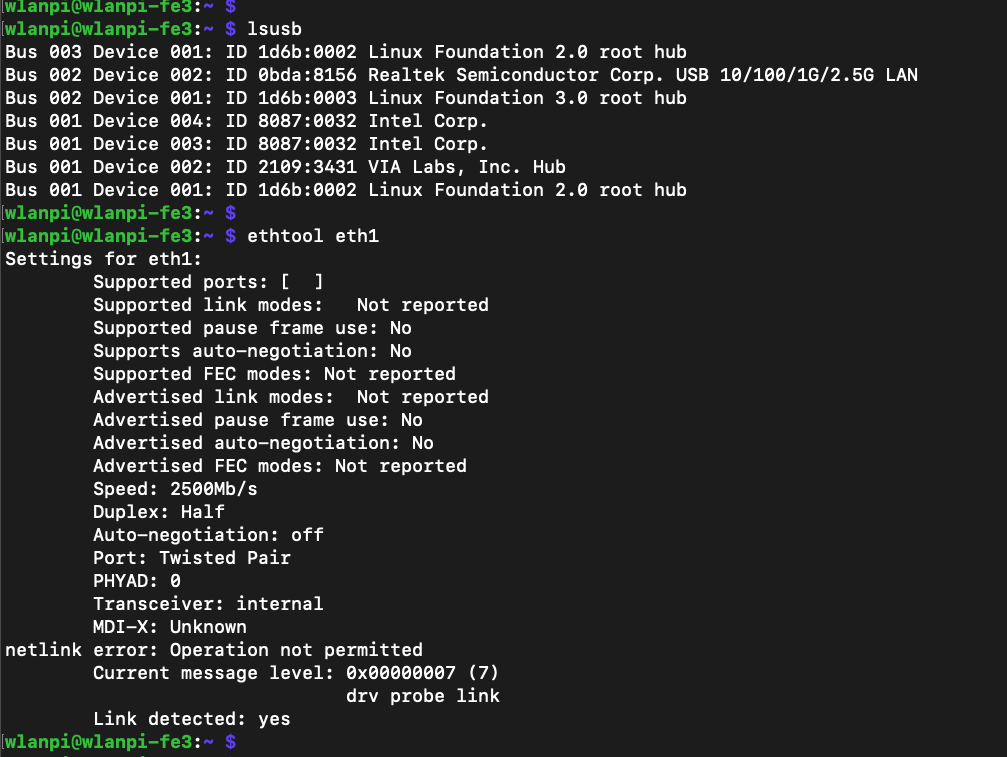
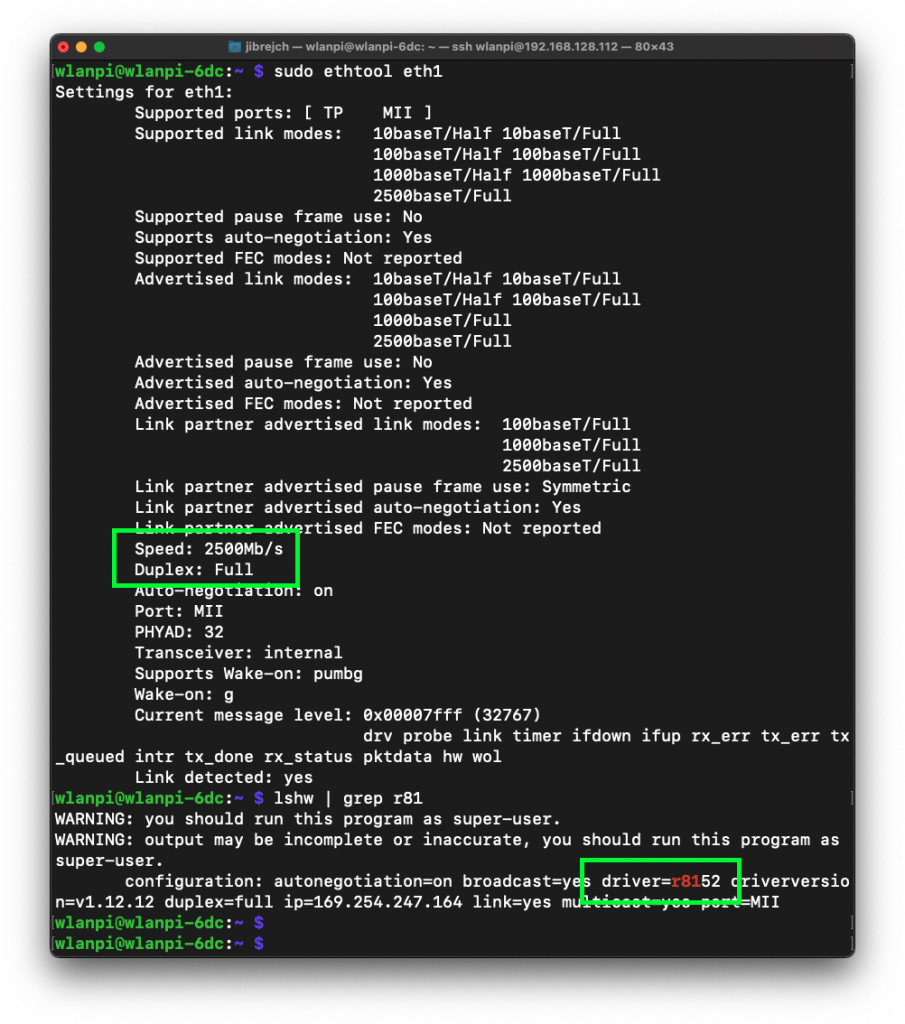
Now the bad news. If you are considering to use this adapter on a Linux machine, the default driver cdc_ncm is a trouble as it only supports 2.5 Gbps Half duplex. Setting Full duplex manually using ethtool command doesn’t work either.
Default driver only supports Half duplex
As you might expect, with the default driver and Half duplex, throughput is very poor.
1.22 Gbps down and 704 Mbps up with the default cdc_ncm driver on WLAN Pi Pro
On WLAN Pi Pro and Raspberry Pi 4 running 5.15 Linux Kernel I managed to fix the duplex issue by the steps listed below. But I hit new auto-negotiation issue between the Plugable adapter and Cisco Catalyst WS-C3560CX-8XPD switch. It took the adapter to eventually negotiate 2.5 Gbps Full duplex around 15 minutes of constantly flapping the interface. Forcing speed and duplex on the Plugable adapter by ethtool did not work. Certainly not ideal, and definitely worth testing before you commit to the Plugable adapter. With other multigigabit adapters, the Plugable had no negotiation issues.
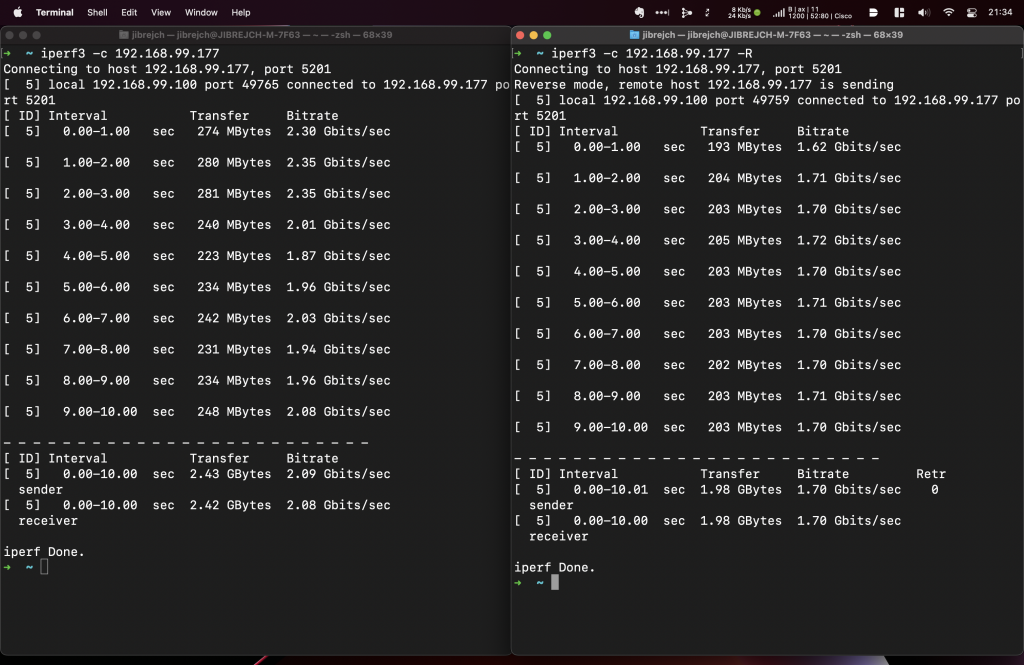
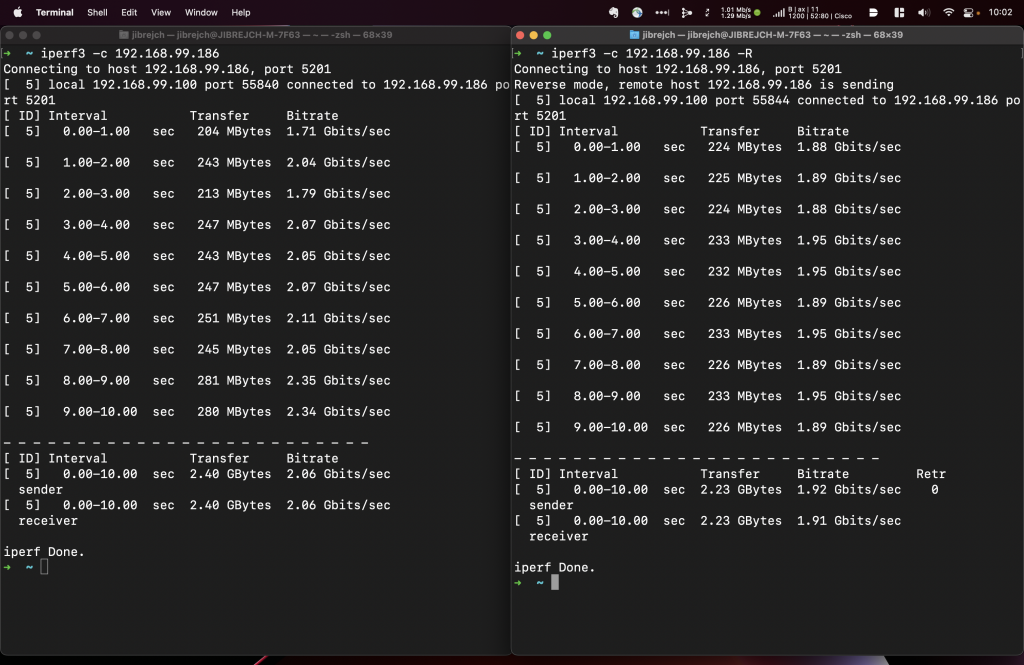
1.7 Gbps down and 2.09 Gbps up with r8156 driver on WLAN Pi Pro1.91 Gbps down and 2.06 Gbps up on Raspberry Pi 4 using the correct r8156 driverRaspberry Pi 4 also known as WLAN Pi Community Edition
How to force Linux to use the right driver
To enable Full duplex capability, we need to tell Linux to use Realtek r8156 driver instead of the default cdc-ncm.
Microsoft has recently updated their free Outlook.com to Exchange Server backend (Office 365 infrastructure), which means that we can now use it as a fully functional Microsoft Exchange account. No more hassle with IMAP, POP3, SMTP or even Hotmail Connector for Outlook. And Mac users can finally see and edit their Outlook.com contacts in Contacts app on Mac OS X!
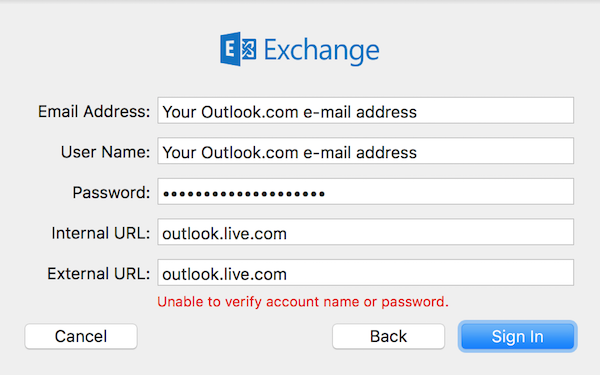
Add Outlook.com e-mail and contacts to Contacts and Mail on Mac OS X
1. Open Mail app > Mail > Add Account…
2. Select Exchange
3. Enter your Outlook.com username and password
4. Click Sing In
5. Use outlook.live.com as Internal URL and External URL
6. Now select to sync E-mail and Contacts
7. Click Done, give Mail and Contacts apps a minute or two to sync